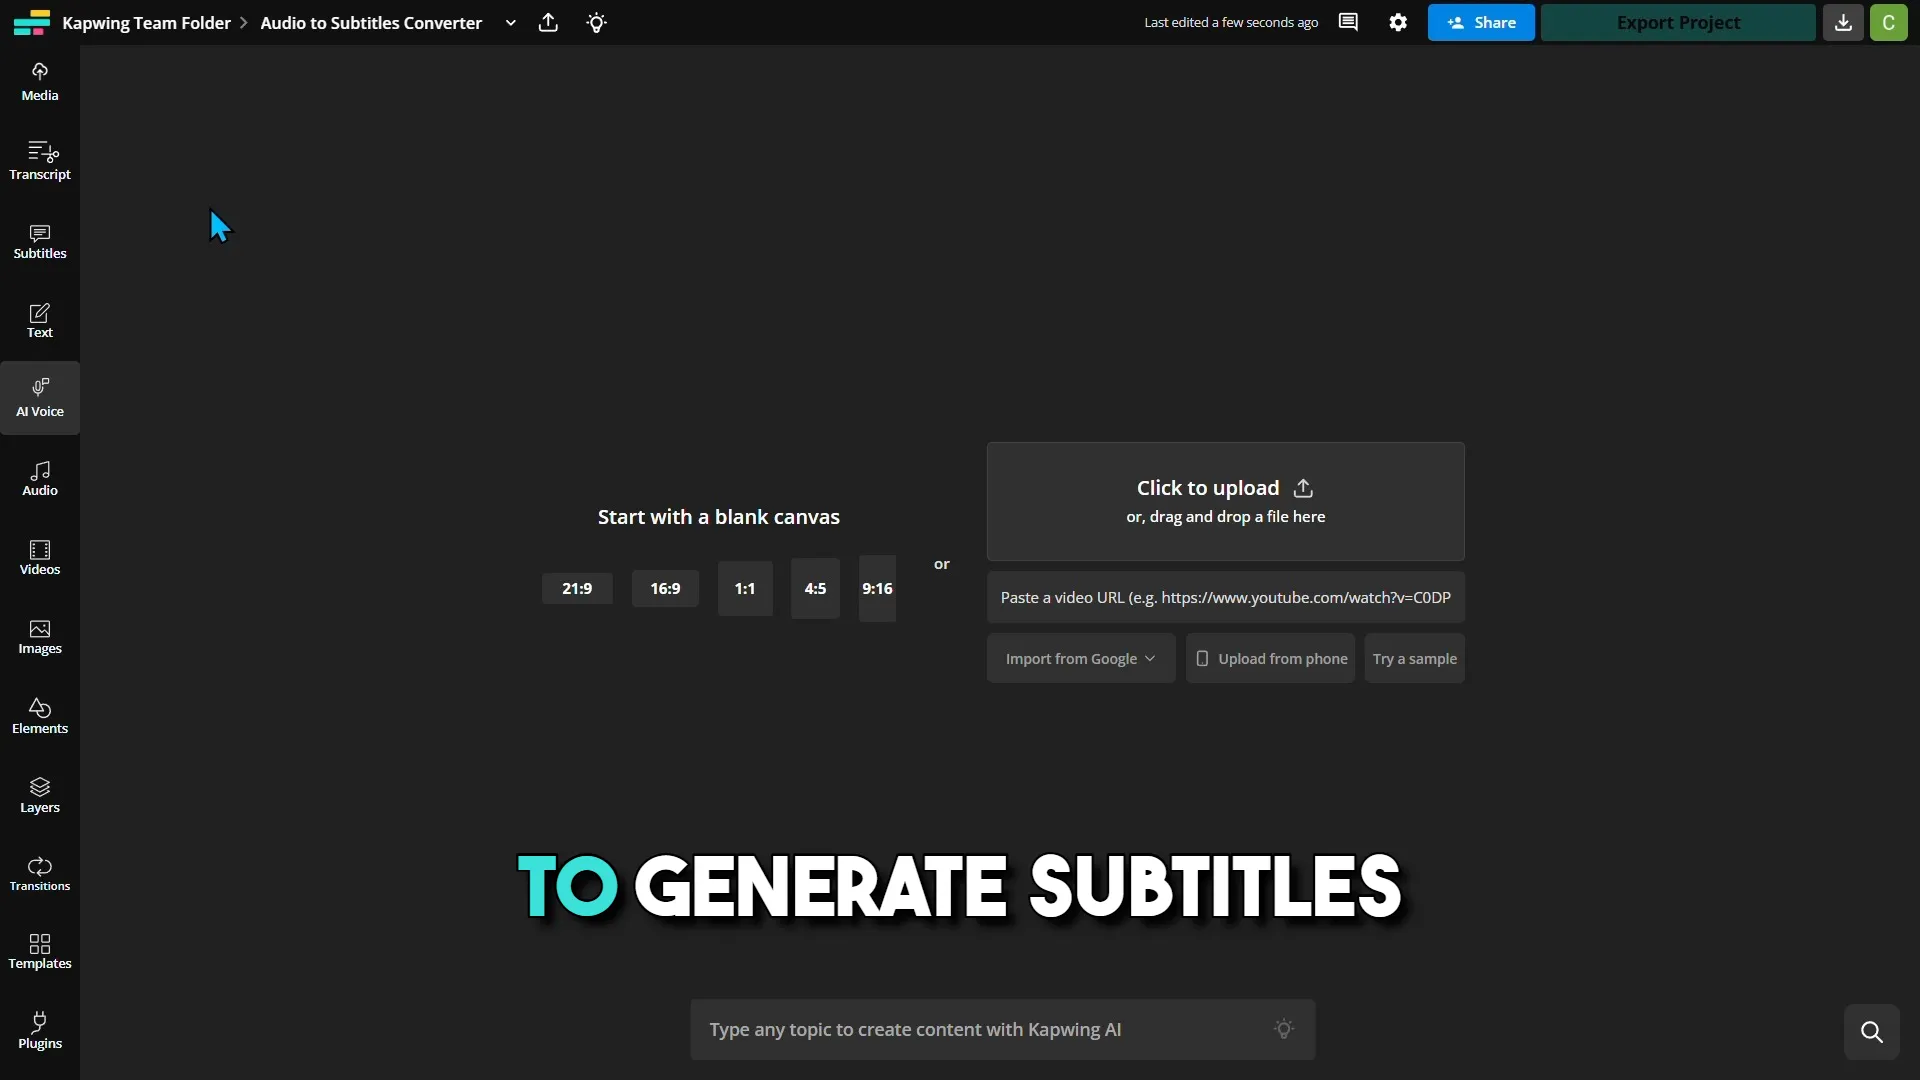
Upload an audio file.
Auto-generate subtitles in seconds.

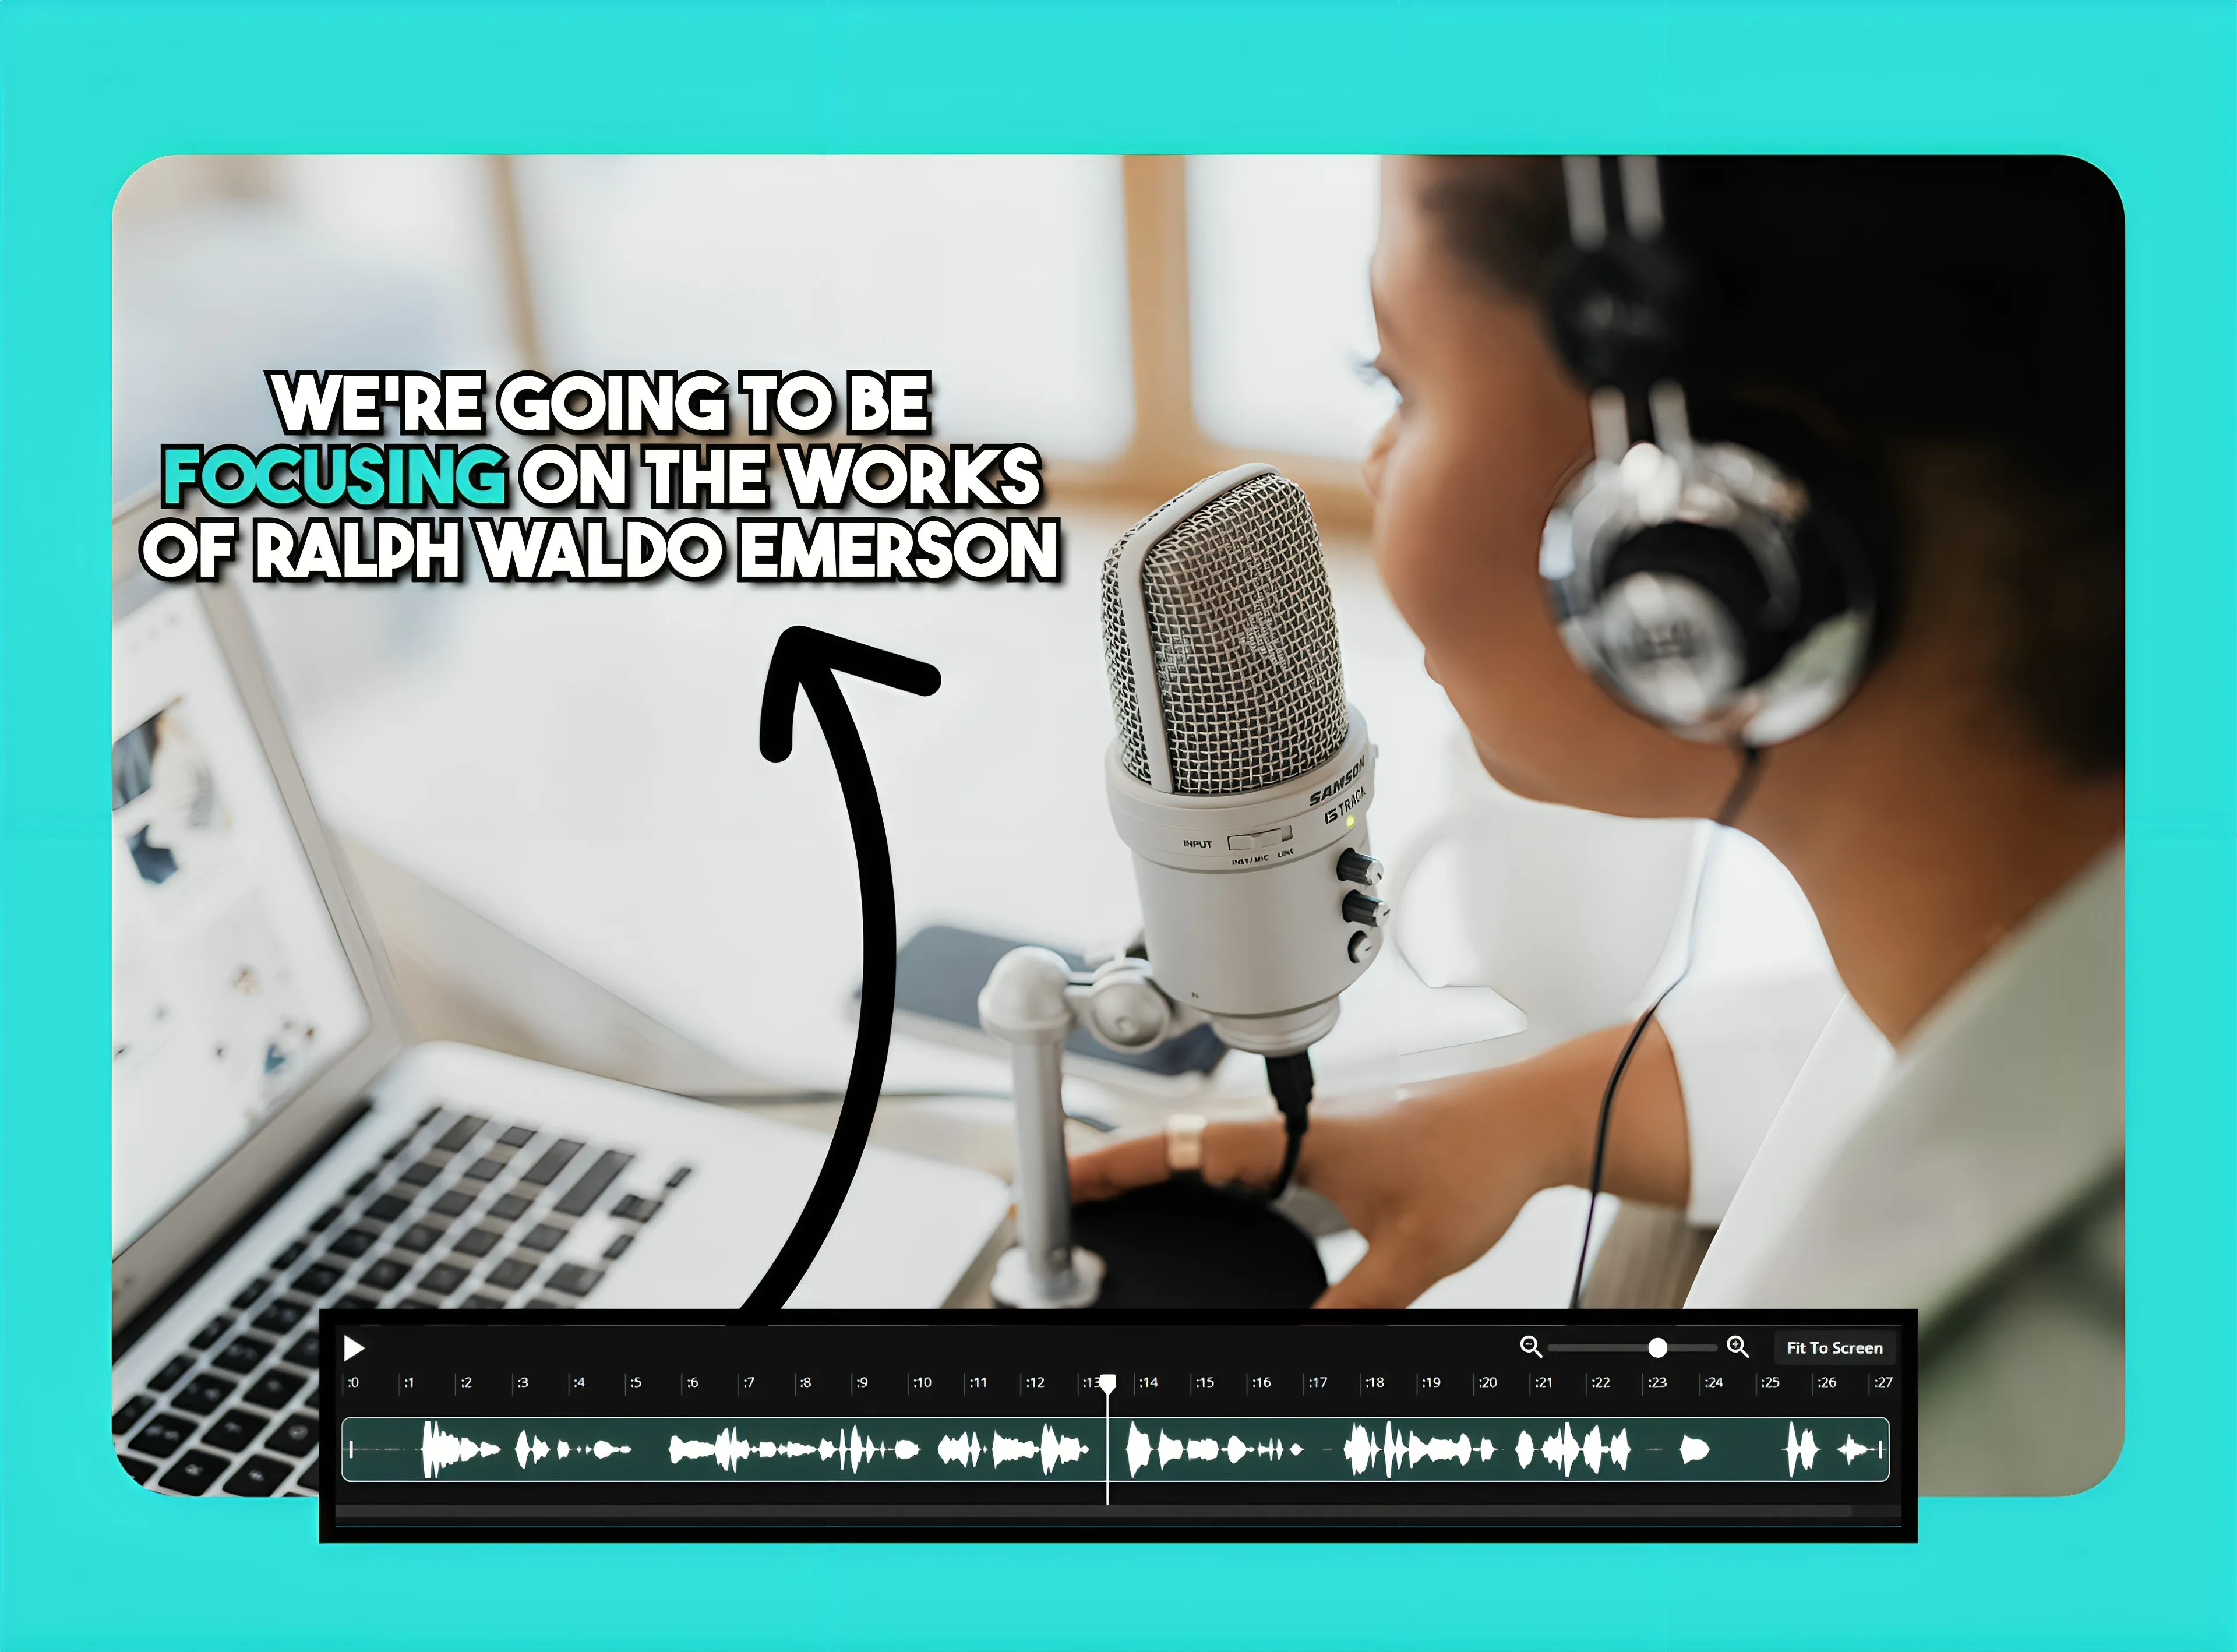
Make audio recordings more engaging
Generate subtitles alongside an editable transcript
Turn any audio file into a visual story with subtitles
Kapwing’s online Audio to Subtitles Converter turns any audio file — including MP3, WAV, and FLAC — into accurate, time-aligned subtitles in seconds. Just upload your file, hit “Auto Subtitles,” and the tool generates both a subtitle track and an editable transcript.
Upload your own images and videos, pull from a built-in stock library, or use AI to quickly design a media-rich video without any external tools or downloads. There's even waveforms, transitions, text overlays, brand watermarks, and animated subtitles inside the user-friendly interface. Turn podcasts into visual assets, provide accessible alternatives to lecture or tutorial audio, and repurpose phone interviews or voice recordings into engaging social media content.
Ensure 99% accuracy from audio to subtitle conversion
Accuracy is essential when repurposing audio content for other formats. The Audio to Subtitles Converter ensures 99% accuracy using automated proofreading and precise line-syncing. This makes it easier for teams and individuals to manage high-volume workflows or subtitle entire audio libraries without sacrificing quality. Built for fast-paced schedules, the converter helps content creators and brand managers save time and effort on subtitling without compromising on accuracy, even when recordings contain multiple speakers.
Expand to global audiences with translated audio subtitles
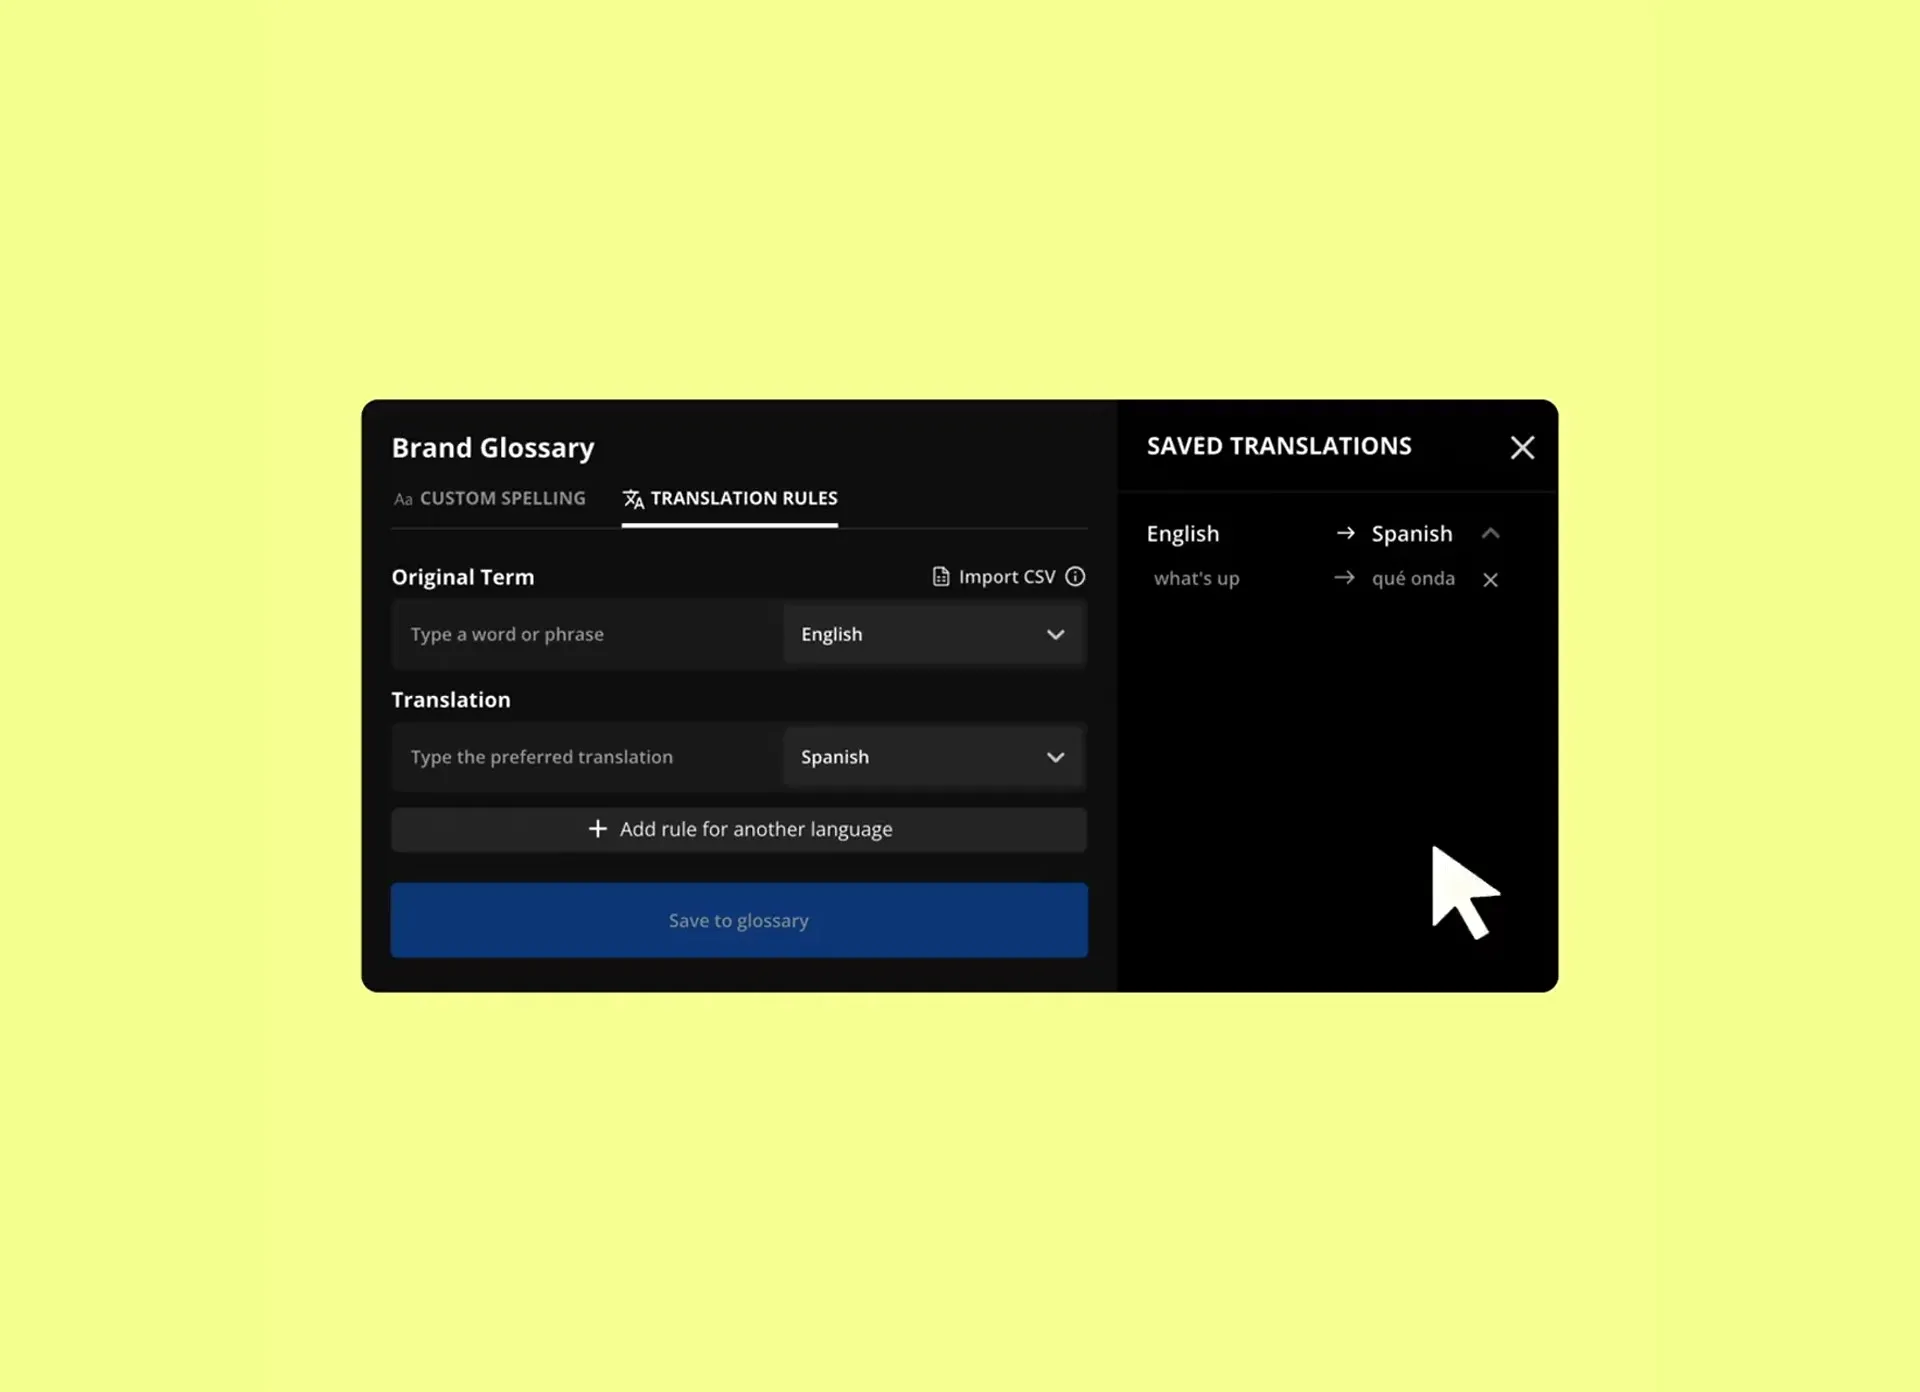
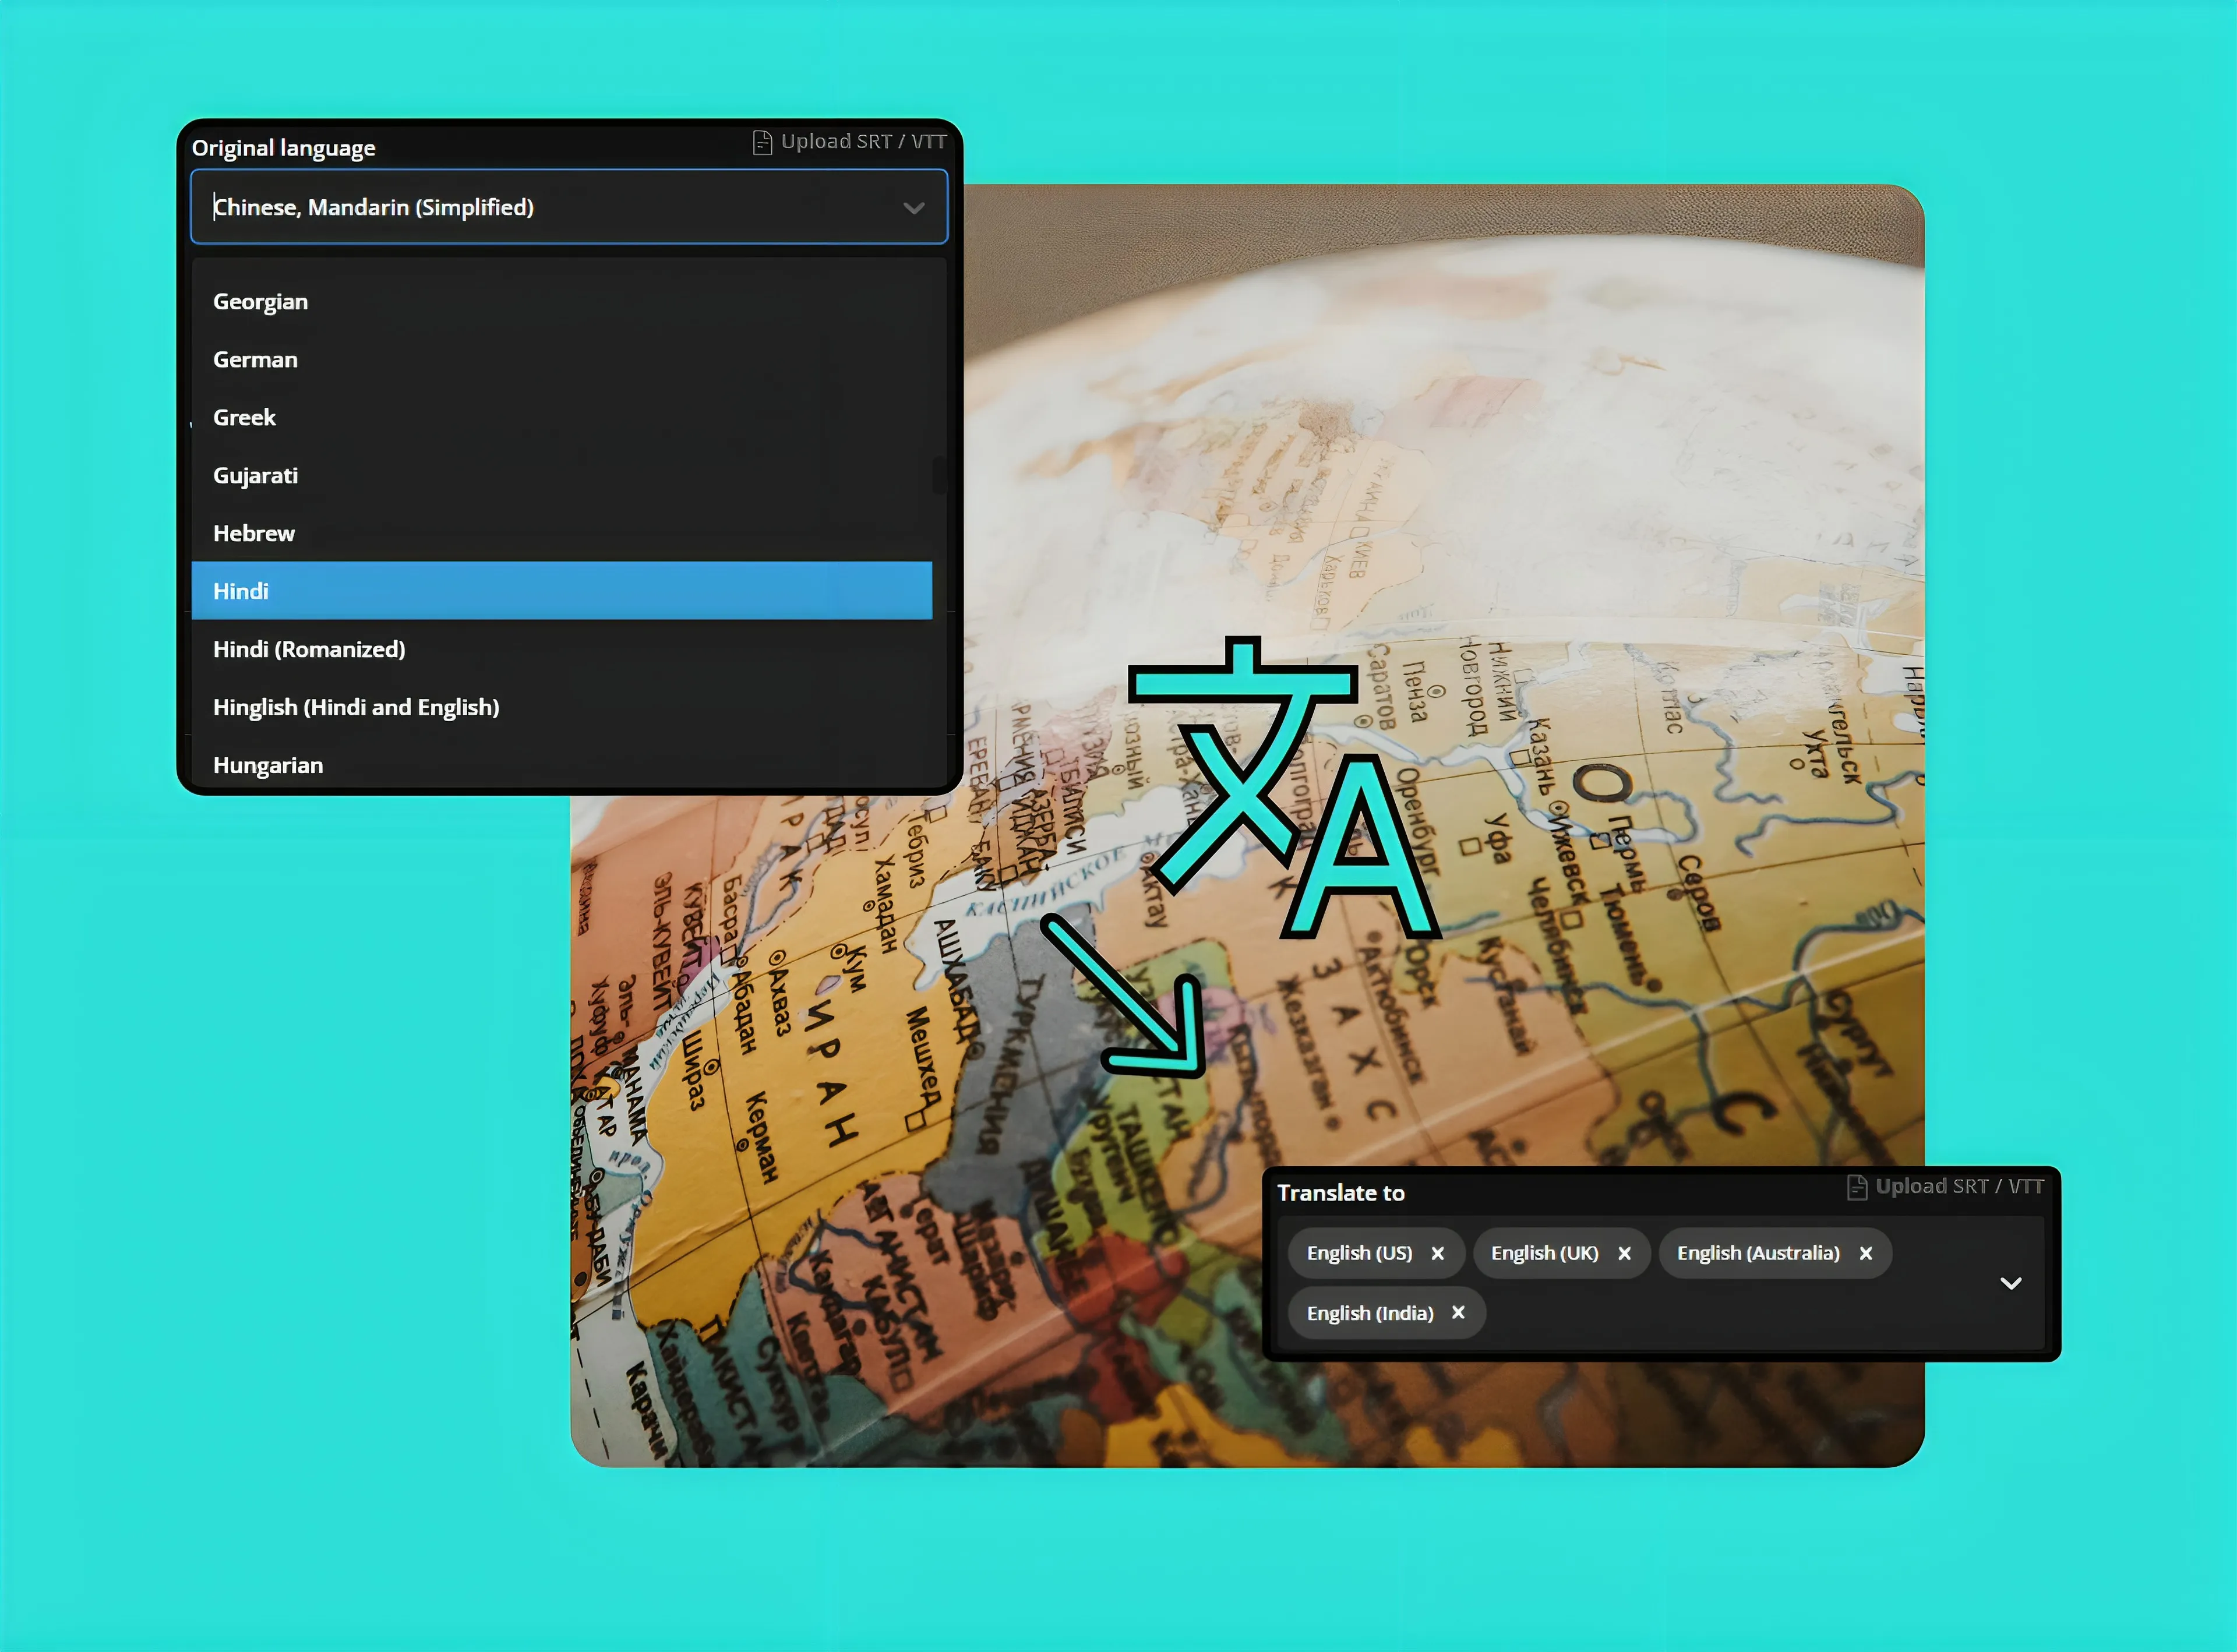
With built-in translation support for over 100 languages, including regional variants like Spanish (Mexico) and Portuguese (Brazil), you can localize audio content without expensive workflows or external tools. Our studio includes a built-in Brand Glossary, where you can create and store custom translation rules for key terms, product names, slogans, and phrases. Reach native speakers in any global target market, whether you're crafting multilingual podcast promos, translating conference recordings, or promoting a book launch internationally.
Fine-tune subtitles for clarity, timing, and emphasis
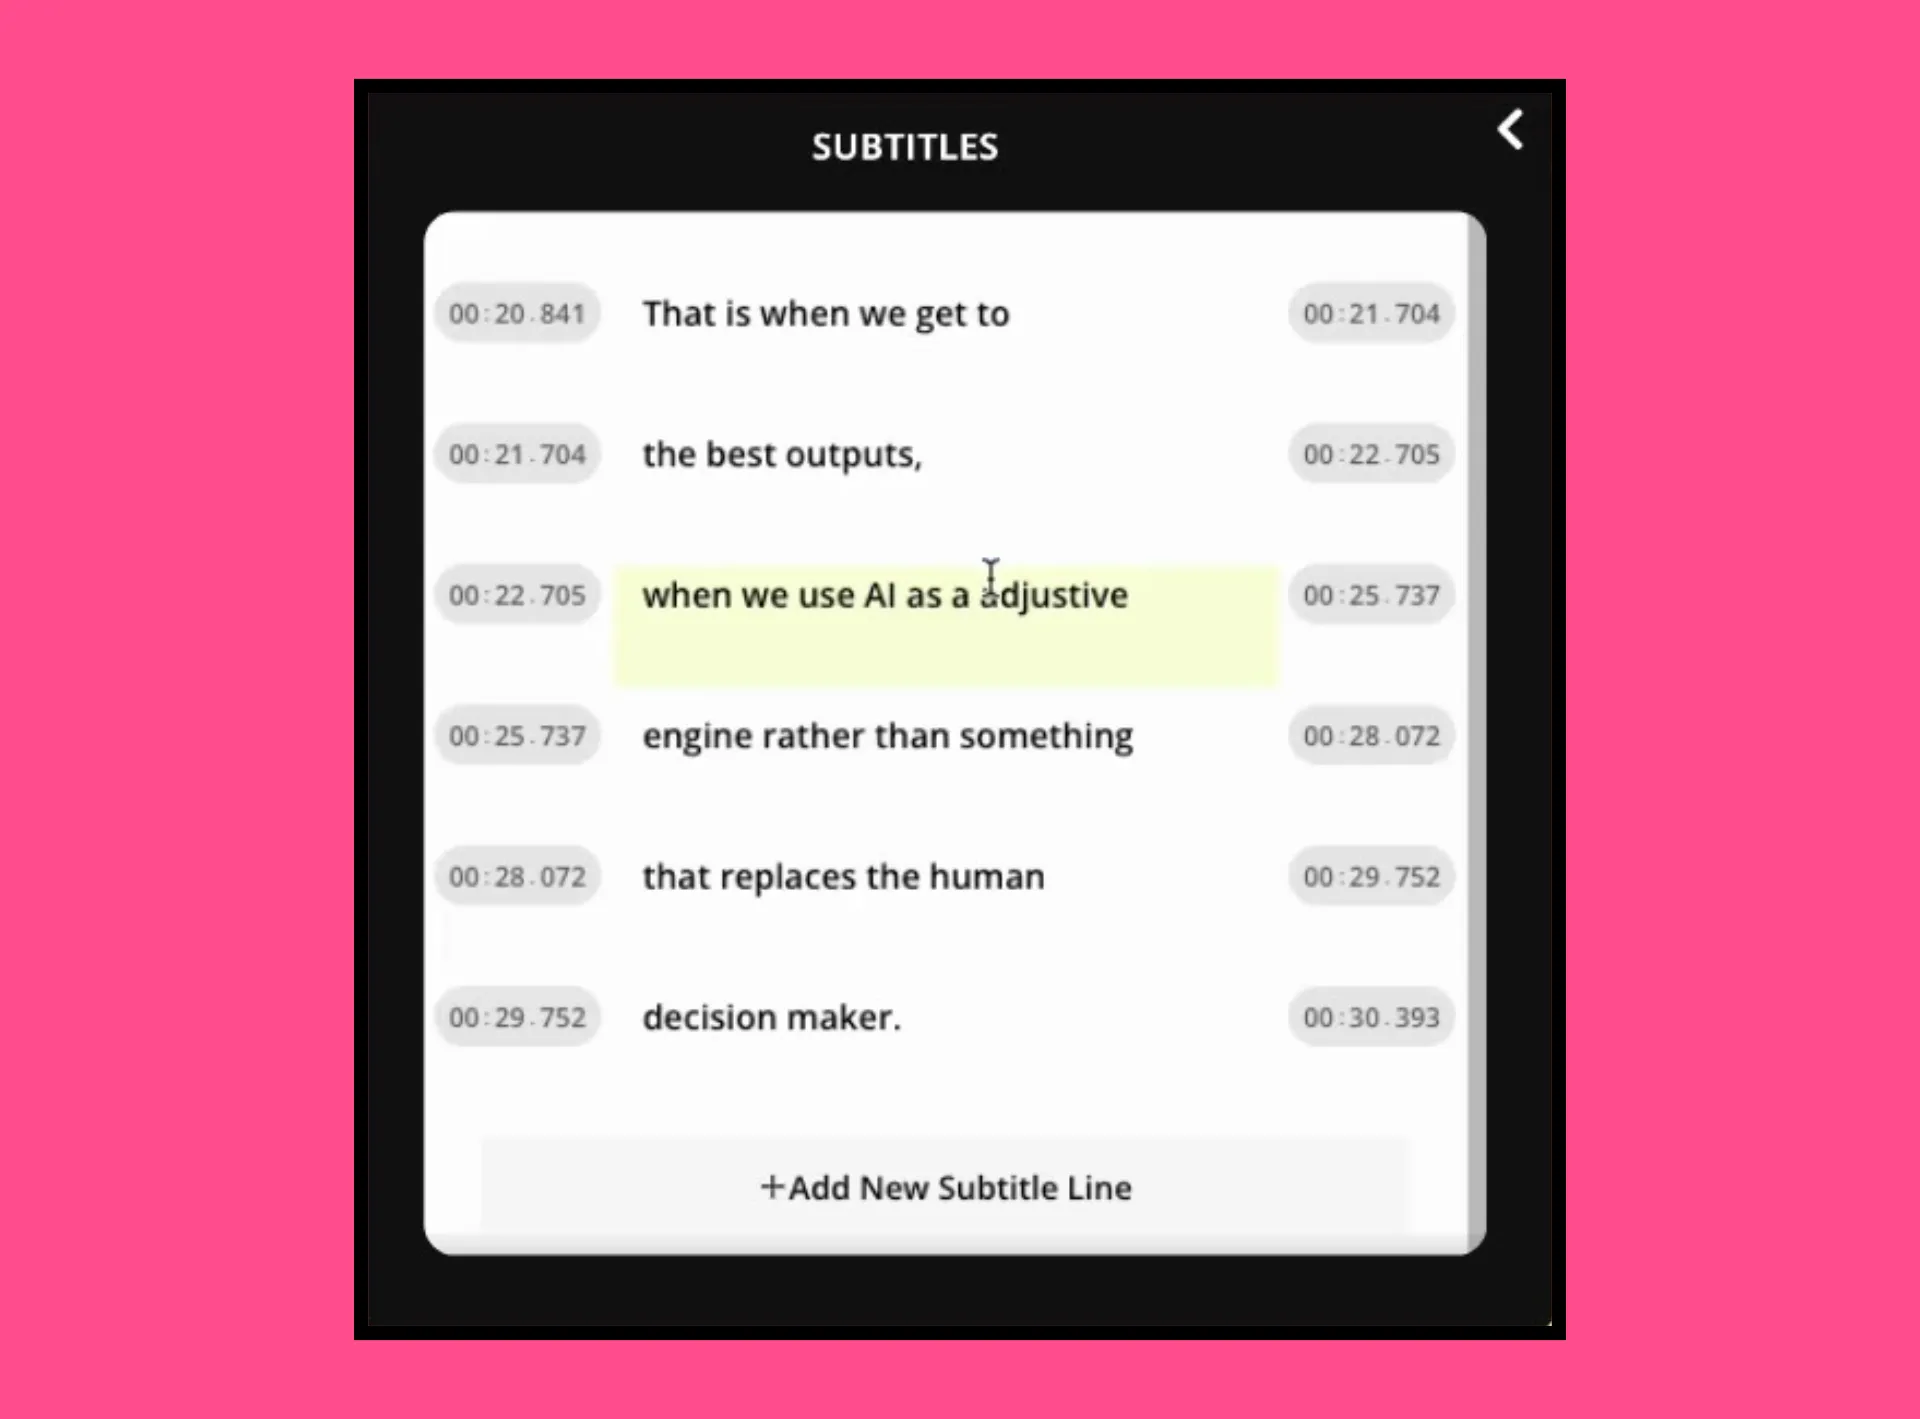
The browser-based editor gives you full control of subtitles timing, formatting, and visual styling. Once generated from your audio file, fine-tune the transcript, adjust characters per line, and choose from thousands of subtitle styles, including font, size, color, and background settings. Use Speaker Labels to draw attention to key-speakers during interviews or any multi-speaker content and ensure key sound bites are highlighted through animations.
Transform audio into universal content experiences
Kapwing users make audio conversion a key part of their content strategy
Podcast Promotions
Podcasters use Kapwing to add subtitles to audio recordings for free, creating synced visualizers with branded text and visuals for sharing on video platforms and websites
Audiograms
Small business owners and podcasters use the online Audio to Subtitles Converter to create audiograms that share interview highlights, product promos, and memorable moments on platforms like TikTok and X (Twitter).
.webp)
E-learning Content
Online educators create subtitles from audio and generate and transcripts from lectures and tutorials, making content more accessible and expanding their reach to diverse learners for free
.webp)
Interview Transcription
Journalists use the Audio to Subtitles tool to transcribe interviews and export as plain text files for articles. Transcripts support both written content and can be paired with video content to improve SEO and discoverability.
.webp)
Social Media Posts
Social media managers and influencers turn short voice recordings and group chat conversations or confessions into viral videos by adding visuals, subtitles, and creative styling
.webp)
Book Snippets
Authors promote their books by reading key passages aloud and converting the audio into subtitles. Pairing voice, captions, and a book cover creates a simple yet powerful piece of marketing content for social media and websites
How to Create Subtitles From Audio
- Step 1Upload audio file
To begin, upload an audio to the Kapwing editor. Kapwing supports popular file types like MP3, WAV, FLAC, OGG, and more.
- Step 2Create audio subtitles
Click the "Auto subtitles" button in the left-hand toolbar under the "Subtitles" tab. Your subtitles will automatically generate, and the Subtitles Editor will open.
- Step 3Edit and export
Edit your subtitle text, timing, and alter the font, color, and animation. At this stage, you can also add visuals and other edits. When you're finished, export your new file and/or download an SRT, VTT, or TXT transcript.
What's different about Kapwing?


Already transforming video creation across industries
Hear directly from the teams who publish faster, collaborate better, and stay ahead.


Frequently Asked Questions
We have answers to the most common questions that our users ask.
Is the Audio to Subtitles Converter free to try?
Yes, it is free for all users to try the Audio to Subtitles Converter, although this includes a limited number of minutes. With a Pro Account upgrade, you’ll get extended monthly minutes for subtitles, translated subtitles, auto-dubbing, and lip sync, alongside access to Voice Cloning.
Is there a watermark on exports?
If you are using Kapwing on a Free account then all exports — including the Audio to Subtitles Converter — will contain a watermark. Once you upgrade to a Pro Account the watermark will be completely removed from your creations.
What audio files does Kapwing support?
Kapwing supports a wide variety of popular audio file formats, including MP3, WAV, WMA, M4A, OGG, FLAC, and AVI. Note that audio exports are always in MP3 format, as we feel this file type represents the best tradeoff between file size and quality.
How to add subtitles to audio
To add subtitles to audio in Kapwing, follow these four simple steps:
- Upload and MP3, WAV, WMA, M4A, OGG, or AVI file to Kapwing.
- Open the "Subtitles" tab in the left-hand toolbar and select "Auto subtitles." Your subtitles will instantly generate onto a blank canvas.
- Adjust the timing and characters per line in the Subtitles Editor, and customize your subtitles using color, font, size, position, and animation options.
- Add any visual elements you want to your canvas and download the final file. Or, download your subtitles as an SRT, VTT, or TXT file.
What is audio accessibility?
Audio accessibility is the process of creating audio content that is accessible to everyone, including individuals with disabilities. The purpose of making audio accessible is twofold: it both promotes a more inclusive experience for listeners and helps creators access a larger audience. By bridging the gap for listeners who need accommodations due to hearing loss, you ensure that everyone has equal access an audio recording's information (or entertainment).
An example of an accommodation created for hearing loss is subtitles or captions, since they reproduce spoken content or environmental noises in visible text that viewers can read. On the other hand, choosing high contrast colors for subtitles/captions like blue and orange or black and white can help those with partial loss of vision read text more easily.
What are SDH subtitles?
SDH refers to subtitles specifically designed for individuals who are Deaf or hard of hearing (hence "SDH" = "Subtitles for the Deaf and hard of hearing"). These subtitles not only capture spoken dialogue but also provide additional details like sound effects, music, and identification of speakers, assuming the viewer cannot hear the audio.
What is content localization?
Content localization is the process of adapting content to fit the language and cultural preferences of a new audience. This often involves translating subtitles, dubbing the audio, and editing SRT subtitle files for timing, minor inaccuracies, and line lengths.
The goal of content localization is to showcase your content to new regions, increasing your market reach. Localization gives you a competitive advantage by helping connect your brand with customers in new places before competitors can reach them.
Full localization includes subtitle translation, but also involves making cultural adjustments, such as using country-specific references, different units of measurement, and culturally relevant visuals.
How do I sync subtitles with audio?
There are a couple ways to sync subtitles with audio. The first is a manual process, which requires using a plaint text editor like Notepad on PC or TextEdit on Mac. Every line of subtitles in an SRT or VTT file should have start and end timecodes, formatted as "00:00:00,000" (representing 0 hours, 0 minutes, 0 seconds, and 000 milliseconds) for SRT and "00:00:00.000" for VTT. You'll need to watch the video and modify the timecodes to match it properly.
However, you can skip over this tedious process by using Kapwing's Subtitles Editor, which provides you with an easy-to-adjust playhead, a chars-per-subtitle slider, and a one-click button beneath timecodes to set a subtitle line to the current playhead time. This greatly simplifies and accelerates the process of modifying the timing on an SRT or VTT file.
What is the difference between SRT and VTT file type?
VTT is similar to SRT but offers more editing and styling options, making it more versatile, though it’s not always compatible with every social media platform. VTT supports additional features like metadata (e.g., title, author) and styling, making it more robust than the simpler SRT format. Here’s a quick comparison:
- SRT timecode format: hours:minutes:seconds, milliseconds
- SRT lacks metadata and styling options
- SRT is a simple, basic format
- VTT timecode format: hours:minutes:seconds.milliseconds
- VTT includes metadata
- VTT supports HTML5 features
- VTT is more robust and feature-rich than SRT
Can Kapwing also created closed captions?
Yes, in addition to subtitles, Kapwing also supports full Closed Caption creation. That means you can include non-spoken audio, speaker labels, and other accessibility features — ideal for meeting legal requirements like the European Accessibility Act.
Discover Resources
Tips, templates, and deep dives to help you create faster and share with confidence.
View all


Get started with your first video in just a few clicks. Join over 35 million creators who trust Kapwing to create more content in less time.