
AI Video Editing Tutorial: 9 Workflows Tested
We tested Kapwing's AI editing tools across real workflows.

AI video editing is getting better at the work that usually takes the longest: cutting silences, sorting through takes, and finding usable clips. Instead of spending an hour trimming a talking-head recording, you can remove pauses automatically, edit footage by deleting words from a transcript, or prompt the edit you want.
We tested nine AI video editing workflows in Kapwing, using a 9-minute, 46-second talking-head recording and a separate 33-minute podcast interview. The results ranged from an automatic rough cut that removed more than four minutes of footage to an AI agent that created six language versions of the same video.
This tutorial covers how to reproduce each workflow, including the exact prompts, processing times, credit costs, and mistakes we had to correct manually. Whether you're editing a YouTube video, podcast, or short-form clip, the goal is to show which tasks are worth automating and where human editing makes a difference.
Table of Contents:
- What Is AI Video Editing?
- How to Use AI for Video Editing
- How Much Does AI Video Editing Cost?
- Frequently Asked Questions
What Is AI Video Editing?
AI video editing uses artificial intelligence to analyze, modify, or assemble existing footage. Depending on the tool, that might mean identifying speech and removing unwanted pauses, generating synchronized subtitles, finding highlights in a long recording, or arranging clips according to written instructions.
It's different from AI video generation, which creates new footage from text prompts, images, or other references. An AI video editor works primarily with material you already have, although some tools, including Kapwing, combine editing and generation in the same workflow.
There are three main approaches to AI video editing:
- Automated editing tools: Perform specific tasks, such as removing silences, generating captions, or resizing videos.
- Transcript-based editing: Let you cut and rearrange spoken footage by selecting and deleting text.
- Prompt-based editing: Use an AI assistant to interpret instructions and perform multiple editing tasks on your behalf.
The nine workflows below aren't necessarily consecutive steps. For example, Auto Edit and Kai's rough-cut tool are two different ways to edit the same raw footage. You can choose the method that suits your project, then use the other workflows to add captions, visuals, or translated versions.
How to Use AI for Video Editing
To get started, open Kapwing, create a project, and upload your video. Most of the workflows happen directly in the browser-based editor, while the more advanced examples use Kai or Kapwing's MCP integration with external AI agents.
1. Automatically Remove Silences and Bad Takes
The quickest way to improve a raw recording is usually to remove footage that doesn't contribute anything: extended pauses, filler words, abandoned sentences, and mistakes where the speaker starts over.
Kapwing's Auto Edit tool analyzes speech and identifies these sections automatically. Unlike conventional timeline editing, you don't need to locate and trim each gap yourself.
To use auto-edit in Kapwing, upload your footage to the Kapwing editor and click Transcript in the left sidebar.
Open Smart tools and select Auto Edit. Then, choose the video's spoken language and click Auto Edit my video.
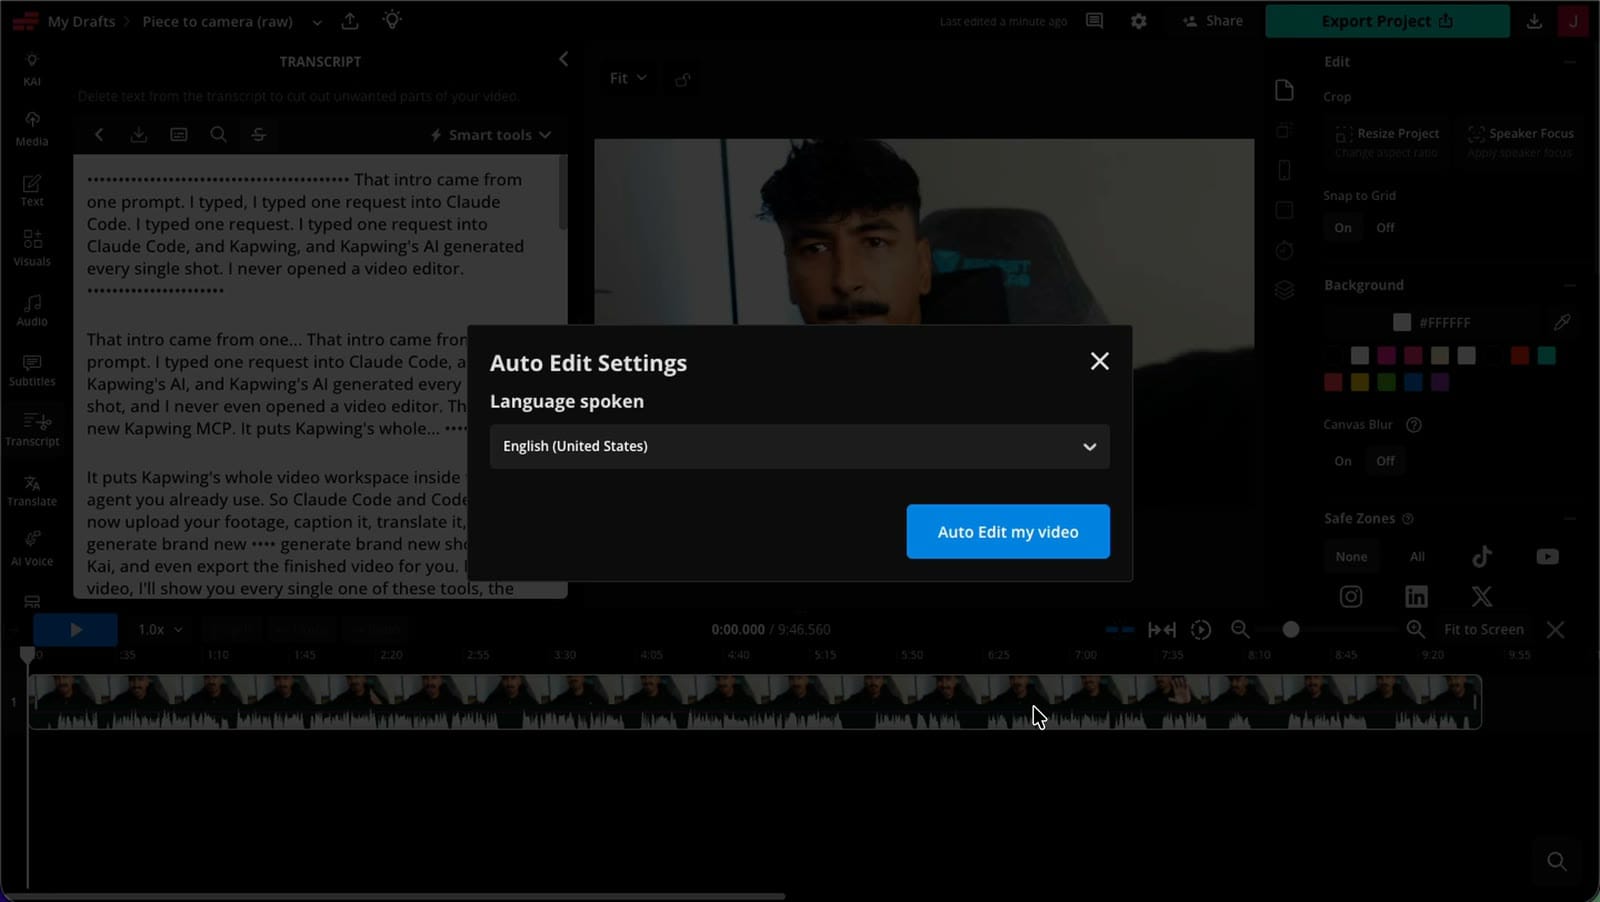
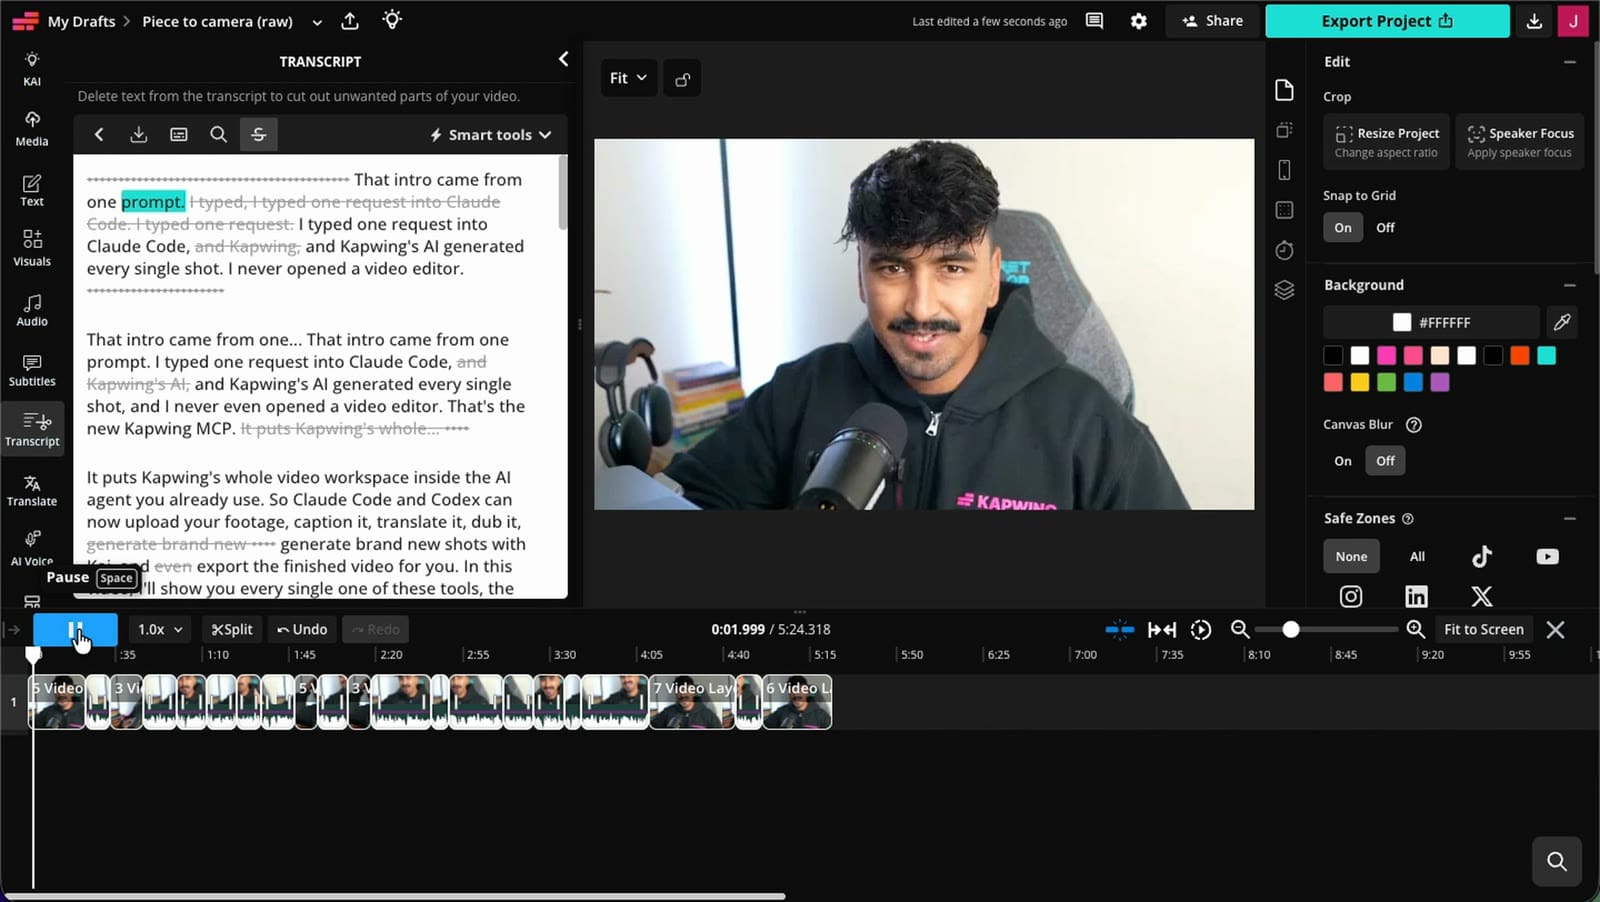
For our first test, we uploaded a 9-minute, 46-second talking-head recording containing long pauses, repeated explanations, and multiple restarts. Auto Edit processed the footage in 20 seconds and returned a 5-minute, 24-second video.
The results weren't identical every time, however. Three runs on the same talking-head recording produced cuts of 6:16, 5:33, and 5:24. While Auto Edit consistently identified unnecessary footage, it made slightly different decisions about which sections to remove.
One feature that makes these results easier to review is the transcript. Removed words remain visible with a grey strikethrough, rather than disappearing entirely. If the AI removes something important, you can find it in the transcript and restore it.
If you want more control over which silences get removed, Kapwing also has Smart Cut, available under AI Tools when a video clip is selected. It includes a sensitivity slider, allowing you to adjust how aggressively the tool identifies gaps.
When to use Auto Edit: Auto Edit is particularly effective for interviews, podcasts, tutorials, and other videos where much of the editing involves cleaning up spoken dialogue. It saves the most time when a recording contains frequent pauses or multiple takes.
2. Edit Your Video by Deleting Words From a Transcript
Auto Edit removes obvious interruptions, but it won't always recognize when an entire explanation has been recorded twice. Rather than manually locating the duplicated section on the timeline, we used Trim with Transcript to remove it.
To use the tool, open the Transcript panel and locate the sentence or paragraph you want to remove. Highlight the text, or triple-click to select an entire paragraph. Press Delete to remove the corresponding footage.
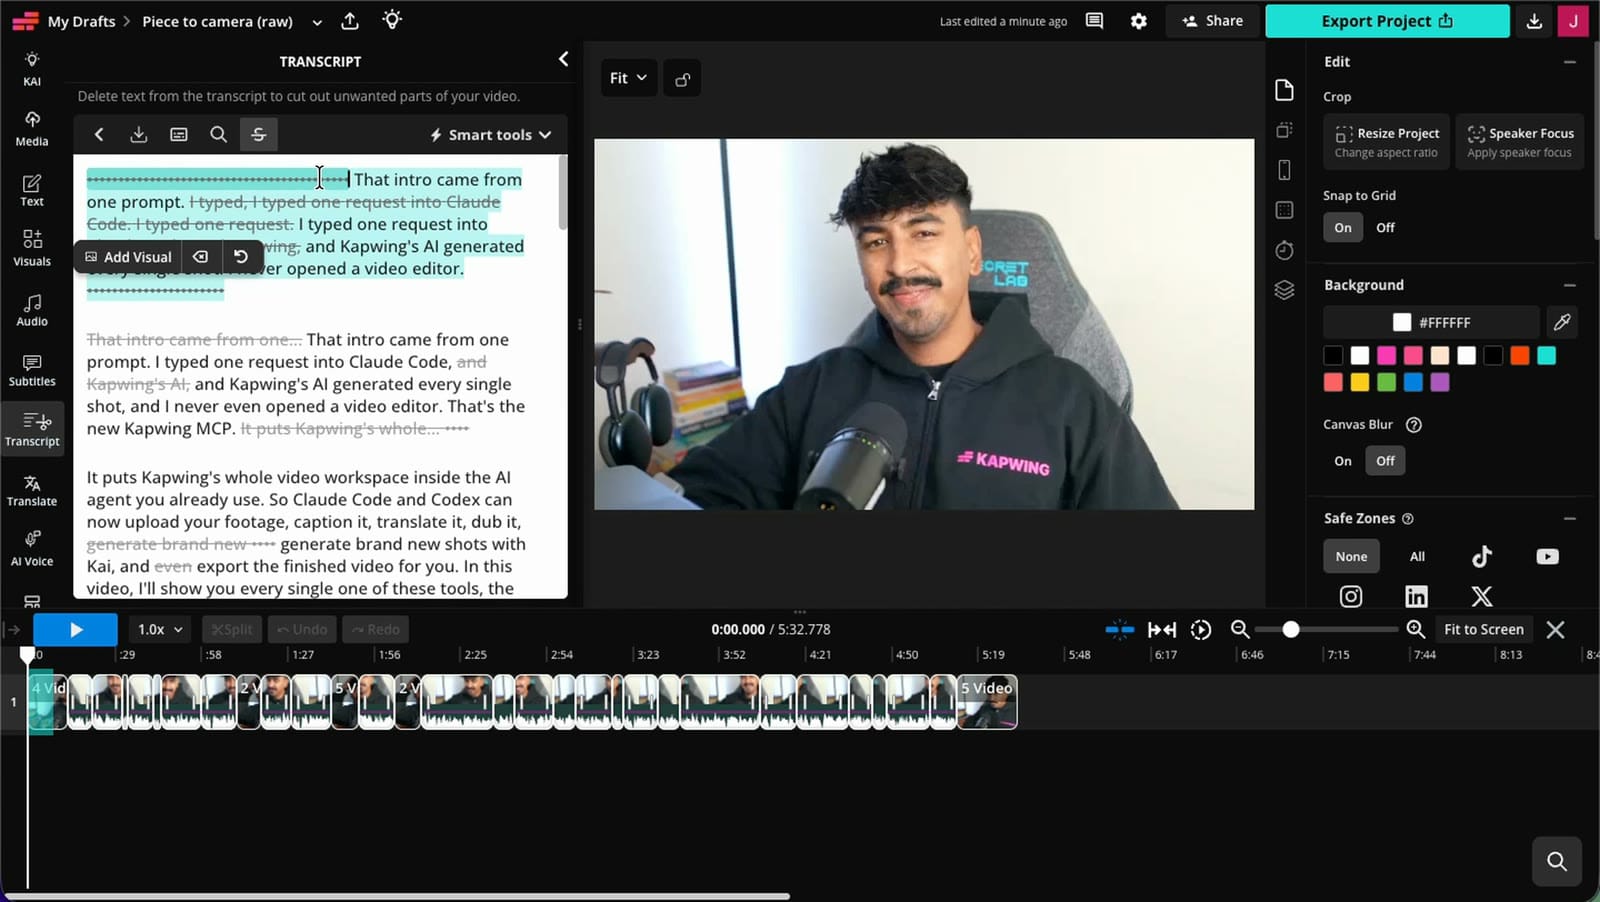
Transcript-based editing is especially useful when the video's structure is driven by dialogue. You can read through the recording, identify redundant explanations, and remove them almost as easily as editing a written document.
It also provides a practical way to correct AI-generated rough cuts. If Auto Edit keeps an unnecessary sentence or Kai removes too much context, you can make a more precise editorial decision using the transcript.
One thing to check: After deleting text, play a few seconds on either side of the cut. Words that look cleanly separated in the transcript may still overlap acoustically, particularly when a speaker talks quickly or takes a breath between phrases.
3. Edit a Video Using AI Prompts With Kai
For more complicated edits, you can describe what you want instead of selecting individual editing tools. Kai accepts natural-language instructions and performs editing tasks using the footage you attach. You can open Kai from Kapwing's home page or access it from the editor.
This approach is useful when you want the AI to make specific editorial decisions, rather than simply remove every detectable silence.
For our test, we uploaded the same 9-minute, 46-second recording and asked Kai to create a rough cut. Instead of telling it to make the video shorter, we specified the kinds of footage to remove, which takes to preserve, and what not to change.
Attach your raw recording as #video_1.
Make a rough cut of #video_1. It is a raw take of me talking to camera, with restarts, repeated lines, false starts and long pauses. Keep the last clean take of each line, cut the mistakes and the dead air, leave my voice and picture untouched, and keep it 16:9. Edit only: no new generated footage, no music, no captions.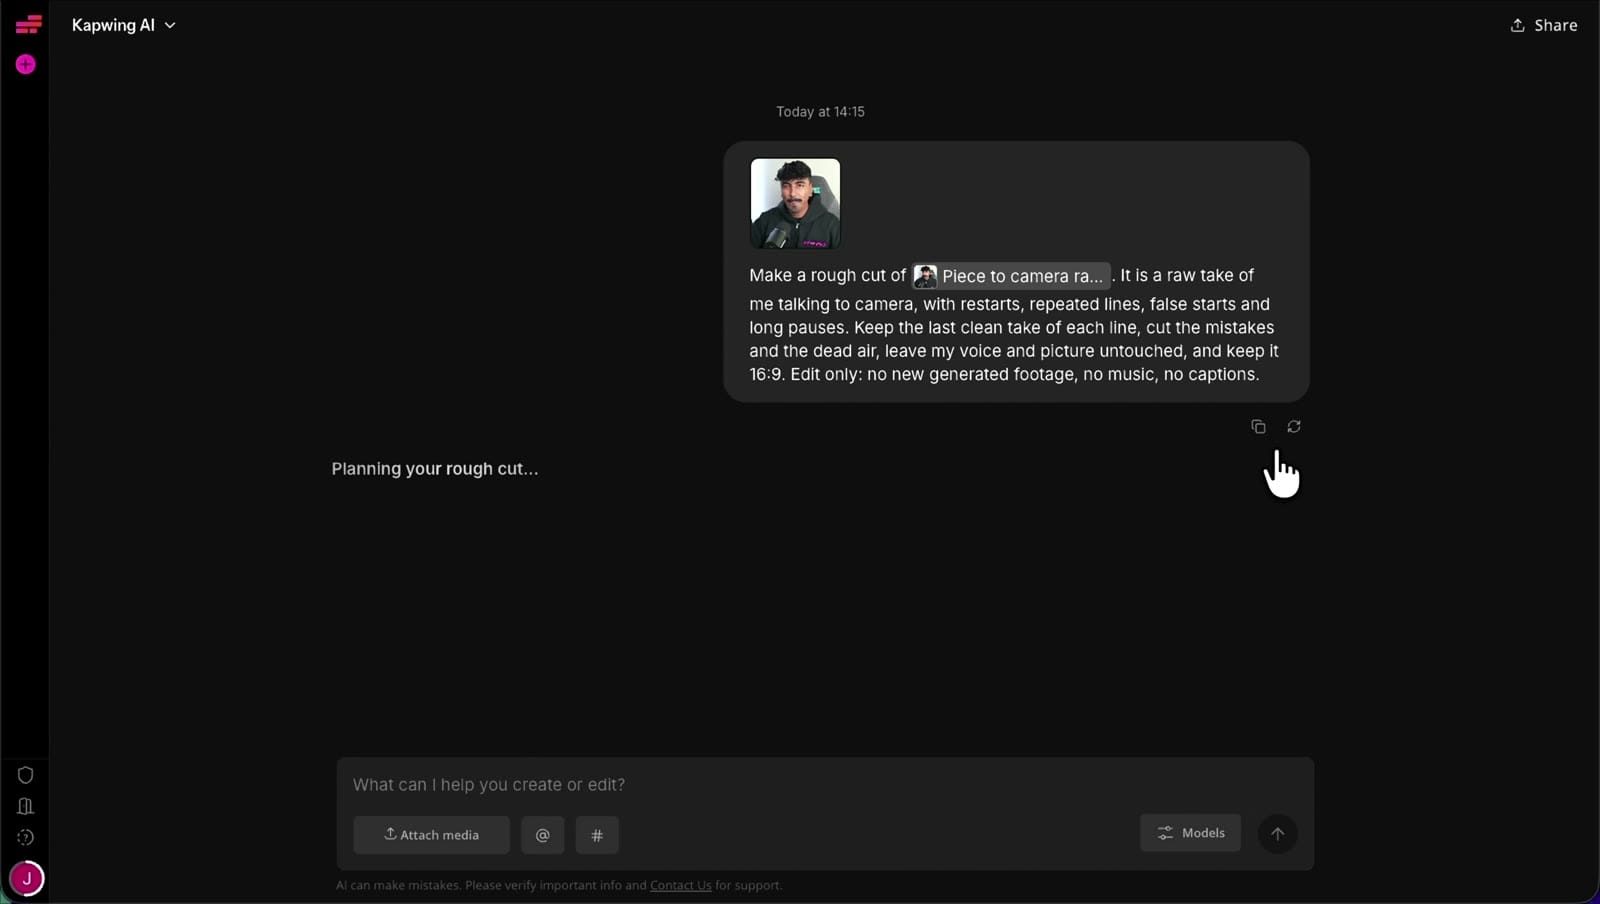
Kai completed the rough cut in approximately 2 minutes and 39 seconds, using 9 Kapwing credits.The resulting video was 4 minutes and 23 seconds long, approximately one minute shorter than Auto Edit's 5:24 version.
That difference illustrates how prompt-based editing differs from automatic cleanup. Auto Edit primarily identifies specific problems, such as pauses and filler words. Kai interprets a broader editorial instruction, in this case deciding which version of a repeated line should remain.
The prompt's constraints were also important. By specifying "edit only" and explicitly excluding generated footage, music, and captions, we limited the task to reorganizing the material we had provided.
When to use it: Choose Auto Edit when you want a fast, standardized cleanup. Choose Kai when you're working with several clips or want the AI to follow particular instructions about pacing, take selection, and what the finished video should contain.
4. Generate and Style AI Captions
Adding subtitles is another task that no longer requires manually transcribing dialogue and timing each line. Kapwing can transcribe the video's audio, generate synchronized captions, and let you customize their appearance.
To generate captions, select Subtitles → Auto subtitles in the editor and choose the spoken language. Once the captions are generated, you can edit their wording, timing, and visual style.
For our test, we selected the Host Style caption preset, set Word Animations to Highlight, and added a Pop transition. This created animated captions where the word being spoken is highlighted as the dialogue progresses.
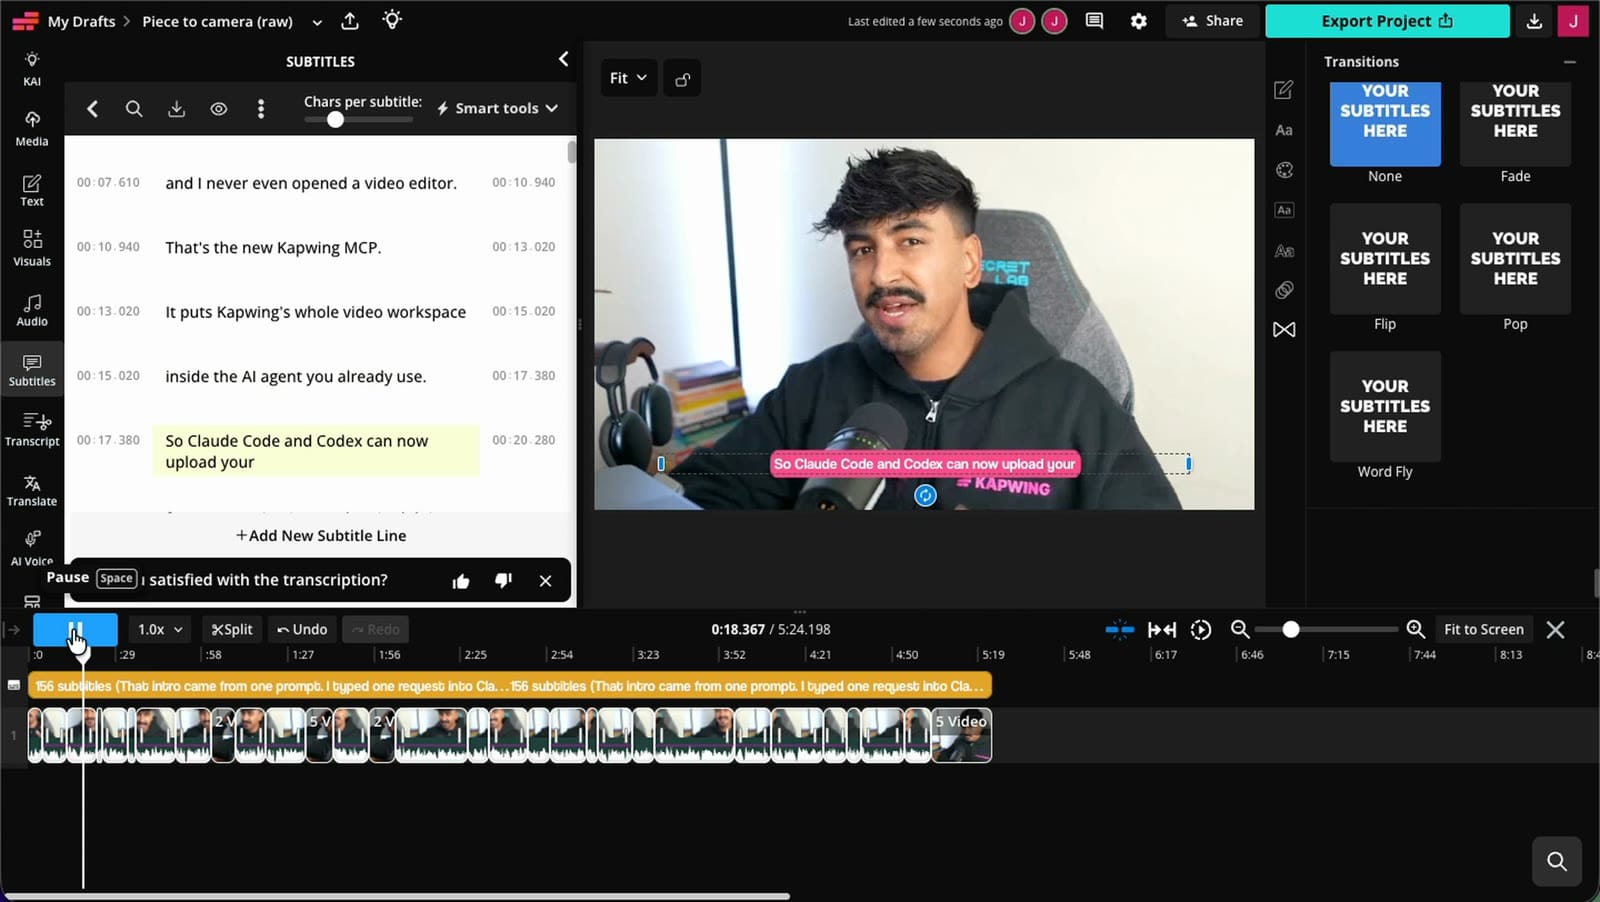
The automatic timing worked well, but we made two adjustments before exporting. First, we increased the caption font size from 48 to 72. The default captions looked relatively small against our 1080p footage, particularly when viewed at mobile size.
Second, we reviewed the transcription for names and unfamiliar terminology. In one of our test videos, the AI misspelled a presenter's surname. These errors can be easy to overlook when the captions look polished, but they matter for accessibility and credibility.
Kapwing also supports subtitle translation into more than 100 languages. If you want to make an existing video accessible to international audiences without replacing the original audio, translated subtitles are often the simplest option.
At the rates recorded during testing, transcription costs 1 Kapwing credit per minute, while subtitle translation costs 2 credits per minute.
5. Add B-Roll Automatically With AI
B-roll is supporting footage placed over the main video to illustrate what someone is saying. In a software tutorial, that might be a screen recording of the feature being explained. In a documentary or interview, it could be relevant footage of a location, product, or event.
The time-consuming part isn't always finding the B-roll. It's watching the original recording, identifying the right moment for each clip, and positioning the footage on the timeline without interrupting the narration.
Kai can automate much of that process by analyzing the main recording and the available supporting clips. We tested two approaches: placing existing B-roll and generating new B-Roll with AI.
Option 1: Add Your Own B-Roll Automatically
For the first test, we provided a talking-head recording and four additional screen recordings. We wanted Kai to match each screen recording to the section of narration describing it.
We attached the main video first, followed by the four supporting clips, and used the following prompt:
Choose relevant clips and overlay them when the voice covers relevant topics. #video_1 is me talking to camera: keep it as the main track, untouched. #video_2 to #video_5 are my B-roll: place each one over the line where I talk about what it shows, muted, full frame, 3 to 6 seconds each. Edit only: no generated footage, no music, no captions.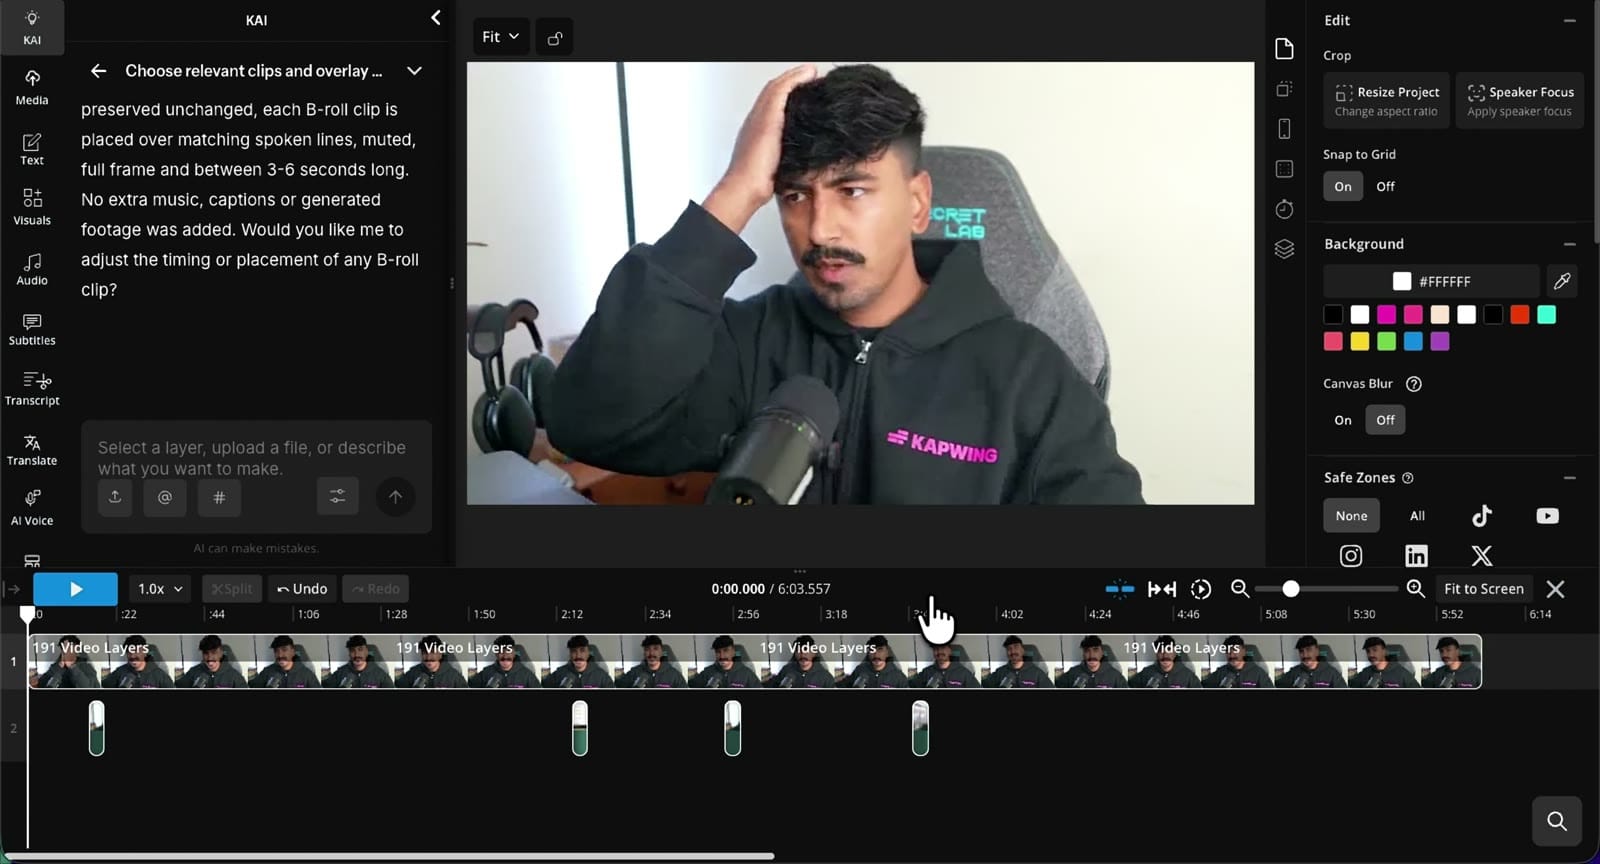
Kai positioned the clips above the original footage while preserving the speaker's voice. The task used 20 credits, and we could open the project afterward to review each placement.
The prompt includes several details worth copying into your own workflow. It identifies which file is the main video, specifies that the supporting clips should be muted, and provides a duration range of three to six seconds.
Option 2: Generate AI B-Roll From a Prompt
If you don't have footage to illustrate a particular section, Kai can generate additional B-roll and add it to the timeline. We tested this using Seedance 2.5, generating three four-second shots to illustrate AI video editing concepts mentioned in the narration.
Instead of creating the shots separately and importing them into the editor, we asked Kai to generate and place all three. Attach your talking-head recording as #video_1 and set the Video Clips model to Seedance 2.5.
#video_1 is me talking to camera: keep it as the main track, untouched, and keep the 16:9 canvas. Generate 3 short 16:9 B-roll shots, 4 seconds each, with no people and no on-screen text: shot 1, a glowing AI chat window on a laptop sending a command that opens a video editing workspace; shot 2, a video timeline where captions and audio waveforms appear on a clip; shot 3, a finished video flying out as a share link while a globe of languages lights up. Overlay each shot full screen, muted, over the line where I talk about what it shows. No music and no captions.Generated B-roll illustrating a finished video being shared internationally.
Kai generated the clips with Seedance 2.5 and positioned them over relevant parts of the original video. The entire process took approximately 5.7 minutes and consumed 282 credits.
The results were useful as illustrative footage, but one shot exposed a limitation of AI video generation. The generated editing interface contained unreadable text and fictional UI elements. It looked convincing as a background visual, but it wasn't an accurate depiction of Kapwing's editor.
There's also a considerable cost difference. Placing our existing B-roll used 20 credits, compared with 282 credits for three generated clips. When you have usable footage already, it's generally worth editing that material before generating something new.
6. Resize Videos for TikTok, Reels, and YouTube Shorts
Once you've finished editing a landscape video, you may want to publish a vertical version for TikTok, Instagram Reels, or YouTube Shorts. A Resize Project tool allows you to change the aspect ratio without manually rebuilding the project.
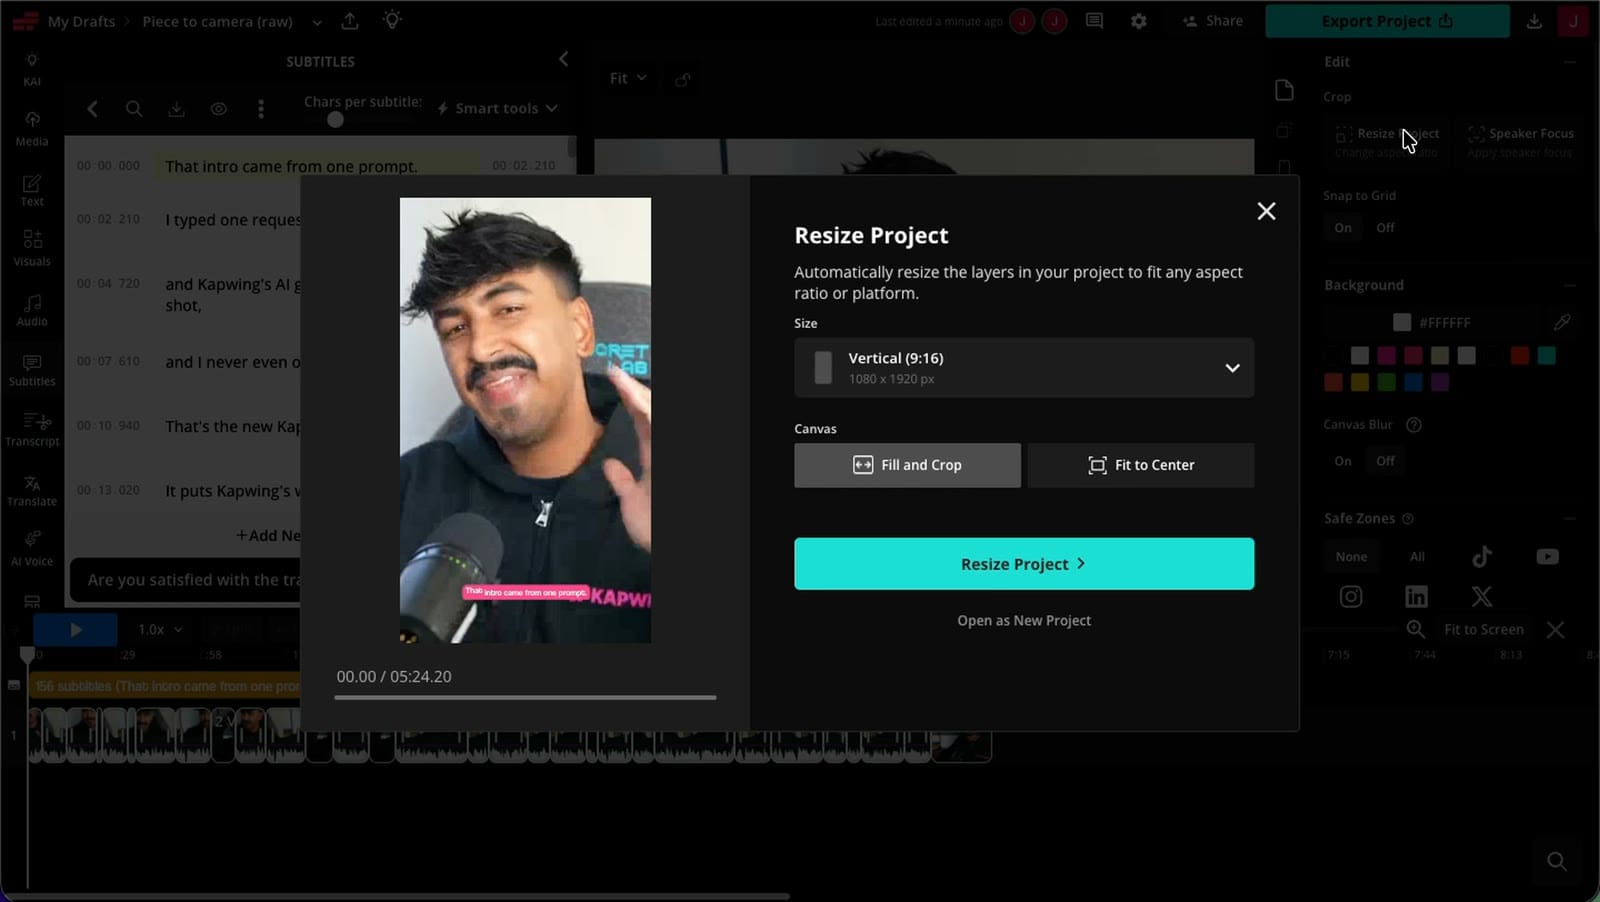
With nothing selected in the editor, click Resize Project and choose the vertical 9:16 format. Kapwing provides two useful options for fitting the original footage into the new canvas.
Fill and Crop enlarges the video until the vertical frame is filled, cutting away footage at the edges. This can create a more immersive, full-screen result, but it may remove important details or crop out a subject who's positioned off-center.
Fit to Center preserves the entire original frame within the new canvas.
It avoids cropping the speaker or other important content, although the footage won't necessarily fill the vertical frame.
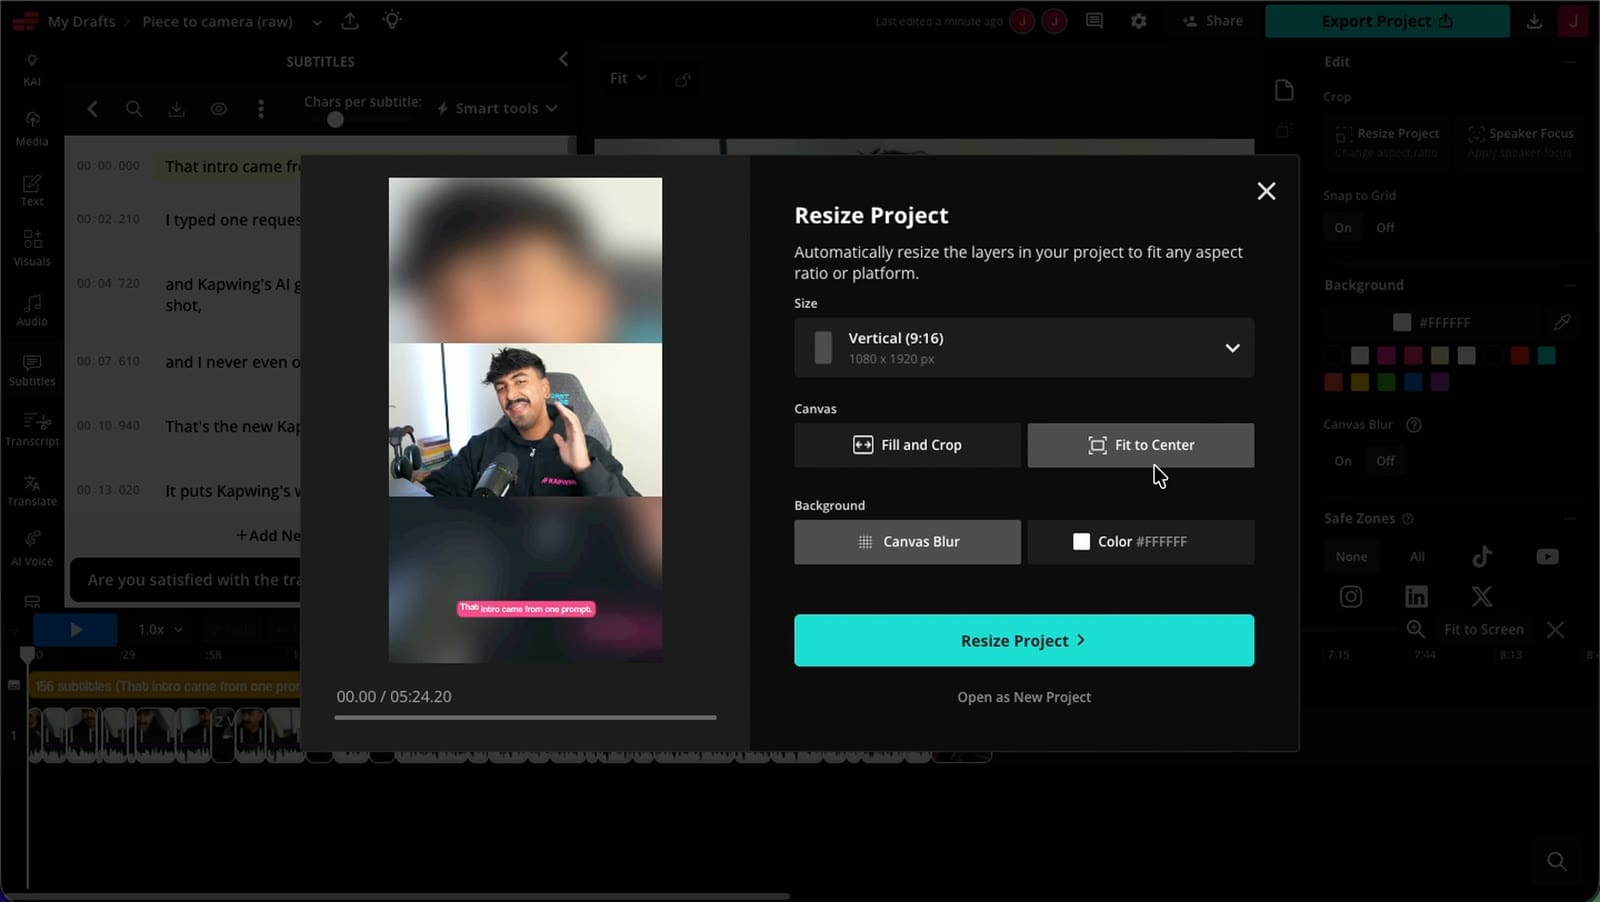
In our test, Fill and Crop removed part of the speaker's face. Switching to Fit to Center preserved the recording and provided a starting point for the vertical edit.
Neither option is universally better. If your subject remains centered throughout the recording, Fill and Crop may work without any additional changes. For interviews, tutorials, or footage with important content near the edges, Fit to Center is often the more reliable choice.
Whichever setting you use, play through the resized video before exporting. Check that the subject stays in frame, subtitles remain readable, and any supporting visuals still make sense at the new aspect ratio.
7. Turn Long Videos Into Shorts With AI Clip Generator
Resizing is useful when you already know which section of a video you want to publish. Finding those sections in the first place can be a much larger task.
For podcasts, interviews, webinars, and longer YouTube recordings, a clip generator can identify moments that work as videos. It analyzes the recording and generates based on instructions about their topic, length, and format.
For this test, we used a 33-minute podcast interview and asked Kai to find three clips under 60 seconds:
Find 3 clips under 60 seconds where one person explains one complete idea. Make them vertical 9:16 with subtitles.The process took nearly seven minutes and returned three short-form clips with subtitles. Kai initially displayed an estimate of 192 credits, but the completed run consumed only 20 credits.
A generic instruction like "find the best highlights" leaves the selection criteria open to interpretation. By asking for a complete idea, we gave the model a more useful standard. Each clip should explain something independently, without relying on the preceding 20 minutes of conversation.
That doesn't guarantee every selection will be suitable for publication. You'll still want to watch the generated clips for context, inspect where they begin and end, and check whether the captions and framing work for a vertical audience.
8. Translate and Dub Videos Into Other Languages
Once a video is edited, you can use AI to produce versions for audiences who speak other languages. Kapwing supports both subtitle translation and AI video dubbing. Subtitle translation preserves the original audio while displaying translated text, whereas dubbing replaces the speech with generated audio in the target language.
For our test, we used Kapwing's AI dubbing workflow to translate a 25-second English recording into Spanish while retaining the speaker's original voice characteristics.
To dub a video in Kapwing, open the Translate panel and select Dub video. Choose the language and select Clone original voice, if available on your plan.
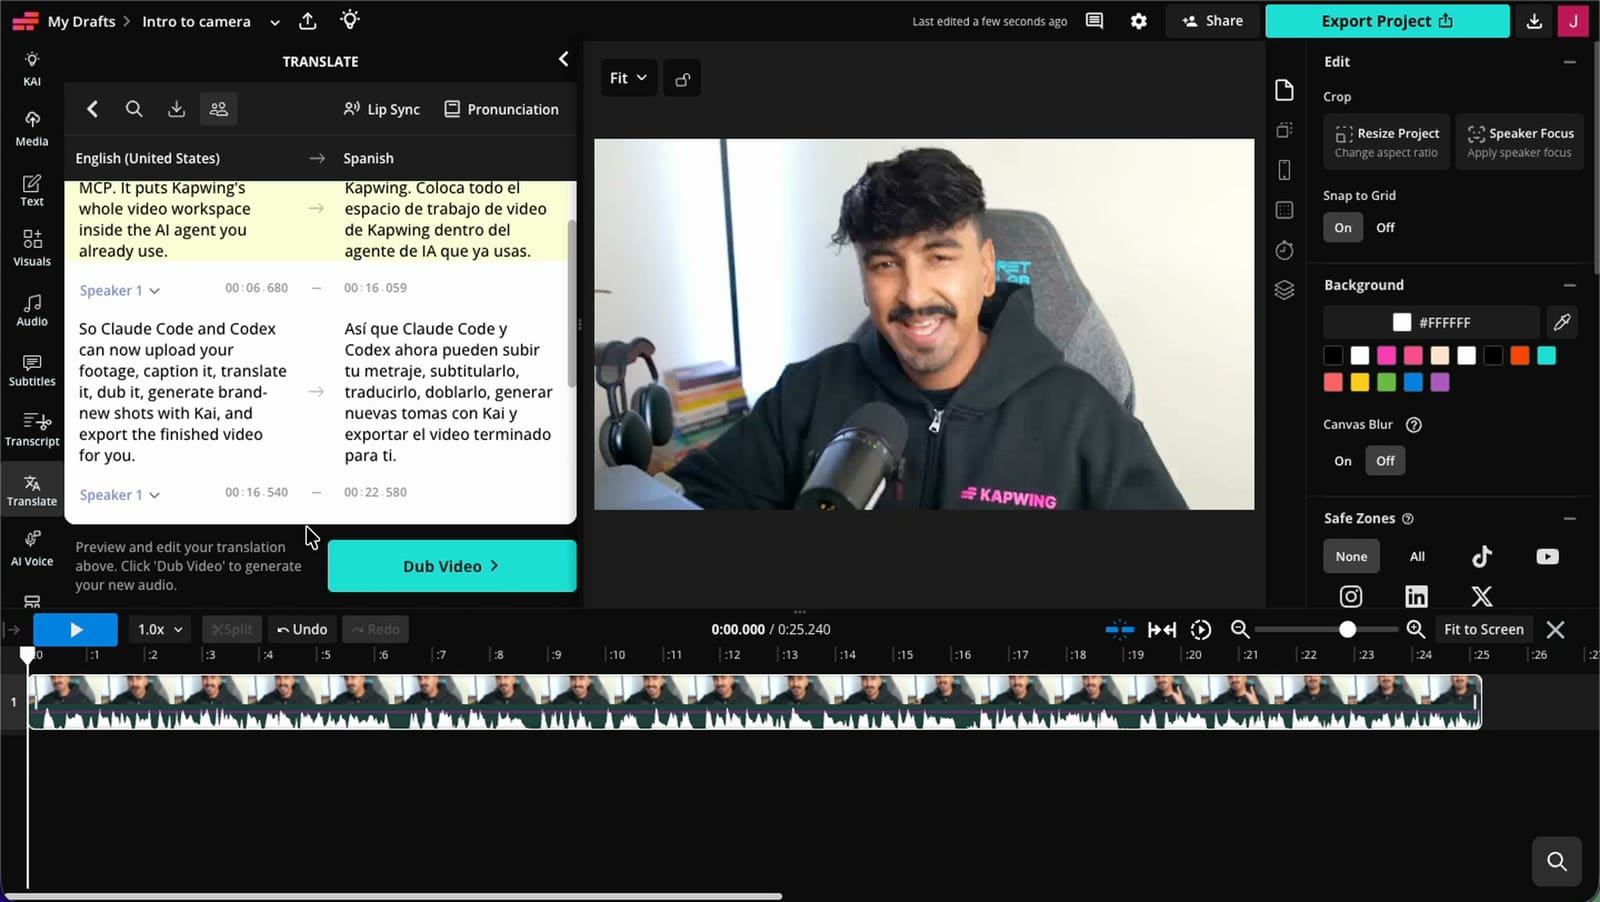
Our 25-second recording took approximately 40 seconds to dub into Spanish.
The most important part of the workflow was the translation review. Any error in the source transcript can carry through to the speech, including misspelled names, incorrect terminology, or misunderstandings of what the speaker said.
It's easier to correct those mistakes in the text before generating the new audio than to discover them afterward and repeat the dubbing process.
At the time of our test, Kapwing supported dubbing in more than 40 languages, with a rate of 10 credits per 30 seconds per language. Original voice cloning required a Business plan or higher.
9. Automate Video Editing With ChatGPT, Claude, or Codex
You can also connect Kapwing to an external AI assistant and ask it to carry out editing tasks from a conversation. This works through the Kapwing MCP, which allows compatible AI agents to interact with your Kapwing workspace.
With the MCP connection, an assistant such as ChatGPT, Claude, or Codex can access supported Kapwing tools to upload footage, generate captions, translate or dub videos, coordinate edits through Kai, and export projects.
How to Connect Kapwing to an AI Agent
For supported AI clients, open the application's connector settings and add a custom MCP server using this address:
https://www.kapwing.com/mcpIn the Claude desktop app we tested, the setup started under Settings → Customize → Connectors. We selected the option to add a custom connector, named it Kapwing, and entered the MCP server URL.
For Codex, we used Settings → Plugins → MCPs → Add MCP server, selected Streamable HTTP, and entered the same address.
AI Video Editing Prompts You Can Try
A useful starting point is to automate repetitive tasks, rather than asking an AI agent to make every creative decision at once.
Clean up and caption multiple recordings
upload these 3 videos, remove the silences, add captions and export each oneDub an existing project into multiple languages
dub my latest project into Spanish and German in my own voice, and send me the linksTranslate captions and export the result
translate the subtitles on my latest project into French and export itOur Test: Creating Six Language Versions From One Prompt
To test a more complex workflow, we started with an 18-second AI-generated travel vlog featuring a speaker walking through a rainy Tokyo street at night.
The original video was generated with Seedance 2.5 using character, location, logo, and voice references. We then used Codex, connected to Kapwing through the MCP, to add B-roll, generate translated versions, and export the finished videos.
Here is the exact prompt we used.
Multi-language AI video editing prompt
Use the Kapwing MCP. Upload demo-raw-clip.mp4 from this folder to my Kapwing Team Workspace, using create_upload_url and a curl PUT. Then ask Kai to add 2 short B-roll shots generated with Seedance 2.5 over the lines where I describe a place, keeping my voice and my face on screen everywhere else. Then dub that video into Spanish, French, German, Japanese and Portuguese (Brazil) in my own voice, one copy per language, each with captions in its own language. After the dubs, add word-by-word English captions to the English version only. Then export all 6 versions and give me the editor link and the MP4 link for each one.This prompt assumes Codex has access to the local file demo-raw-clip.mp4 and can run the upload command. Other AI clients may require you to attach the recording or provide it through a different supported upload method.
When the workflow reached the B-roll generation stage, Kai displayed a plan with an estimated cost of 199 credits. After we approved it, the task used 189 credits.
The agent then coordinated the dubbing and export steps, returning links for six versions of the recording: English, Spanish, French, German, Japanese, and Brazilian Portuguese.
The Spanish-dubbed version, with translated captions and a cloned version of the original voice.
How Much Does AI Video Editing Cost?
AI video editing costs depend heavily on whether you're modifying existing footage or generating entirely new media.
In Kapwing, AI tasks consume credits based on the operation being performed. Kai also displays an estimated cost for certain tasks before generation, allowing you to review the proposed workflow before approving it.
The following table summarizes the credit usage and processing times from our November 2026 tests.
| AI video editing task | Kapwing credits | Processing time |
|---|---|---|
| Auto Edit on a 9:46 recording | Included in a combined total of 10 or fewer credits for Auto Edit, captions, and resizing | ~20 seconds |
| Manual transcript trimming | No separate AI generation | Instant |
| Kai prompt-based rough cut | 9 | ~2 min 39 sec |
| Auto captions | 1 per minute of transcription | ~8 seconds for styling after transcription |
| Placement of 4 existing B-roll clips | 20 | A few minutes |
| Generation of 3 Seedance 2.5 B-roll clips | 282 | ~5.7 minutes |
| Resizing to 9:16 | Included in the combined editor total above | Instant |
| 3 Shorts from a 33-minute podcast | 20 | ~7 minutes |
| AI dubbing | 10 per 30 seconds, per language | ~40 seconds for a 25-second clip |
| 2 generated B-roll shots through the MCP | 189 | Not recorded |
These figures reflect the actual test runs, not guaranteed charges for every project. Some Kai tasks show estimates that can change as the workflow progresses; our Clip Generator run, for example, displayed 192 credits before processing but ultimately consumed 20.
At the time of testing, Kapwing's Pro plan included 1,000 credits per month. Credit allowances and feature prices may change, so check the current Kapwing pricing before starting a large project.
Frequently Asked Questions
Can AI edit videos automatically?
Yes. AI tools can automatically remove pauses, trim unwanted takes, generate subtitles, insert supporting footage, resize videos, and create short-form clips. AI agents such as Kapwing's Kai can also interpret editing instructions written in natural language.
However, automatic editing doesn't guarantee that every creative decision will be correct. You should review the resulting footage for continuity, context, pacing, and accuracy before publishing.
What is the best way to edit videos with AI?
For dialogue-heavy recordings, a good starting point is automatic silence removal followed by transcript-based editing. This combination removes much of the repetitive work while leaving you in control of which explanations and takes remain.
For more complicated projects involving multiple clips, supporting visuals, or specific editing instructions, a prompt-based assistant like Kai may be more useful. The best approach depends on whether you need standardized cleanup or more flexible editorial decisions.
Can AI edit videos using text prompts?
Yes. Prompt-based video editing allows you to describe editing tasks in natural language, such as removing repeated takes, placing B-roll over relevant dialogue, or generating a vertical version with subtitles.
Kapwing's Kai can perform these operations using uploaded media. For examples of different prompt-writing approaches, see our guide to editing videos with AI prompts.
Can AI remove silences and filler words from videos?
Yes. Kapwing's Auto Edit tool analyzes spoken audio and identifies unwanted pauses, filler words, and certain retakes. You can then review the removed sections through the transcript and restore anything that should remain.
Smart Cut provides an alternative when you want more control over silence detection and trimming sensitivity.
Can AI turn a long video into YouTube Shorts?
Yes. AI clip generators can analyze long recordings and select shorter moments suitable for platforms such as YouTube Shorts, TikTok, and Instagram Reels.
In our test, Kapwing generated three vertical clips with subtitles from a 33-minute podcast interview. For better results, give the AI specific selection criteria, such as finding moments where a speaker explains one complete idea rather than requesting generic highlights.
Can AI add B-roll to an existing video?
Yes. Kai can analyze uploaded B-roll alongside the main recording and place relevant clips over corresponding sections of narration. It can also generate new footage from descriptions when suitable material isn't available.
You'll still want to check where each clip begins and ends, especially for tutorials where visuals need to match the spoken explanation precisely.
Can I use ChatGPT or Claude to edit videos?
Yes. With a compatible MCP connection, ChatGPT, Claude, Codex, and other AI assistants can interact with supported Kapwing tools to upload, caption, translate, dub, and export videos.
Tasks that involve cutting or rearranging footage can be handed to Kai, and the resulting projects remain available for manual editing in Kapwing.