How to Add Captions to Instagram Stories Automatically
In this step-by-step tutorial, we'll share how to quickly add captions to Instagram Stories using the auto-caption sticker and other tools.
Did you know the auto-caption sticker is available for Instagram Stories? Here's how it works: In a few taps, the spoken dialogue or voice over in your Instagram Story gets transcribed into text, which is then turned into subtitles and captions. (Remember, subtitles and closed captions are different things!)
The auto-caption feature for Instagram Stories is convenient and helps improve accessibility for a wider audience, but it does have some limitations.
Don't worry, however, because there are a number of solutions available for you if the auto-caption sticker isn't appearing, isn't working, or doesn't fit your needs. And in this guide, we're going to cover all of them.
How to add captions to Instagram Stories
1: Open Instagram and create or upload a Story
Head over to the Instagram mobile app and tap your profile picture in the top left corner. Long-press the record button to make a Story or tap the square in the bottom left corner to upload a video from your camera roll.
Note that an individual Instagram Story can be up to 60 seconds long and if you do upload a video, make sure that it adheres to Instagram's 9x16 aspect ratio. If it doesn't, you can always use Kapwing's Instagram Resizer to edit your video to the right dimensions.
If you record an Instagram Story that's longer than 60 seconds, your Story will be broken up into multiple Stories and auto-captions will only appear on the first Story. If you want to post a longer Story and also add video subtitles, you'll need to cut the longer video into multiple Story posts that are each no longer than 60 seconds.
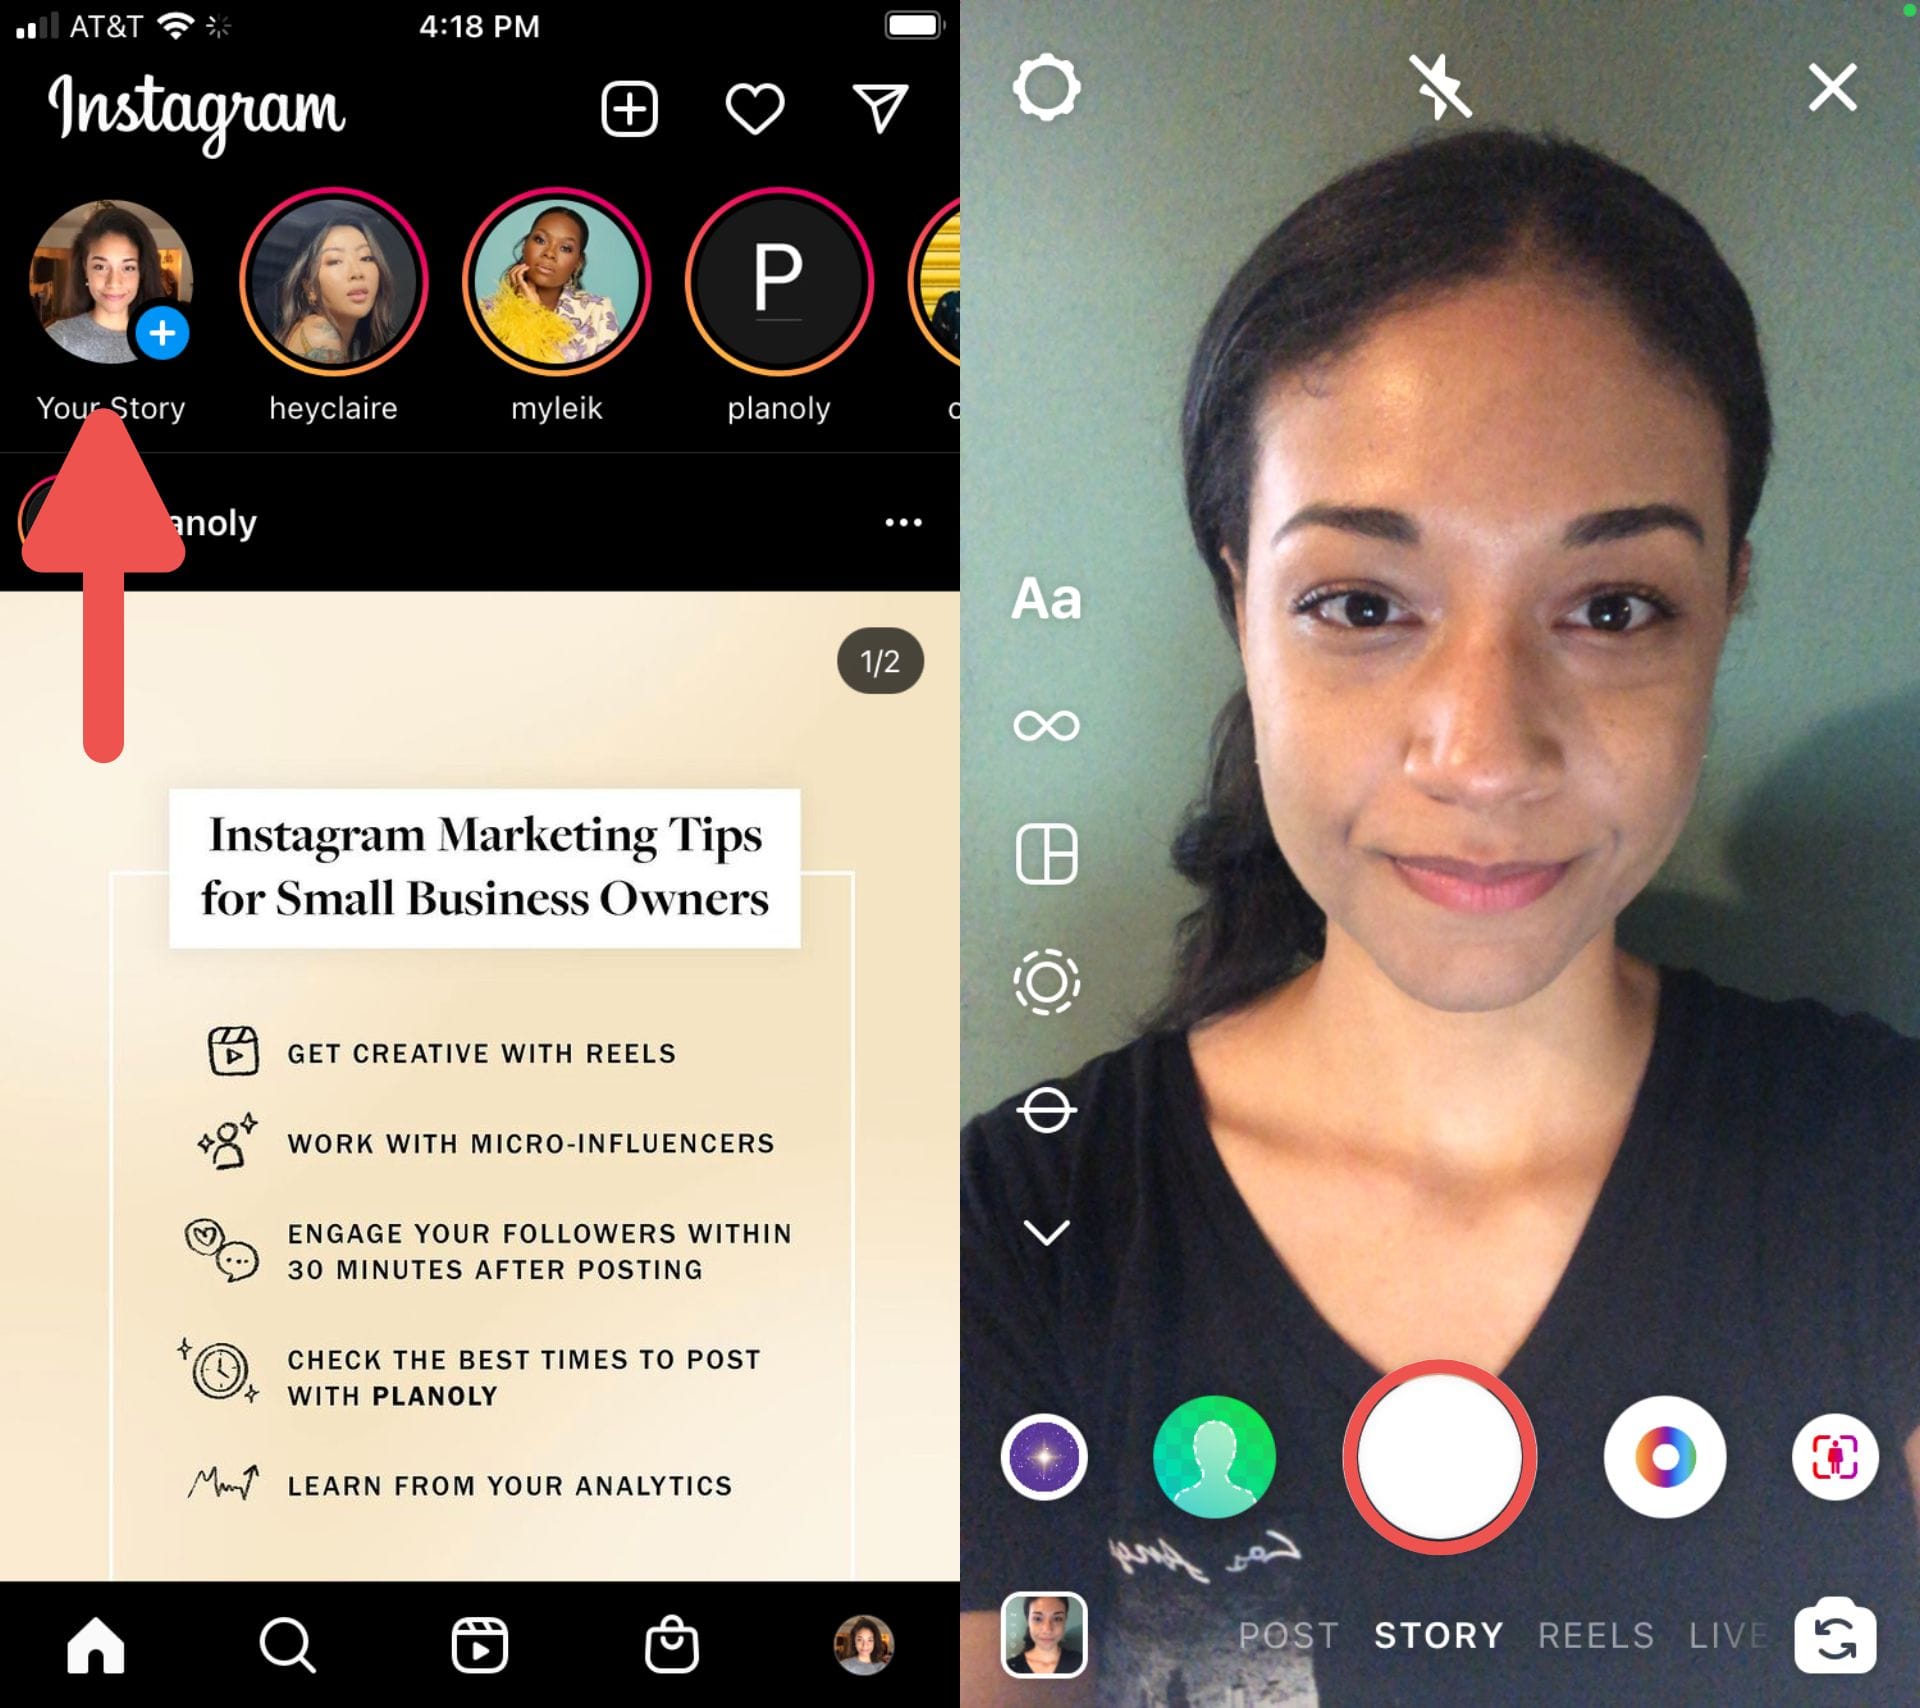
2. Use the caption sticker to add captions automatically
Now, tap the sticker icon (the square with a smile) at the top of the screen, then tap "Captions" which will appear as one of the options if it's available to your account. The auto-caption feature will begin transcribing your video into text. This should only take a few seconds to complete.
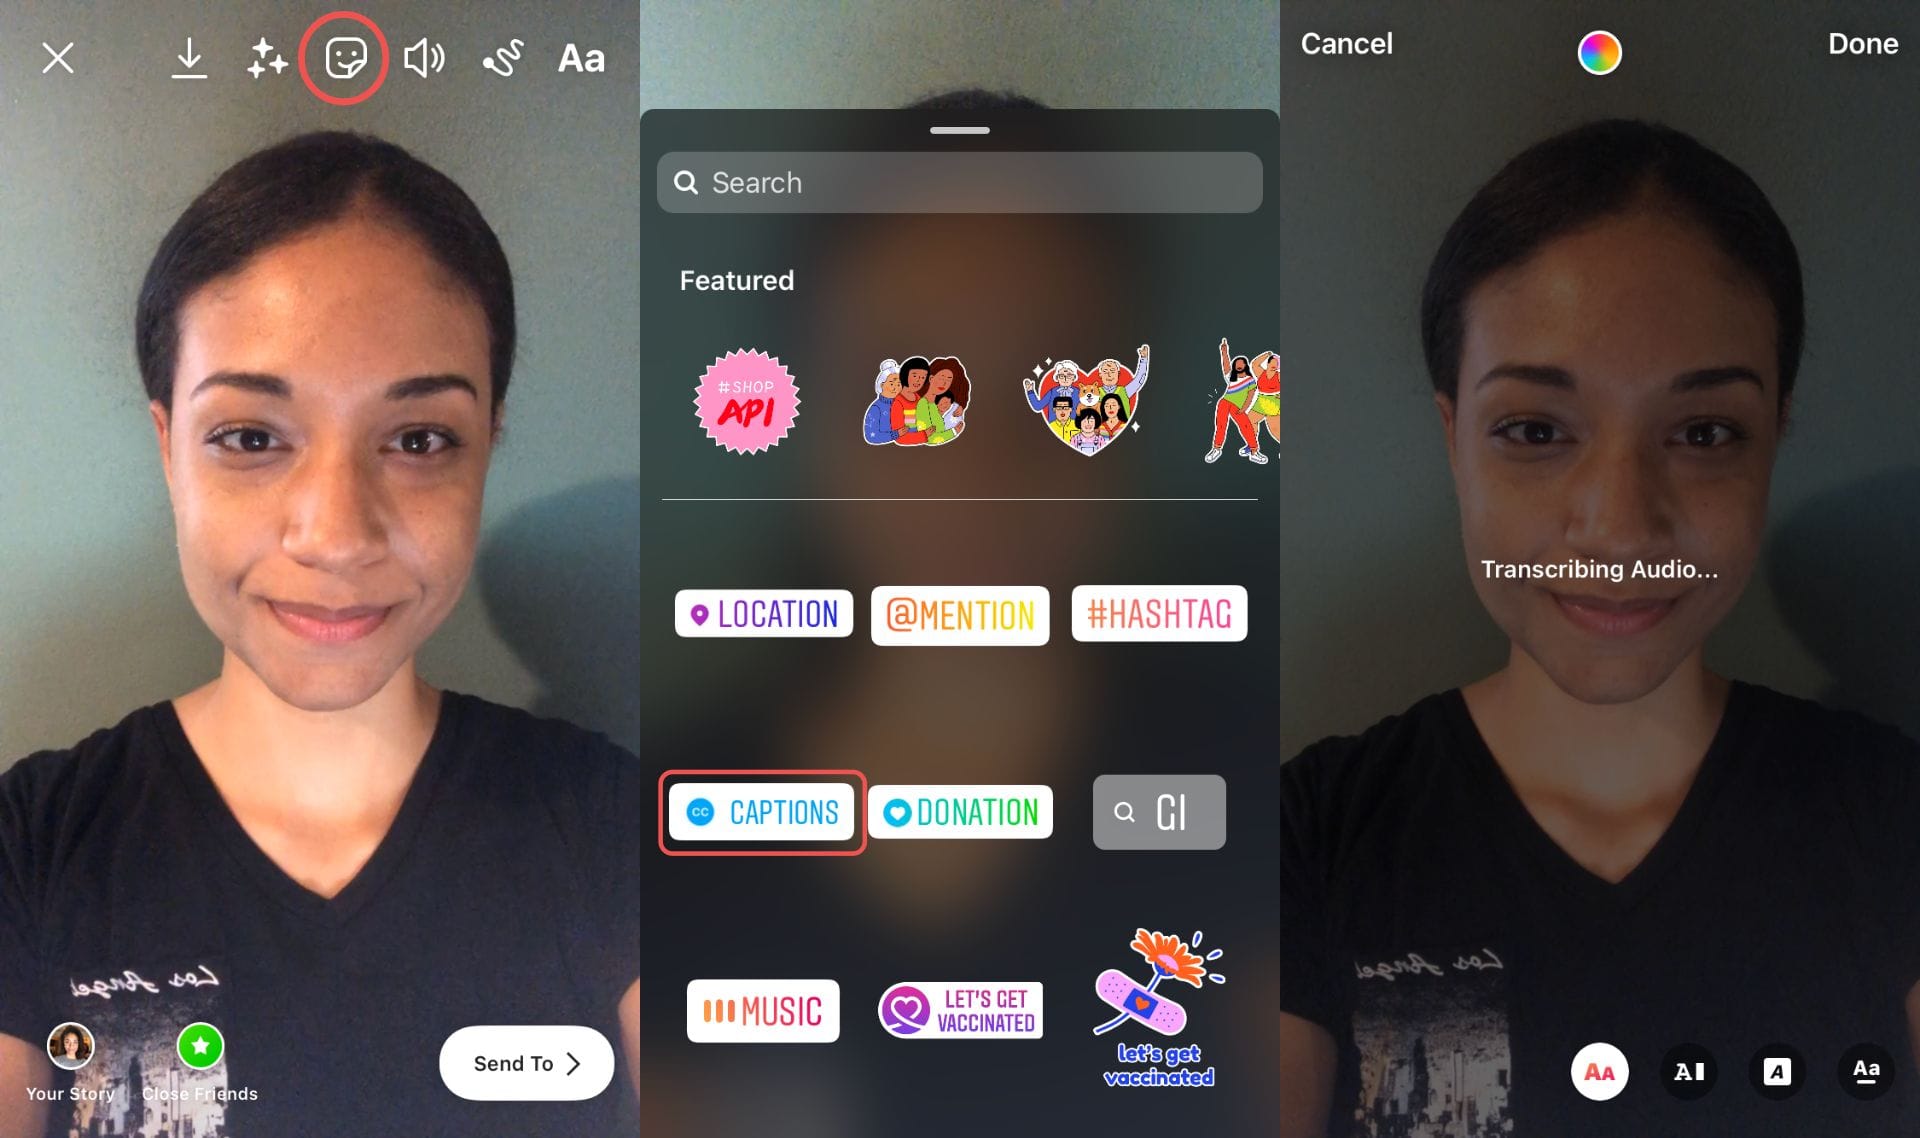
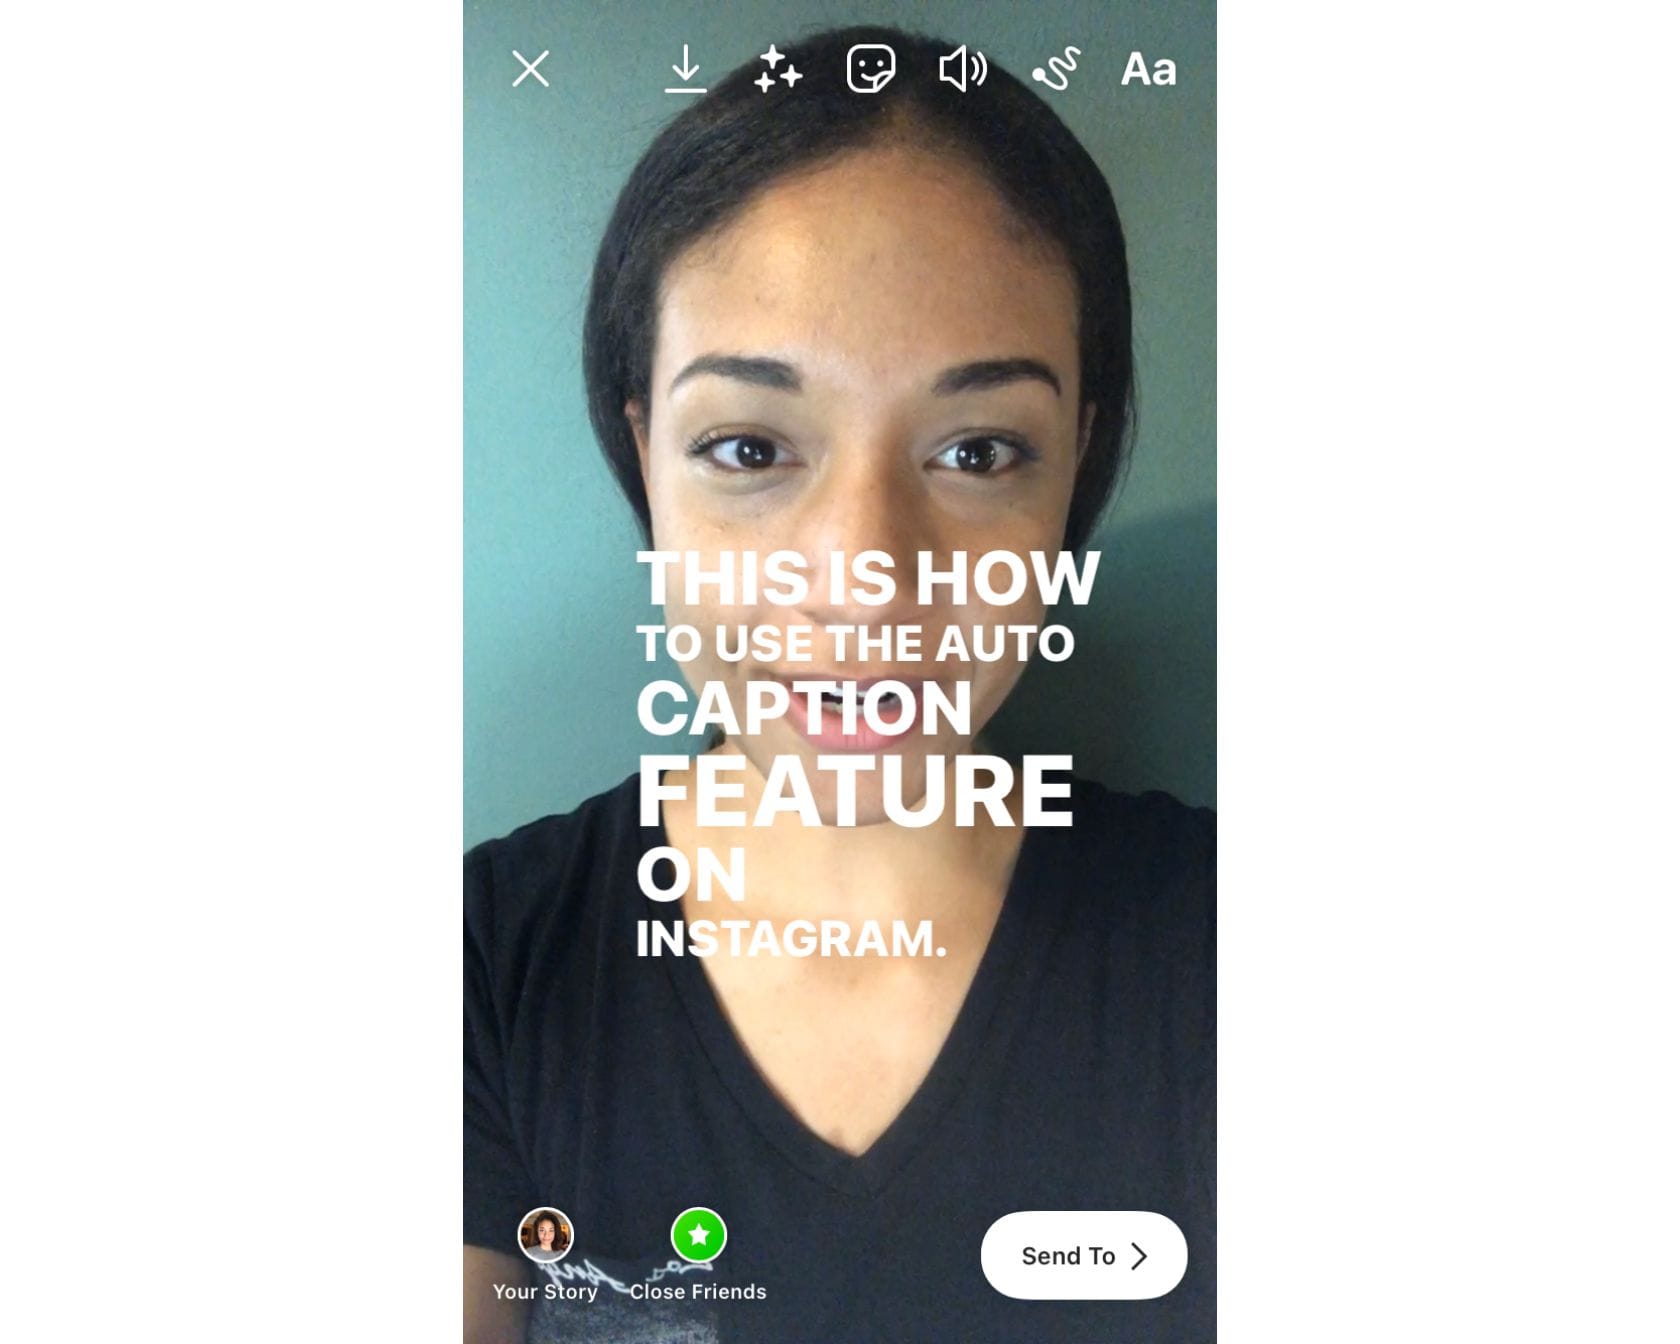
When your captions have been processed, they'll begin to appear on the screen at the same time as any dialogue or voice over present in your video; swear words will be censored with symbols.
Without any additional edits, the text will appear in a white font with no background, but these details can be changed.
3. Edit the captions on your Instagram Story
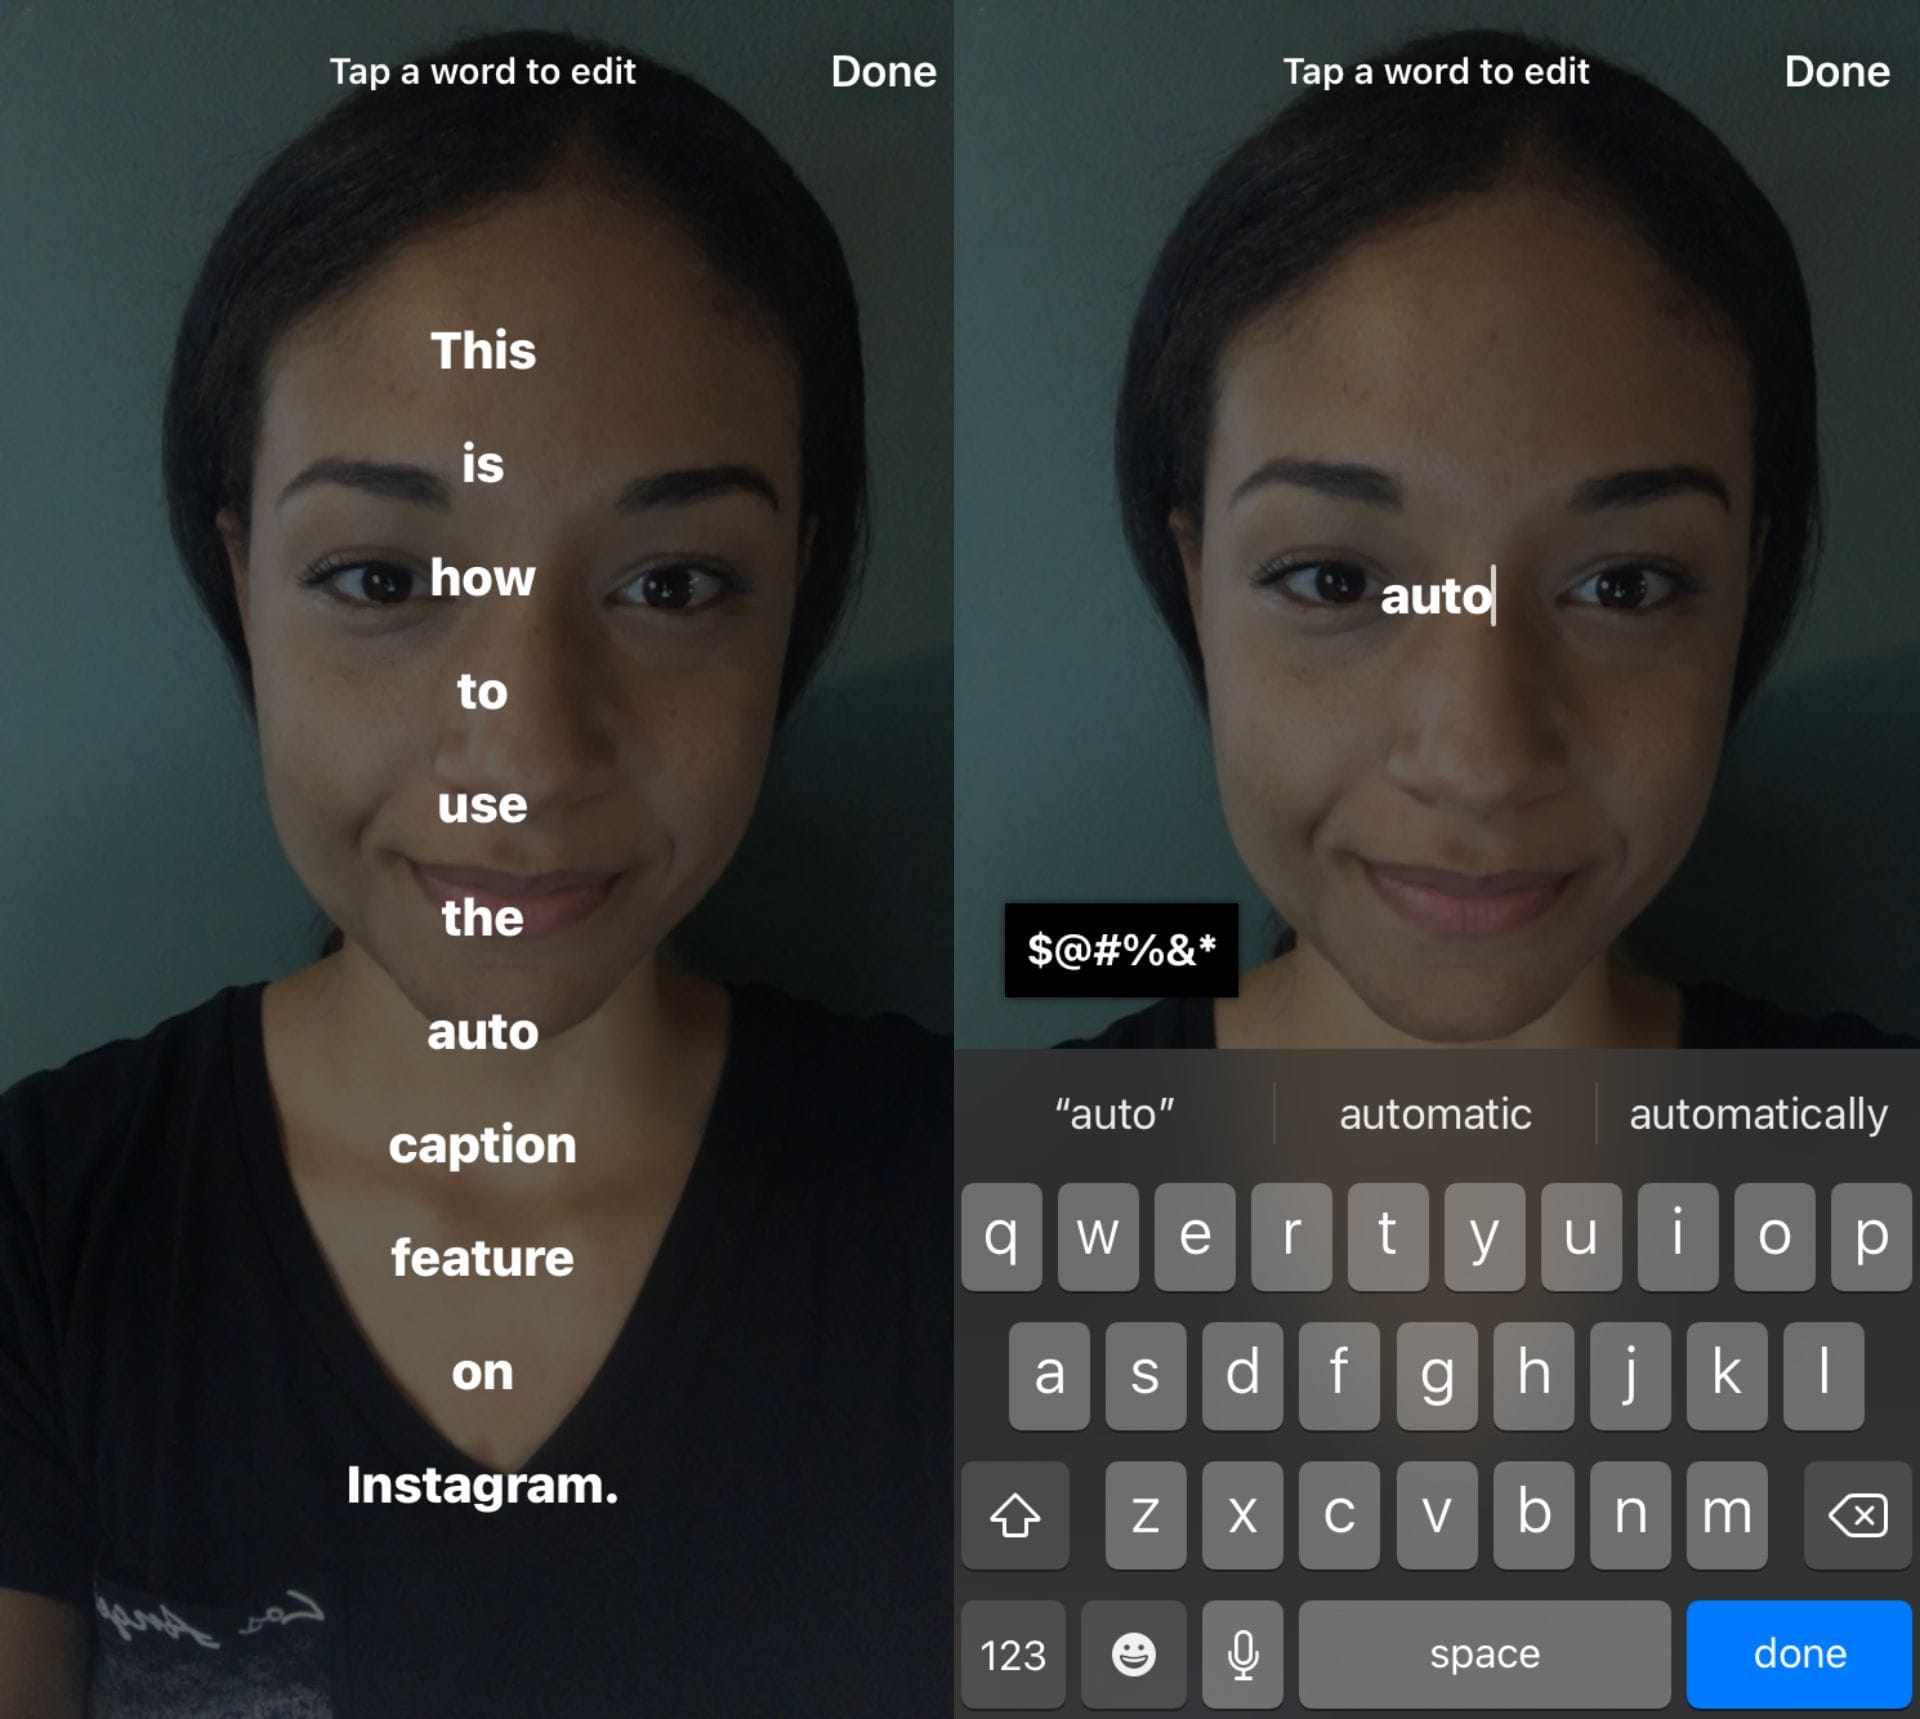
Now we can start editing our captions. First, if you need to fix any typos caused by Instagram's automatic transcription, tap your captions and then tap a specific word to edit. You can edit how the word is spelled or replace it entirely, or you can censor a word by tapping it and then choosing the censor symbol. When you're finished editing the text, tap "Done" to save your changes.
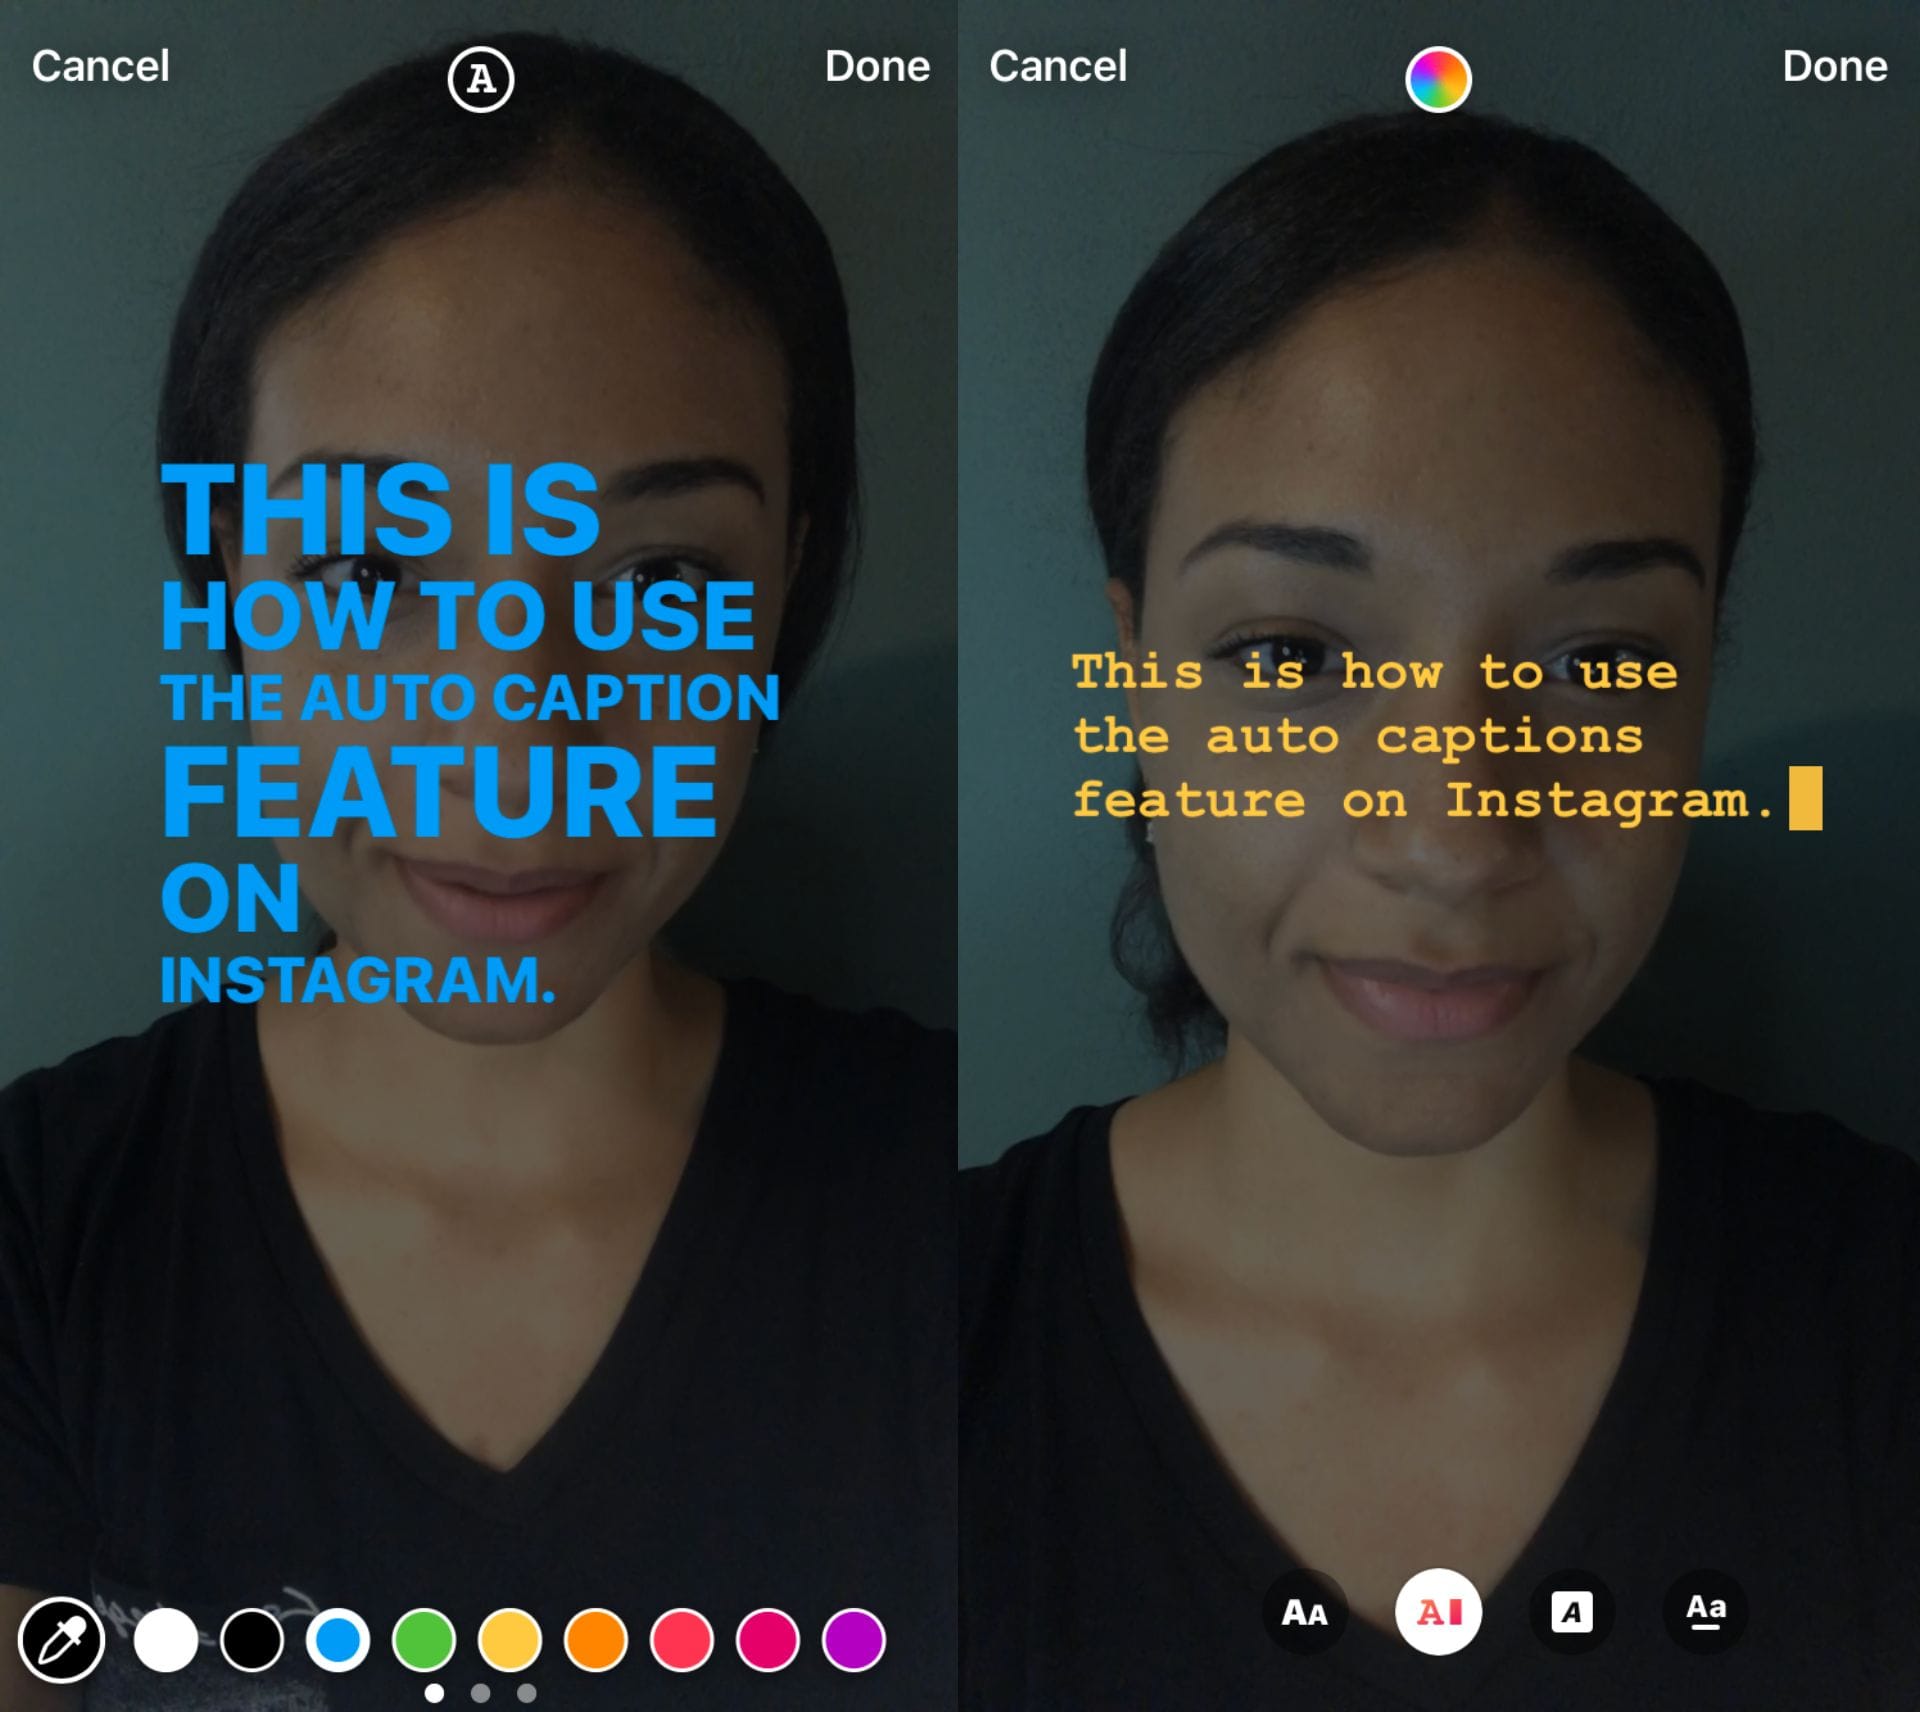
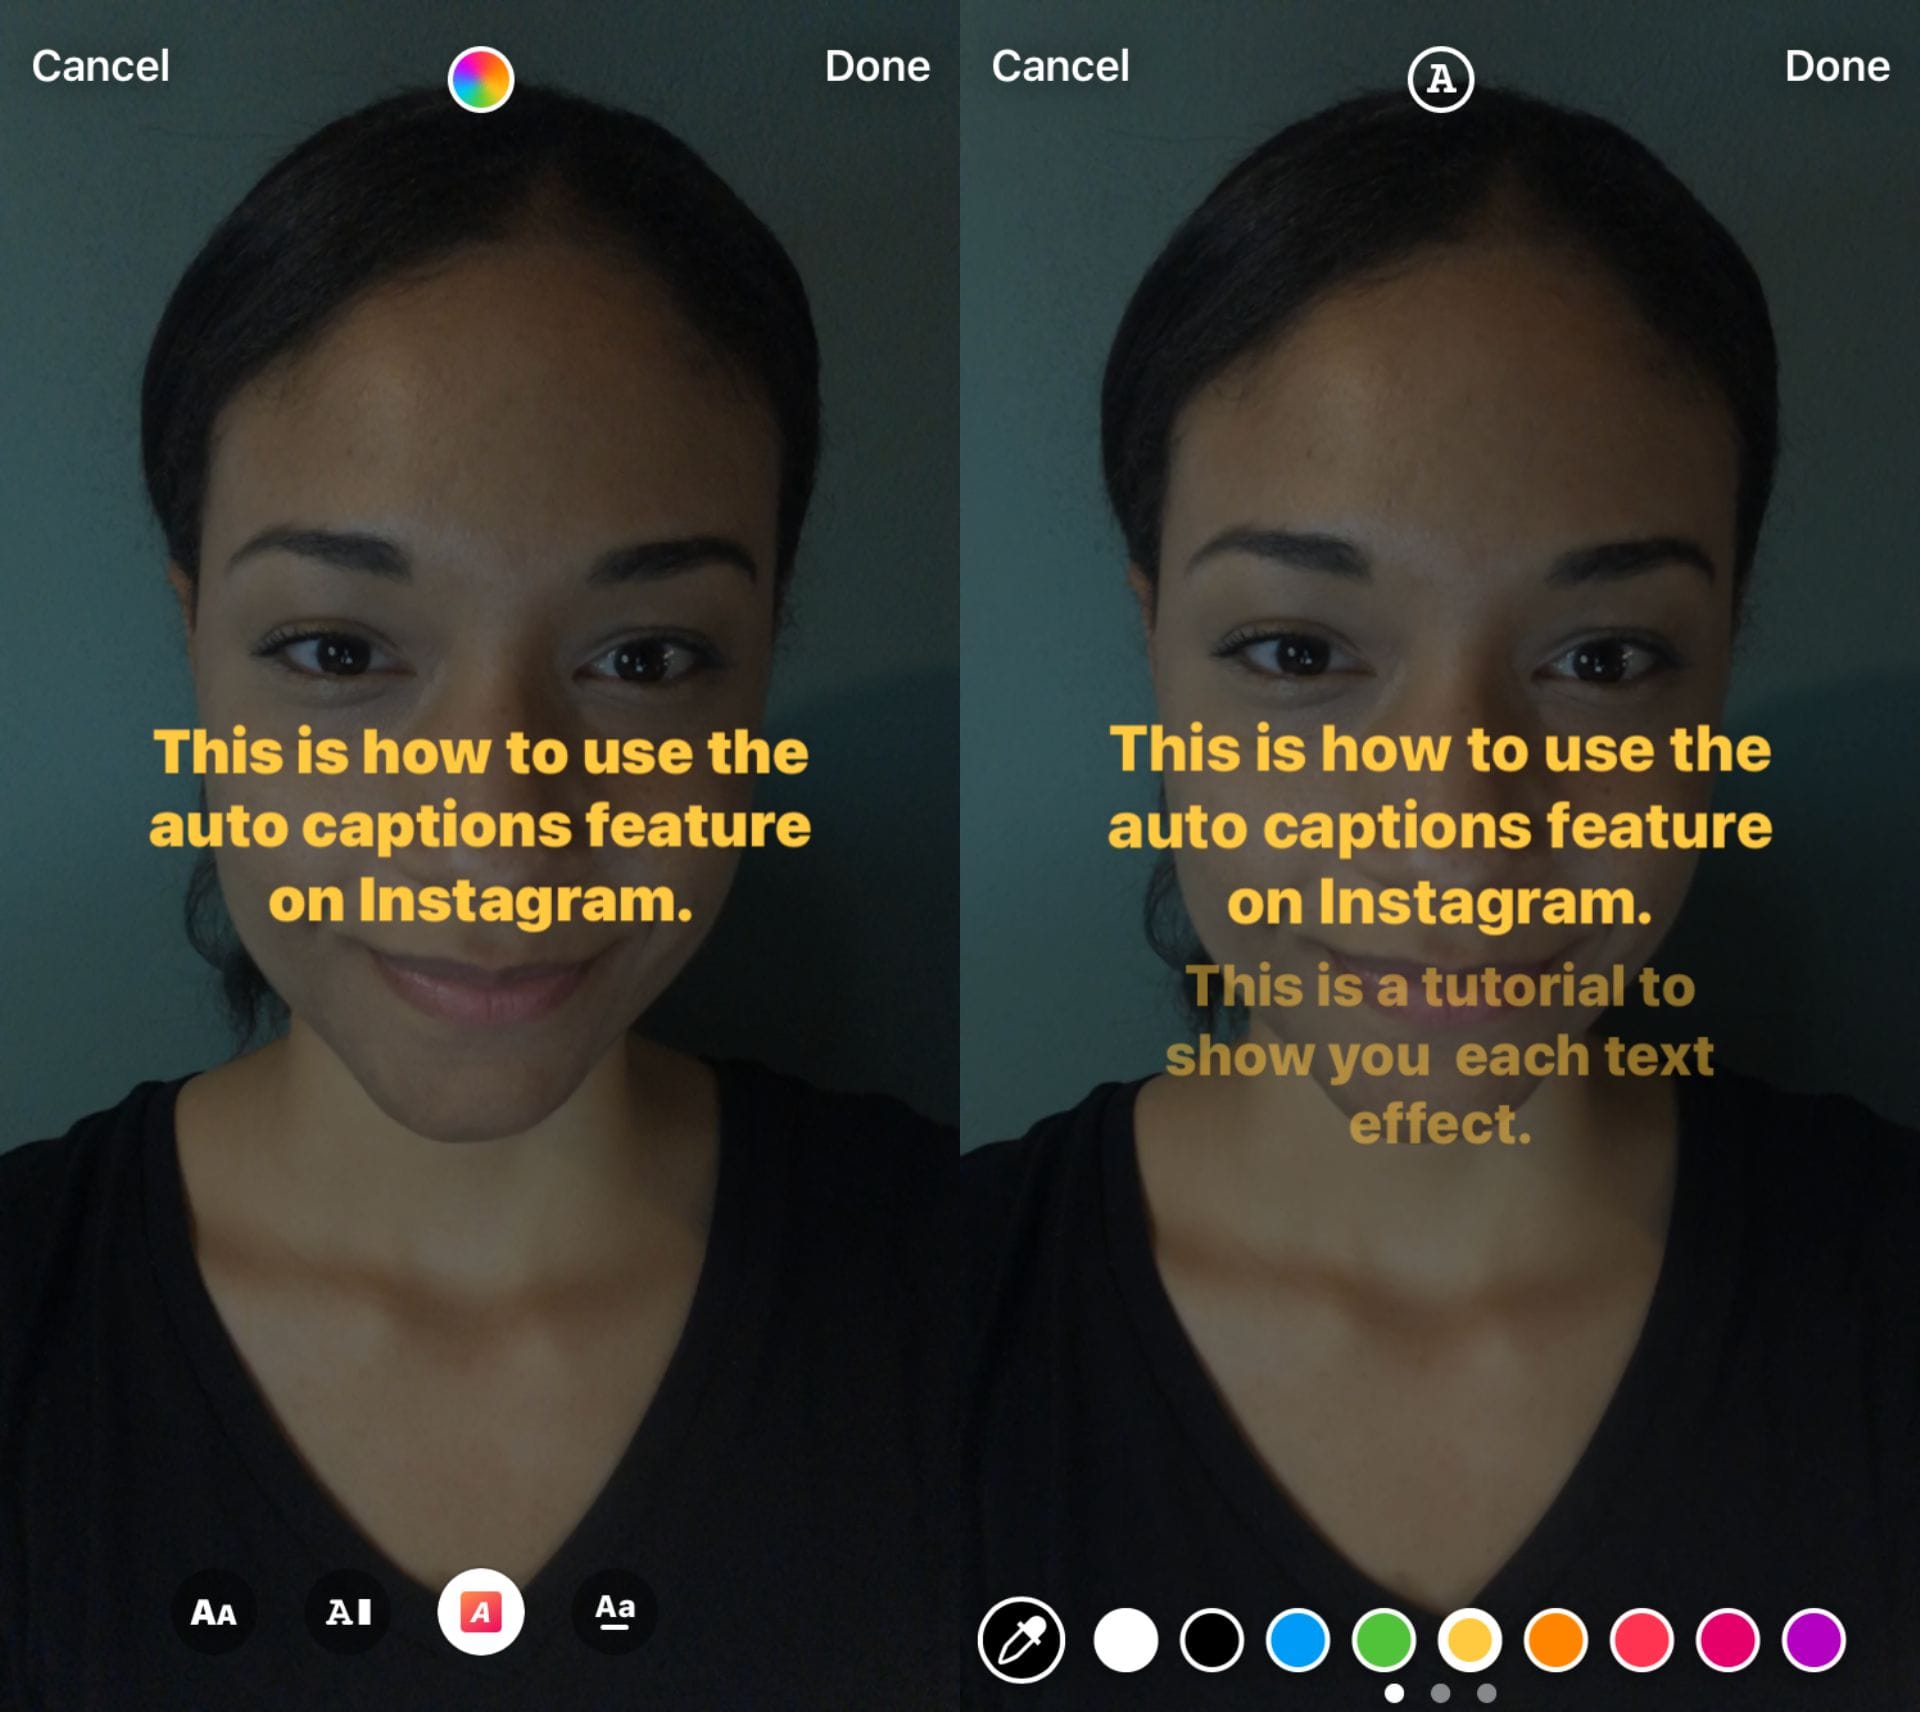
You can also change the color of your captions by tapping the color wheel at the top of the screen. There are currently 27 colors to choose from, and you select custom colors by using the color wheel at the top of the screen.
Here's a cool feature: If you select the color wheel and then tap the color dropper icon (at the bottom to the left of the standard colors), you can select any area of your video and Instagram will automatically apply the correct hex code so you can use that color as your text.
This works quite well and lets you match the text to colors that stand out in your video, and in general, makes it much easier to have your captions match the overall colors present in your Instagram Story.

There are four text effects available to let you further customize how your captions will appear in your Instagram Story—these are also located at the bottom of the screen.
The first effect causes each word to appear as you say it and then disappear when you finish a full sentence. This effect is smooth and easy to follow and might be a great pick if you're a fast talker.
The second effect is a typewriter-styled animation where each word appears one by one as it is said in the video, but the captions remain on the screen for a few moments even after you've finished speaking.
Next up is the third caption effect. With this option, the text appears instantly and then swipes upward to reveal the next sentence. This effect doesn't make the viewer wait to see what's being said, but it can be a little hard to follow if you're a fast talker or if there's a lot of dialogue in the video.
Finally, we have the fourth text effect. The final effect is similar to the previous one, but both the sentences before and after the current dialogue being spoken appear as grayed-out or low-opacity text. This effect ends up being easy to read and follow, but it tends to take over a large portion of the screen, which you may not want.
Out of these four text effects, There's no best or worst effect as you'll want to choose the one that works best with your video and overall brand. If none of these options work for you, Kapwing's Video Caption Generator features many more built-in styles to try—which we'll cover in the section below.
Lastly, you can apply a background color to all of these caption effects by selecting the "A✨" right next to the text icon itself at the top of the screen. If you select a dark background, Instagram will automatically apply a light color for the text, and vice-versa.
What if you don't have the captions sticker on Instagram?
Many people still report not having access to the captions sticker on their Instagram accounts. This seems to be most common with new accounts that haven't posted before or haven't posted much, but there's been little guidance from Instagram around which accounts have and do not have access to this feature, or what an account should do to get access.
So unfortunately, the answer to "What should you do?" is to post more often and hope you get access, or simply use other tools to create your captions and subtitles. If you're not keen on the wait-and-see approach, we have a few options for you below.
How else can you add captions on Instagram?
Can't find the sticker in your Instagram Stories? Your best options are one of the following:
1. Add the captions manually
It's certainly not as magical as auto-captions and will be kind of a chore if there's lots of dialogue, but you always have the option of applying manual captions. You'll now need to open up the captions feature, not the captions sticker, by tapping the "Aa" icon and then type your captions out word by word.
You can also do what most Instagram users do, which is to not write word-by-word captions and instead write a summary of what's happening or what's being said. But this isn't a great solution for accessibility or for anyone who may be watching on mute. If this isn't a good enough solution, keep reading.
2. Turn on auto-captions for Reels and Posts
Note that this is only for people who would like to see captions on the videos and Stories they watch, not the videos they make.
To turn captions on across the entire platform, head to your profile and then click the dropdown in the top right (☰), and then tap Settings and privacy. From here, scroll down to Accessibility and then tap on Captions. Tap the toggle to turn captions on and from here on out, Instagram will display auto-generated closed captions for all video posts. You can also select your preferred language for captions from this screen as well.
Note that unfortunately, this setting does not apply to Stories, only to Reels and video posts on Instagram.
3. Create custom captions with other tools
The best option for creating auto-generated captions that you actually apply to your Instagram Stories is to use a tool outside of Instagram to add your captions, and then upload your final video as a Story.
In the section below, we'll show you how to do this with Kapwing's Magic Subtitles tool, which applies automatic captions in just a single click and is available in over 75+ languages.
How to create custom captions for Instagram Stories
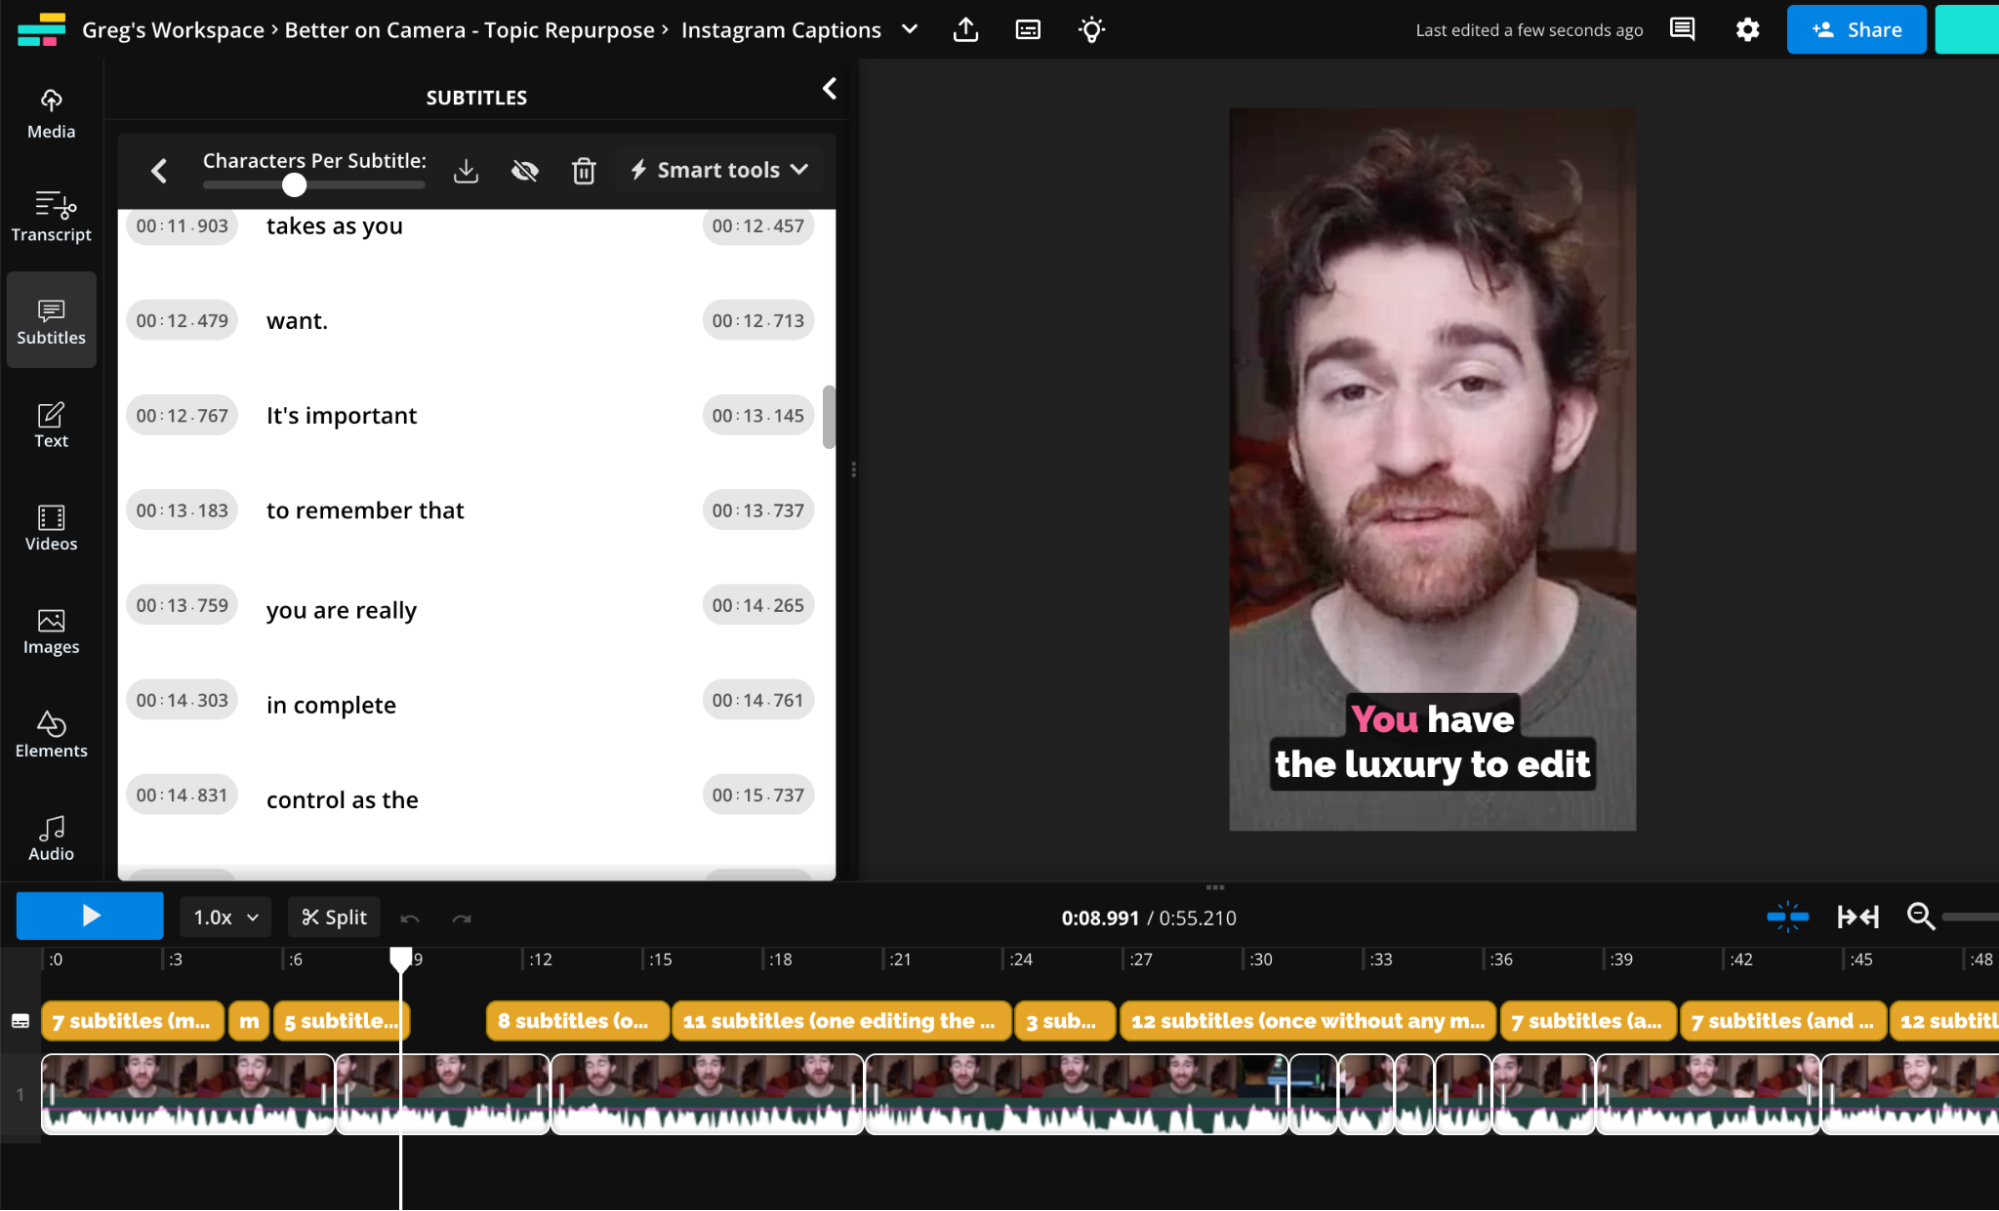
We’re using Kapwing's AI-powered caption generator, which you can access from our video editor on any device. Let's use a recent video we made to show how you can create customizable subtitles and captions for Instagram Stories.
1. Upload your Instagram Story to Kapwing
Head over to Kapwing's Auto Subtitle Generator or jump directly into the editor to get started.
First, upload the video or footage you'd like to publish as an Instagram Story—you can either upload the file from any device or pastea link to an existing video, such as a YouTube video. Your video file will then load into the Kapwing editor.
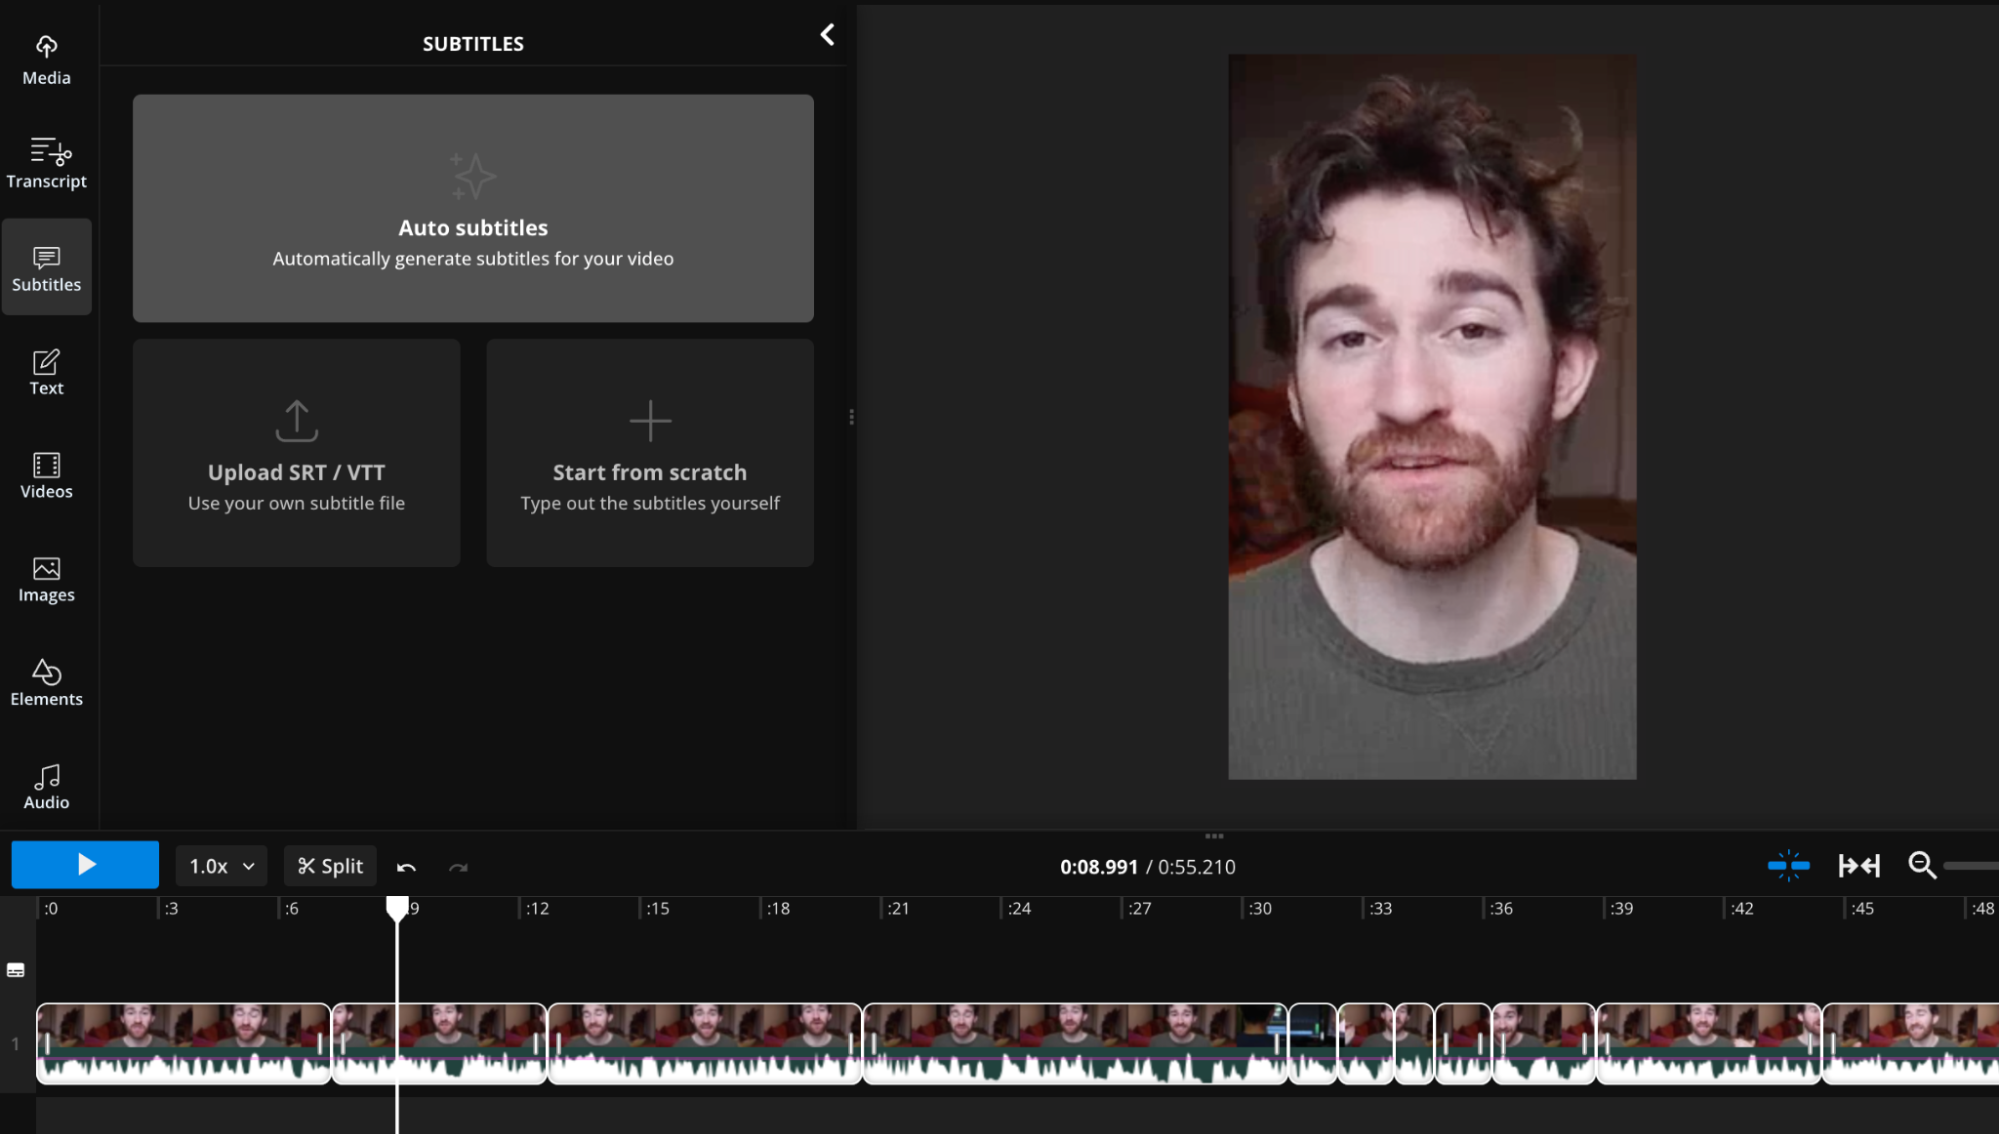
2. Auto-generate captions for your Story
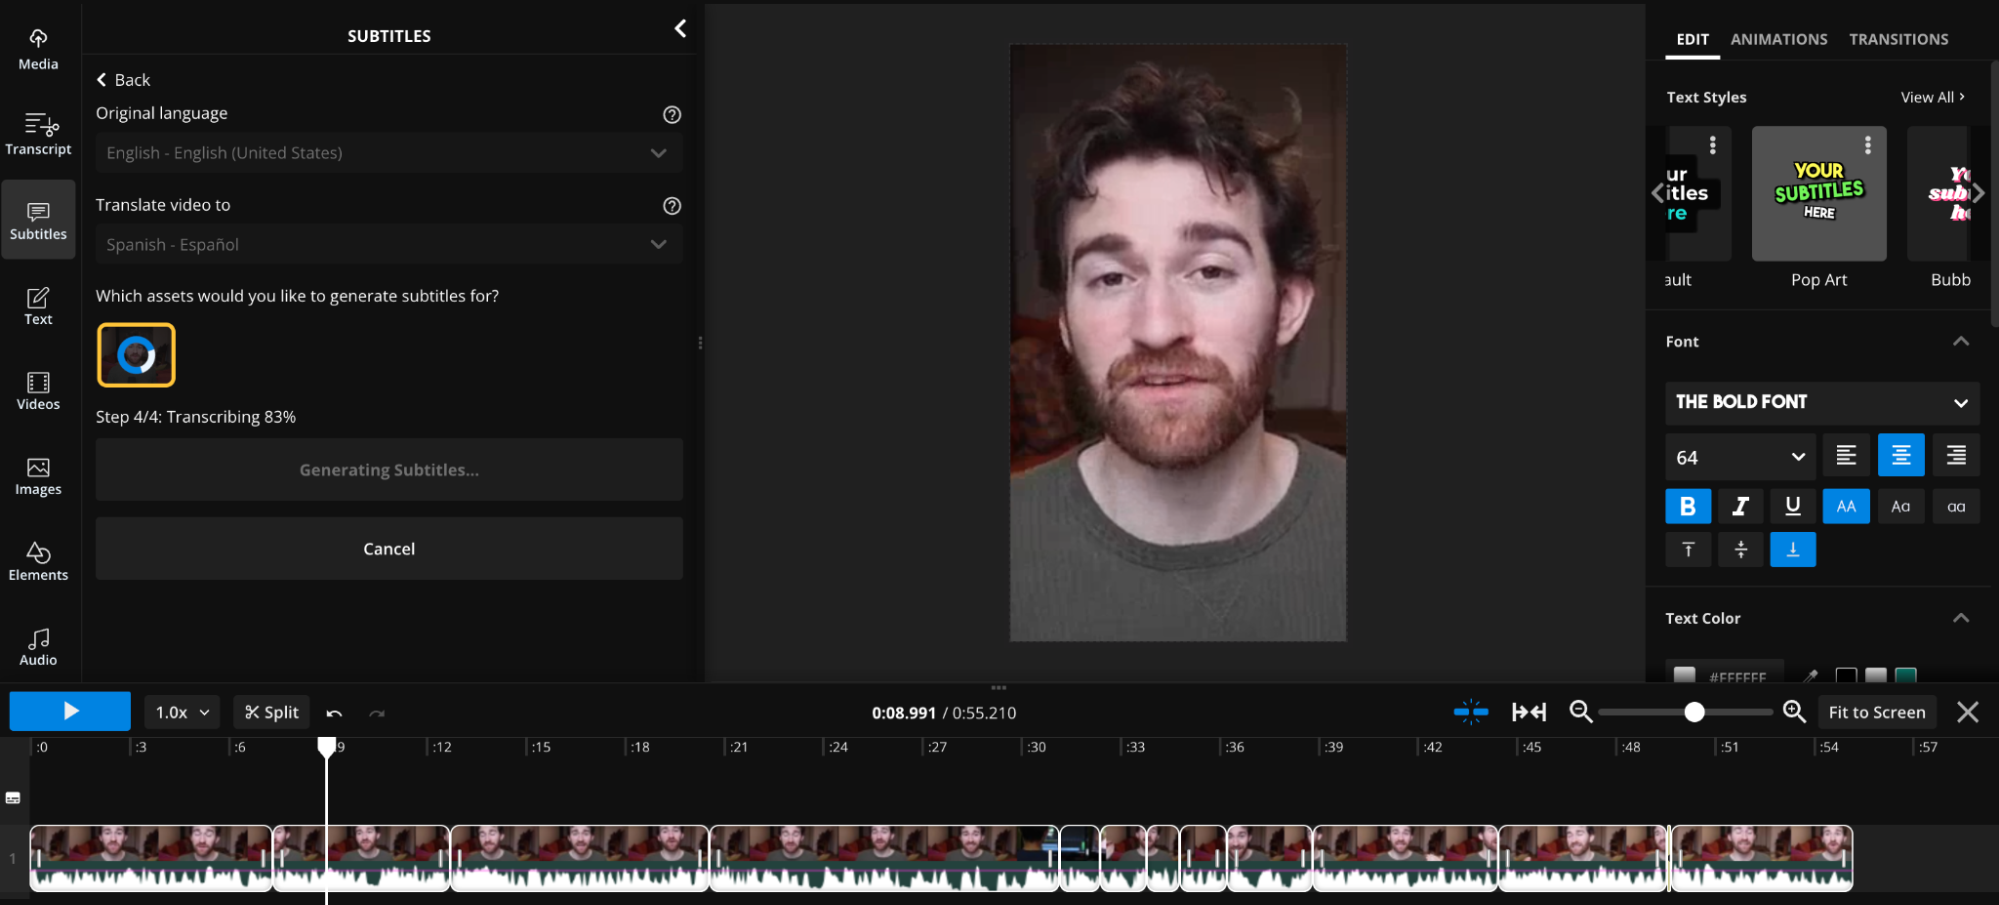
Then, select the Subtitles option from the right sidebar and click on the Auto subtitles option that appears. Your captions/subtitles will now be automatically created based on the dialogue or narration in your video.
This process just takes a few seconds depending on the length of your video footage. Remember that you can also choose which language you'd like your subtitles to appear in by using our Subtitle Translator.
3. Edit and customize the captions for your Story
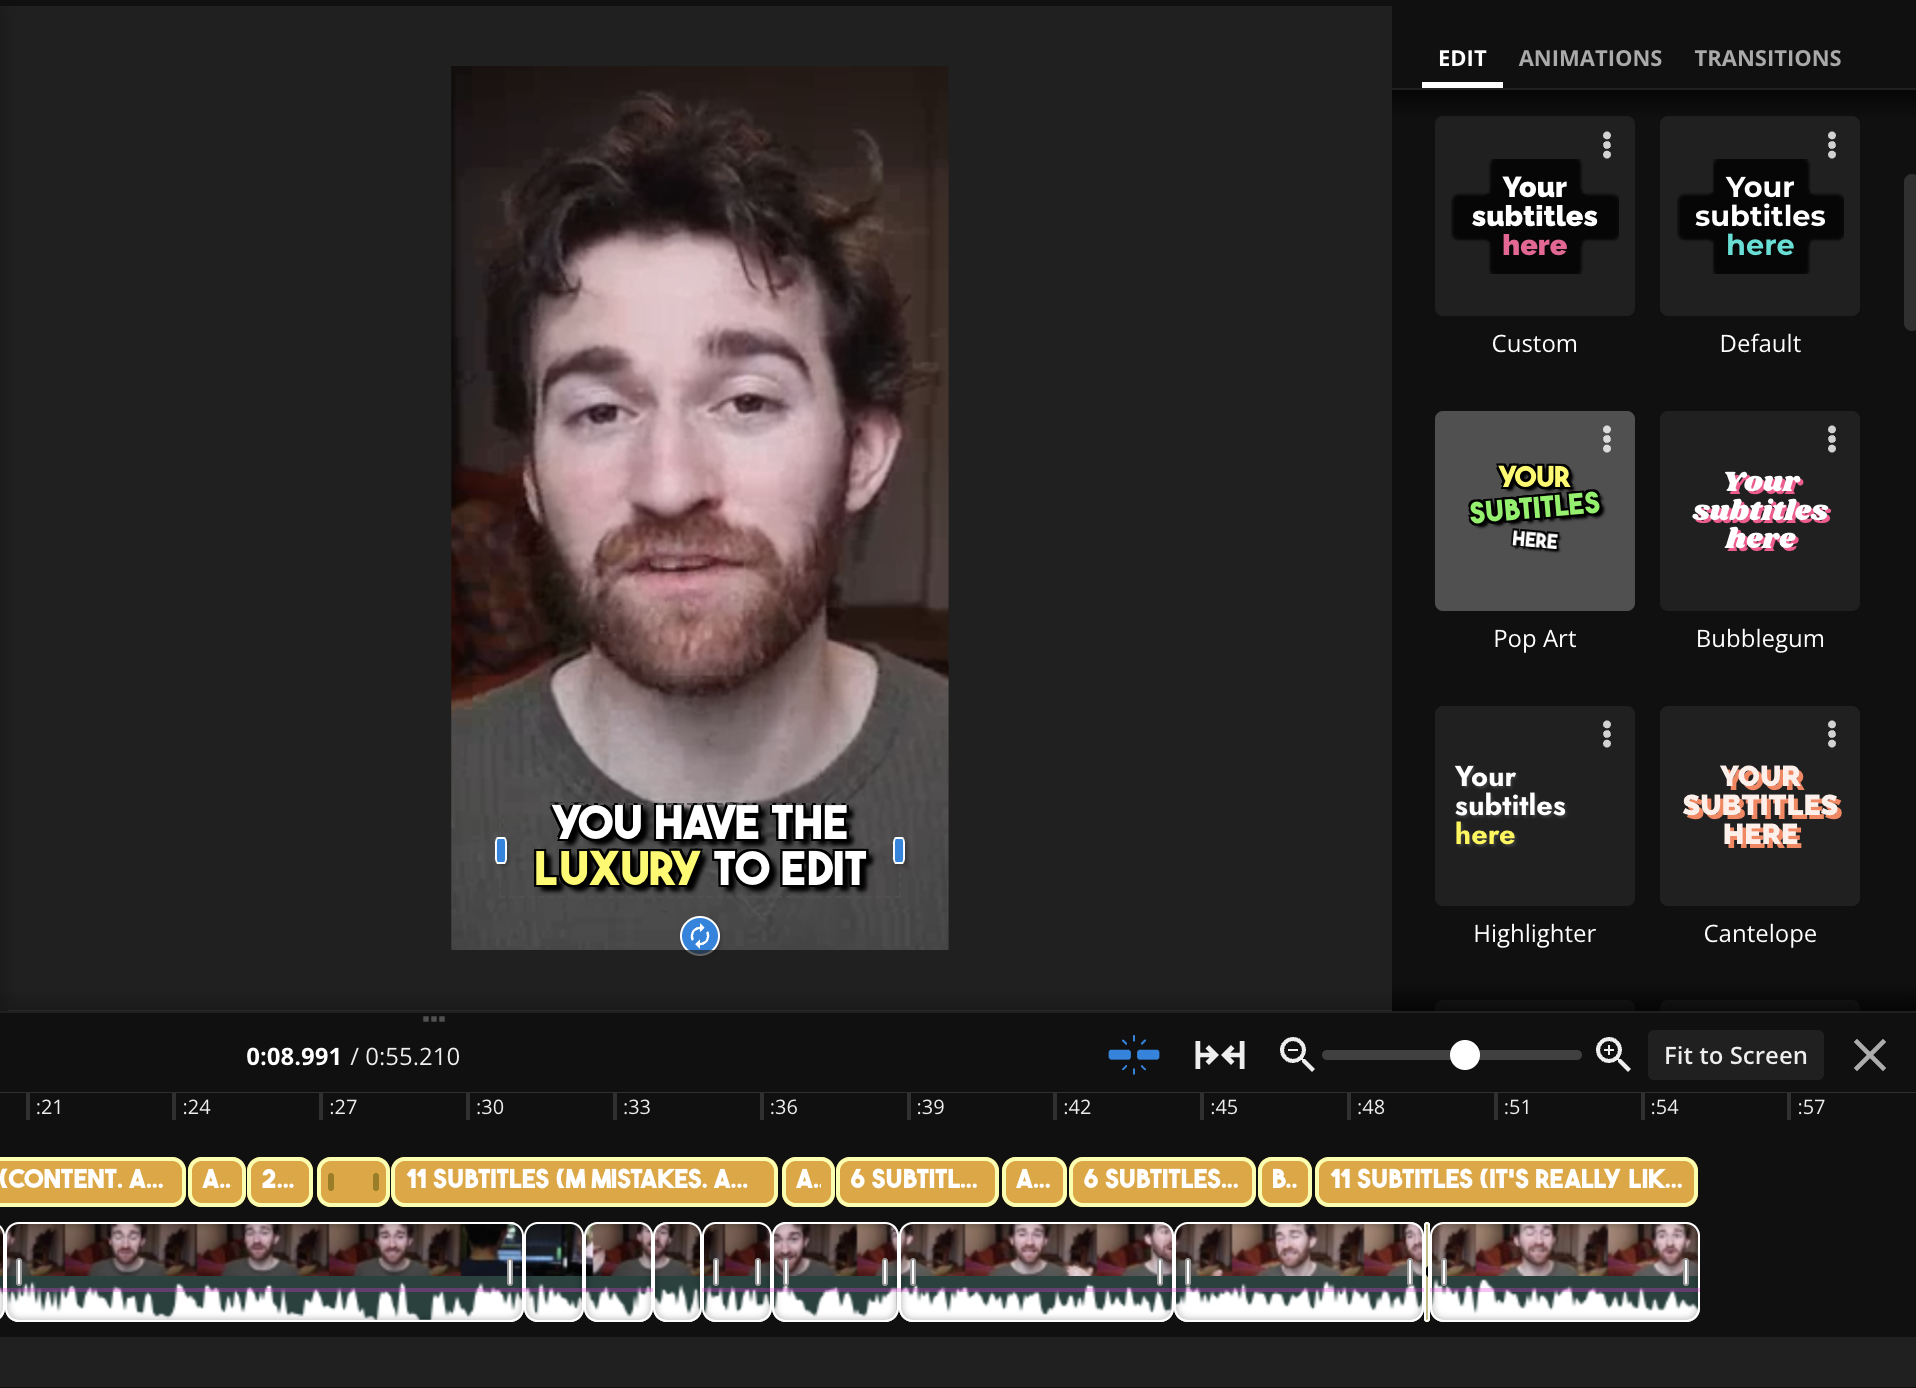
Now comes the fun part. Once your subtitles are generated, click on them in your video and head to the right sidebar to customize the colors, fonts, backgrounds, and more. You can even choose from a number of built-in subtitle styles and custom animations.
Did a word get misspelled in your subtitles? That happens most often with the names of people or brands and products. You can access the subtitle editor by selecting your subtitles, then you can simply search or scroll to find the misspelled word and fix it by editing your captions directly.
If you create a lot of videos with subtitles, try using Kapwing's Custom Spelling feature to include commonly misspelled words—after you add these words and their proper spelling to Kapwing, we'll automatically locate and fix them in future subtitles you generate.
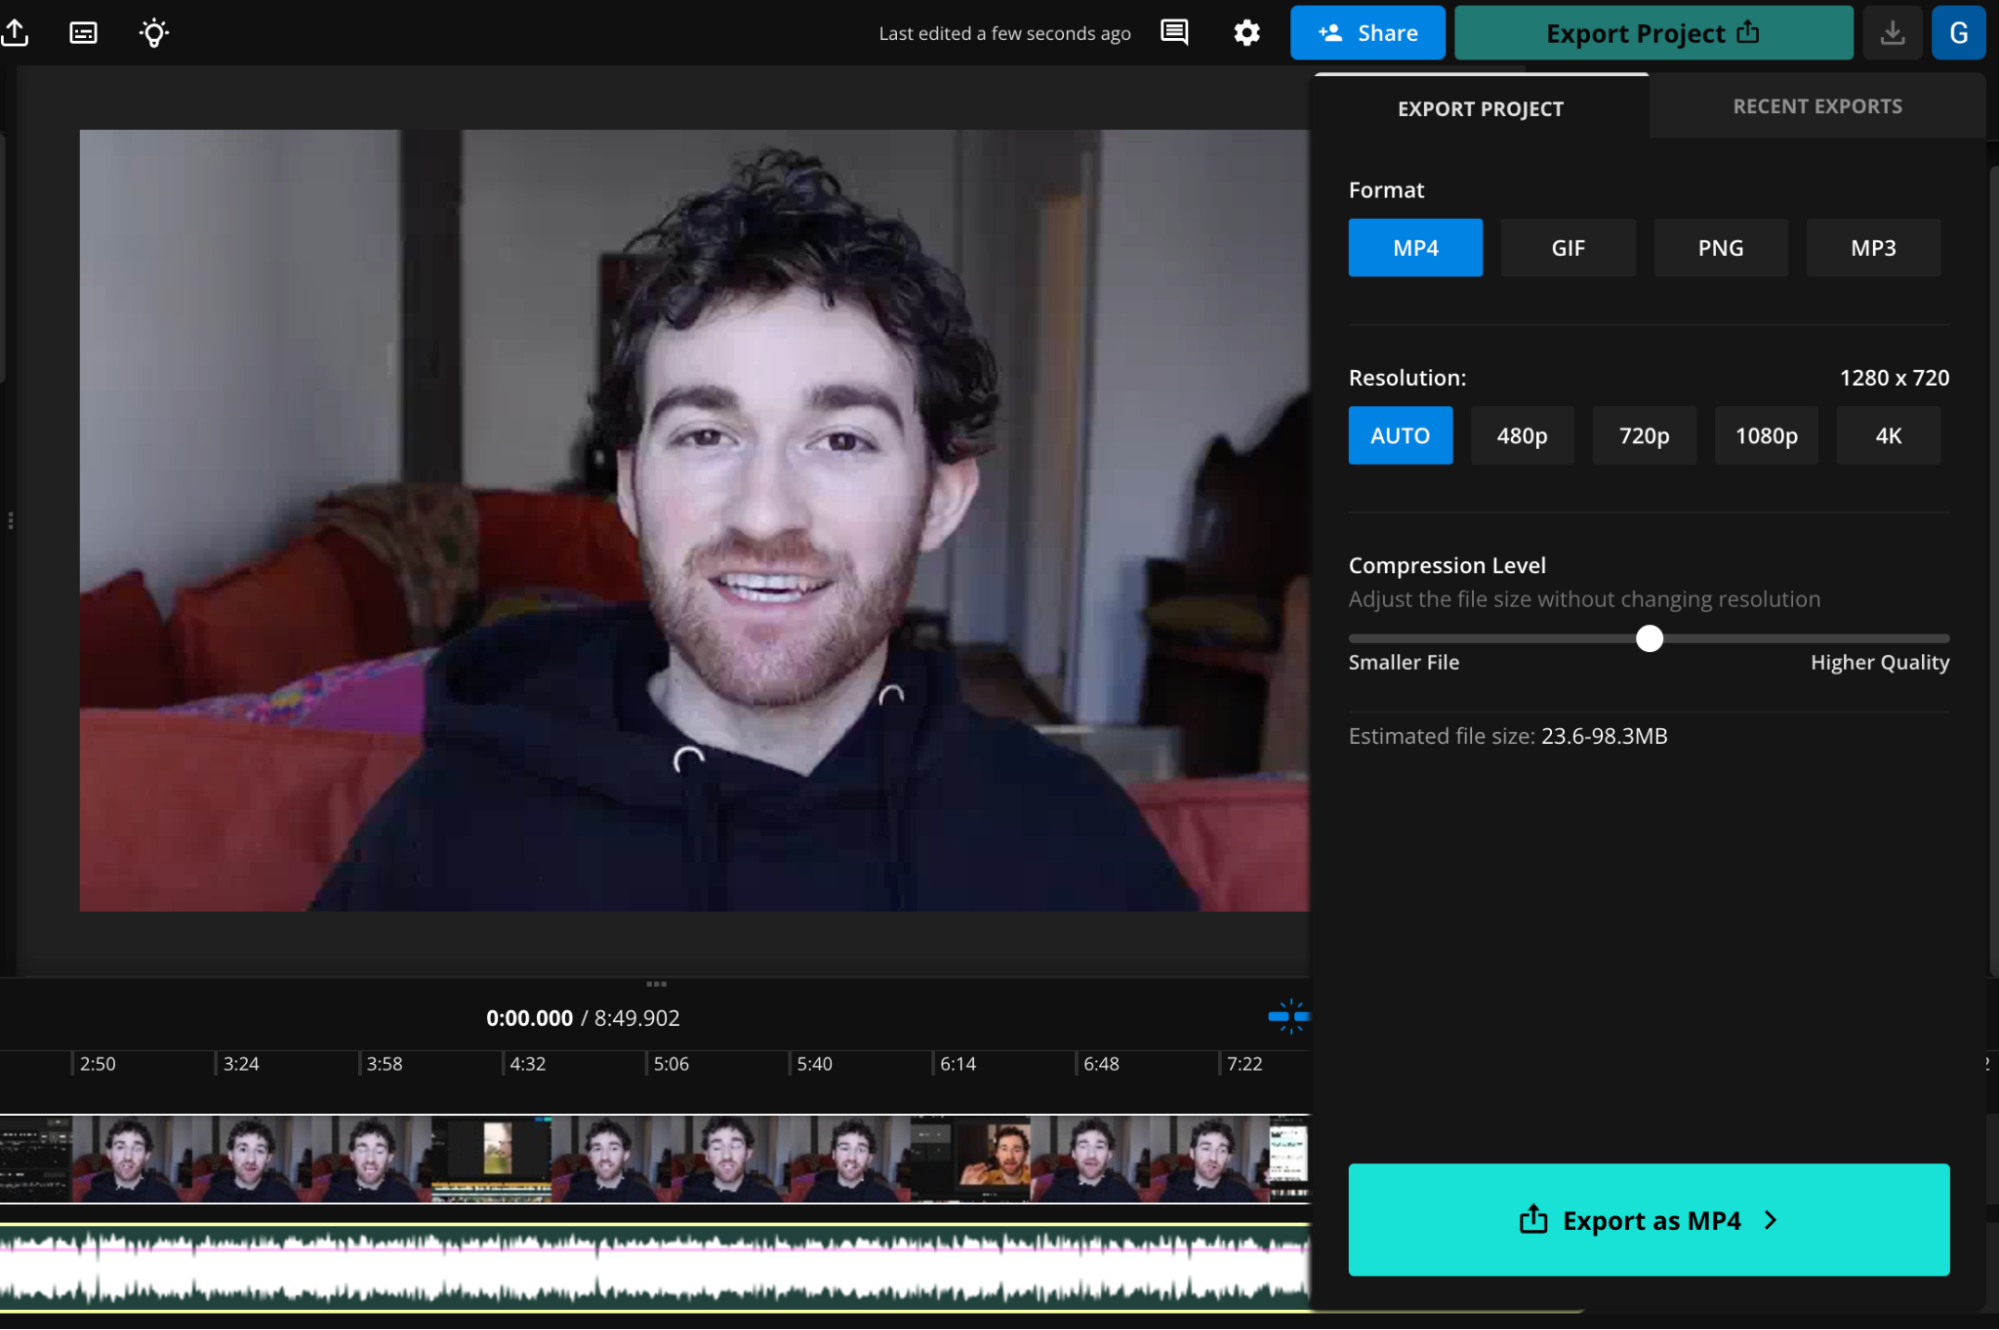
4. Export your Story and share it on Instagram
Once you're happy with your customized subtitles, click on the "Export Project" button at the top of the Kapwing editor. You can now export and download your video to share it as an Instagram Story.
Captions are essential for Instagram
The auto-caption sticker on Instagram is good, but it has a few notable shortcomings and hasn't been meaningfully updated for quite a while. The four text effects are stylish but limited, especially since you can't customize the fonts. And the feature still has limited language availability, too.
If you need more than what the captions sticker offers, or if it's simply not available in your account, your best option is to auto-generate your captions with a tool outside of Instagram, then upload your final video as a Story. Feel free to reach out to our team if you need any additional help.
Captions and subtitles are must-haves for short-form video content, as so many people rely on them. So no matter which option you go with, captions and subtitles are worth the effort—and your viewers will thank you, too.
Read these next: