
How to Edit Videos Using Kapwing (2026): A Complete Beginner's Guide
More than 1.3 million users create projects on Kapwing every month.
Video has become the most popular form of online content, driven by the rise of short-form platforms like TikTok, which reached an estimated 1.88 billion monthly active users in 2025. Instagram has also adapted its platform to prioritize video, redesigning its interface to make Reels a central part of the user experience.
As a result, videos are no longer just a "nice-to-have". Knowing how to edit them is now a crucial skill not just for professional creators, but for marketers, entrepreneurs, educators, and anyone looking to connect with an audience online.
Fortunately, you don’t need to be a professional to get started. Kapwing’s online video editor simplifies the process. In this guide, you'll learn exactly how to edit videos using Kapwing, with step-by-step workflows for creating a new video from scratch, repurposing existing content, and generating new videos using AI-powered tools like Kai.
Table of Contents:
- How to Edit a Video With Kapwing
- How to Repurpose an Existing Video
- How to Generate a Video With AI
- Tips for Better Video Editing as a Beginner
- Frequently Asked Questions
How to Edit a Video With Kapwing
There are a few different ways to create videos using Kapwing, depending on what you’re starting with:
- Editing from scratch with (focus of this section)
- Repurposing an existing video for a different format or platform
- Generating a new video using AI tools
In this section, we’ll focus on editing a video from scratch. This workflow is ideal for when you're starting with unedited clips and want full creative control over how your video comes together.
Step 1: Record Your Content
Before you start editing, you’ll need video clips to work with. Recording with editing in mind can save time and make the process smoother.
Here are a few ways to make editing easier before you even hit record:
- Audio Quality:
While most modern smartphones have great cameras, their microphones are often not designed for high-quality recordings. Even with great visuals, poor sound can make a video hard to watch.
Using good equipment, like an external mic will dramatically improve clarity. For the best results, record your audio separately and then synch it. - Optimize Your Setup:
Choose a quiet, well-lit space to record. Natural light is ideal, but a simple ring light or softbox can help if you're indoors. Aim for a background that looks clean and intentional, but not distracting. - Plan What You’re Going to Say
Being on camera can feel awkward at first. Planning helps. Create a script before recording so you’re not improvising everything on the spot.
Step 2: Make A Rough Cut
A rough cut is your video’s first full draft, with all clips in the right order and any unusable parts (like long pauses or mistakes) removed. Rough cuts are important because they give you a strong foundation to build on and makes the rest of the editing process much smoother.
This step can be time-consuming if done manually, requiring you to trim, cut, and organize each clip by hand. Fortunately, the Auto-Edit tool takes care of a lot of that work for you, automatically removing silences, filler words, and bad takes.
Here's how to use it:
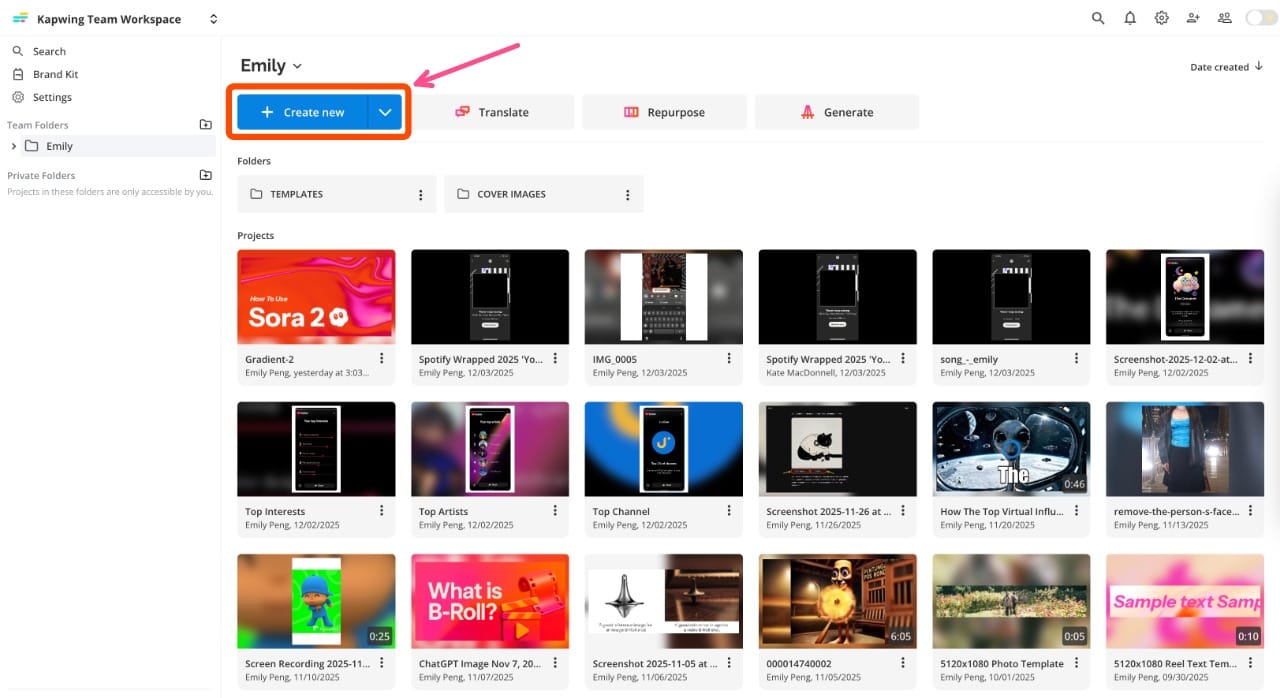
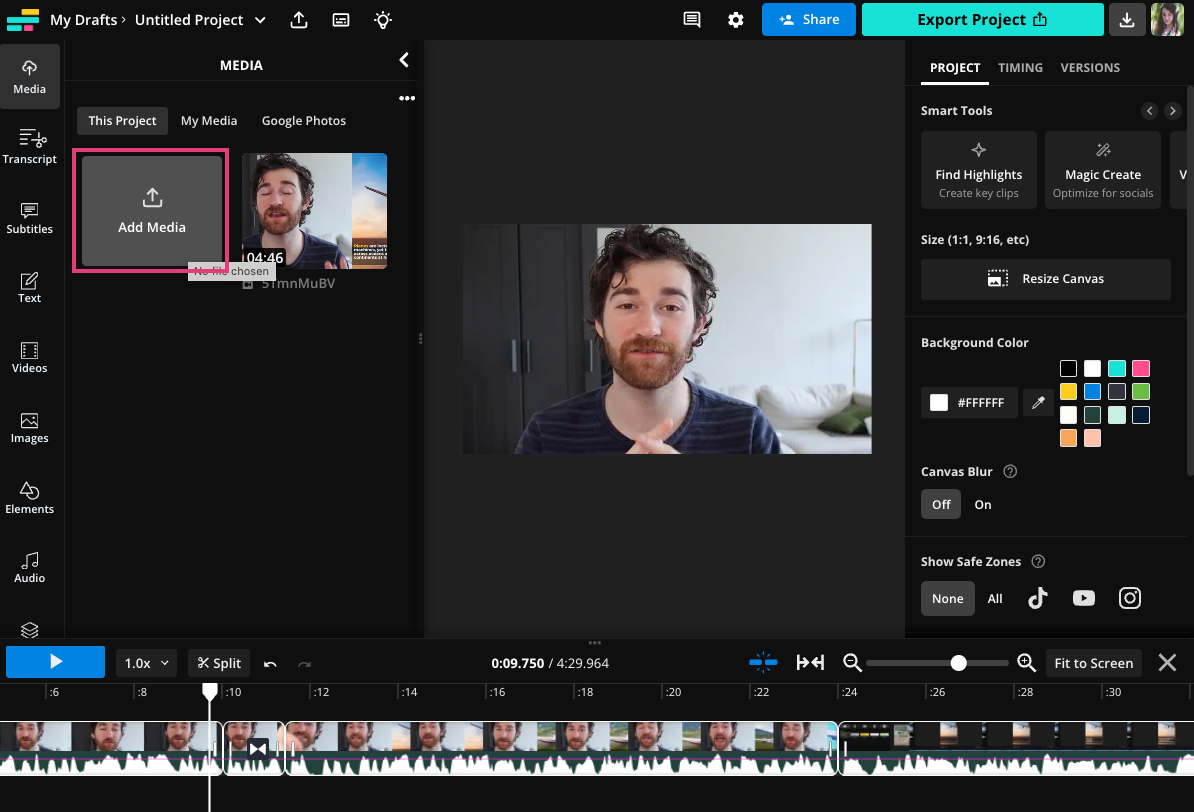
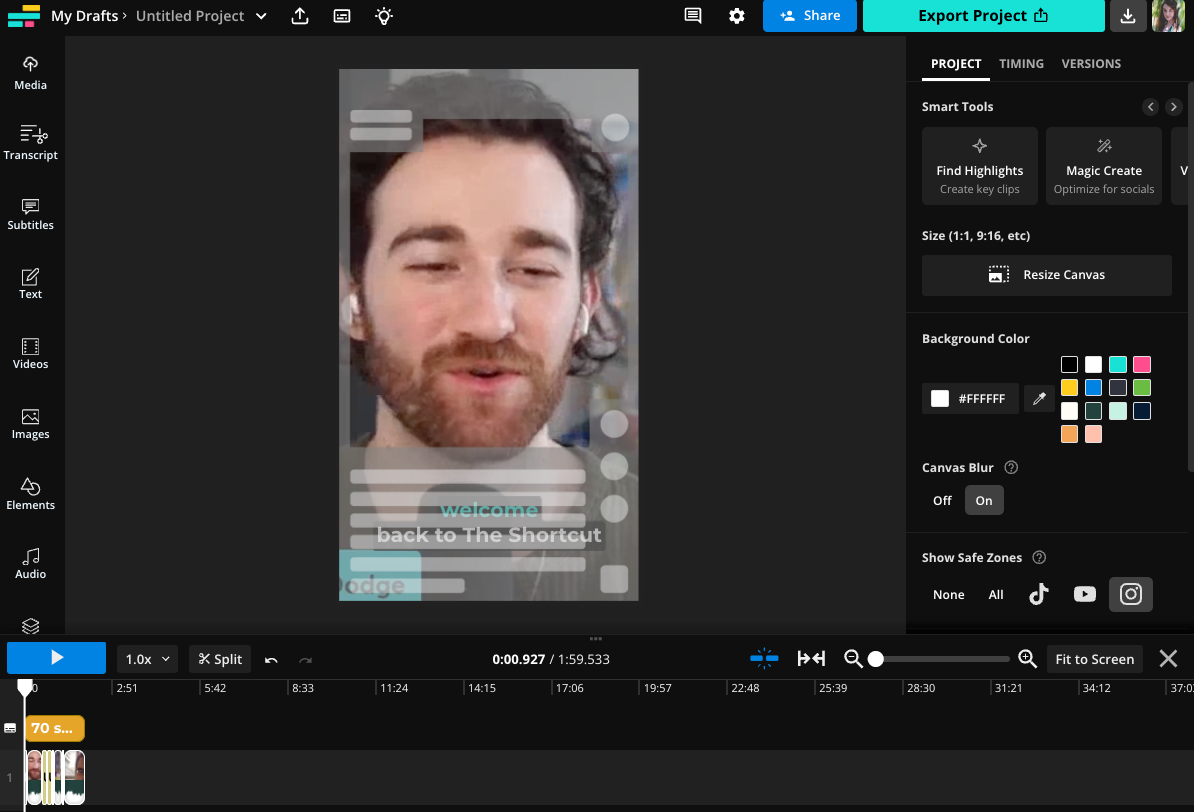
Begin by uploading your footage. Click the “Create New” button at the top of your workspace to start a new project. From there, you can upload video files directly from your device or import them using a link.
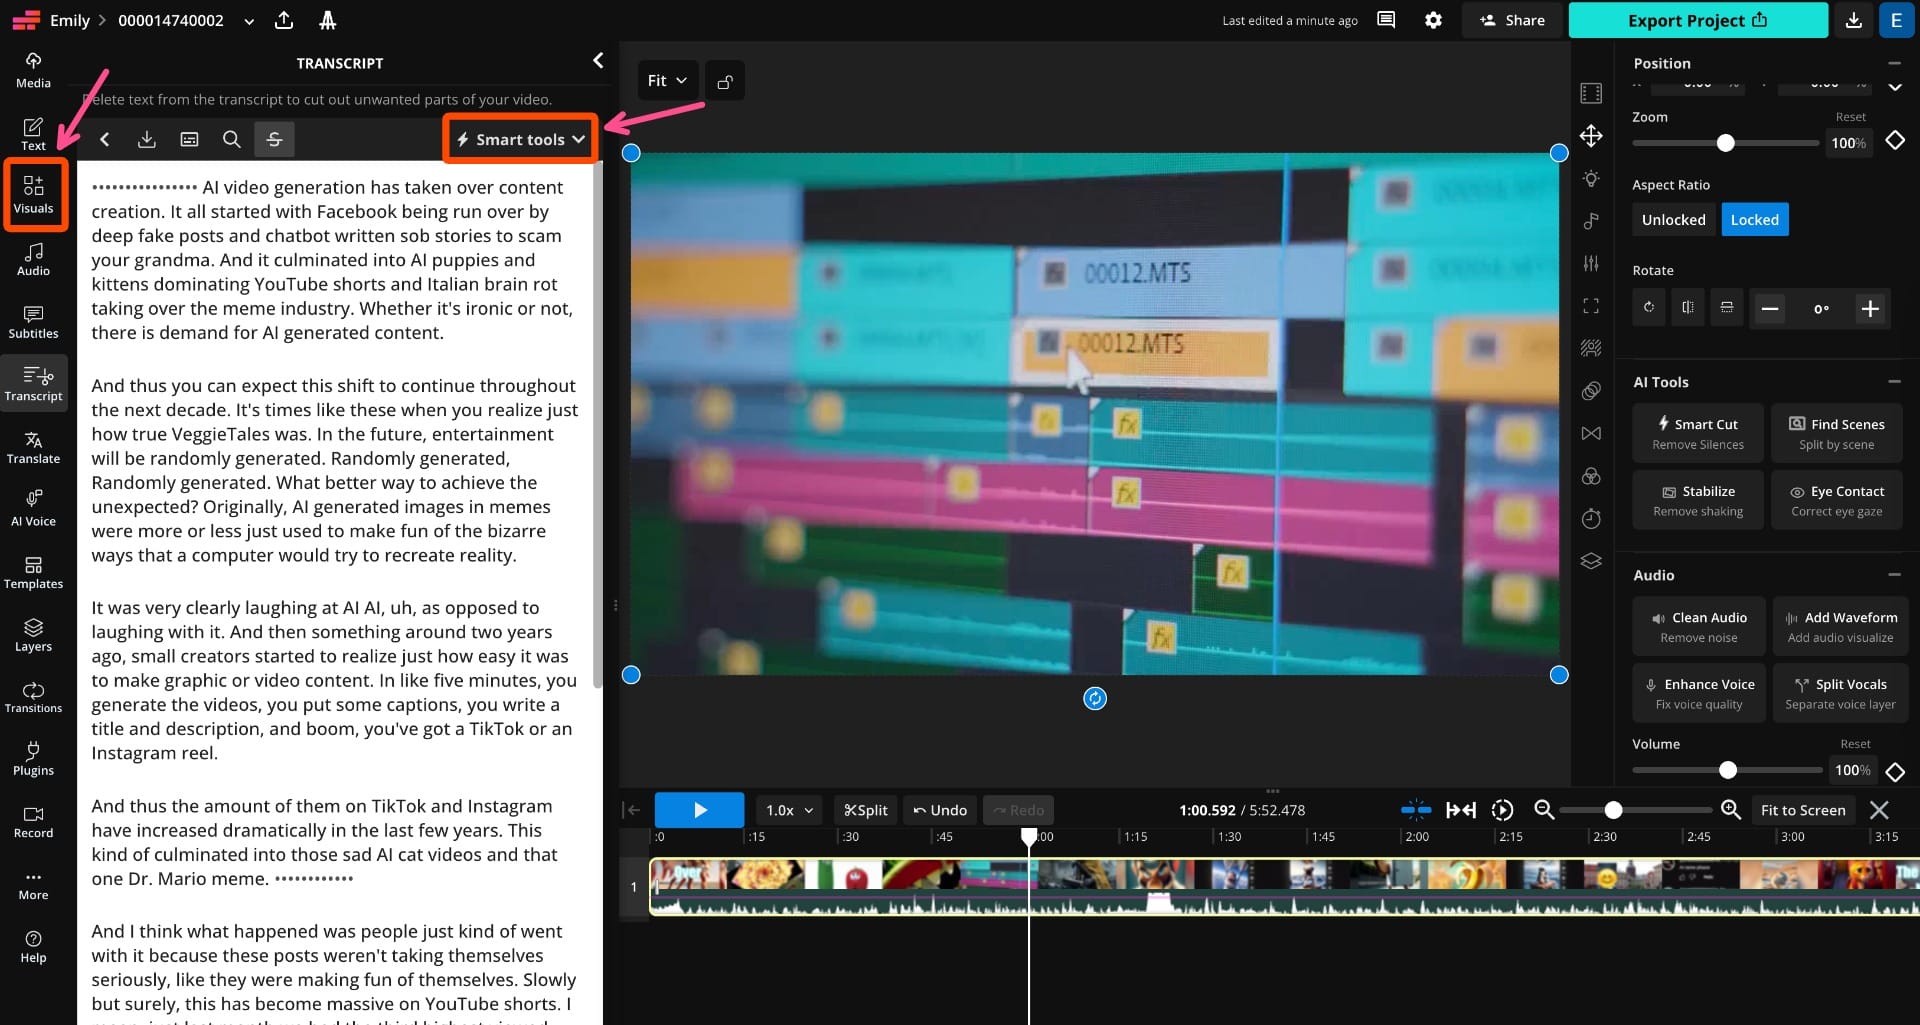
Next, arrange your video clips in the correct order on the timeline. Once your clips are in place, click the “Transcript” tab in the left-hand toolbar. This will generate a full transcript of your video.
You can edit the transcript manually, deleting words or lines will also trim those sections from the video itself. However, to speed things up, open the “Smart Tools” menu in the top-right corner and select “Auto-Edit” from the dropdown.
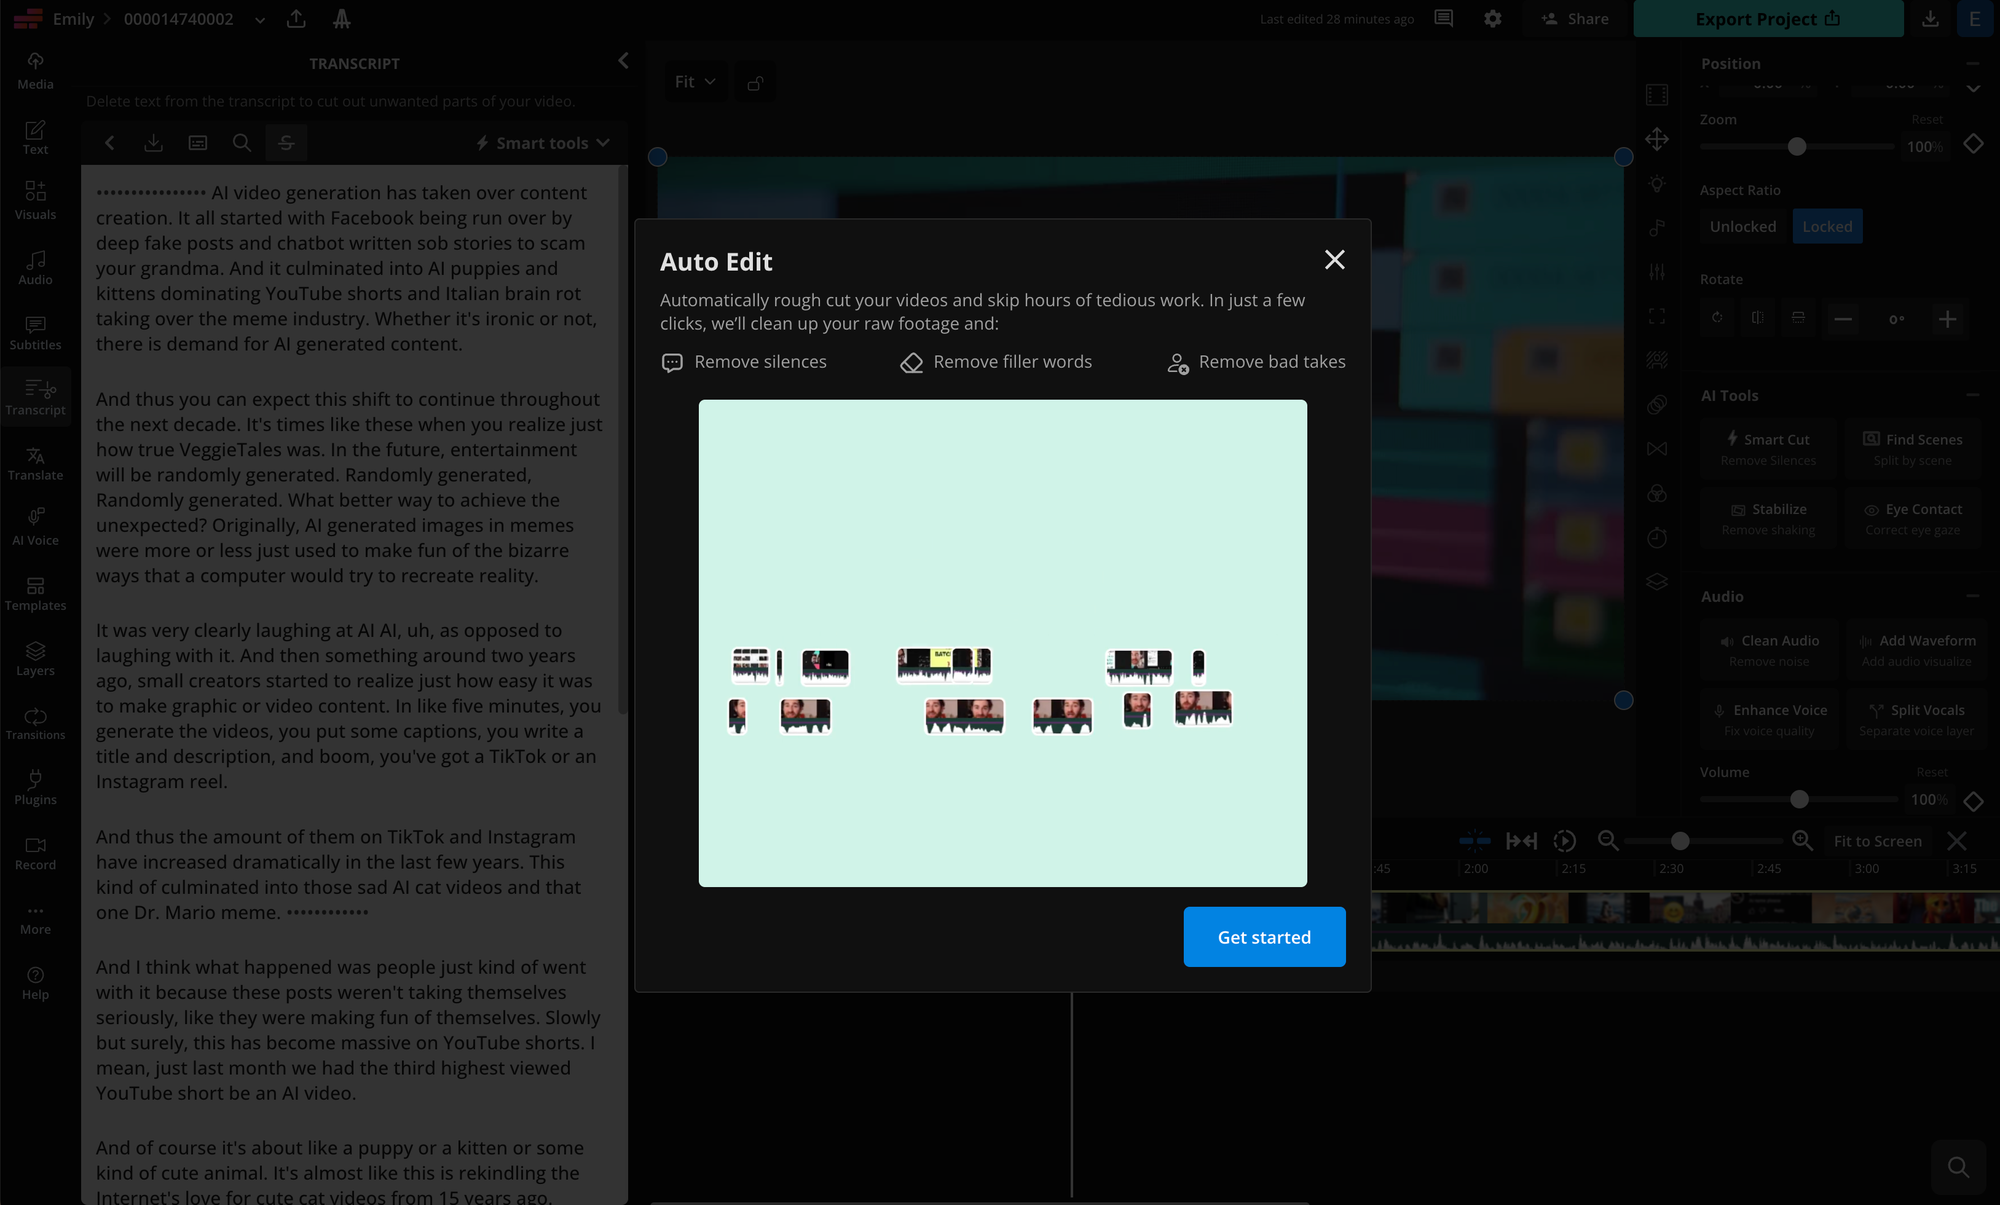
This will open a pop-up where you’ll be prompted to select the language spoken in your video. Once selected, Kapwing will automatically remove silences, filler words, and bad takes.
After processing, the video in your timeline will be trimmed into smaller segments, giving you a cleaner, more streamlined rough cut to build from.
Step 3: Add Subtitles or Voiceover
Subtitles and voiceovers both make your video more engaging, inclusive, and platform-ready. Subtitles make content more accessible, not only for viewers who are hard of hearing, but multilingual audiences and anyone watching without sound. Voiceovers provide narration and clarify visuals.
Here’s how to add them:
Subtitles
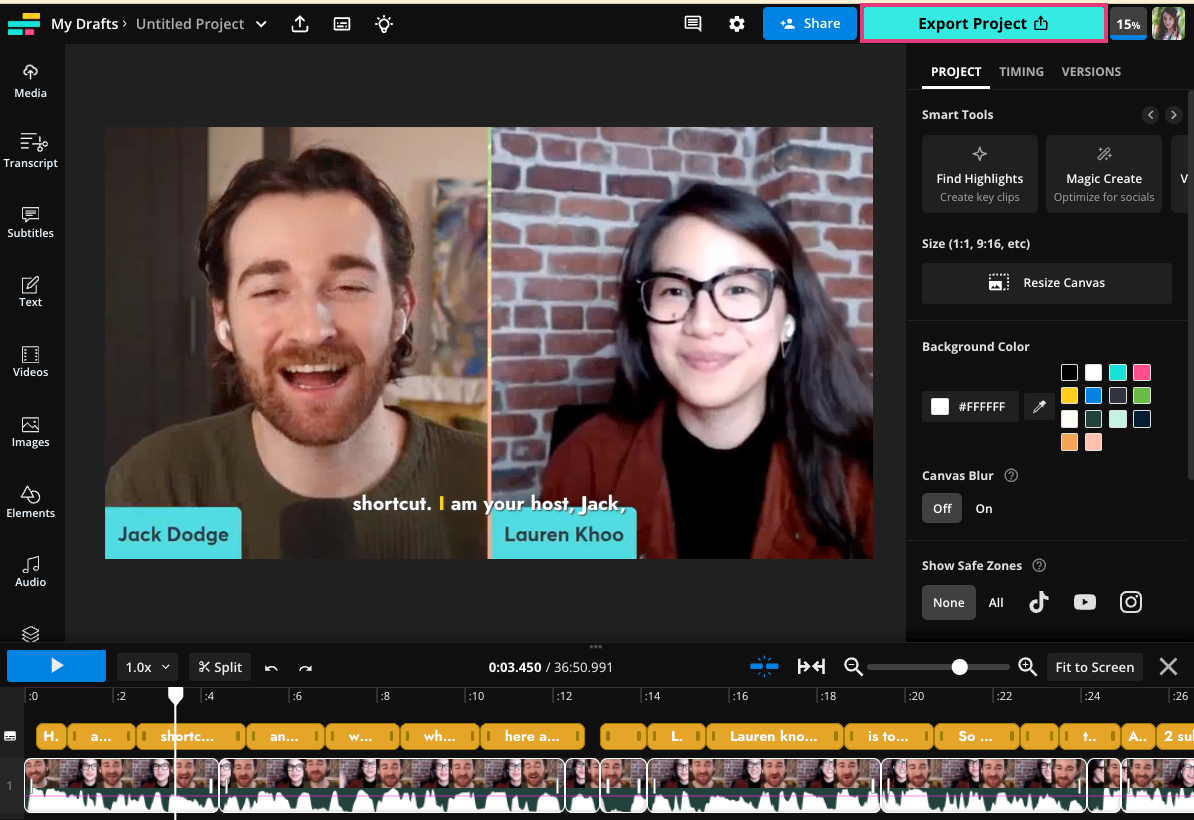
Kapwing makes it easy to add subtitles to your video, whether you already have a subtitle file (SRT or VTT) or want to generate them automatically.
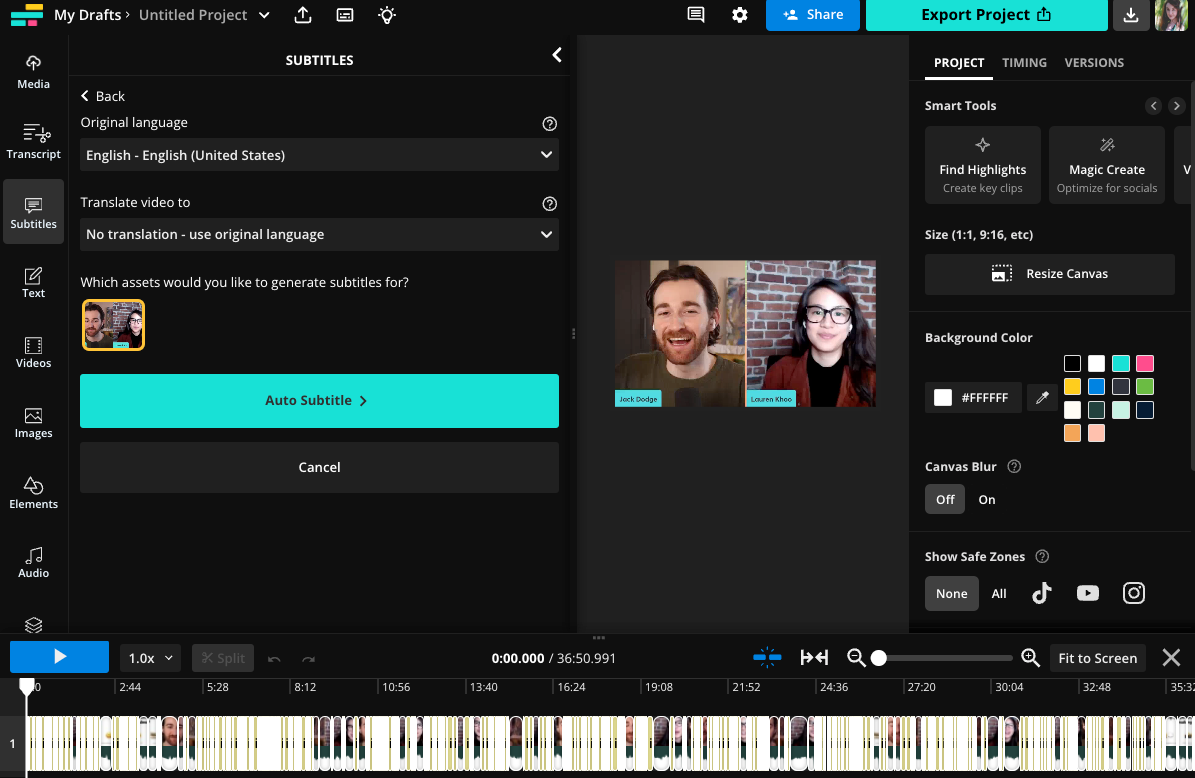
To begin, click “Subtitles” in the left-hand toolbar. You can either upload a subtitle file or select “Auto Subtitles” to generate them using Kapwing’s AI.
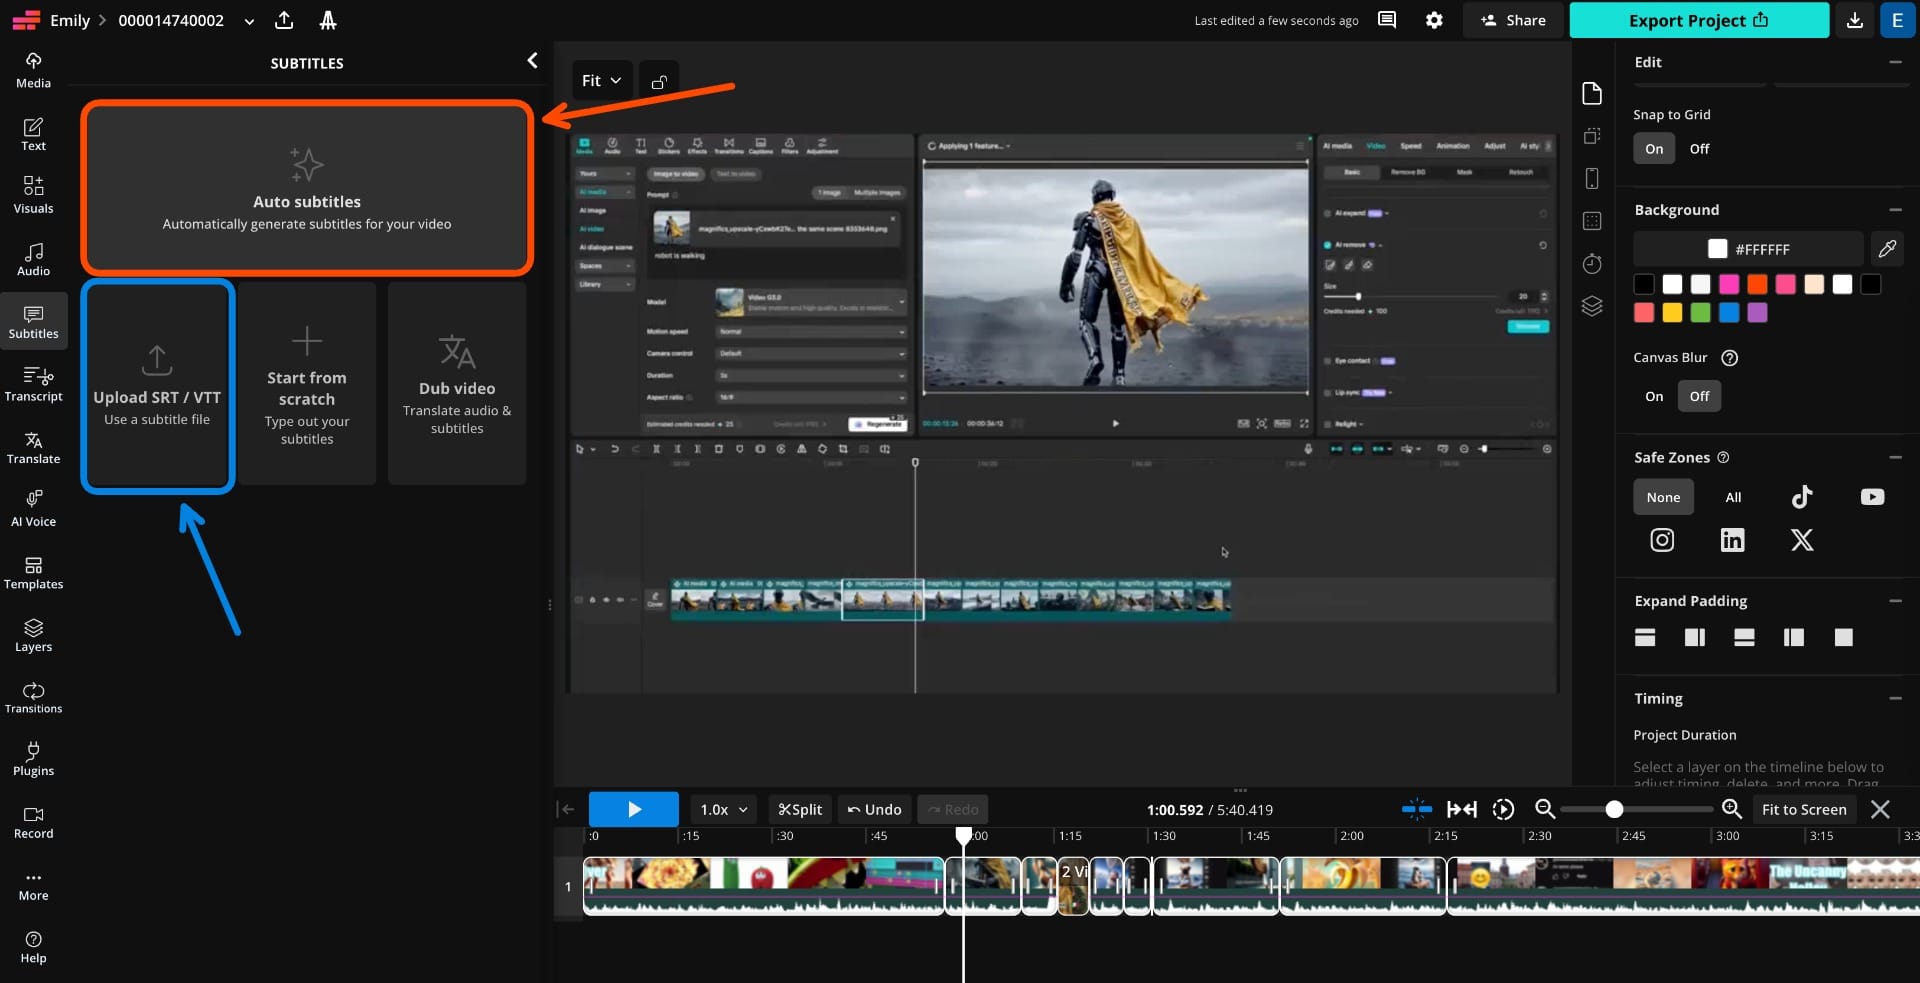
If you choose Auto Subtitles, you’ll be prompted to select the spoken language in your video or translate it into another language.
Once you've made your selection, click “Auto Subtitle” to generate time-synced captions.
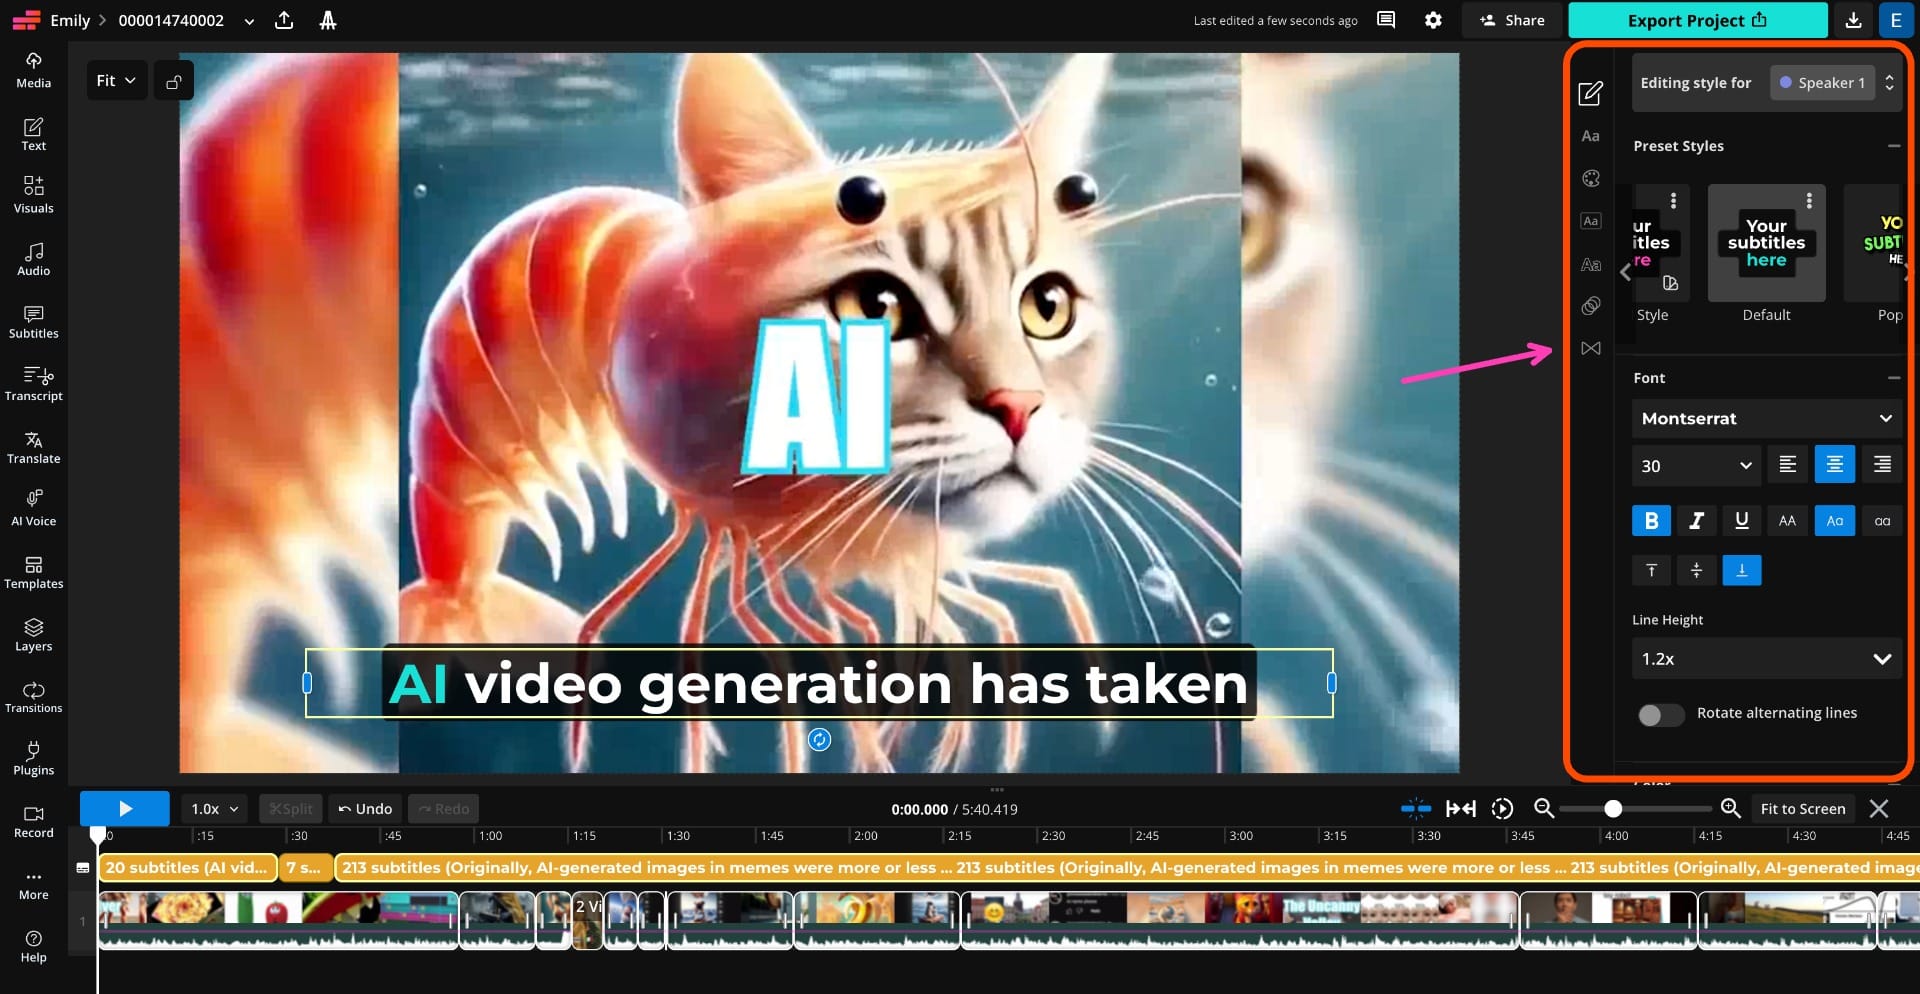
Once your subtitles are generated, you can easily edit any typos or errors directly in the subtitle window.
You also have full control over the look of your subtitles. Choose from preset styles or customize the font, color, size, and animations. You can also adjust the number of characters per line and where the subtitles appear.
Voiceovers
If you don’t want to record a voiceover yourself, the Text-to-Speech tool makes it easy to generate one using AI.
To create a voiceover, click “Audio” in the left toolbar and select “Text-to-Speech.”
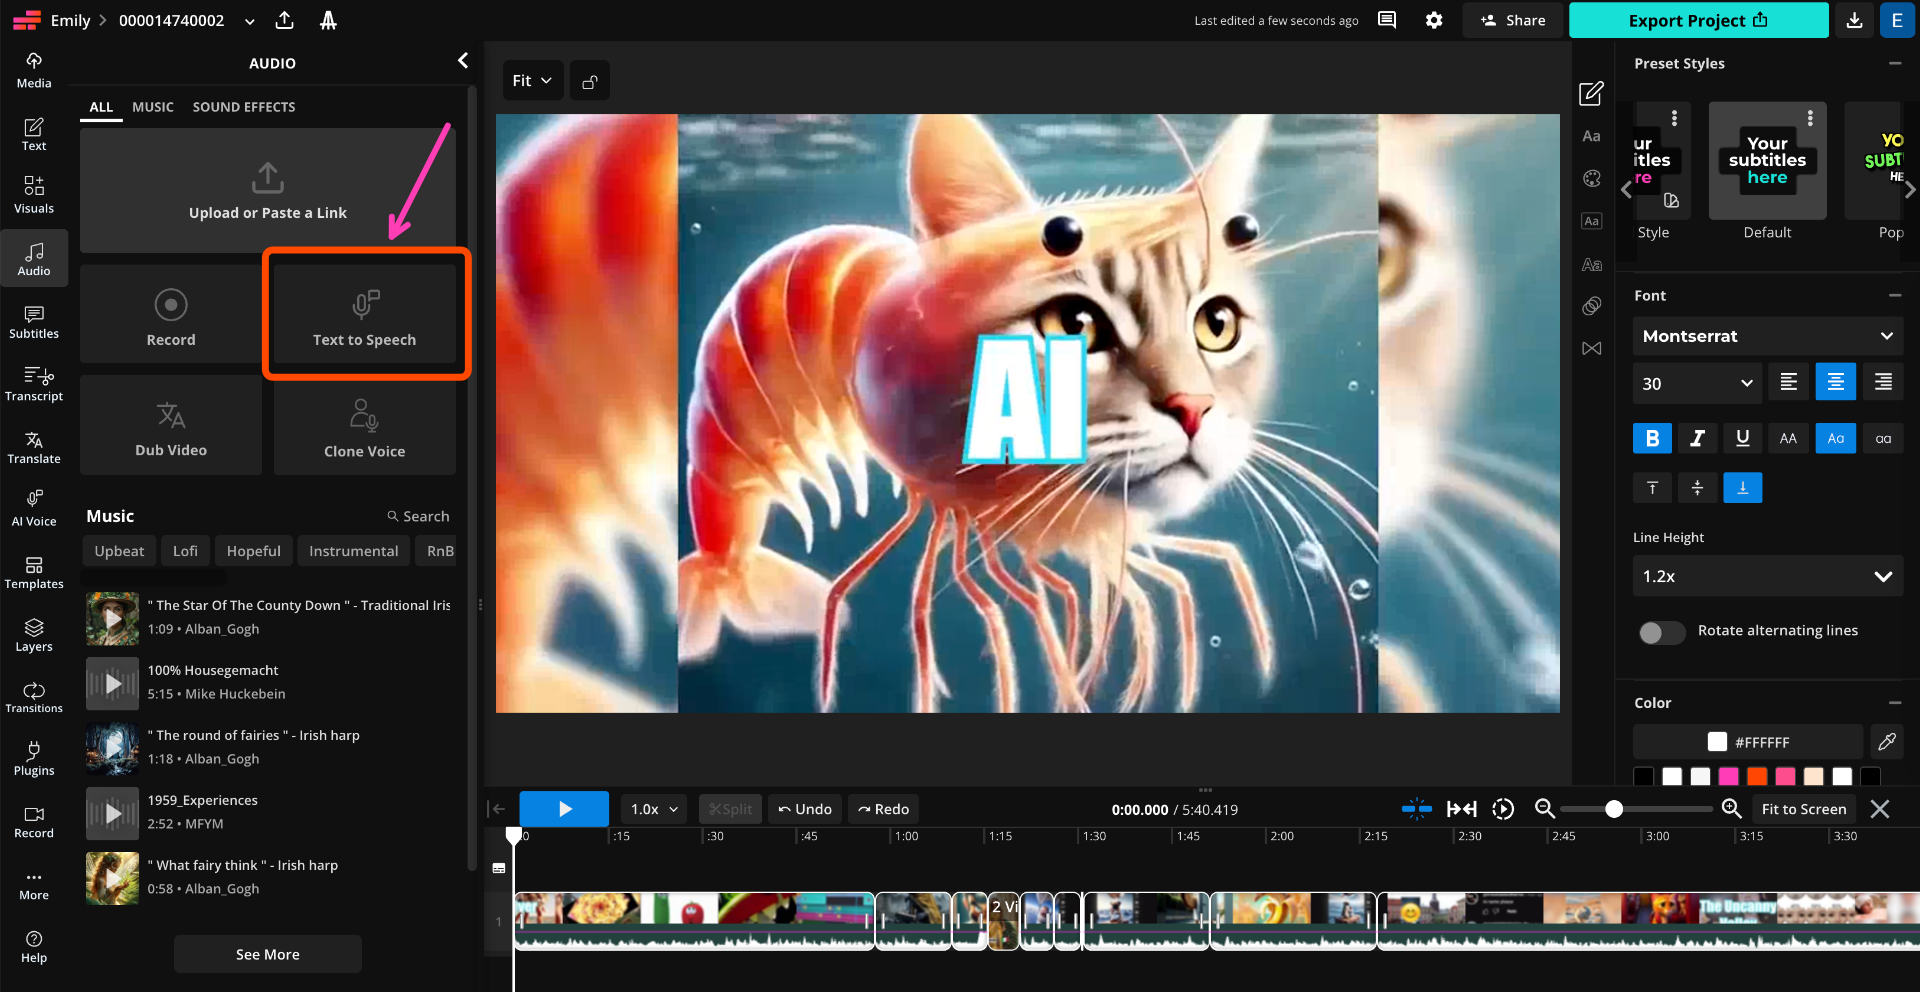
From here, enter your script and pick from a range of realistic-sounding AI voices. Kapwing supports over 20 languages and multiple voice profiles for each.
You can even create an AI clone of your on voice with a voice cloning tool.

Step 4: Add Transitions, Overlays, and Audio
Video editing tools like transitions, overlays, and music effects are great for fixing filming mistakes and giving your content a polished, professional look.
Transitions:
Transitions help guide your viewer from one scene to the next, smoothing out edits and adding visual flow. While simple jump cuts are common, using intentional transitions can elevate your edit and make the pacing feel more polished.
Kapwing has over 70 transition effects. Here are some common use cases:
- Fade to black: great for opening or closing a video, or signaling a time shift.
- Slide or wipe: helpful for switching between scenes, topics, or locations.
- Zoom or scale: adds energy and motion, ideal for emphasizing a moment.
To add a transition, select the clip in your timeline and click the “Transitions” tab on the right-hand toolbar.

Choose a transition style and set its duration. You can apply it to the start, end, or both ends of the clip.
Overlays/B-Roll
Overlays are images or text placed over your footage to highlight key points. B-Roll is footage spliced into the timeline, to visually support the narrative. Both help illustrate what you're saying and keep your content interesting.
To add them, click on the “Visuals” tab in the left-hand toolbar. This will open the stock media library.

You can browse through the library, or filter by images/video. If you know what you want, you can search for media directly with the search bar.
You can also upload your own files. Just click the “Media” tab to add visuals from your device or paste a link.
Once you've selected your media, click on it to add it to your timeline.
For B-Roll, insert the new clip directly after your main footage in the timeline. For overlays, place the visual on top of your video, before resizing and moving it.
Adding Audio
Audio plays a huge role in setting the tone of your video. Background music and sound effects can add energy, emotion, or clarity to your edit.
If you already have a music track (and permission to use it), upload it via the Media tab. Otherwise, head to the Audio tab and select “Music” to browse Kapwing’s stock audio library. You can search by keyword or explore categories like Upbeat, Chill, or Cinematic.
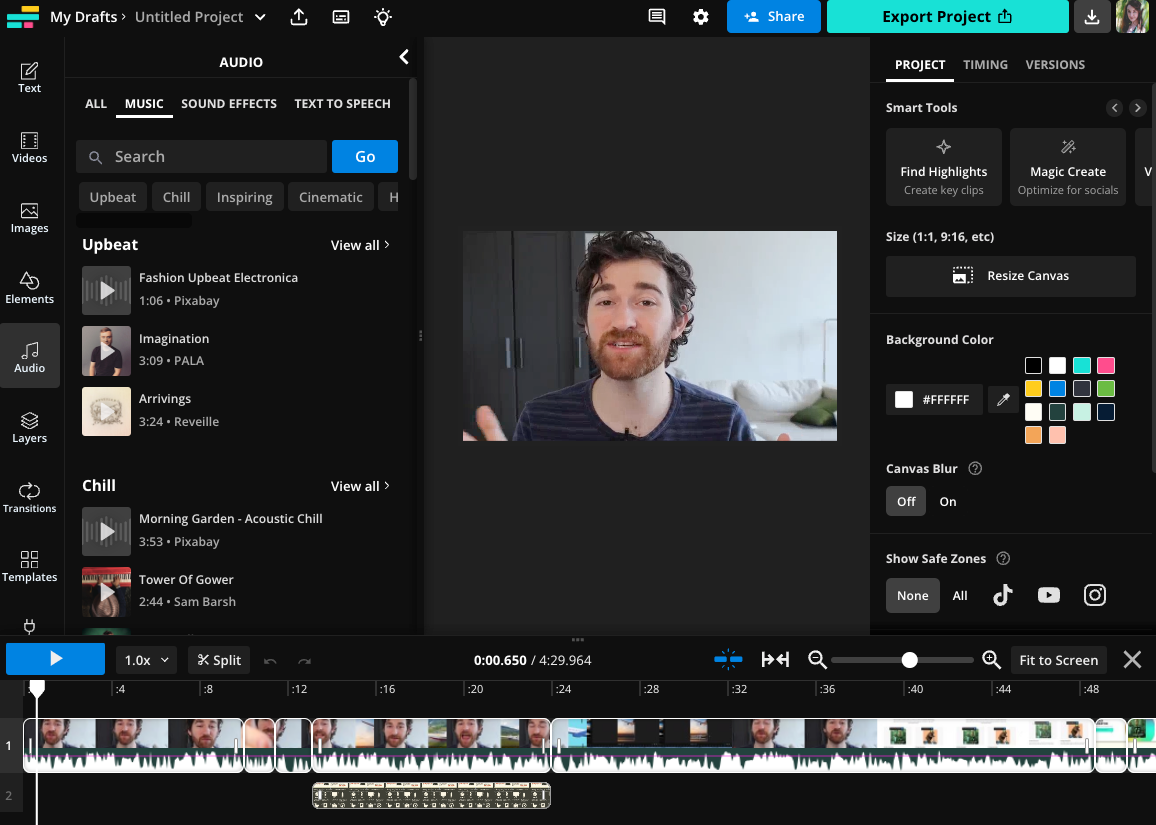
Audio changes the tone of your video, so make sure to choose something that matches what you’re trying to create. For example, fast, high-BPM music works well for action videos, while slower tracks are better suited for explainer videos.
Once added to your timeline, adjust the volume so it supports, but doesn’t overpower, your main audio.
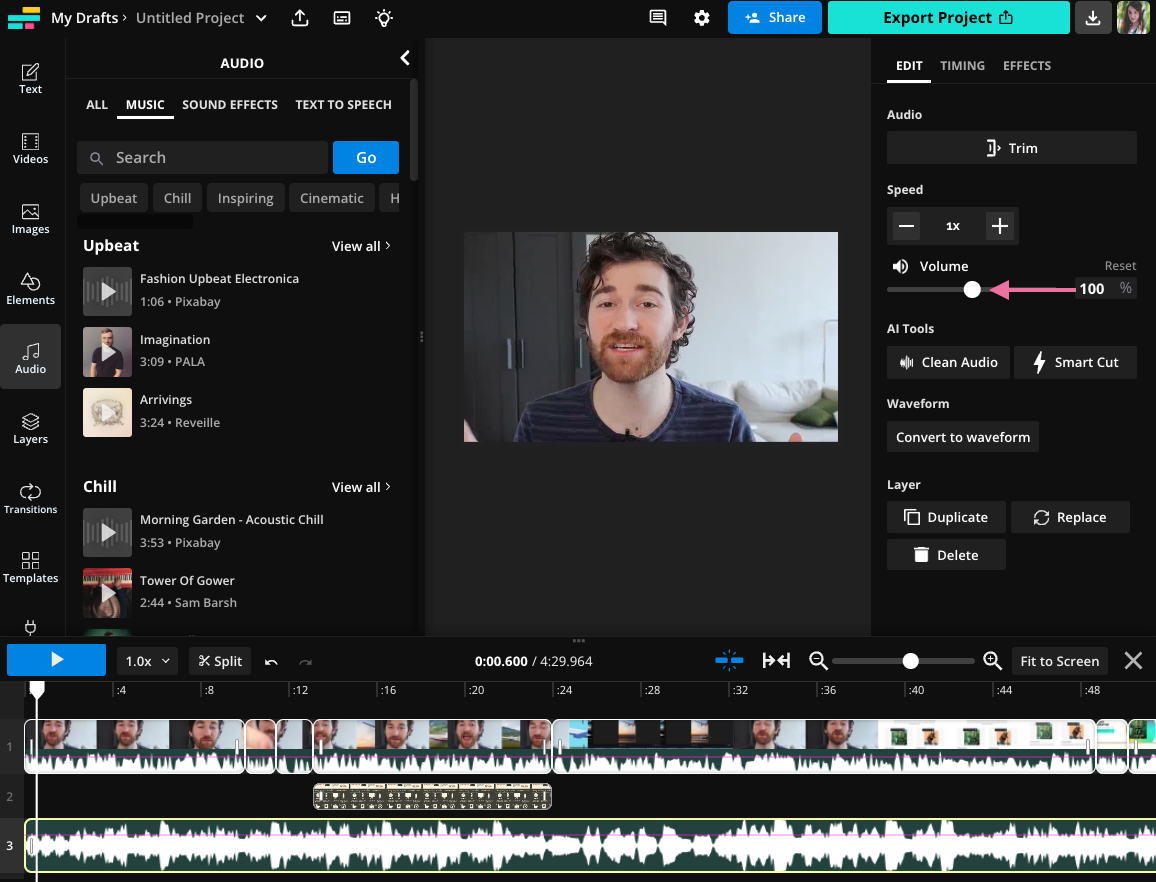
To add more detail, try layering in sound effects. You can:
- Search the stock library for common sounds like typing, ding, or whoosh.
- Generate custom sound effects. Just describe the sound, and Kapwing AI will create it for you.
Step 5: Review and Export
Before exporting, take a few final steps to make sure your video is polished, platform-ready, and shareable.
If you're creating a short-form vertical video, enable Safe Zones to ensure your content won’t be hidden by in-app UI elements. Go to the right-side toolbar and select Safe Zones. Choose the platform you're publishing to.
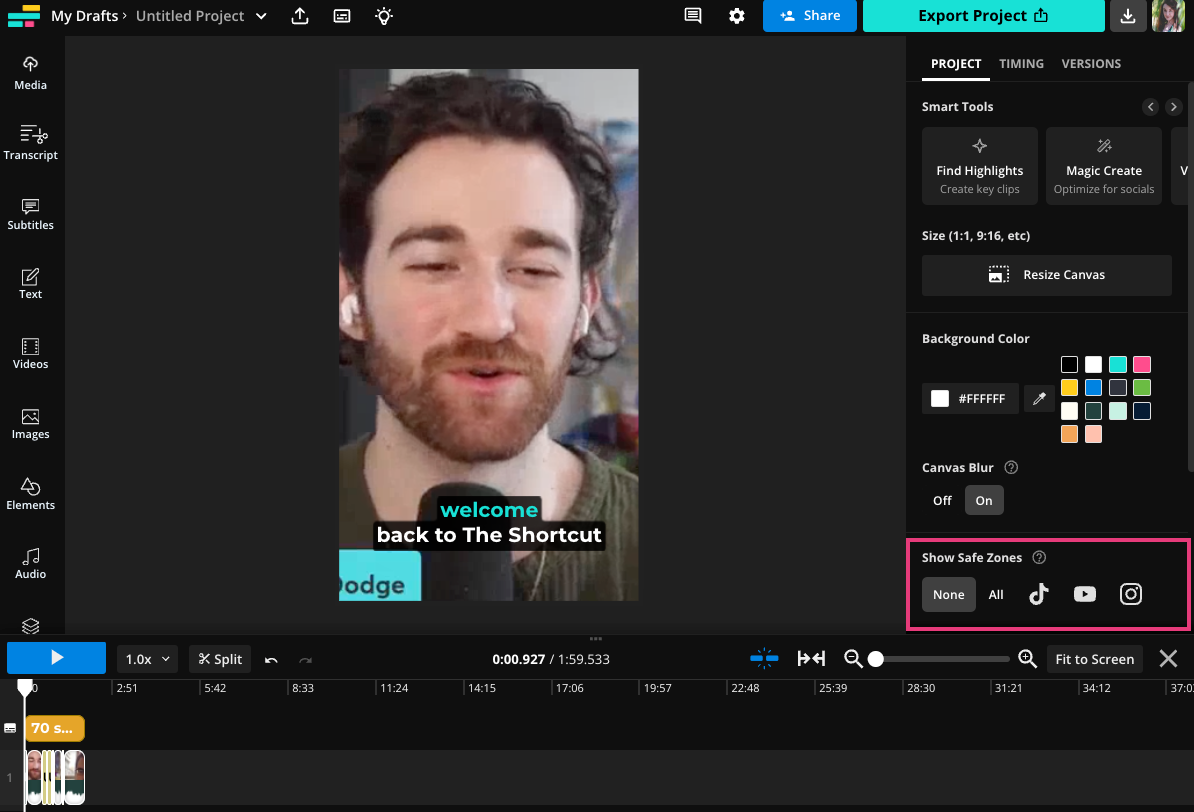
Kapwing will overlay a transparent frame showing where captions, buttons, or usernames will appear.
You can edit as usual while Safe Zones is turned on.
If you're collaborating with a team or want feedback before publishing, click “Share Project” at the top of the editor.
You can share via link or email, and collaborators can leave timestamped comments or make direct edits.

Finally, you’re ready to save your finished project.
Hit the export button at the top right of your screen and download your finished video to your device.
How to Repurpose an Existing Video
Repurposing long-form videos into short-form content is an efficient ways to extend the reach of your content, especially for platforms like TikTok and Reels.
You can do this manually, but we recommend using an AI clip generator. Instead of manually scrubbing your footage, you can upload a video and let it generate social ready clips based on topics and highlights it detects. Here's how:
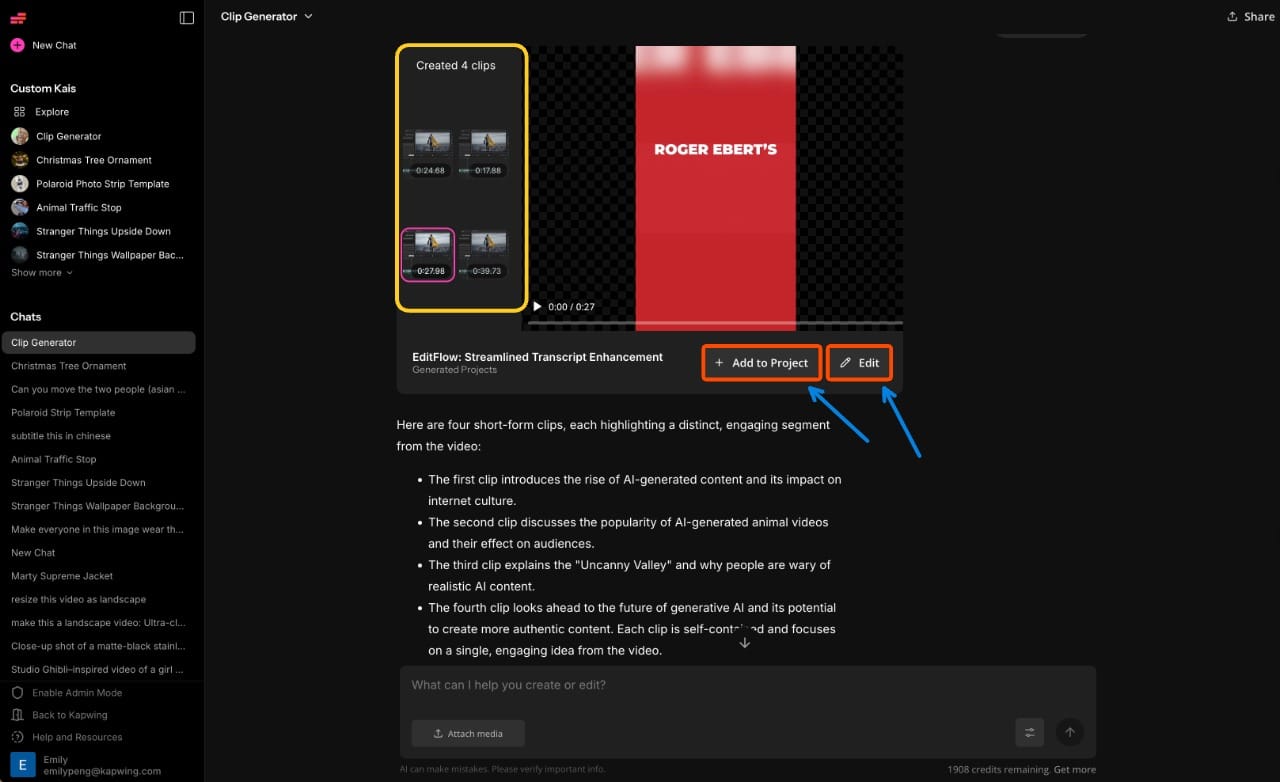
Open Kapwing AI and start a new chat. In the bottom-left corner, click Attach Media to upload your video file.

Once the upload is complete, Kai will automatically analyze the video and return a series of short clips, each grouped around different topics or moments that are ideal for social media.
You can review and select the clips, to either:
- Download them directly
- Click Edit in Studio to make adjustments, like adding subtitles, resizing for vertical formats, or trimming further
How to Generate a Video With AI
Creating video content no longer requires cameras, scripts, or editing software. With AI, you can generate an multi-scene videos from a single prompt.
Here’s how to get the best results, using expert-level techniques.
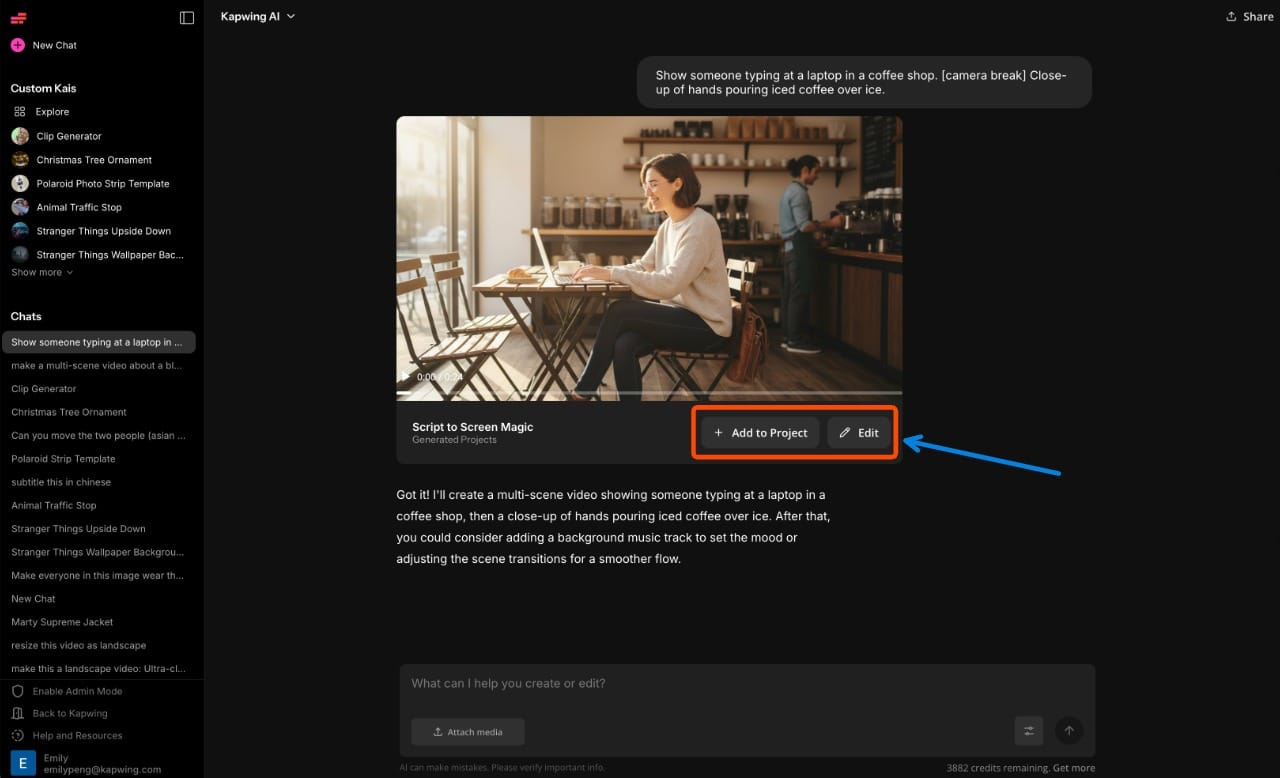
Step 1: Open Kapwing AI and Start a New Chat
Head to Kapwing AI, then click “Attach Media” in the bottom-left corner if you want to include an image as part of your prompt.
Otherwise, start by typing your prompt in the chat.
Step 2: Write a Strong Prompt
A good AI prompt clearly outlines what you want to see and hear in the final video. Include:
- Topic & tone: e.g. “Create an upbeat video explaining how to make iced coffee”
- Audience context: e.g. “For Gen Z viewers on TikTok”
- Desired format: e.g. “Vertical, 30 seconds long, with captions and background music”
✅ Expert tip: Use “[camera break]” to structure multi-scene videos. For example:
“Scene 1: Show someone typing at a laptop in a coffee shop. [camera break] Scene 2: Close-up of hands pouring iced coffee over ice.”

Step 3: Include Media (Optional)
You can upload images or audio for Kai to incorporate directly. This is helpful for brand assets, product photos, or stock footage you want to base the visuals on.
✅ Expert tip: Upload a high-quality image and prompt Kai to turn it into a video scene using motion effects, camera pans, or overlays. For example:
“Create a short animated clip using this image, adding slow zoom-in and ambient music.”
Step 4: Edit or Refine the Output
Once Kai generates your video, you can:
- Reply with refinements — e.g. “Make it shorter,” “Add more energy,” or “Use brighter visuals.”
- Ask Kai to reformat — e.g. “Resize for Instagram Reels,” or “Add captions and voiceover.”
- Click “Edit in Studio” to open the generated video in Kapwing’s full editor. From there, you can tweak timing, text, music, and transitions using manual or AI-assisted tools.
Tips for Better Video Editing as a Beginner
Like any creative skill, video editing gets easier with experience, but starting with the right techniques can dramatically shorten the learning curve. Whether you're working on short-form content or long-form projects, these tips will help you edit more efficiently and produce polished, professional-looking videos from the start.
1. Start with a Plan
Before opening your editor, define the video’s purpose, target audience, and platform. Create a basic outline or storyboard that includes your hook, main content, and CTA. This pre-edit planning minimizes time wasted second-guessing edits later and ensures your video follows a logical, goal-driven arc.
Pro Tip: Label your footage clearly and use folders to organize clips by type (A-roll, B-roll, cutaways, audio). This will help you find what you need quickly when building your timeline.
2. Use Keyboard Shortcuts
Knowing the keyboard shortcuts will speed your editing process up exponentially, especially for actions you repeat, like clipping and trimming:
- Cut: ⌘ + x (Mac) | ctrl + x (Windows)
- Copy: ⌘ + c (Mac) | ctrl + c (Windows)
- Paste: ⌘ + v (Mac) | ctrl + v (Windows)
- Delete: delete (Mac) | delete (Windows)
- Ripple Delete*: ⌘ + delete (Mac) | ctrl + delete (Windows)
- Split: s (Mac) | s (Windows)
*deletes the selected section(s) and shifts everything left on the timeline
3. Use Visual Effects Intentionally
Don’t add transitions, zooms, or effects for the sake of flair. Instead, use them to solve specific problems, like masking a jump cut or emphasizing a key statement.
Pro Tip: Use motion blur, crossfades, or zooms sparingly to create rhythm and visual interest without overwhelming the viewer. Save bold effects for CTA moments or high-impact transitions.
4. Design for Mobile-First
Over 80% of video views happen on mobile devices. Use Safe Zones tool to check that your text, captions, and graphics aren’t hidden behind UI elements on TikTok, Reels, or Shorts.
Pro Tip: Keep key text elements within the top 60% of the screen for vertical videos, and make sure fonts are legible at a glance.
5. Leverage Brand Consistency
Consistent branding builds recognition. Use the same fonts, colors, logo placements, and transitions across all your videos. Set these defaults in the Brand Kit to save time and maintain cohesion.
Frequently Asked Questions
What is the easiest video editing software for beginners?
Kapwing is one of the most beginner-friendly online video editors, offering AI-powered tools, a simple drag-and-drop interface, and no downloads required. It’s ideal for creators, marketers, and educators looking to get started quickly.
Can I edit videos for TikTok or Instagram Reels using Kapwing?
Yes. Kapwing supports vertical video formats and includes Safe Zones for TikTok, Instagram Reels, and YouTube Shorts, so you can make sure your content looks great on any platform.
What is the difference between trimming and splitting a clip?
Trimming shortens the beginning or end of a clip, while splitting divides a clip into two or more segments so you can rearrange or remove specific parts in the middle.
Is Kapwing free to use?
Kapwing offers a free plan with core editing features, watermark-free exports, and limited access to AI tools. Paid plans unlock higher export quality, brand kits, and advanced features like AI voice cloning and Smart B-Roll.
How do I make my video look more professional?
Focus on consistent branding, clean edits, high-quality audio, and adding elements like subtitles, transitions, and background music. Using tools like Kapwing’s Brand Kit and Safe Zones can also help your content look polished across platforms.
How do I create a video when I don’t have any footage?
You can use Kapwing’s AI video generator (Kai) to generate full videos from a written prompt, or browse the built-in stock library for footage, music, and visuals to build from scratch.