
Advanced Editing Tips for Kapwing

Kapwing has a ton of features to make editing quick and more precise - allowing for more advanced editing.
- Zooming on Timeline
- Timeline Dropdown
- Multi-Select
- Detach Audio
- Undo & Redo
- Version History
- Ripple Mode
- Snap to Timeline
- Grouping
- Moving Layers on the Canvas
Zooming on Timeline
The Timeline view allows for more flexibility in editing multiple layers. Sometimes getting precise edits can be tricky if layers look too small while the time increment is too large.
You can zoom in or out of the Timeline by clicking the (-) or (+) magnifying glasses or dragging the seeker between the (-) and (+) magnifying glasses at the top of the Timeline view. If you want all of your video to fit in the Timeline so that you can see the entire duration of your layers within the Timeline, click the "Fit to Screen" button next to the magnifying glasses.
Timeline Dropdown
While editing in the Timeline view, right click the layer you want to edit to open a dropdown menu that offers advanced editing tools, such as cut, copy, paste, and delete.
These common actions have similar keyboard shortcuts that you may already be used to:
Cut: ⌘ + x (Mac) | ctrl + x (Windows)
Copy: ⌘ + c (Mac) | ctrl + c (Windows)
Paste: ⌘ + v (Mac) | ctrl + v (Windows)
Delete: delete (Mac) | delete (Windows)
Split: s (Mac) | s (Windows)
Splitting is commonly used to cut sections out of videos. Instead of clicking the "Split" button in the Timeline, or using the "Split" option from the right click drop-down, you can use the keyboard shortcut "s" for a quick way to streamline your editing workflow.
Some other helpful shortcuts include:
Move Seeker ~1 frame
Right arrow key to move right (Mac) | Right arrow key to move right (Windows) Left arrow key to move left (Mac) | Left arrow key to move left (Windows)
Move Seeker to beginning of nearest layer
Up arrow key (Mac) | Up arrow key (Windows)
Move Seeker to end of nearest layer
Down arrow key (Mac) | Down arrow key (Windows)
Play/Pause
Space bar (Mac) | Space bar (Windows)
Multiple Select
Multiple selection allows you to click on several layers at a time rather than dealing with editing them one by one. We also have a Select All feature that allows you to select all of the layers in your Timeline. This makes it easier to move, reposition, or edit all of the layers in your project at once.
Multiple select and select all works for all layers in your Timeline, regardless of what type of media they are.
Select All: ⌘ + a (Mac) | ctrl + a (Windows)
If you don't need to select all of your layers at once, but you do need to move or edit more than one layer at a time, you can click one layer, then hold down the ⌘/ctrl button while clicking to select other layers in the timeline.
Detach Audio
You can detach your audio by right clicking the layer and selecting "Detach Audio" from the Timeline dropdown menu, or with the keyboard shortcut:
Detach Audio: shift + ⌘ + A (Mac) – shift + ctrl + A (Windows)
Visit this article for more details on detaching audio.
Undo and Redo
When creating or editing, Undo and Redo are core features. When you're editing a video, you can find the "undo" and the "redo" arrow buttons along the top of the timeline.
Undo: ⌘ + z (Mac) | ctrl + z (Windows)
Redo: shift + ⌘ + z (Mac) | shift + ctrl + z (Windows)
Version History
To find Version History, click outside the canvas, then select the "Versions" tab on the right. If you want to save the current state of the project as a version, select "Save Current Version to History". To revert to or duplicate an older version, click the three dots icon next to the version and select your desired option.
Visit this article for more details on Version History.
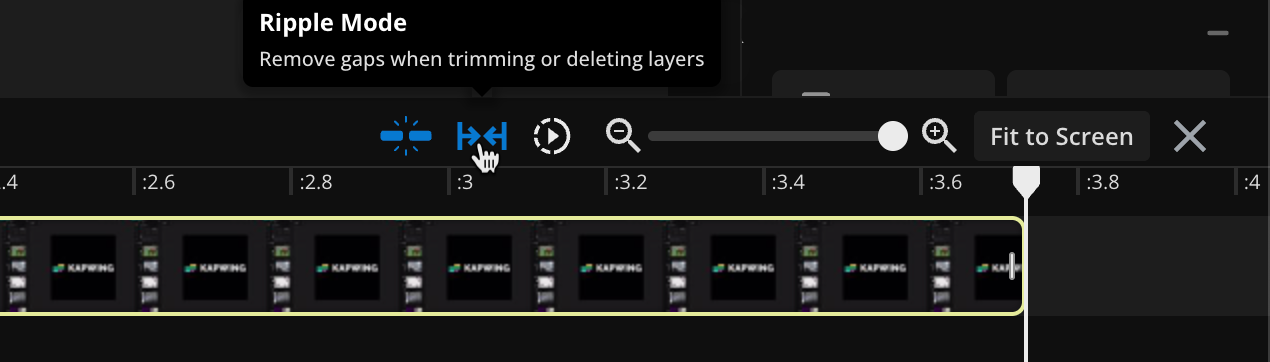
Ripple Mode
Turning on "Ripple Mode" allows you to trim, cut, and delete sections from your video, without keeping a gap in time between your layers. Gaps are automatically removed when you trim, split, and delete sections, allowing for quick and seamless editing.
You can turn it on and off in your project settings or you can find the "Ripple Mode" button in the top bar of the Timeline view.
If you don't need Ripple Mode on the entire time you're editing, you can instead use Ripple Delete in the right click dropdown menu in the Timeline.
Ripple Delete: ⌘ + delete (Mac) – ctrl + delete (Windows)
Snap to Timeline
Found next to the "Ripple Mode" button, is the "Snap to Timeline" button. Turning on the "Snap to Timeline" feature allows for finer adjustments in the Timeline by automatically aligning clips within your project.
When the Snap to Timeline function is off, the layers move freely when you drag them within the Timeline. This can be helpful when needing to make micro-adjustments to the start or end time that shouldn't align with any other content (like fixing audio sync issues).
When Snap To is on, the asset being moved will try to automatically align to the start or end time of other layers in the Timeline.
Groups
When you have several elements or images that you want to keep together on the canvas, the best way to do this it to group them together.
To group:
- Select all the layers you want grouped together. You can do this by holding ⌘/ctrl while clicking each item on the canvas or the timeline.
- On the right side panel, you will see the option to group the layers (as well as duplicate, lock, and delete them)
Moving Layers on the Canvas
When you add items to the canvas, they are automatically placed at the "top" of the canvas until you add/upload a new layer or manually adjust the layer. To adjust layers, view the right side panel after selecting the layer you want to move either from the canvas, timeline, or layers tab on the left sidebar.
- Forward brings that layer "up" one layer. Or use CMD + ] or CTRL + ] on your keyboard.
- Backward brings that layer "down" one layer. Or use CMD + [ or CTRL + on your keyboard.
- Front brings that layer to the "top" of all other layers. Or use CMD + Option + ] or CTRL + Option + ] on your keyboard.
- Back brings that layer to the "bottom" of all other layers. (i.e. if you want that layer to be your background, this is what you'd want to click) . Or use CMD + Option + [ or CTRL + Option + [ on your keyboard.
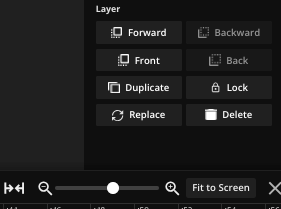
Note: If one of the layer options is grayed out, that means that layer cannot be moved to that position as it is already there. (For example, if your background image is already the bottom layer then "Back" and "Backward" will be grayed out and un-clickable.)
Looking for more help?
Check our Release Notes for tutorials on how to use the latest Kapwing features!


