How to Create a Character Reference Sheet With AI
Turn one character idea into a consistent visual identity.
AI image generators are very good at creating compelling characters. The harder part is getting that character to stay consistent across multiple images.
As soon as you change the pose, camera angle, expression, or setting, small details can start to drift. If you're creating a recurring character for a comic, video series, game, or brand, those inconsistencies become obvious very quickly.
A character reference sheet helps solve that problem. Instead of relying on a text prompt to reconstruct the character from scratch every time, you create a set of approved visual references that define what the character is supposed to look like. Those references can then be reused when generating new poses, scenes, expressions, or shots.
This guide covers how to create a high-quality AI character reference sheet, which details matter most for consistency, how to structure prompts, and how the workflow changes depending on the image model you're using.
Table of Contents:
- What Is an AI Character Reference Sheet?
- How to Make a High-Quality Character Reference Sheet With AI
- Model-Specific Guidance for AI Character Reference Sheets
- Frequently Asked Questions
What Is an AI Character Reference Sheet?
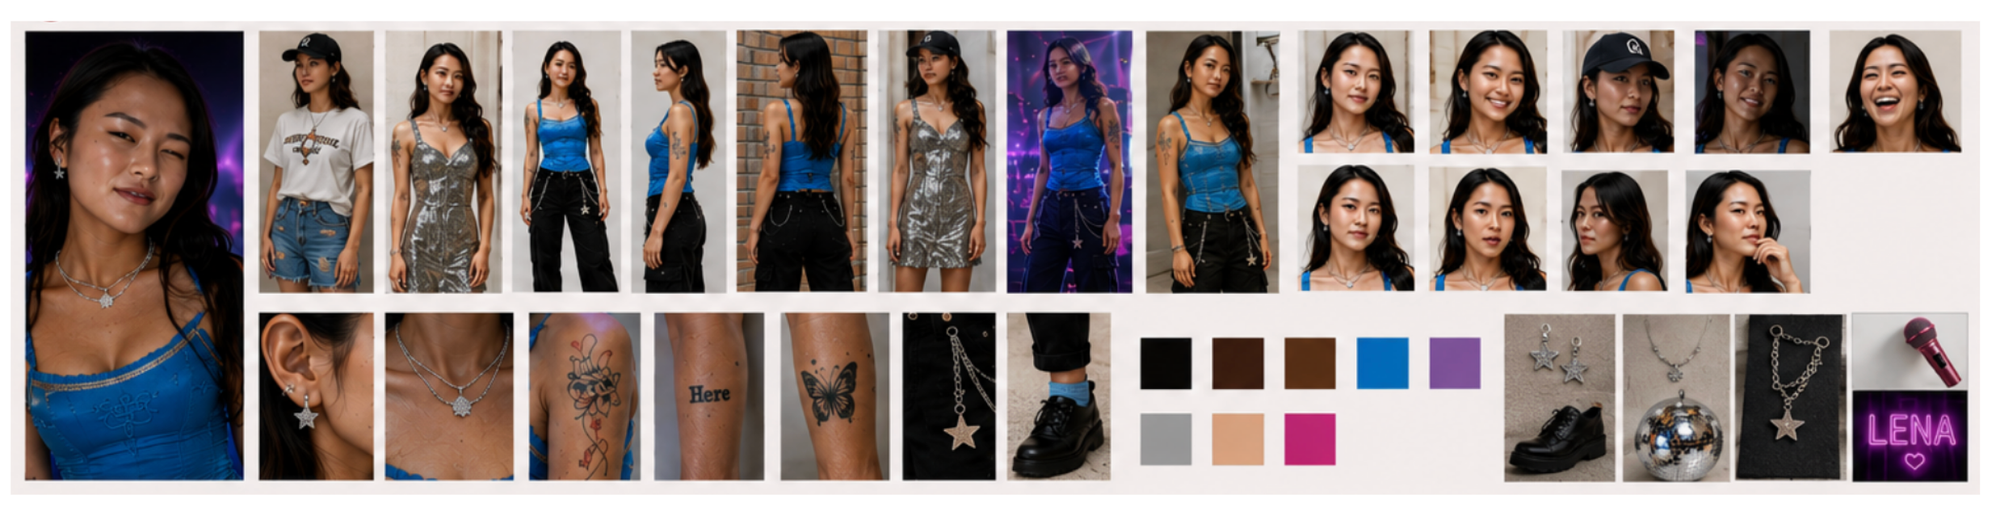
An AI character reference sheet is a set of images that defines a character's visual identity from enough angles and at enough levels of detail that the AI character can be recreated.
They are important because text prompts leave a lot of information unspecified. You can describe a character, but prompted assets will still often vary from one generation to the next. A reference image gives the model much more guidance and constraints. That makes them especially useful for AI micro-dramas, AI influencers, or any other content type that requires consistent characters.
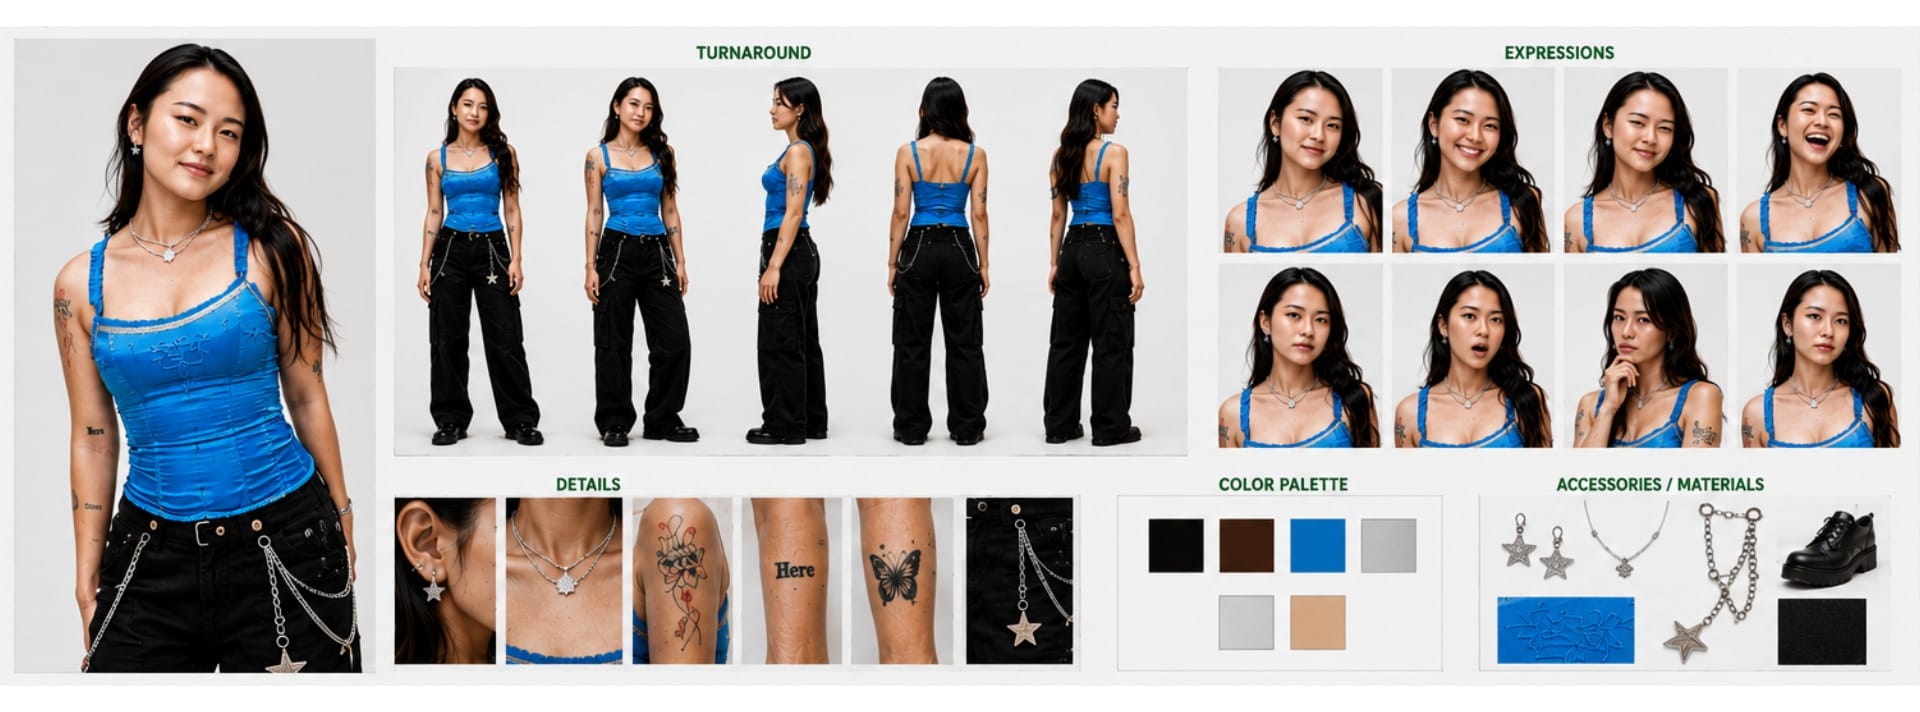
A useful reference sheet typically includes:
- A primary full-body character image
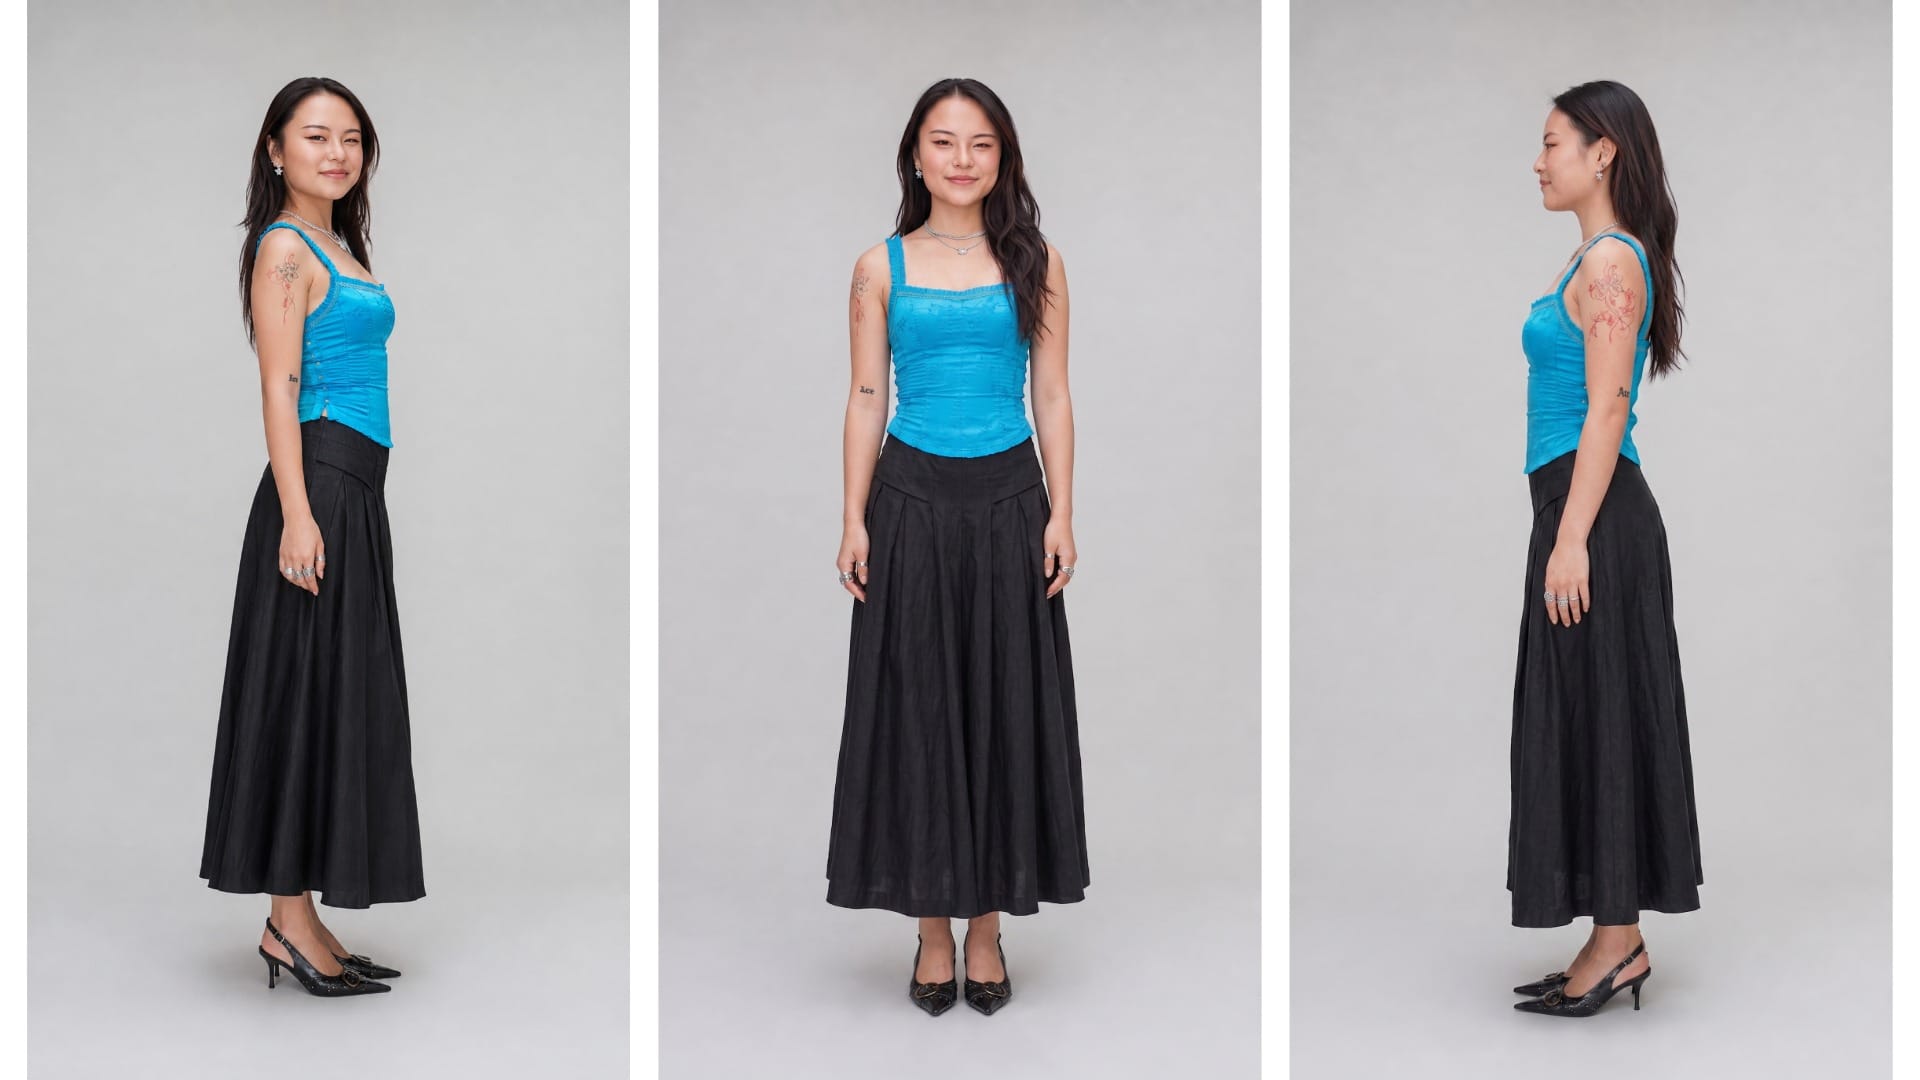
- Front, three-quarter, profile, and back views
- Neutral and expressive facial close-ups
- Consistent clothing and accessories
- Close-ups of important or easily confused details
You may see terms like character sheet, model sheet, turnaround, or expression sheet. A turnaround is specifically concerned with showing the character from several angles, while an expression sheet focuses on facial variation. A full character reference sheet can include both.
What Makes a Good Character Reference Sheet?
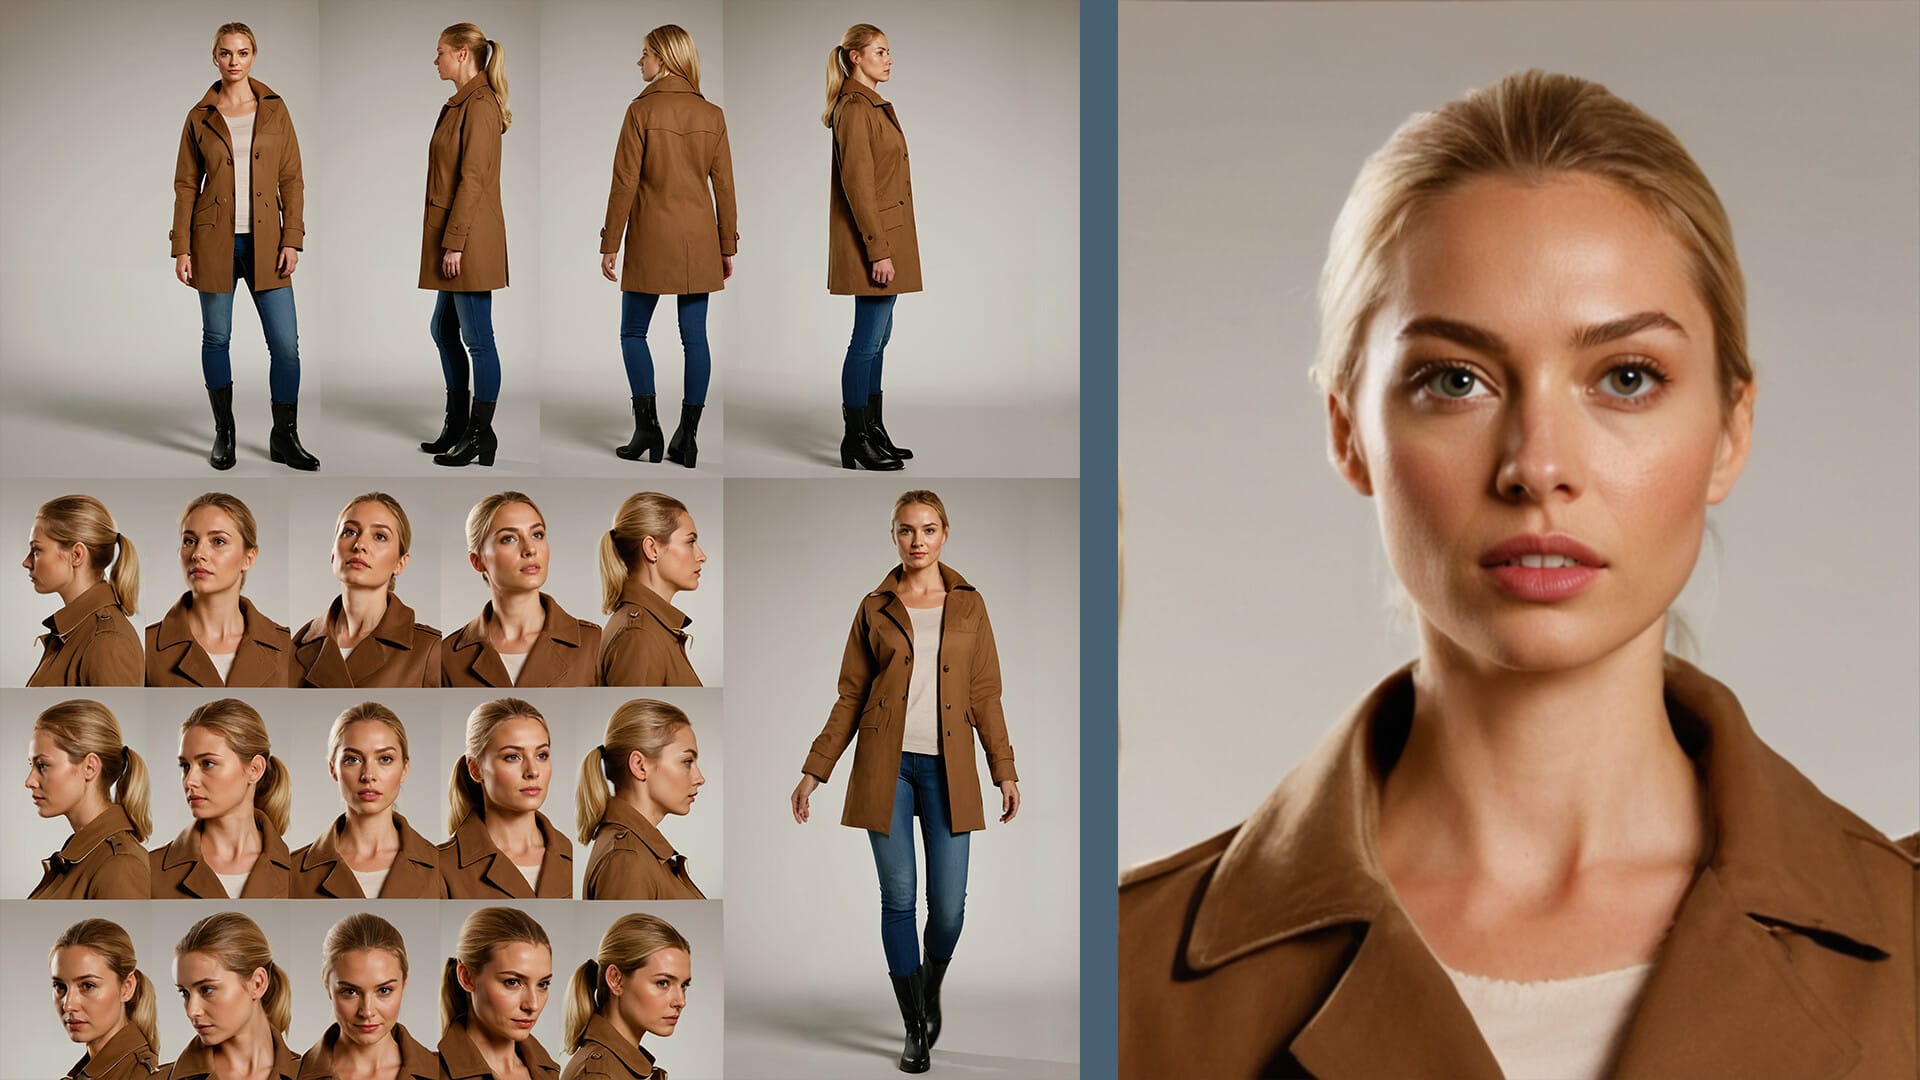
A good reference sheet is not necessarily the most attractive one. Its main job is to remove ambiguity.
The character should look recognizably identical in every image. Their face, proportions, hairstyle, clothing, accessories, and distinguishing features should all remain consistent. The images should also make the design easy to inspect, which usually means simple poses, neutral lighting, and minimal background clutter:
A poor reference sheet may be inconsistent, with details like facial proportions, or hairstyle changing between views.
It can also fail if poses are too stylized, if lighting or heavy post-processing obscures important features, or if the images are too low-resolution to capture fine details:
How to Make a High-Quality Character Reference Sheet With AI
You can ask an AI image generator to create an entire character sheet in one prompt, but that usually gives you less control.
For better consistency, it helps to build the sheet in stages.
1. Define Your Character
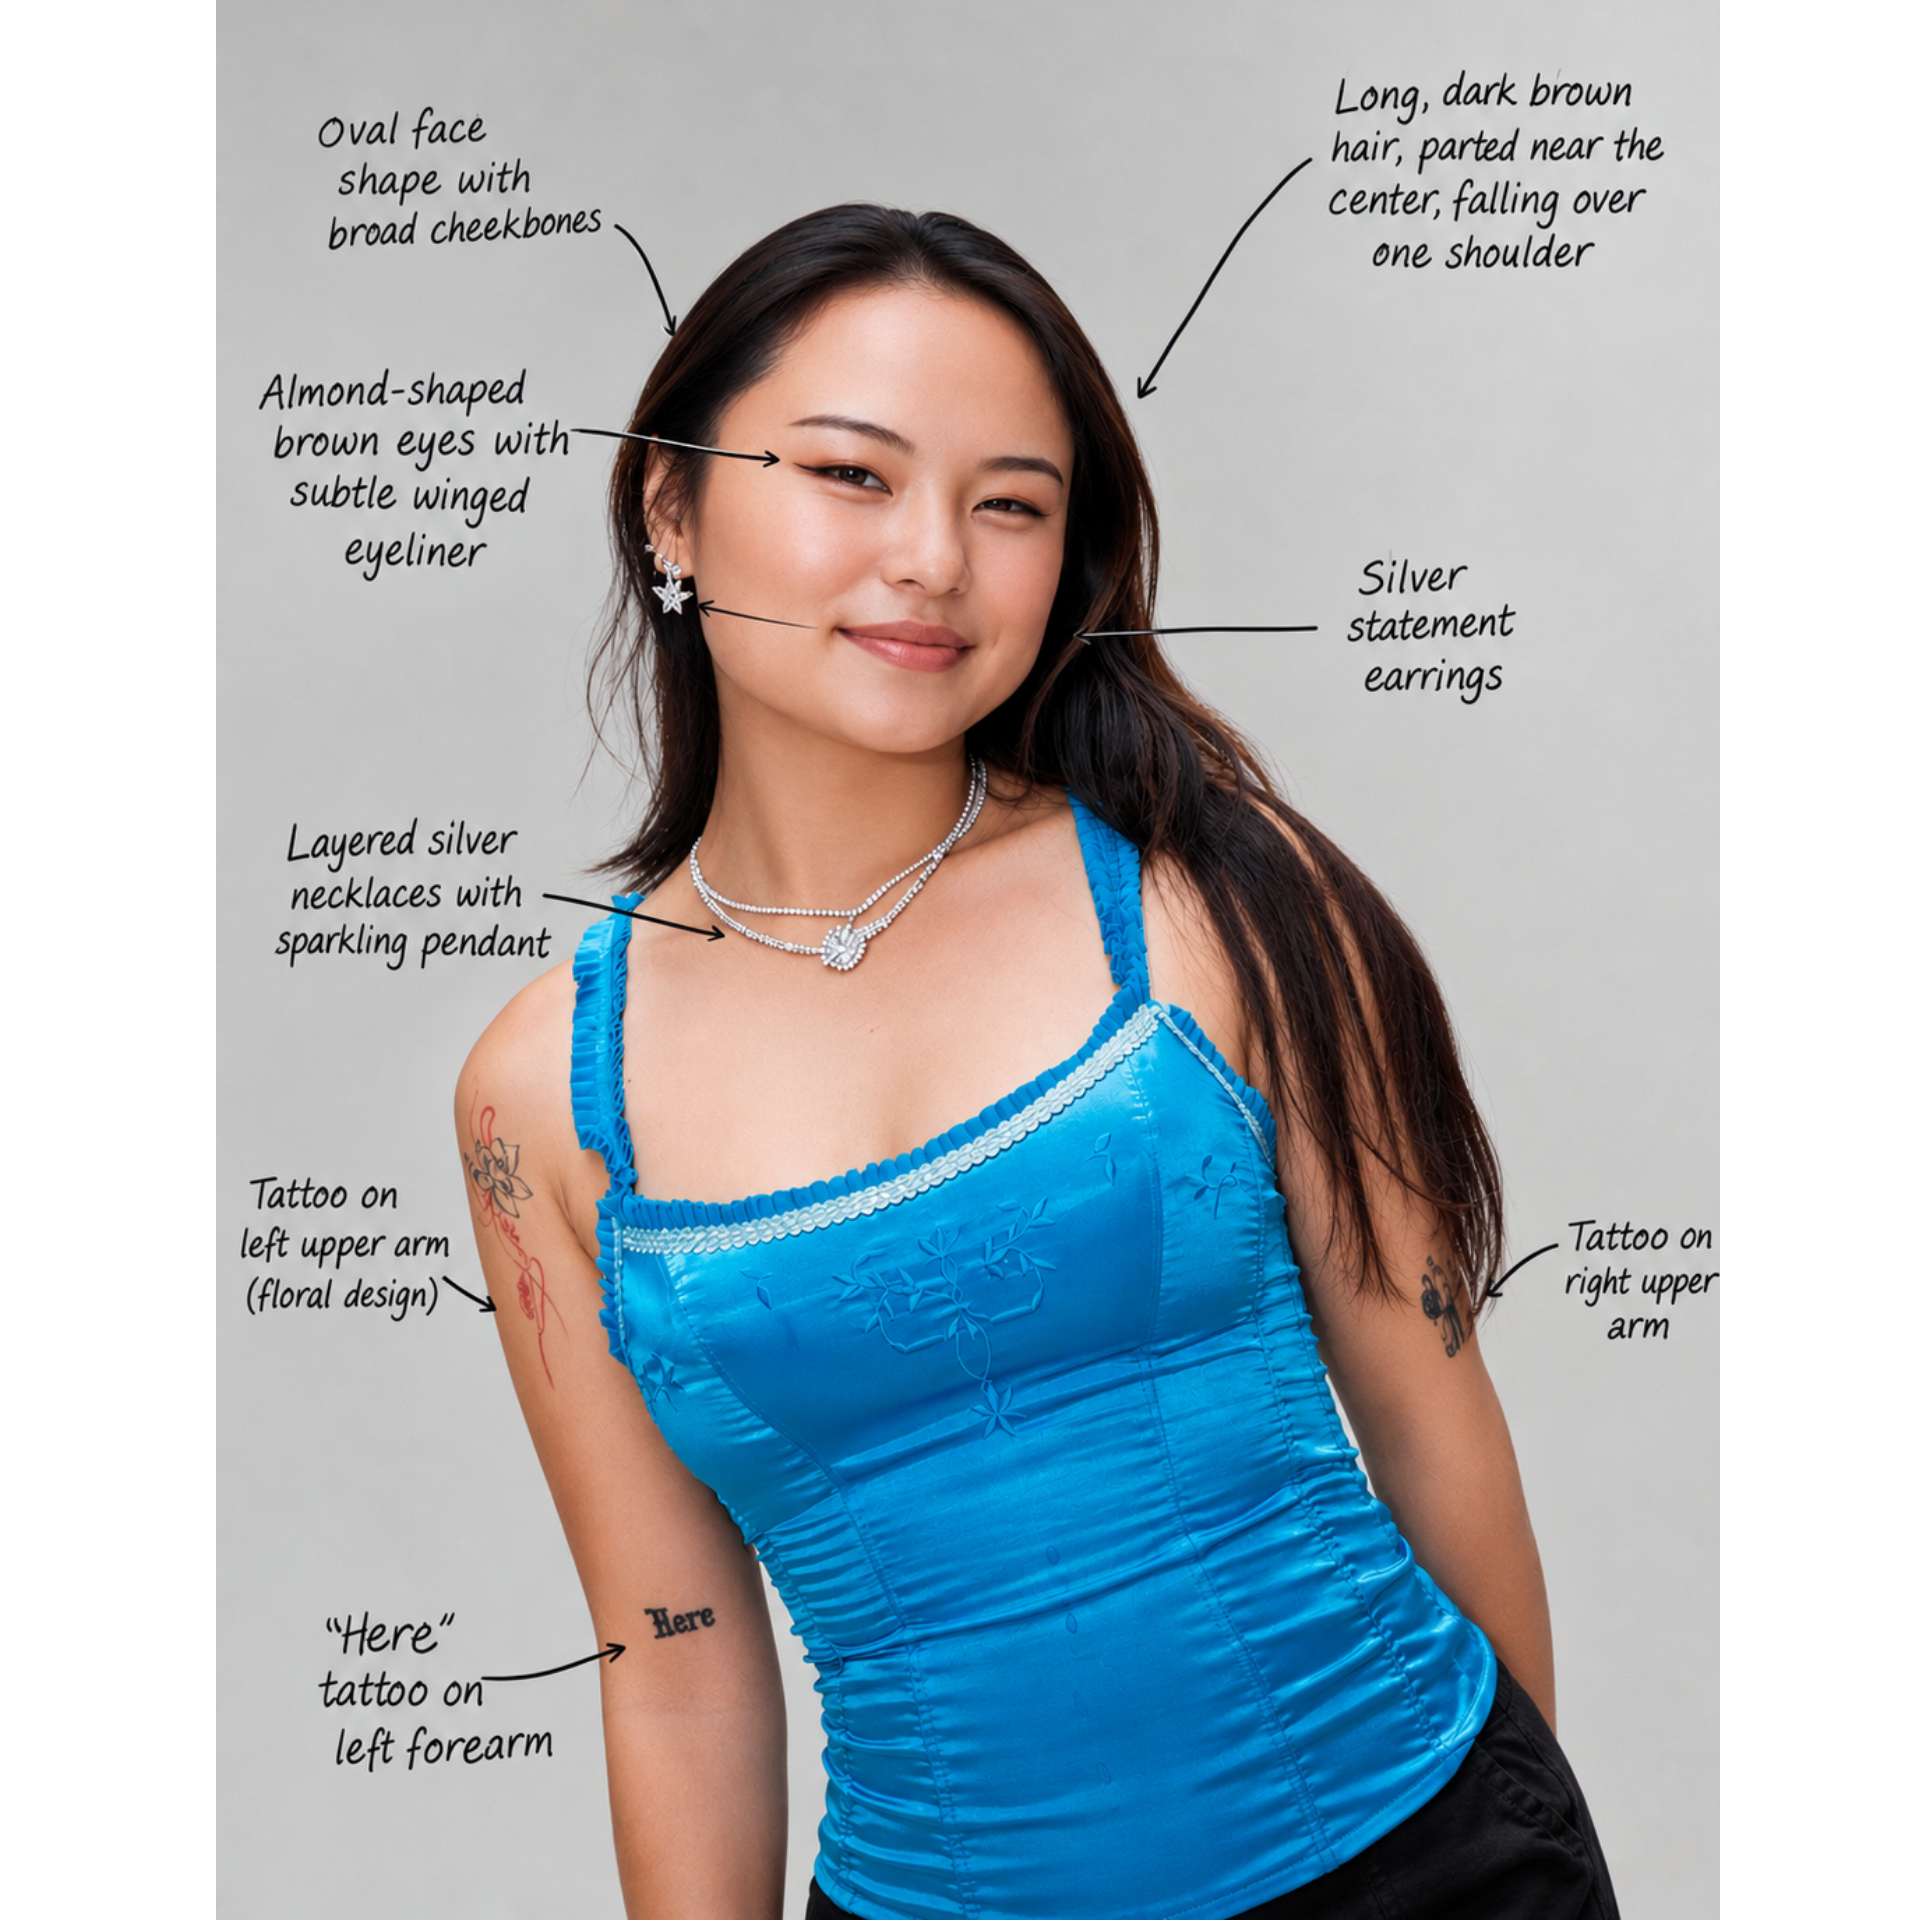
Before you generate anything, decide which traits are non-negotiable. These are the visual details that define the character and should remain consistent across every image: facial structure, hairstyle, body proportions.
If you're designing a character from scratch, make a short list of defining traits. Focus on the characteristics that would make the character noticeably different if they changed. For example:
- Race
- Height
- Hairstyle and color
- Eye color
- Tattoos or other noticeable markings
If you're starting from an existing image, you can annotate the image to mark the features you want to preserve.
2. Generate a Master Character Image
Once you know what needs to stay consistent, turn those notes into a image prompt.
An easy way to do this is to paste your character traits into Claude and ask to turn it into a prompt. If you're working from an existing image, you can also upload it:
Turn these character traits into a concise image-generation prompt. Prioritize specific visual details and character consistency. Avoid personality or backstory unless it changes the character's appearance.
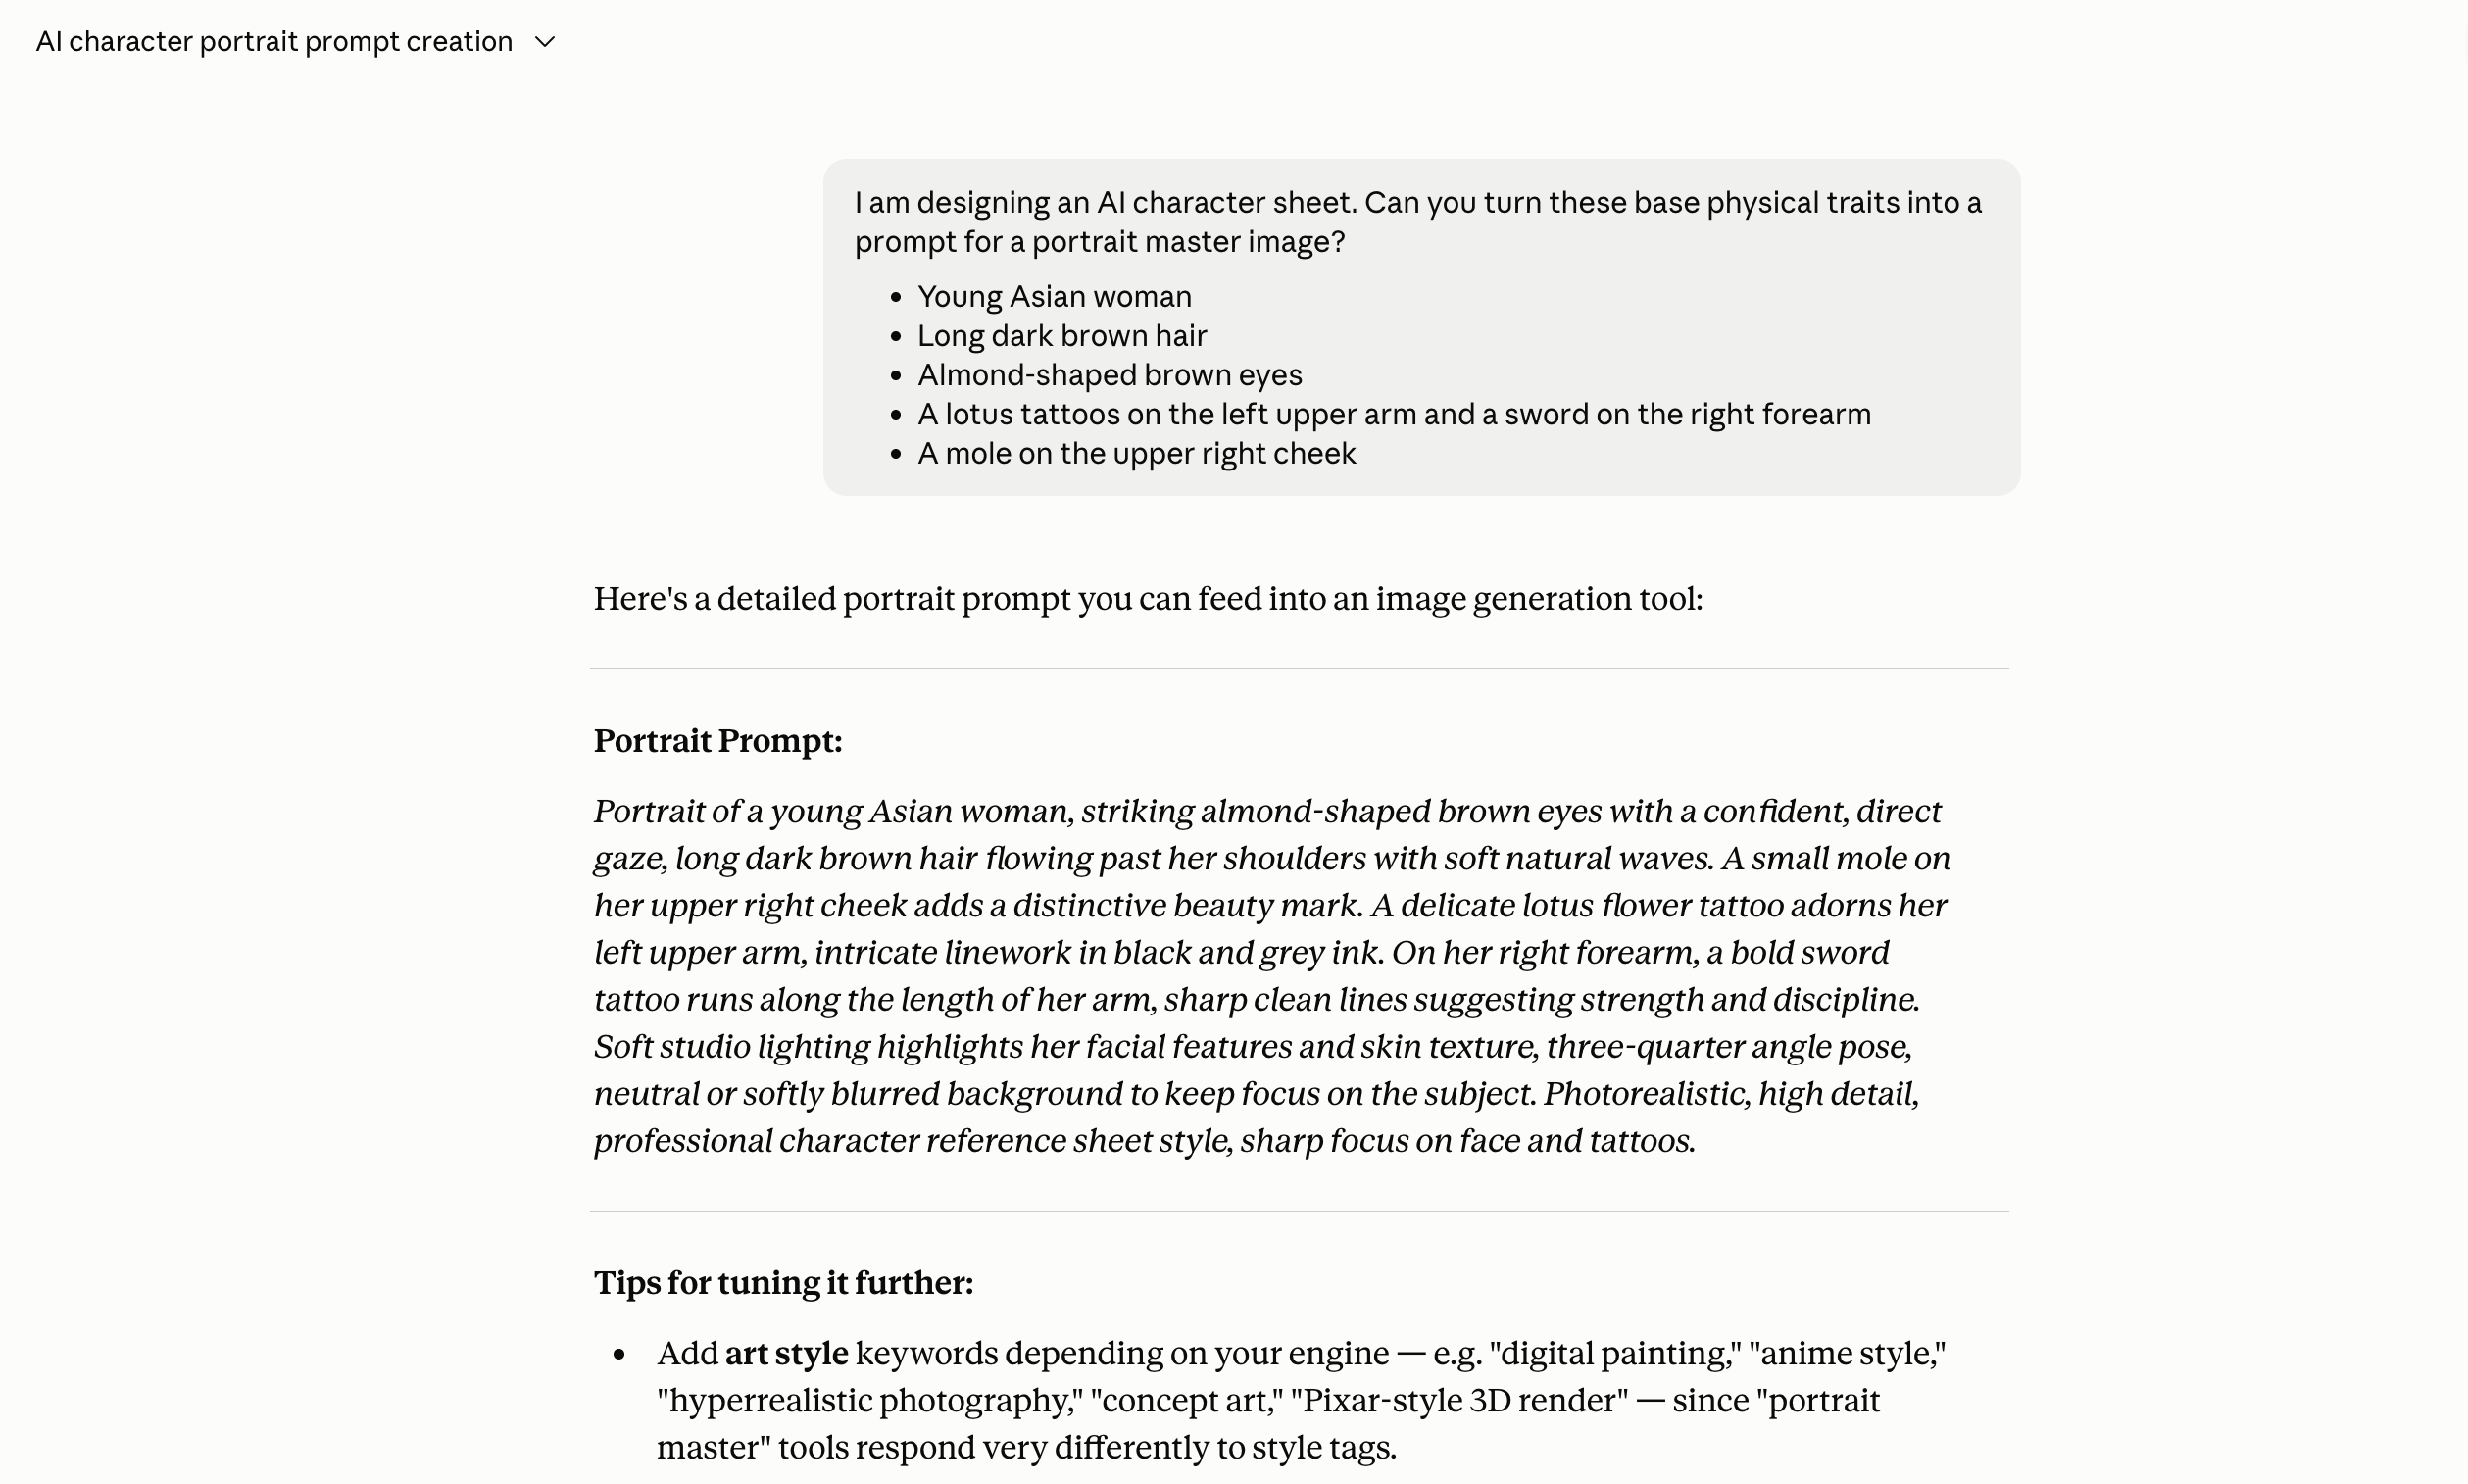
You can then take the resulting prompt, alongside your reference if you used one, into an image generator and create your first master image.
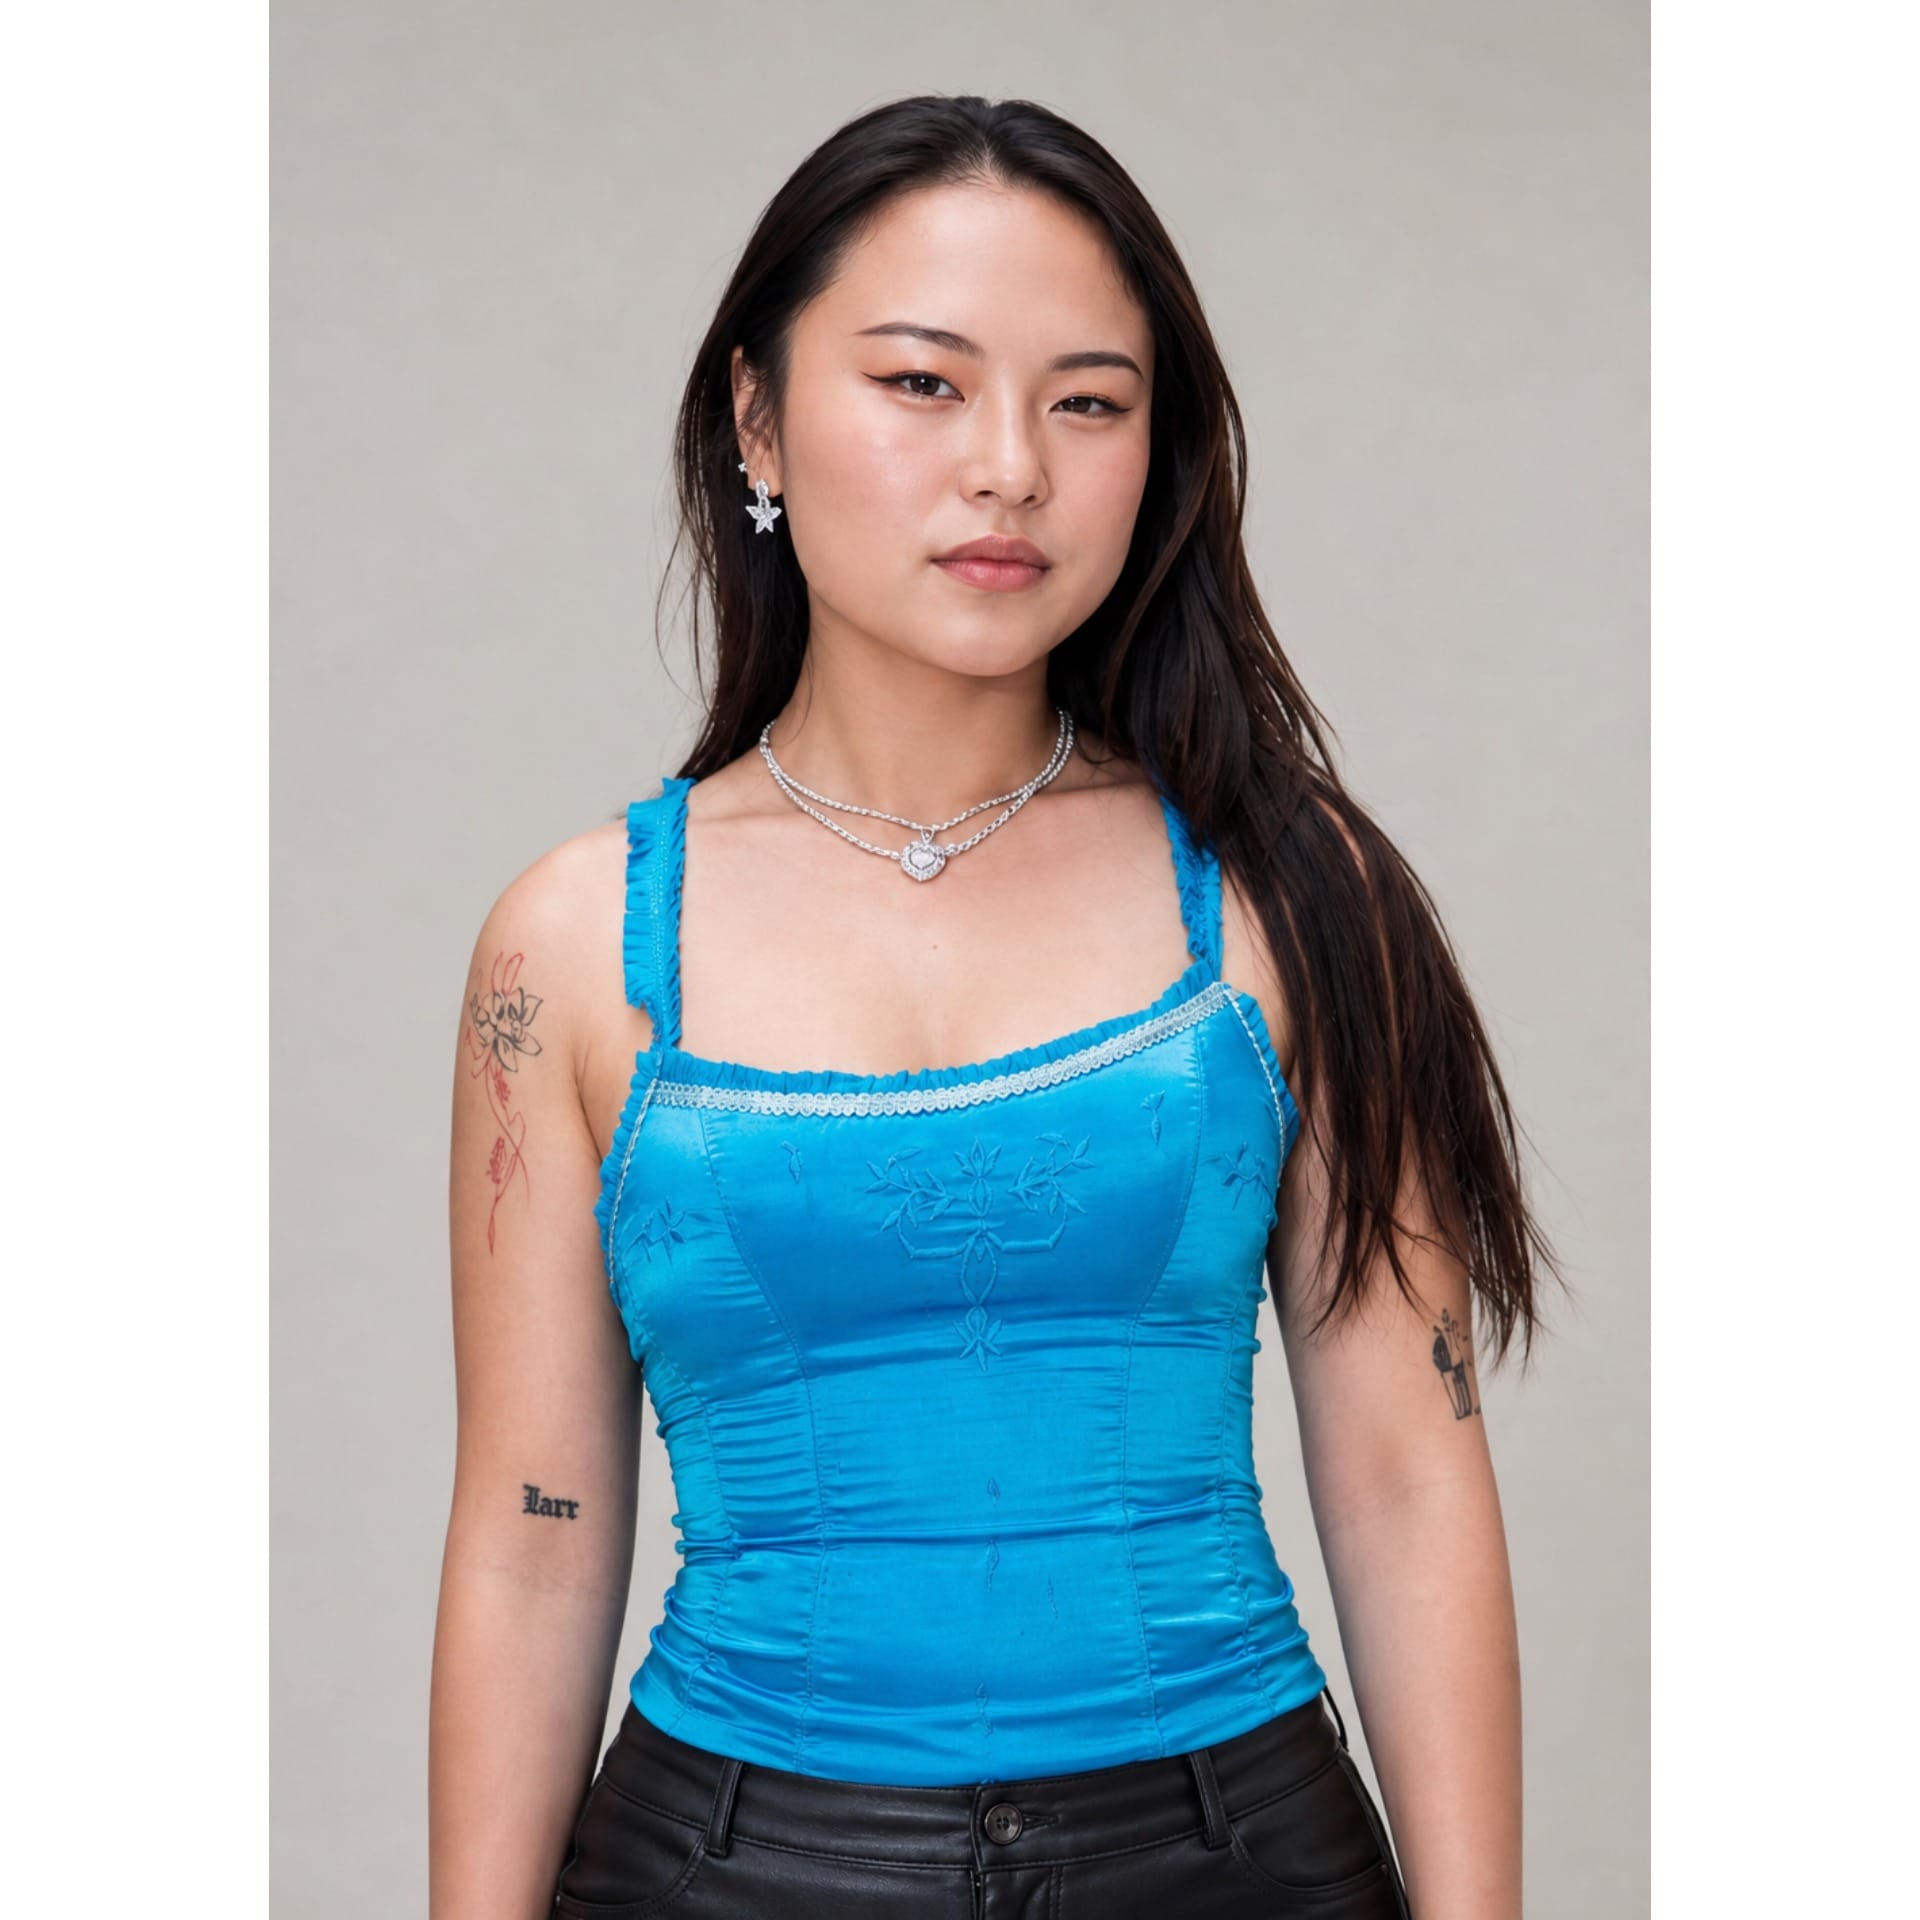
A master image should make the character as easy to understand as possible. Use a full-body composition, clear visibility of the face, simple lighting, and an uncluttered background:
Character Sheet Master Image Template
Photorealistic full-body portrait of a [AGE] [ETHNICITY] [GENDER] with [HAIR DESCRIPTION]. They have [EYE SHAPE + EYE COLOR] and [MAKEUP OR FACE DETAILS IF ANY]. They wear [TOP / UPPER BODY CLOTHING DESCRIPTION], [ACCESSORIES SUCH AS JEWELRY, GLASSES, ETC.], [BOTTOMS], and [SHOES]. [TATTOOS / SCARS / DISTINCTIVE MARKINGS AND THEIR LOCATIONS]. Standing in a relaxed neutral pose, facing the camera, arms naturally at their sides, entire body visible, soft even studio lighting, plain light-gray background.
3. Generate the Character From Multiple Angles
Once you have a master image, generate the character from multiple angles. A single image can only define how a character looks from one perspective. This leads to inconsistencies when the character is in 3D motion.
Different angles each serve a specific purpose in building a character reference:
- A front view establishes the core identity of the character, including facial symmetry, expression, and the full layout of their outfit and accessories.
- A three-quarter view bridges the gap between front and side, making it one of the most useful angles for future illustrations because it shows depth and natural perspective.
- A profile view focuses on the side silhouette, revealing the true shape of the nose, jawline, and hairstyle, as well as how features align from the side.
- A back view completes the set by showing everything hidden from the front, such as hair design and any details placed on the back of the character.
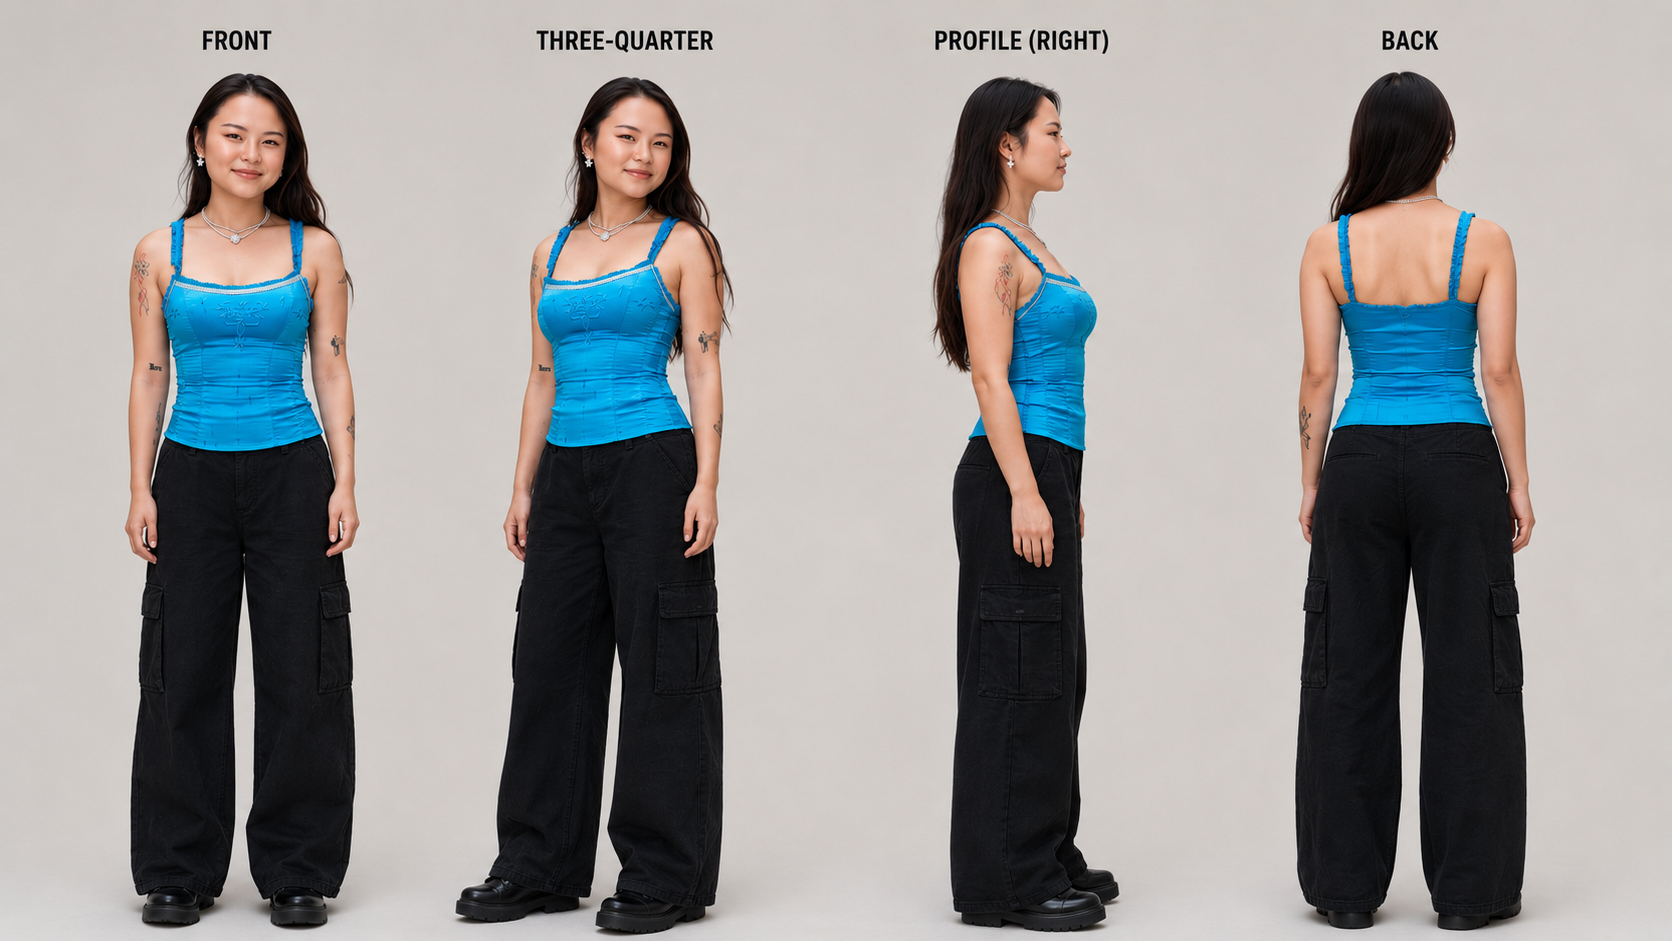
You do not necessarily need every angle. For example, to generate a UGC video, a front and three-quarter view may be enough. For a action shot, three-quarter, side, and back references are much useful because the character will be seen from a wider range of camera positions.
Character Sheet Turnaround Image Template
Using the provided master character reference, generate the same character from the following angles: [INSERT ANGLES]. Preserve the exact facial identity, hairstyle, body proportions, clothing, shoes, accessories, tattoos, and colors in every view. Keep the character at a consistent scale and use the same neutral standing pose throughout. Use soft, even studio lighting and a plain background. Do not redesign the character or change any defining features.
4. Create an Expression Sheet
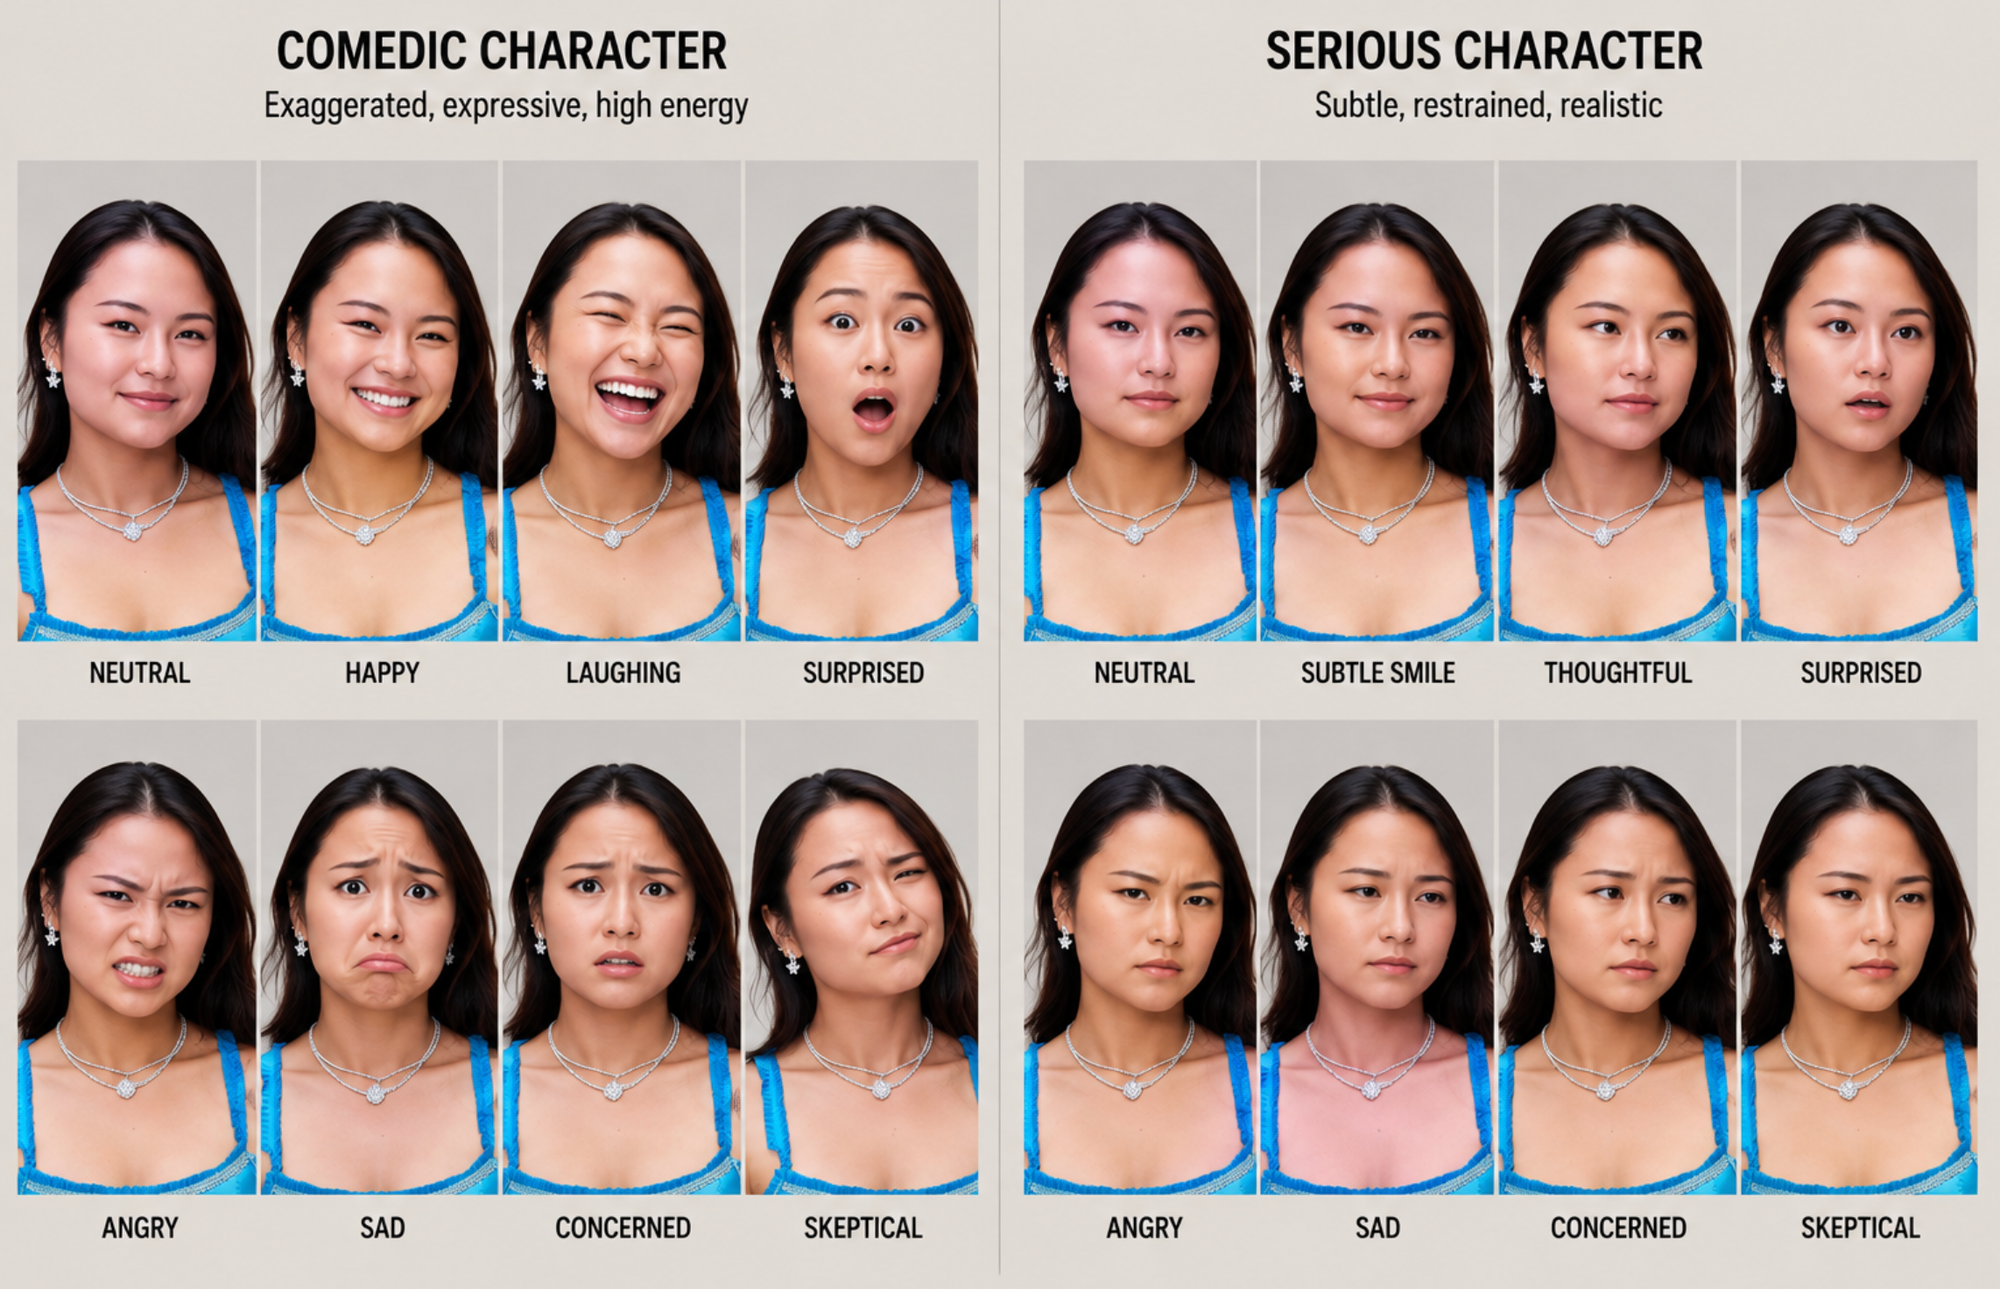
An expression sheet shifts the focus to the character's face, using tighter portrait crops so you can define facial identity in much more detail.
This matters because smiling, shouting, frowning, or looking surprised can cause an AI video model to alter the jawline, eye shape, cheeks, or other features. An expression sheet establishes how the same face changes with emotion.
A useful expression sheet might include neutral, happy, sad, angry, surprised, concerned, and skeptical expressions. The exact set should match the type of character you're creating. A comedic character may need exaggerated reactions, while a more serious character may benefit from subtler emotional variation.
Character Sheet Expression Sheet Image Template
Create an expression sheet for the provided character reference using close-up head-and-shoulders portraits. Show the character with the following expressions: [INSERT EXPRESSIONS]. Preserve the exact same facial identity, face shape, eye shape, nose, jawline, hairstyle, skin tone, apparent age, and accessories across every portrait. Change only the facial expression. Keep the camera angle, framing, lighting, and background consistent across all images.
5. Generate Important Details Separately
A full-body turnaround can't capture every part of a character at useful resolution. If a feature is small, complex, distinctive, or especially important to the character's identity, consider giving it its own close-up reference. Depending on the character, that could include clothing, tattoos, jewelry, hairstyles, or props.
Two particularly useful areas to consider are facial details and outfit details.
Facial Details
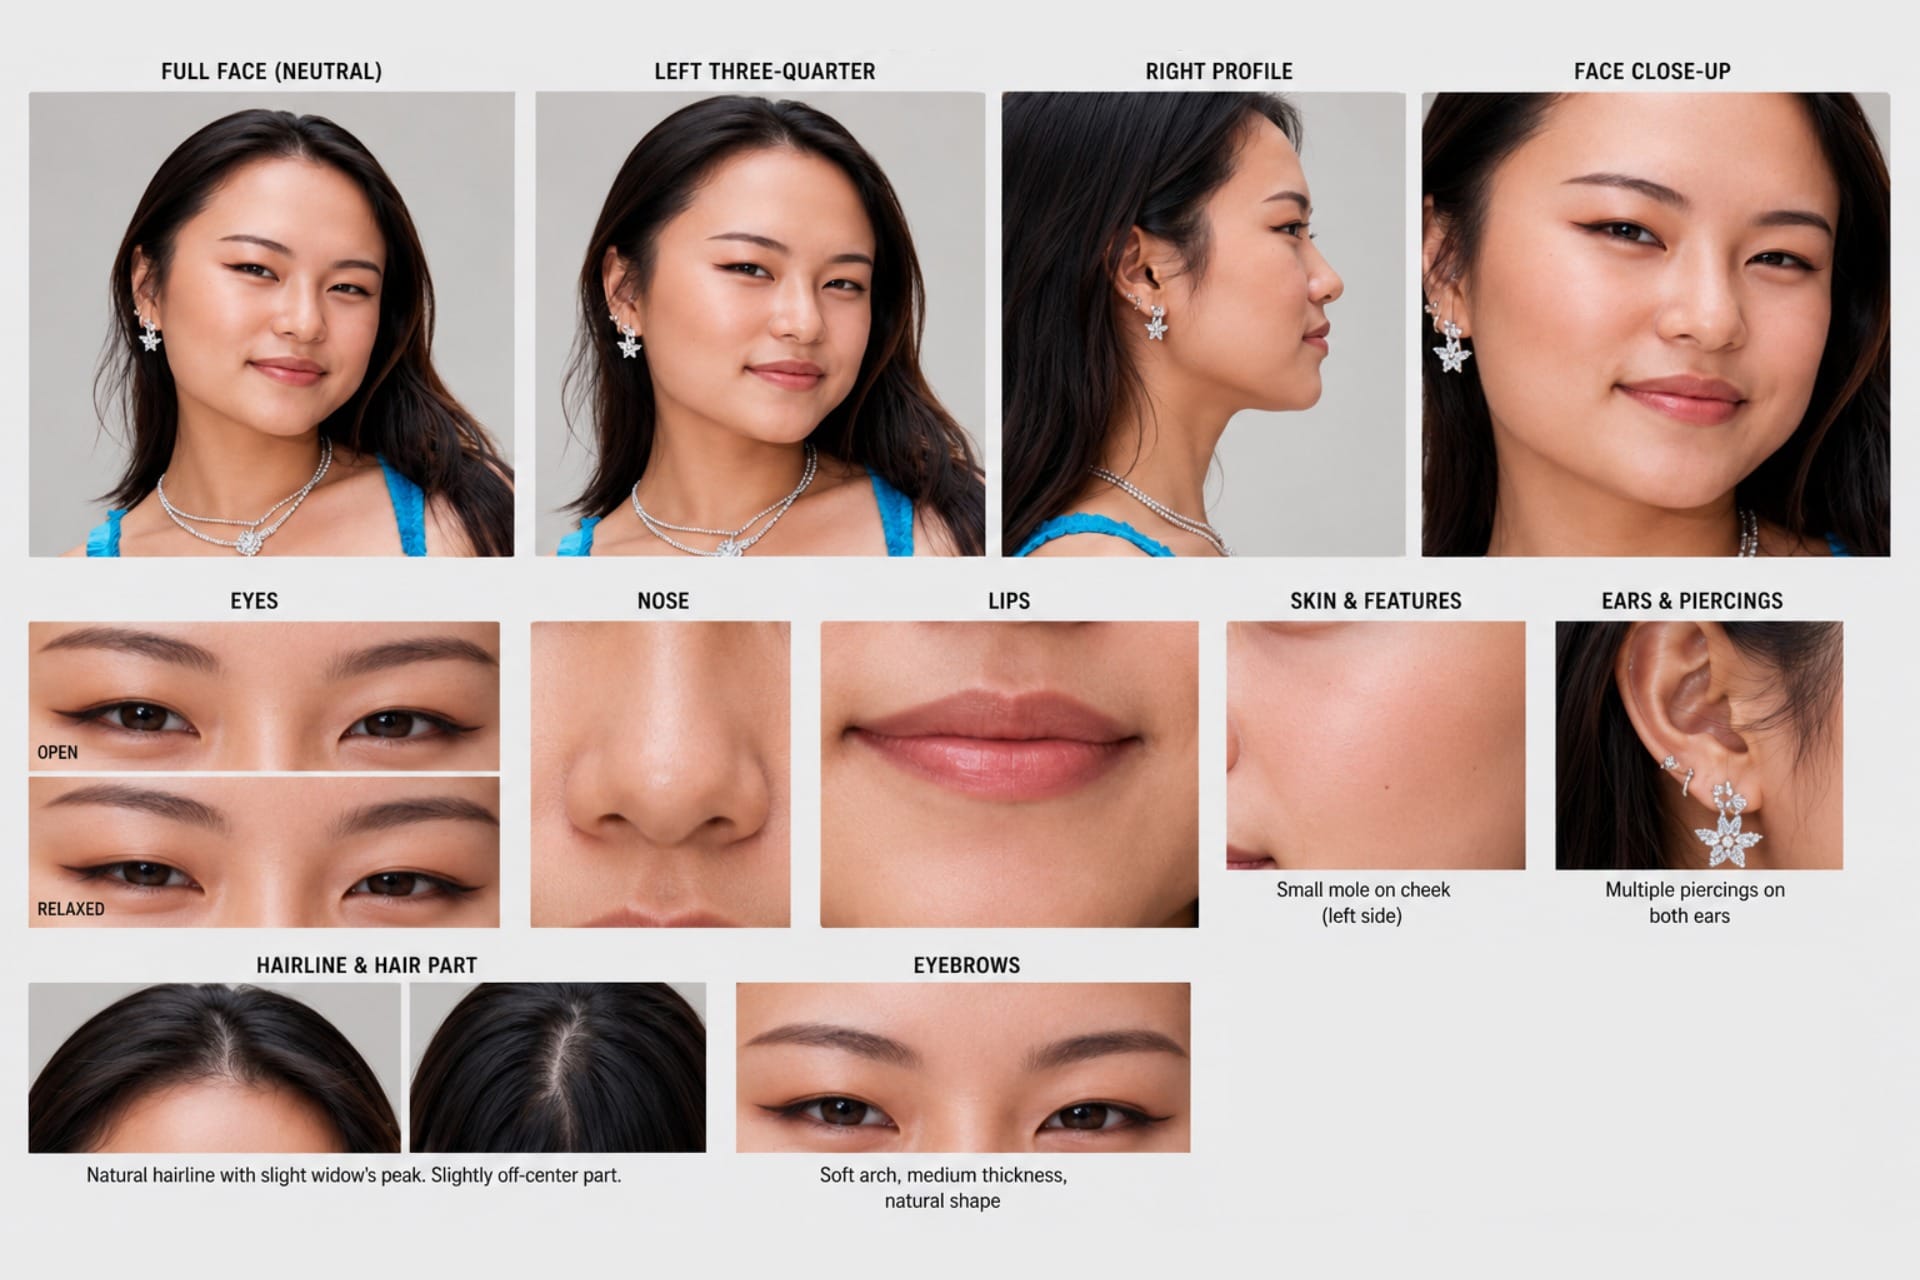
An expression sheet shows how the face changes with emotion; a facial detail reference shows what should not change.
Close-ups can establish details that are difficult to see in a full-body image, such as eye shape and makeup, freckles, scars, piercings, hairline, or other distinguishing features.
Character Sheet Facial Detail Image Template
Create detailed close-up references of [INSERT FACIAL DETAILS] for the provided character. Preserve the character's exact facial identity, proportions, skin tone, hairstyle, and defining features. Use a neutral expression, even studio lighting, and a plain background. Prioritize clarity and consistency.
Outfit Details
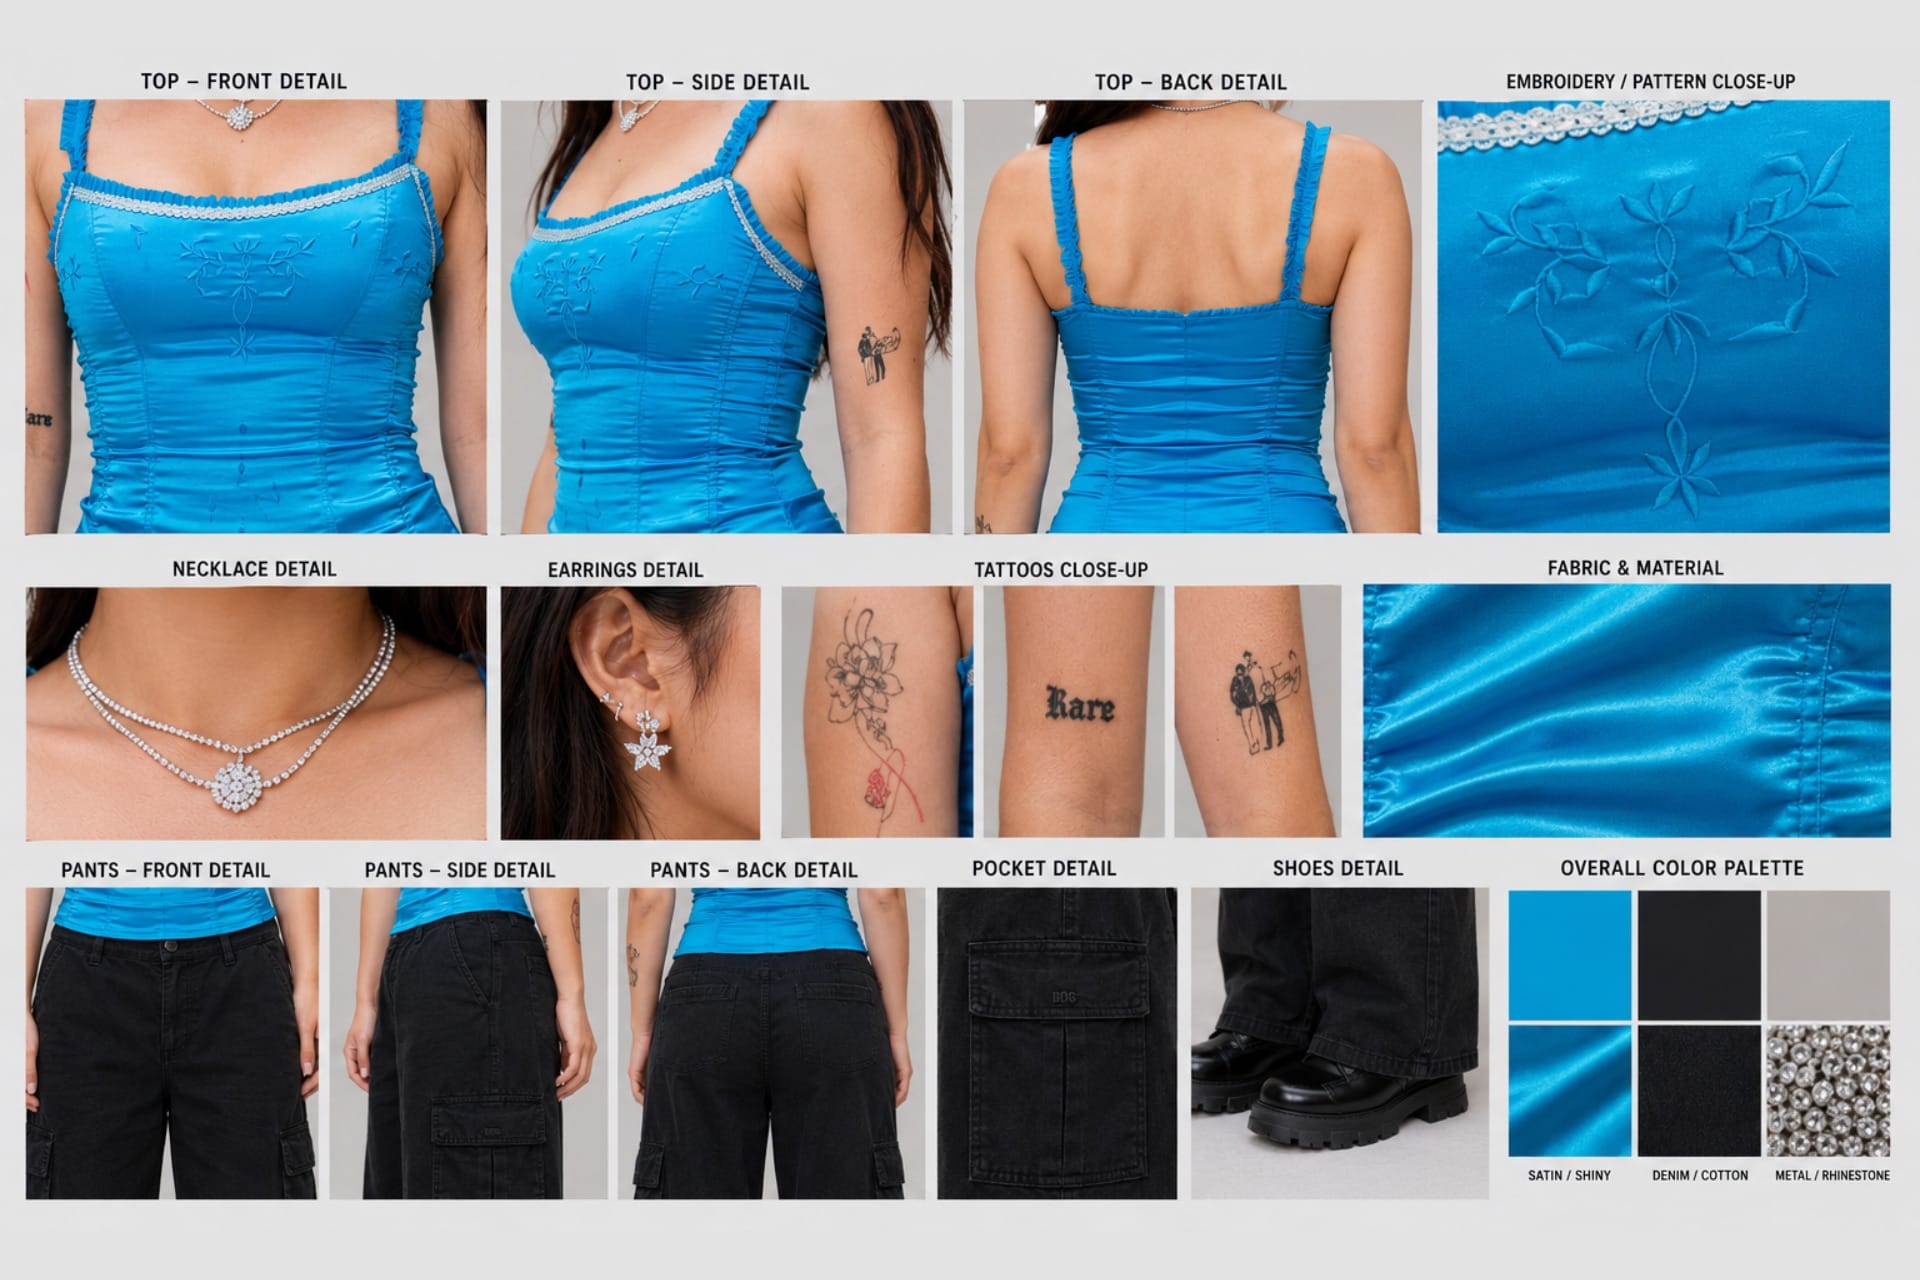
Complex clothing is another common source of drift. A turnaround might establish the overall silhouette of an outfit without clearly showing its jewelry, fastenings, patterns, materials, or other small design elements.
Generate close-ups of any details that need to remain exact. For example, a character with an embroidered top might benefit from a dedicated reference showing the embroidery pattern and neckline construction, while a character in armor might need separate references for insignia, buckles, and individual pieces.
Character Sheet Clothing Detail Image Template
Create detailed close-up references of [INSERT OUTFIT DETAILS] for the provided character. Preserve their exact design, placement, colors, materials, patterns, and construction. Show each detail clearly with neutral studio lighting and a plain background. Do not redesign, simplify, or add new elements.
7. Use Your Reference Sheet to Generate New Images
Once you've created your master image, angle references, expression sheet, and any detail references, you don't need to combine them into a single sheet. Instead, think of them as a reference library for the character.
When generating a new image, select the references that contain the information the model needs for that particular shot. For a close-up portrait, you might provide the master image and expression references. For a full-body shot from behind, the back view and outfit references will be more useful. If an important accessory or clothing detail needs to remain exact, include its close-up as well.
Your prompt should then focus primarily on what is new: the action, pose, setting, composition, camera angle, lighting, and mood.
Use the provided images as references for the same character. Preserve the character's identity and all defining features shown in the references. Prioritize [REFERENCE 1] for [WHAT IT DEFINES], [REFERENCE 2] for [WHAT IT DEFINES], and [REFERENCE 3] for [WHAT IT DEFINES]. Show the character [ACTION / POSE] in [SETTING]. Frame the image as [SHOT TYPE / CAMERA ANGLE] with [LIGHTING / MOOD]. Do not redesign or alter the character.
Model-Specific Guidance for AI Character Reference Sheets
Not every AI model uses a character reference sheet in the same way. Some image generators have dedicated subject-reference controls, while others let you feed several images into the same generation. Video models introduce another distinction: they may use a character image as a starting frame, as a persistent subject reference, or as one reference among several for the character, setting, motion, and camera work.
For that reason, the best character-reference workflow is model-specific.
ChatGPT Images
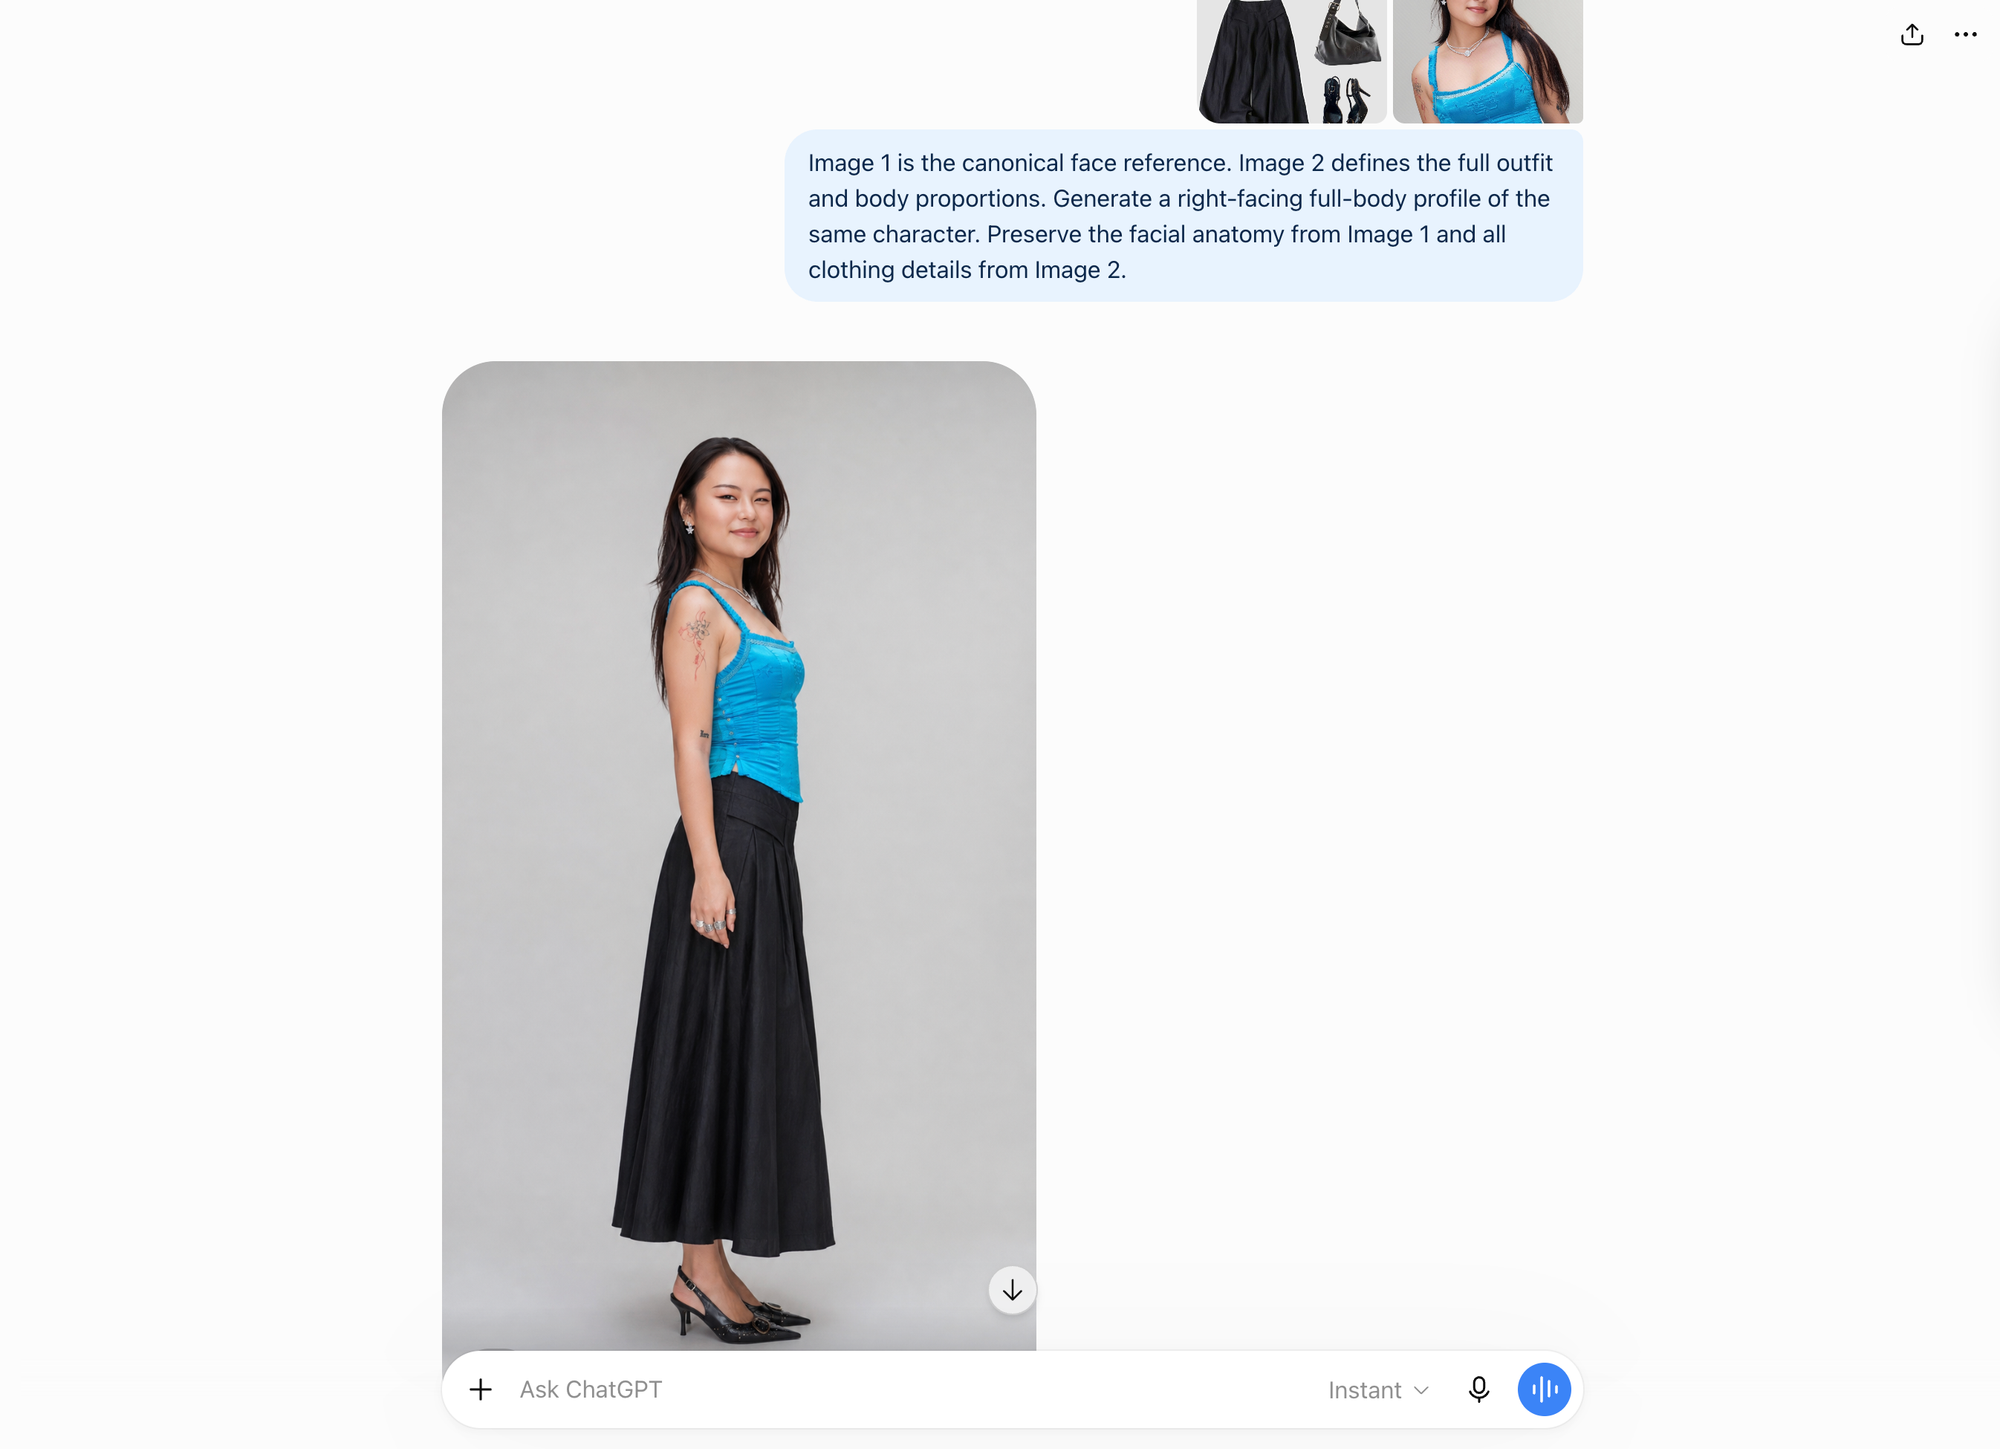
OpenAI recommends making image revisions step by step and giving direct, specific feedback rather than broadly asking the model to "make it better." It also supports multiple uploaded images and recommends explicitly explaining the purpose of each one.
That lends itself well to a workflow with the ChatGPT image generater such as:
Image 1 is the canonical face reference. Image 2 defines the full outfit and body proportions. Generate a right-facing full-body profile of the same character. Preserve the facial anatomy from Image 1 and all clothing details from Image 2.
This is more reliable than simply uploading several images without explaining which details each one should control.
Midjourney V7
Midjourney V7 uses Omni Reference to carry a person, creature, object, or other subject into a new image. Midjourney currently allows one Omni Reference image, so the quality and clarity of that master image matter more than they would in a model that can directly ingest several character references.
A good workflow is therefore to first create one especially strong master character image, then reuse it as the Omni Reference while asking for individual angles or scenes. One limitation is precision. Midjourney itself notes that intricate features such as exact freckles or clothing logos may not reproduce perfectly.
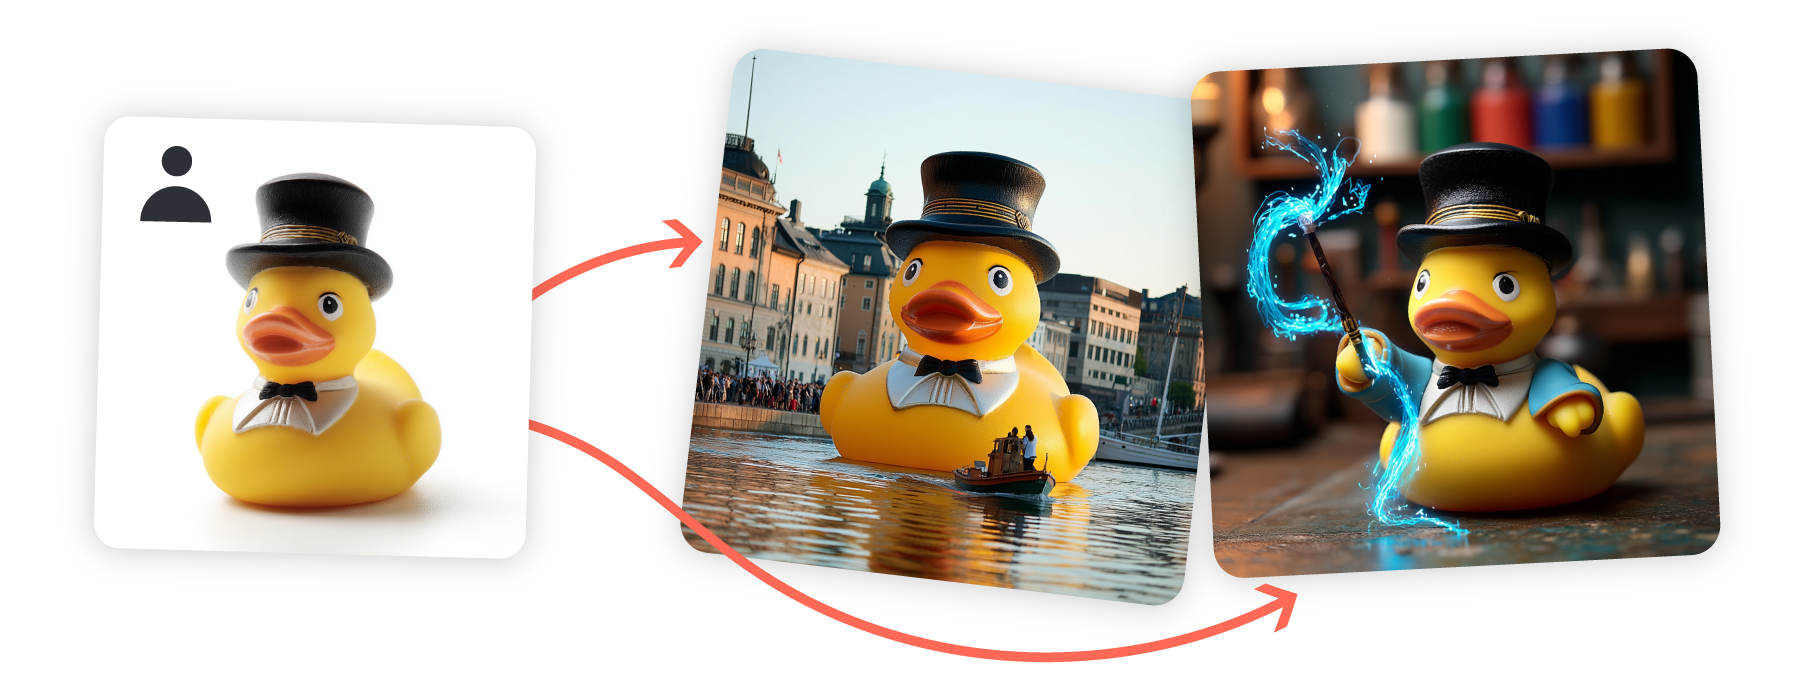
However, you can adjust how strongly the reference affects the generation with Omni Reference Weight (--ow). Midjourney advises staying below 400.
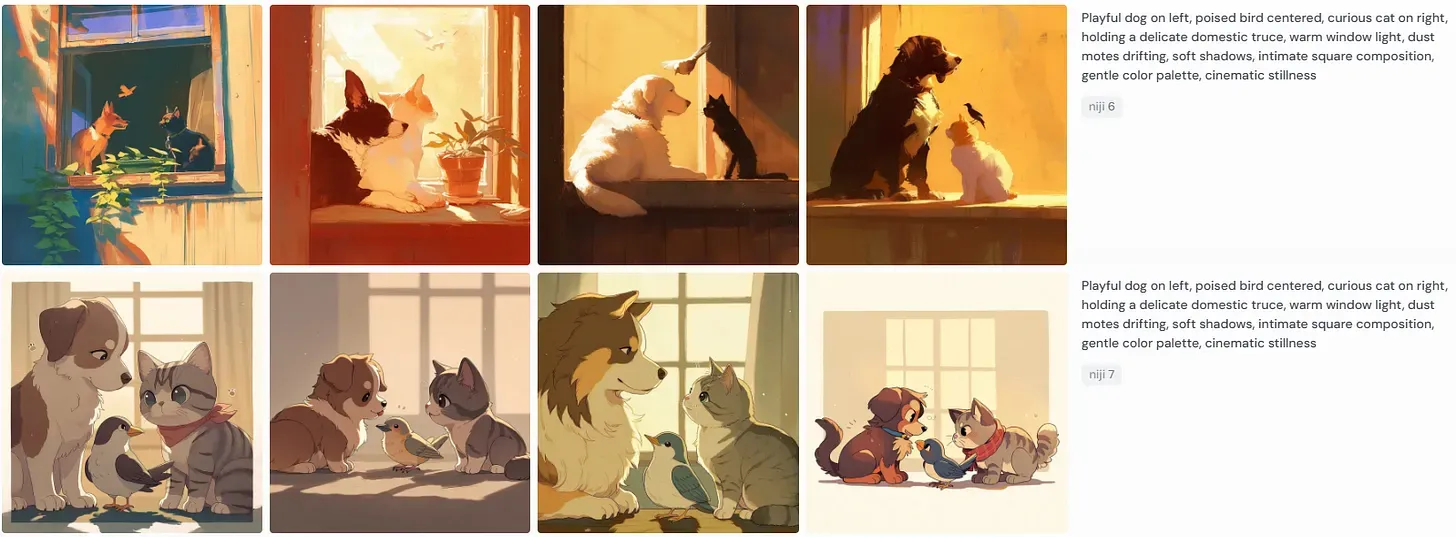
For anime and manga-inspired characters, Niji 7 is worth testing. Midjourney describes Niji as its model family focused on anime and Eastern illustration styles, and Niji 7 specifically improves coherence, fine details, and prompt adherence.
Google Gemini
Gemini has one of the clearest documented workflows for constructing a character from multiple angles.
Google recommends creating 360-degree character views iteratively: generate one angle, then include previously generated images when requesting the next angle:
Step 1: canonical front view
Step 2: front view → right profile
Step 3: front + profile → back view
Step 4: approved references → three-quarter pose
Step 5: approved face references → expression sheet
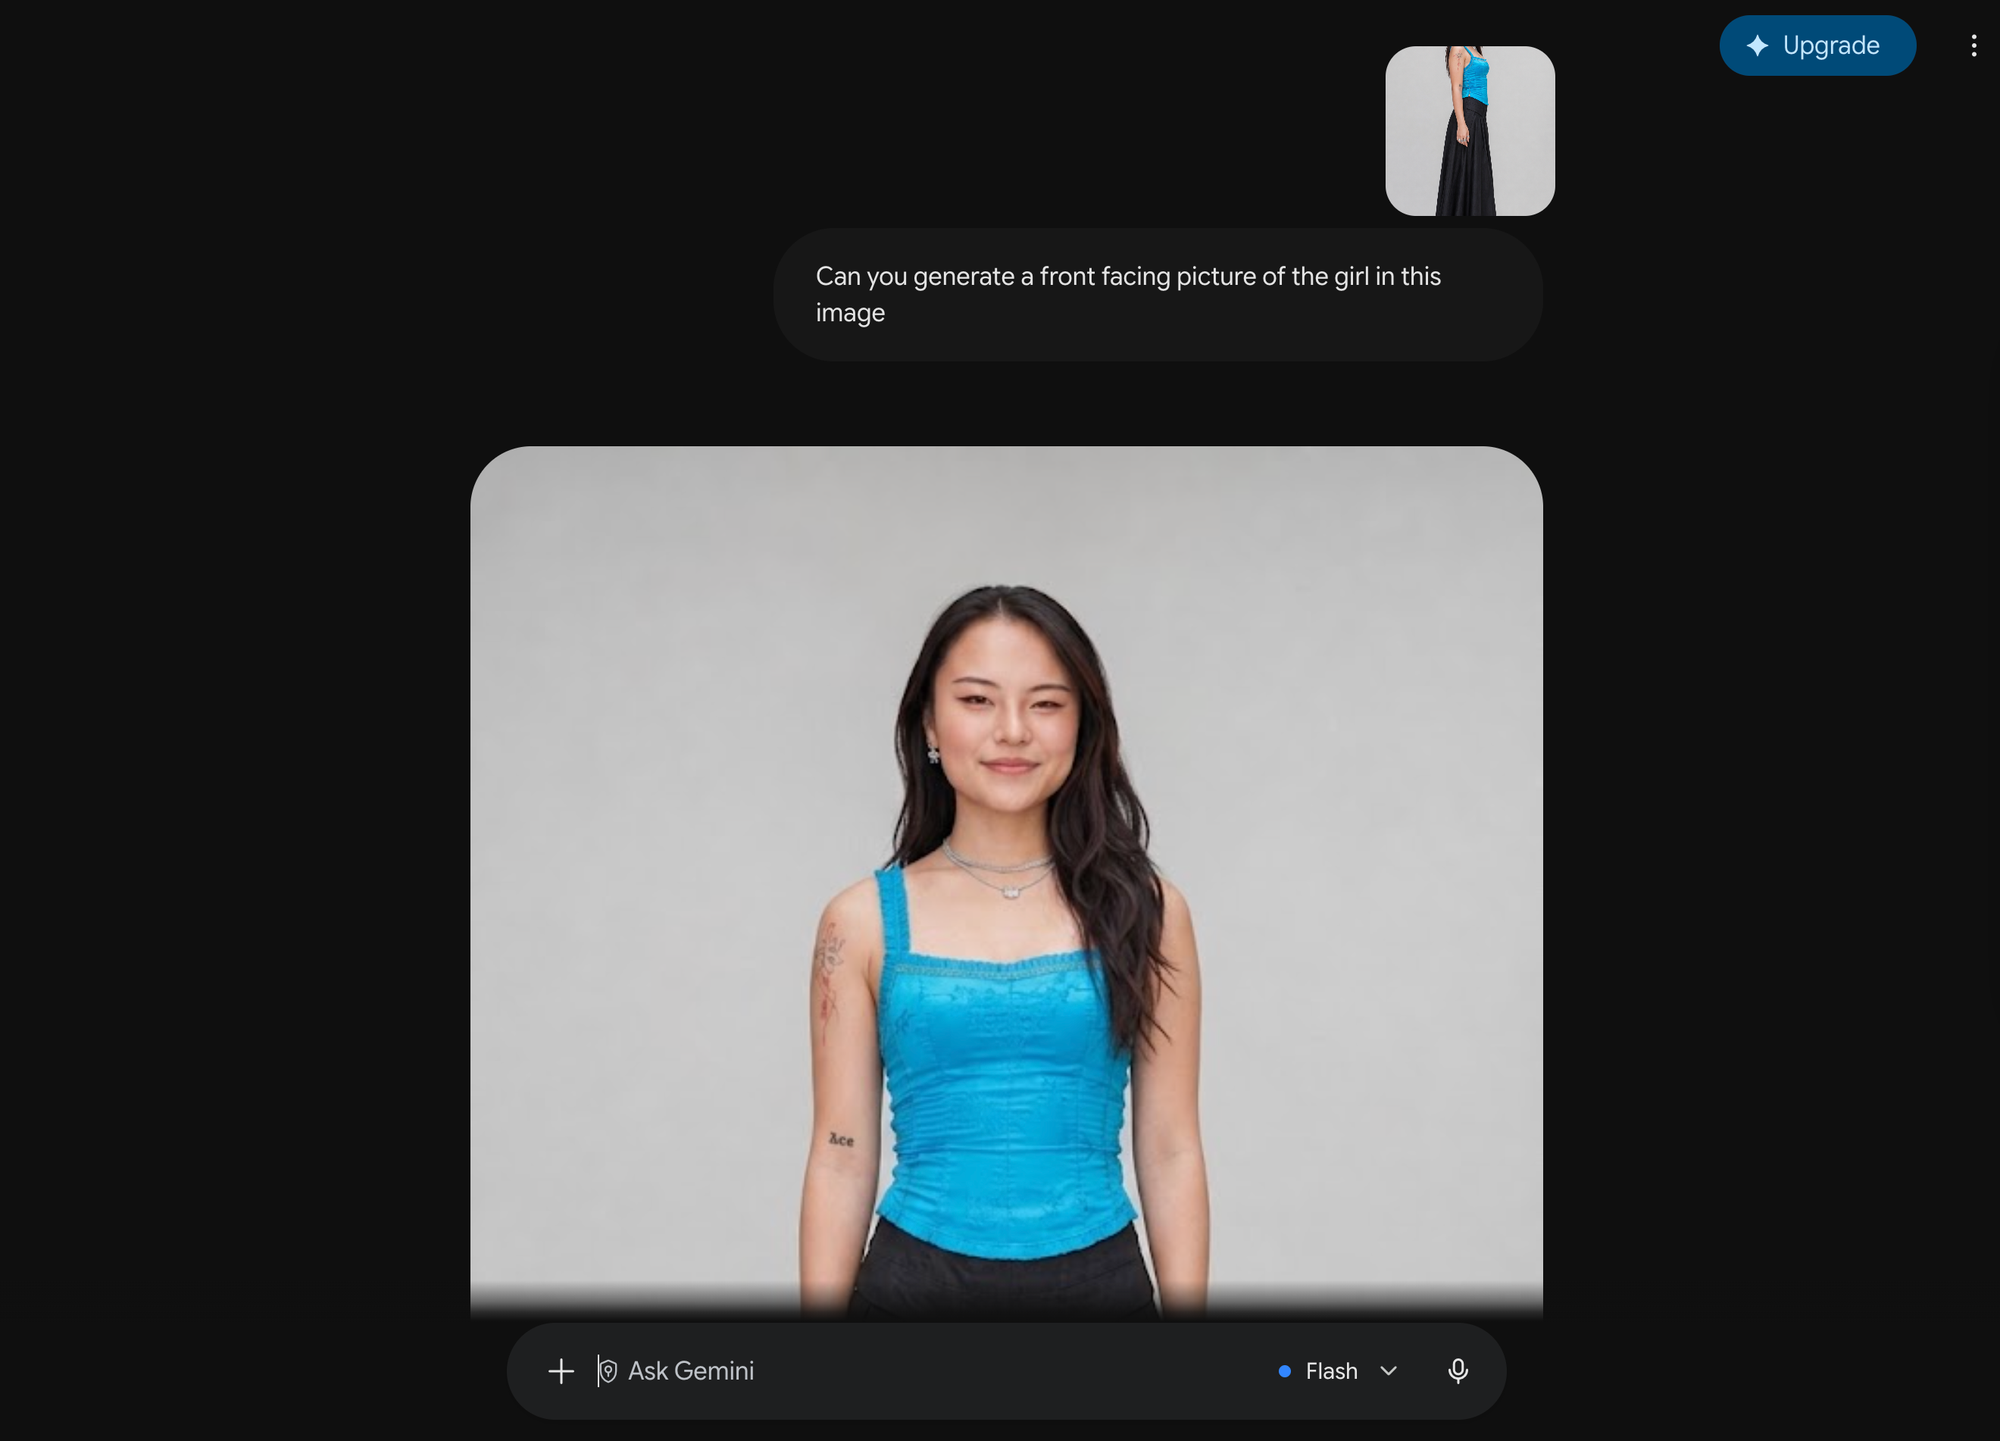
Current Gemini 3 image models can also take up to 14 total reference images. Gemini 3.1 Flash Image can maintain resemblance for up to four characters, while Gemini 3 Pro Image supports up to five character references.
Gemini is therefore particularly useful when your reference sheet needs to resolve the character from several directions rather than relying on one hero image.
Seedance 2.5
Seedance 2.5 accepts up to nine images, three videos, and three audio clips alongside text instructions. Those references can play different roles: one image can establish the character, another the scene, another a prop, while a video can provide the desired motion or camera language.
ByteDance gives a example in which one reference supplies a storyboard, another supplies the character, another the setting, and another the props. That is a useful way to think about reference sheets for modern multimodal video models: the character sheet is one component of a larger reference package, rather than the only image the model sees.
For character consistency, avoid turning all of those references into competing versions of the character. Use a small number of approved character images, then spend the remaining reference slots on information the character sheet does not contain.
Frequently Asked Questions
What should a character reference sheet include?
For most characters, start with a canonical full-body image, a clear facial reference, and front, three-quarter, side, and back views. Add an expression sheet and close-ups of any details that are difficult to see in the turnaround.
The exact contents should depend on how you'll use the character. A character intended for close-up dialogue scenes needs strong facial and expression references, while a character appearing in action sequences may benefit more from full-body views, costume details, and references from several angles.
What is the difference between a character reference sheet and a character turnaround?
A turnaround is one component of a character reference sheet. It shows the same character from multiple angles—typically front, three-quarter, side, and back—to establish how the design works in three dimensions.
A character reference sheet is broader. In addition to a turnaround, it can contain facial expressions, color information, clothing details, props, accessories, poses, and written notes about features that must remain consistent.
Can AI generate a character reference sheet from one image?
Yes, although the quality depends on the model and the source image. A clear, full-body image with an unobstructed face, readable clothing, and relatively neutral lighting gives the model more useful information than a heavily cropped or dramatically posed image.
There is also an important limitation: AI has to invent anything it cannot see. If your source image only shows the front of a character, the model does not actually know what the back of their jacket or hairstyle looks like. Treat the first generated back view as a design proposal, approve or correct it, and then add the approved result to your canonical references.
Should I generate the whole character sheet in one prompt?
You can, and it can work well for early concepts. For a production-quality reference, however, generating everything at once gives you fewer opportunities to catch inconsistencies.
A more controlled workflow is to create and approve the master character first, generate the turnaround from that reference, then build the expressions and detail studies. This turns the process into a series of smaller identity-preservation tasks rather than one complicated generation.
How do I prompt AI to keep the same character?
Use an approved reference image whenever the model supports one, and separate the character's fixed attributes from whatever you want to change.
For example:
Use the provided image as the canonical character reference. Preserve the same facial identity, facial proportions, hairstyle, body proportions, outfit, accessories, and colors. Change only the pose: show the character in a full-body right-facing profile with a neutral stance.
For subsequent scenes, the same principle applies. Let the reference establish who the character is, then use the prompt to specify what the character is doing.
Why does my AI character keep changing?
Character drift usually happens because the model has incomplete or competing information. A new camera angle may reveal details that were never established, a dramatic expression can alter facial structure, or several slightly different reference images can give the model conflicting versions of the character.
When drift appears, return to your strongest canonical reference rather than using the inaccurate generation as the basis for the next one. It can also help to make smaller changes—such as changing the angle first and the environment afterward—instead of changing pose, lighting, style, clothing, and camera position simultaneously.
What is the best AI model for consistent characters?
There isn't one model that's best for every workflow.
ChatGPT Images is useful for iterative design and corrections; Midjourney's Omni Reference is useful for carrying a strong character concept into stylized generations; and Gemini is particularly well suited to building characters iteratively from multiple visual references.
For video, models such as Veo, Seedance, Minimax and Wan provide different reference-based workflows. The more useful comparison is therefore not simply which model produces the "best" images, but which one gives you the reference controls required by your project.
Can I create a character reference sheet from a real person?
Yes, if the image model supports reference-image generation or editing. Start with clear source imagery that establishes the person's face and other characteristics you need to preserve.
If you're converting the person into a stylized fictional character, it can be useful to first create one approved stylized version. Treat that image as the canonical character design for subsequent turnarounds and expressions rather than repeatedly asking the model to reinterpret the original photo.