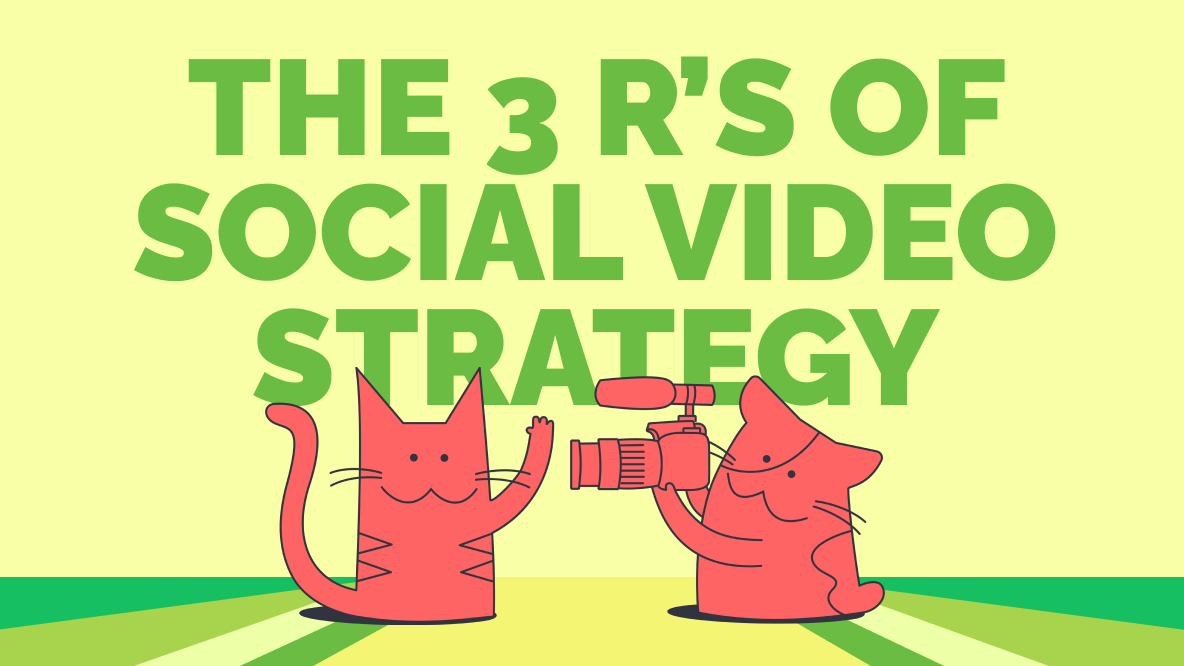
The Three R's of Social Video Strategy: Reuse, Resize, Repurpose
We've got three R's we're going to talk about today: If you want a social media video strategy that works for you instead of the other way around, you've got to learn to reuse, resize, repurpose.
Video is king on social media these days which might feel overwhelming if you're a marketer (or blogger, artist, small business owner, etc.) first, video editing aficionado second. So, how do you create a social video strategy that works for your schedule when you have to be on every platform all at once?
Let me introduce you to the three r's of social media video strategy (yes, like the Jack Johnson song — only instead of saving the planet, we're saving your sanity):
- The First R: Reuse Content You've Already Published
- The Second R: Resize Existing Content for New Platforms
- The Third R: Repurpose Content in New, Creative Ways
Whether you're a marketer, a content creator, a small business owner, or anything in between, these three R's will help you work smarter, not harder.
How to Reuse Video Content You've Already Published
The First R is probably the simplest and most intuitive. Having a brand presence on multiple platforms doesn't have to mean tripling or quadrupling your content production. Instead, reuse the content you've already created for other channels or purposes.
This can be as straightforward as sharing your latest TikTok on Instagram, YouTube Shorts, and Twitter. But you can also reshare older content that did well elsewhere. One thing to keep in mind, though, is that original content tends to do better on most platforms.
What do I mean by "original?"
Traditionally, original content is anything you've created yourself. However, social media algorithms interpret it a little differently. Platforms like Reels and YouTube Shorts are trying to differentiate themselves from TikTok, so they actively deprioritize content with watermarks from other platforms.
That means that just downloading your latest TikTok and uploading it to Instagram isn't going to cut it. At least, not if you actually want anyone on IG to see it.
There are two ways to get around the problem of platform-specific watermarks on your content.
Edit Social Videos in Your Browser Instead of In-App
Although Reels, YouTube Shorts, and TikTok all have their own video editing tools, if you create the content inside the app, you can't save the file directly to your phone sans watermark. I also find the mobile app editing suites to be difficult to use.
Instead, try using a browser-based editor like Kapwing.
Cut together all of your clips, include transitions and animations, and add captions all in one place so you can upload and publish without any further edits.
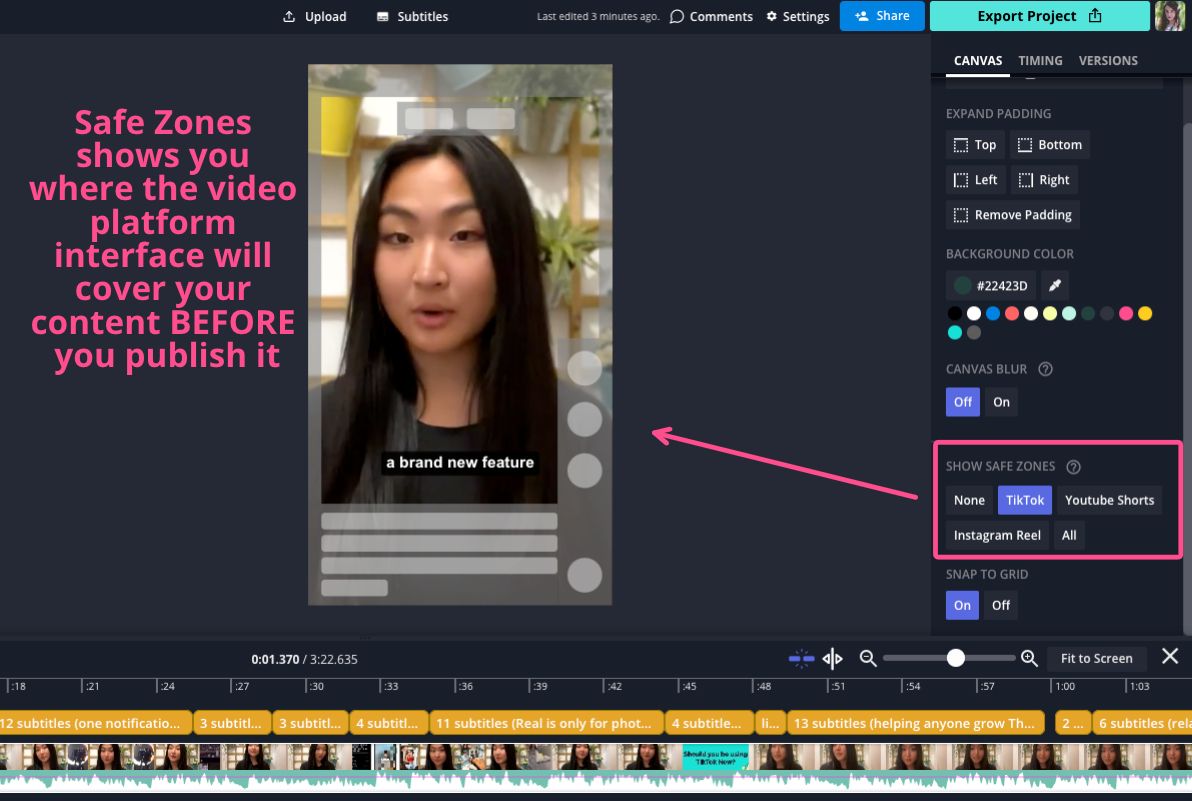
Bonus: Before exporting your finished project, use the Safe Zones filters to check that your content and captions will be visible no matter which app you're posting on.
You might be thinking, that's all great for new content I want to make and share on all of my social media channels. But what about my existing content that TikTok (or Reels or Shorts... they all do it) keeps slapping their watermark on?
How to Resize Content for New Platforms
Reusing existing content is great if you're taking content from one vertical video platform to another, but sometimes it's not that straightforward. Even with the recent focus on short-form, vertical video, if you're creating content for multiple different channels, there's going to be some variation in video dimension and size.
So, how do you get the most out of your content if it's the wrong size for posting across all of your channels?
Let's say, for example, that your company publishes long-form YouTube videos or hosts live webinars. You want to be able to share that valuable content with your audiences on TikTok or Instagram but the videos are 16:9, not 9:16. Not to mention, you'll need to find the most relevant clips to share, since both of those platforms prioritize short-form videos.
While you can upload your horizontal videos to vertical video platforms (and the other way around), the question is, why would you want to? Help your content put its best foot forward by resizing it for the platform it's on, rather than making viewers squint to see what's happening in a tiny horizontal box in the middle of their screen. Or, let's be honest, just scroll past it.
The goal is to work smarter, not harder, so how can you resize your content with the least amount of extra work? By using a video resizing tool like Kapwing. We recommend using our Repurpose Studio to speed up the process—automatically find clips, resize, and format for social all in one place.
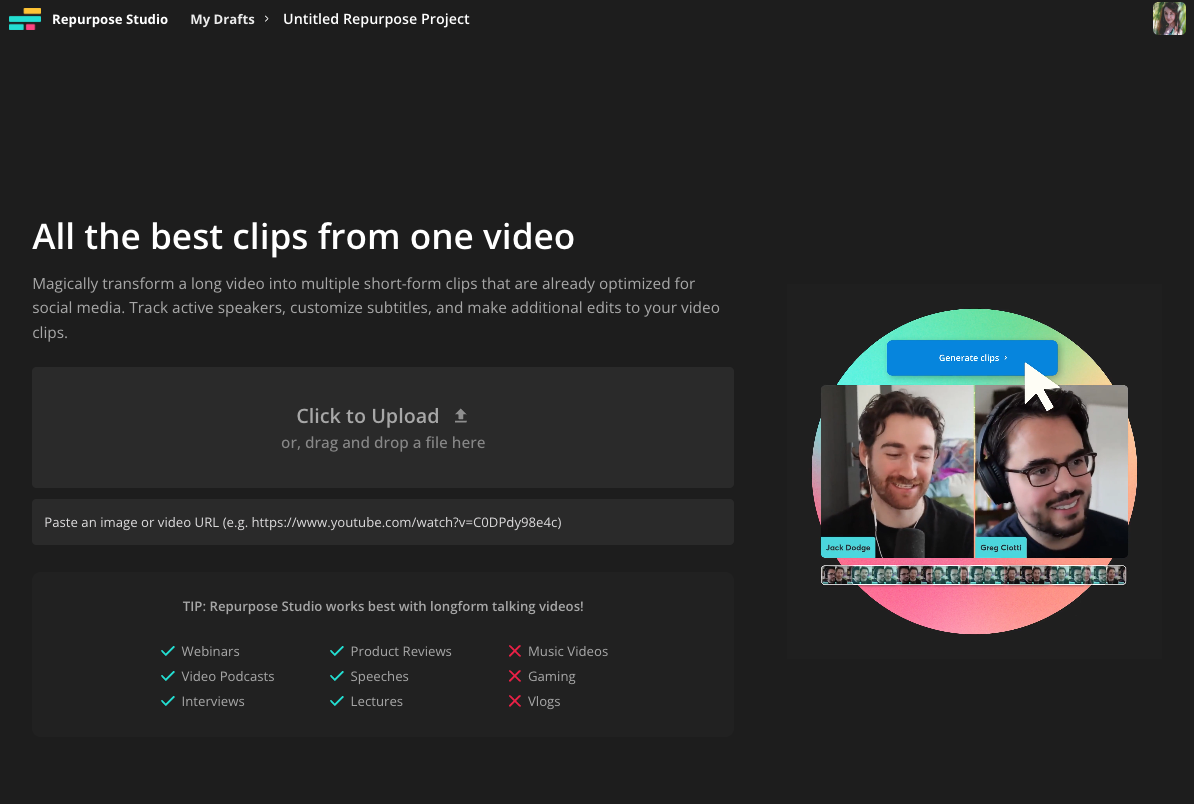
How to find and resize clips from longer videos
Open the Repurpose Studio in your Kapwing workspace.

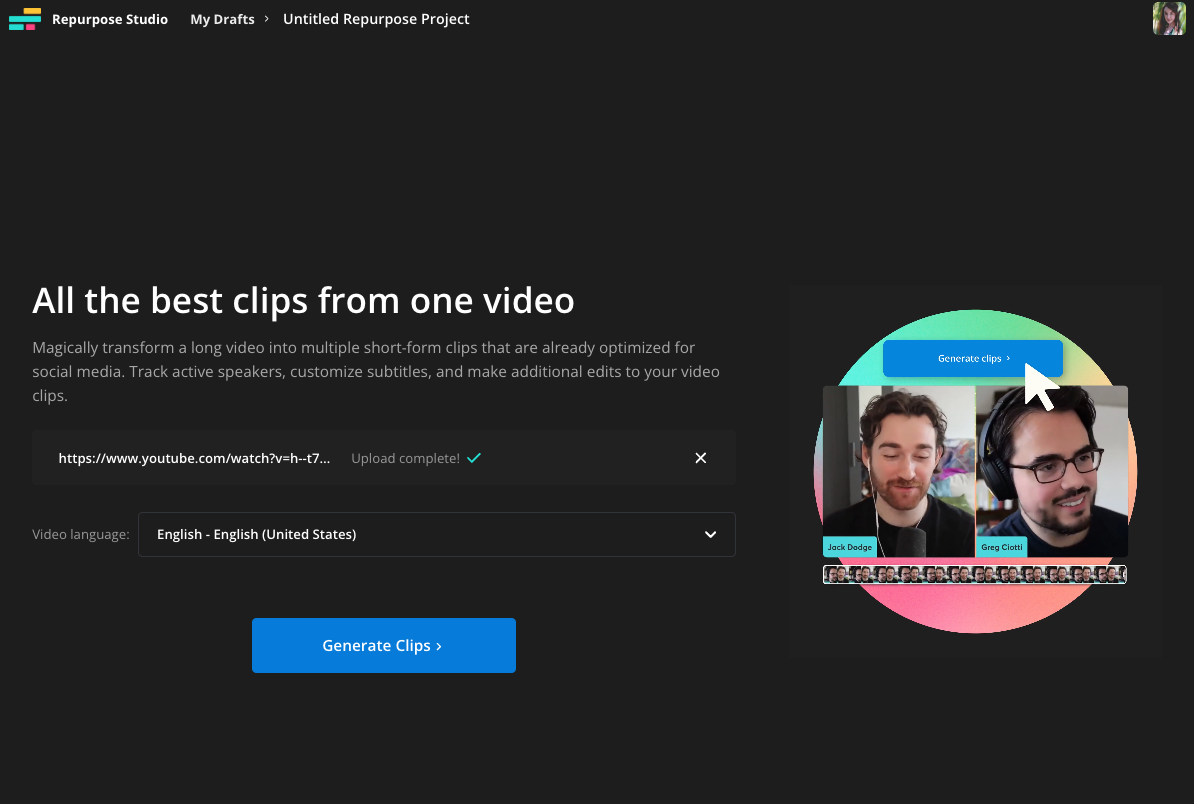
Upload your video from your device or paste a link to the video, if it’s already published somewhere online.
Once your video has been uploaded, hit “Generate Clips.”
It could take up to 10 minutes for Kapwing to analyze the transcript and choose and format the best clips. Longer videos will take longer to process. You’ll receive an email when they’re ready for review.
Choose the size and subtitle style of your video clips while you're waiting for them to process. You can also toggle Speaker Focus, which keeps the speaker in frame for the whole clip, on or off.
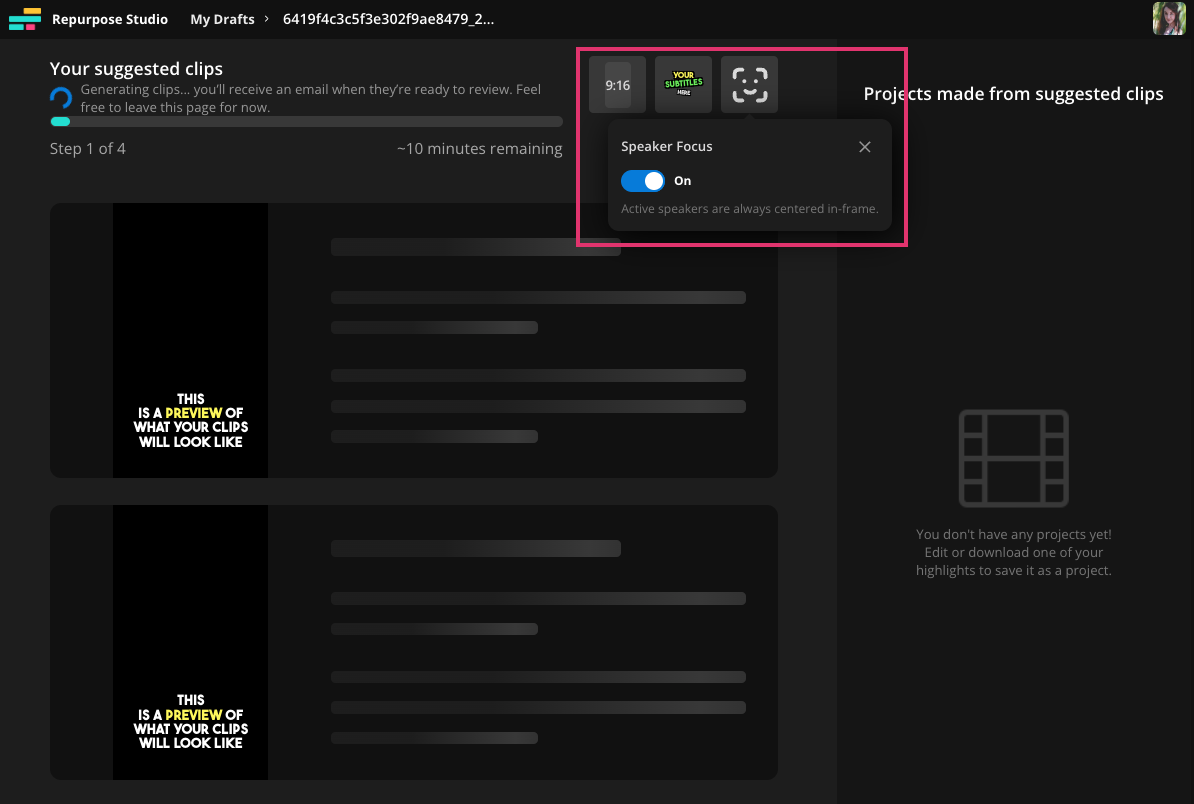
Once your clips are ready, you’ll see the previews as well as the transcripts for them right there in Repurpose Studio.
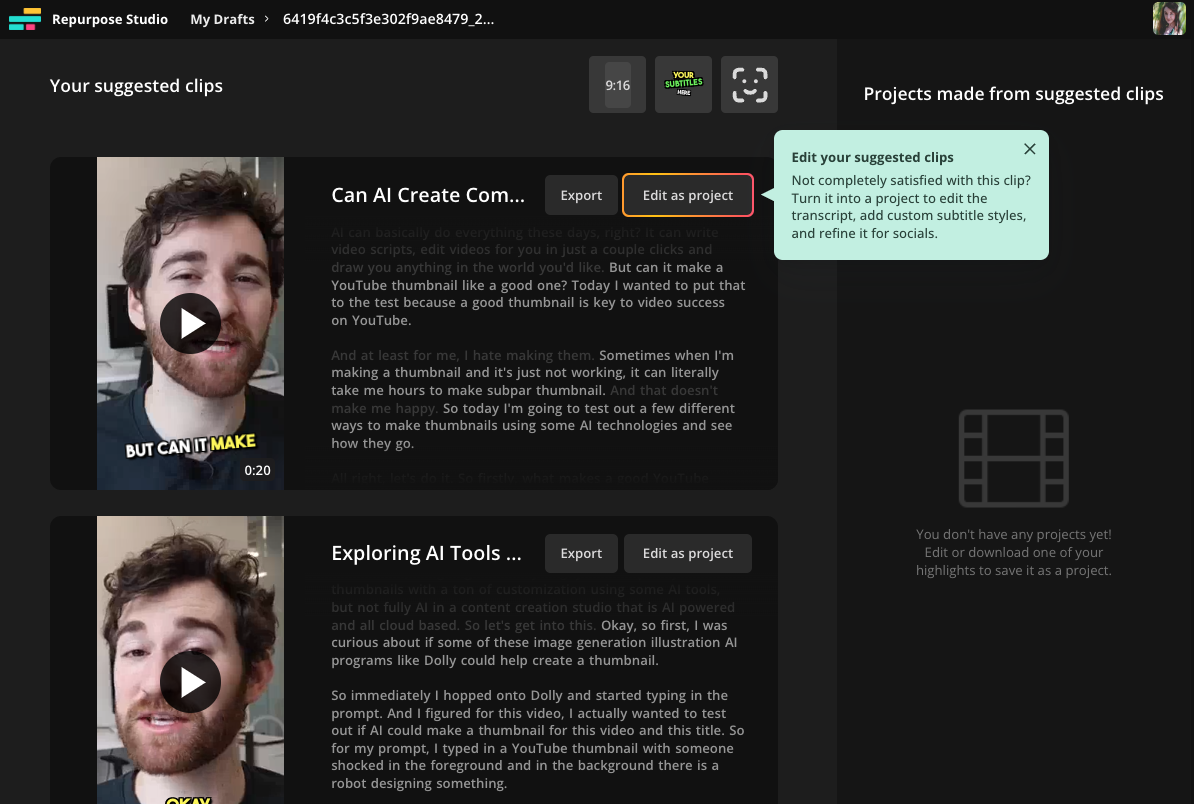
You can choose to export as is or open the clip as a new project and edit it further.
If you do choose to edit a suggested clip, Kapwing will open a new project in a new tab in your browser. Here, you can edit the entire clip as if it were a video you created from scratch in Kapwing.
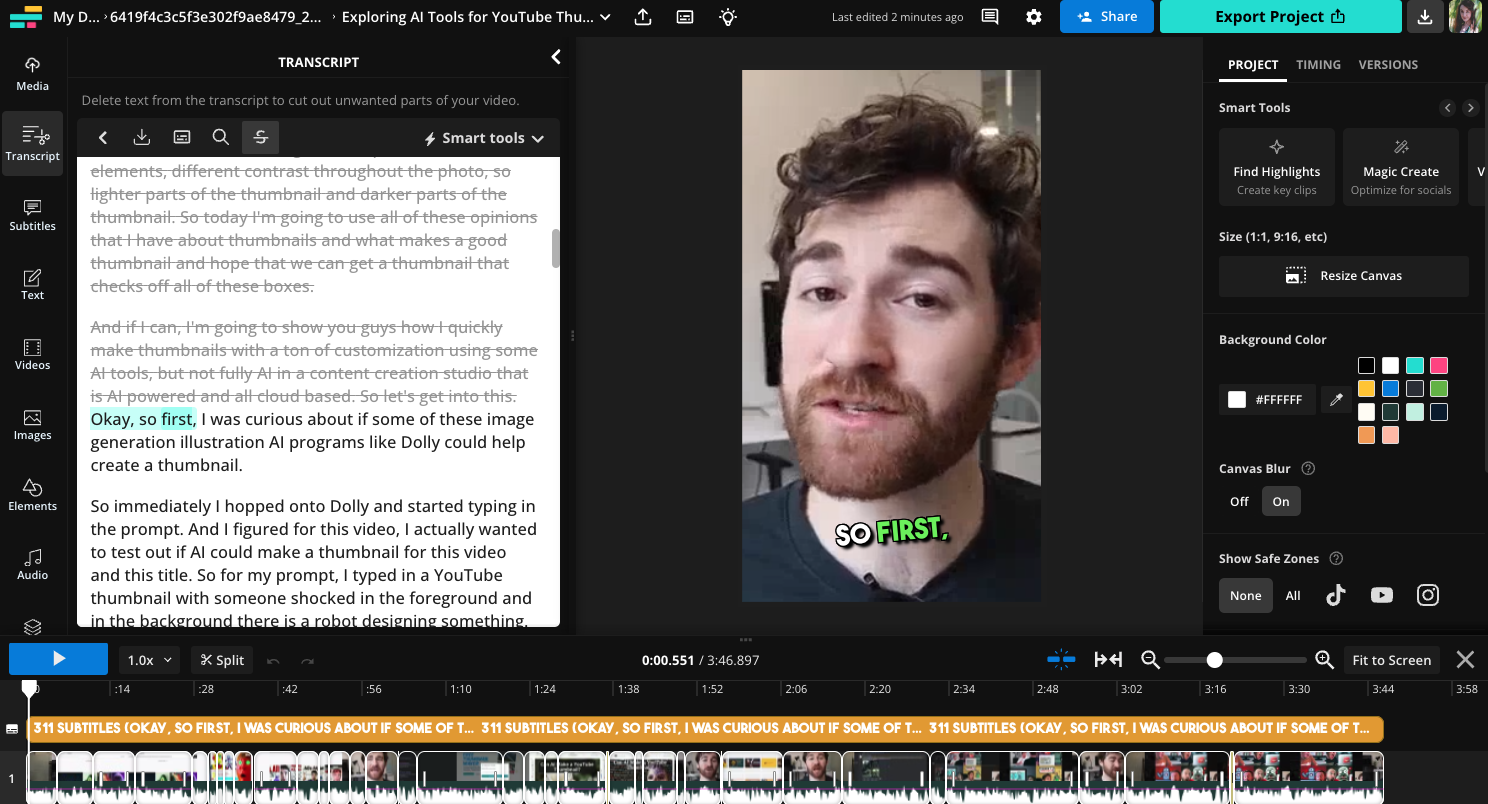
In this example, we’ve opened the transcript editor. The section Repurpose Studio chose to create a clip works for the most part, but we can clip this first phrase out to make the intro flow better as a standalone piece.
You can also customize the font and style of your subtitles, add overlays, and use Safe Zones filters to double-check everything looks perfect before you export.
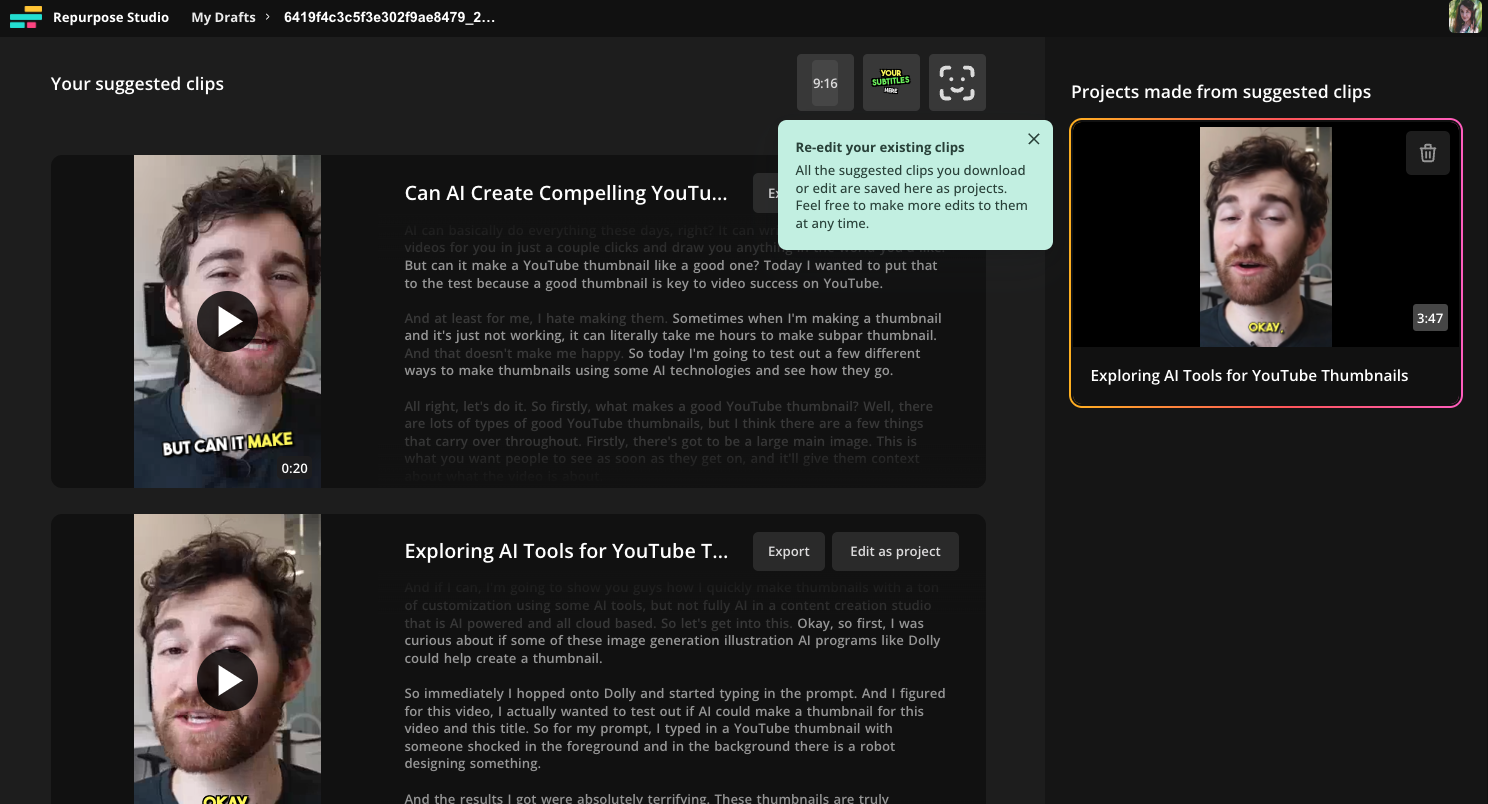
If you reopen your Repurpose Studio project, you’ll see that any projects you’ve created from the suggested clips will be saved in the right side panel so you can easily access and re-edit them all from one place.
How to resize existing clips
If you're resizing a horizontal video that's already a minute or less in length, you can just use Kapwing's resizing tool in the regular studio.
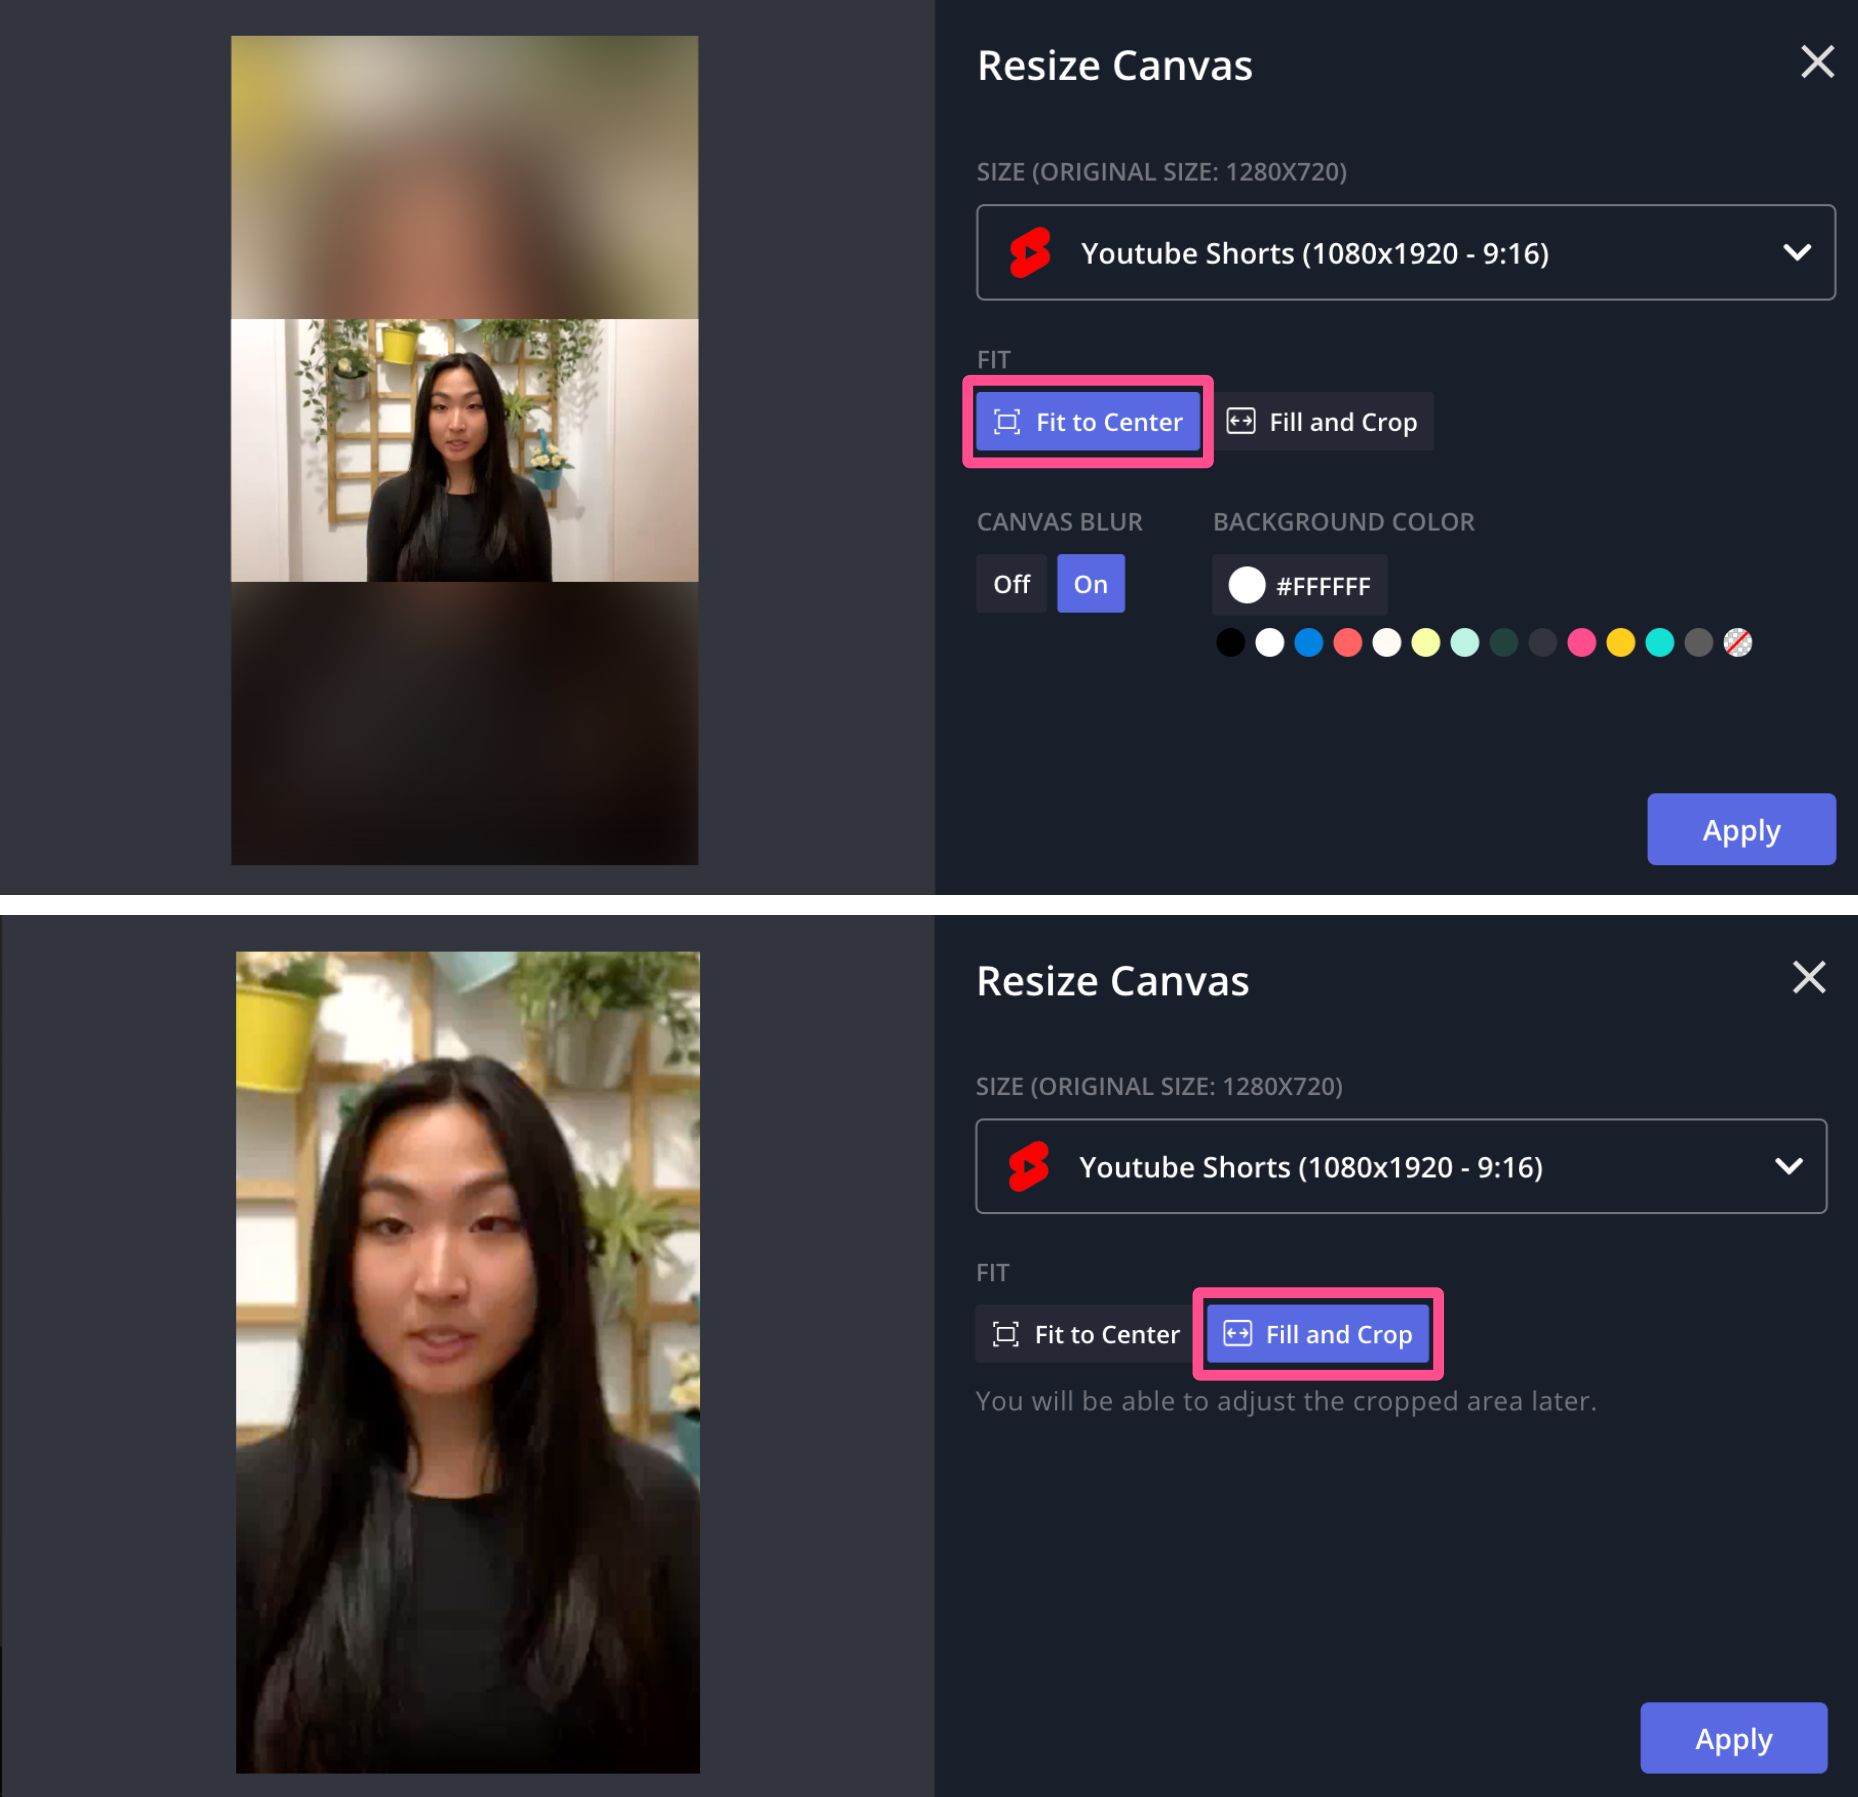
From the "Select Size" drop-down menu, choose the new aspect ratio for your video from the available presets or enter a custom aspect ratio. For vertical video, you'll want to pick one of the 9:16 presets, like YouTube Shorts, TikTok, or Instagram Reels.

Once you select the new aspect ratio, you'll have the option of "Fit to Center," with or without background blur, or "Fill and Crop." Choose the one that best fits the kind of content you create. For the purposes of this example, I went with the "Fill and Crop" option, so it looks most like videos filmed natively on vertical platforms.
Adjust the crop to make sure everything you want in the video is in frame and then you're ready to add captions, check your framing with Safe Zones, and export.

By resizing and trimming your horizontal video for vertical platforms, you're getting new life out of old and existing content and cutting your work in half.
How to Repurpose Existing Content in New, Creative Ways
The third and final R: Repurpose. While technically the first two R's could fall under this category, I want to specifically talk about how to think outside the box when it comes to repurposing video content. There's opportunity for great social video content in more places than you'd think.
To start building your content repurposing workflow, think about the kind of content your brand or company already makes: blog posts, podcasts, static image posts, tweets, the list goes on. These might not seem like obvious candidates to be repurposed as video content, but that's where a little dash of creativity (and the right tools) can come into play.
Here are some examples pulled from real businesses and brands to inspire you:
1) Turning a podcast into a video post
While some podcasts also exist as videos (aka vodcasts), that's extra work that not everyone is down for. Also, even if you decide to make vodcasts going forward, maybe you have a backlog of existing podcast episodes that are full of great tidbits you want to share on social media.
An easy way to turn audio-only content into video content is with a waveform animation. You can add one by uploading your audio file to Kapwing and choosing a waveform from the Elements tab. Change the color of the waveform to match your branding or the podcast's cover artwork.

Speaking of artwork, while you can leave the background just a solid color, it's a nice touch to add your podcast logo, cover art, or stylized image of the speaker for an aesthetically pleasing background. Finally, add subtitles so viewers can follow along with or without their sound turned on.
You can also use a podcast audiogram as a way to promote your podcast to new audiences. When Erin Welch, Ph.D., of the epidemiology podcast "This Podcast Will Kill You" did a summer series of bonus episodes, they promoted the new format on their Instagram page:
Even though TPWKY doesn't regularly post audio clips of their podcast to their feed, they knew that regular listeners might not know to tune in for the bonus episodes and wanted to get the word out.
2) Turning a blog post into a video
Your brain might not immediately go to written content when brainstorming for new video ideas, but it should! If you have a successful blog or Substack, I guarantee there are plenty of nuggets of information in there that you can make videos about. The best part is, you or your team has already done all the hard work and research by writing the post. All you have to do is distill the most important points down into a short video script.
We do this with our high-performing Resource Library content, like this article about BeReal notification times that we turned into a TikTok:
@kapwing Ever wondered what time BeReal send the notification to post? We found out 👀 #bereal #socialmedia #investigation ♬ Love You So - The King Khan & BBQ Show
3) Turning website content into a video
Blog posts aren't the only site content you can convert into video to share on social media. If you have informational content on your website, like a help center or a terms glossary, chances are your social media audience would find that info useful, too.
Squarespace has an ongoing series in which they take glossary terms and define them in video format on Instagram:
It's simple and straightforward, but it works because it's relevant to their target audience, and the engaging caption and colorful video catch and hold viewers' attention.
This tactic is great if you operate in an industry that has a lot of jargon or niche vocabulary. Demystifying things and breaking them down for your audience establishes trust with your followers and positions you as an expert on industry topics. You can also repurpose product-specific site content, like help center articles, on social media to give followers a better understanding of what you do.
And you don't have to stop at repurposing physical assets. Content atomization is a great way to repurpose key themes and ideas when the original piece of content doesn't lend itself well to a quick resize or reformatting. Reworking the same concept across channels helps cut down on ideation time while still producing net new content.
Now that you have an idea of how to Reuse, Resize, and Repurpose content for your social media video strategy, I hope you put those three R's to good use! Whether you're looking for new ideas to flesh out your content calendar or just need some tools for lightening your workload, we've got you covered.
Check out our Resource Library for more creative tips, tools, and tricks. You can also find inspo and info over on our YouTube channel.