3 Ways to Make Instagram Reels
Reels is Instagram's answer to TikTok and has taken over our Instagram Feeds in the last few years. In this article, I'll show you how three different ways to make a Reel on Instagram.

Reels seem to have taken over Instagram, copying TikTok’s compelling format and easily scrollable feed. In fact, Reels have consistently shown higher engagement rates and reach than other types of Instagram posts over the past two years.
If you want to capitalize on that, you need to know how to create Reels on Instagram.
In this article, I’ll walk you through how to make a Reel on Instagram as well as how to create your Reel in an online editor and then upload to Instagram afterward.
Here’s what I’ll cover:
- Instagram Reels Size and Length Requirements
- How to Make a Reel on Instagram
- How to Make a Reel with Instagram Reels Templates
- How to Make an Instagram Reel in Kapwing
Let’s jump right into it.
Instagram Reels Size and Length Requirements
Like TikToks, Reels are typically shorter, vertical videos. Here’s the criteria for dimensions and duration.
What Is the Aspect Ratio for Instagram Reels?
The correct aspect ratio for Instagram Reels is 9:16. To keep the video quality of Reels high, Instagram also requires a minimum of 720p resolution and a 30FPS frame rate.
If you’re filming your video directly in the Reels editor on Instagram, you don’t need to worry about these settings, as they’ll be automatically applied. If you’re filming and editing your Reels with a third-party app or editor, though, make sure they’re the right size and resolution.
How Long Can Instagram Reels Be?
Instagram Reels can now be up to 20 minutes long. This is significantly longer than TikTok, which recently expanded video limits to 10 minutes.
Note: If you’re filming your video directly in the Reels editor on Instagram, you’ll need to change your video length before you hit record.
How to Make a Reel on Instagram
There are a few ways to make Reels inside the Instagram app. You can upload an existing video that you filmed and edited elsewhere (more on that shortly), you can film and edit your Reel from scratch, or you can make a Reel using an Instagram Reels template.
First, let’s talk about how to create Reels from scratch.
Step 1: Open Instagram Reels
Open Instagram on your mobile device and tap the Reels symbol at the bottom of the screen. Then, tap the camera symbol at the top right corner to open the Reels editor.

Step 2: Choose Your Settings
Let's adjust the settings before hitting the record button. There are nine buttons on the left side of the screen that allow you to manipulate different settings for your Reel. You don't have to use every feature, but I recommend testing them out to see what you like.
Here’s a breakdown of what each one does:
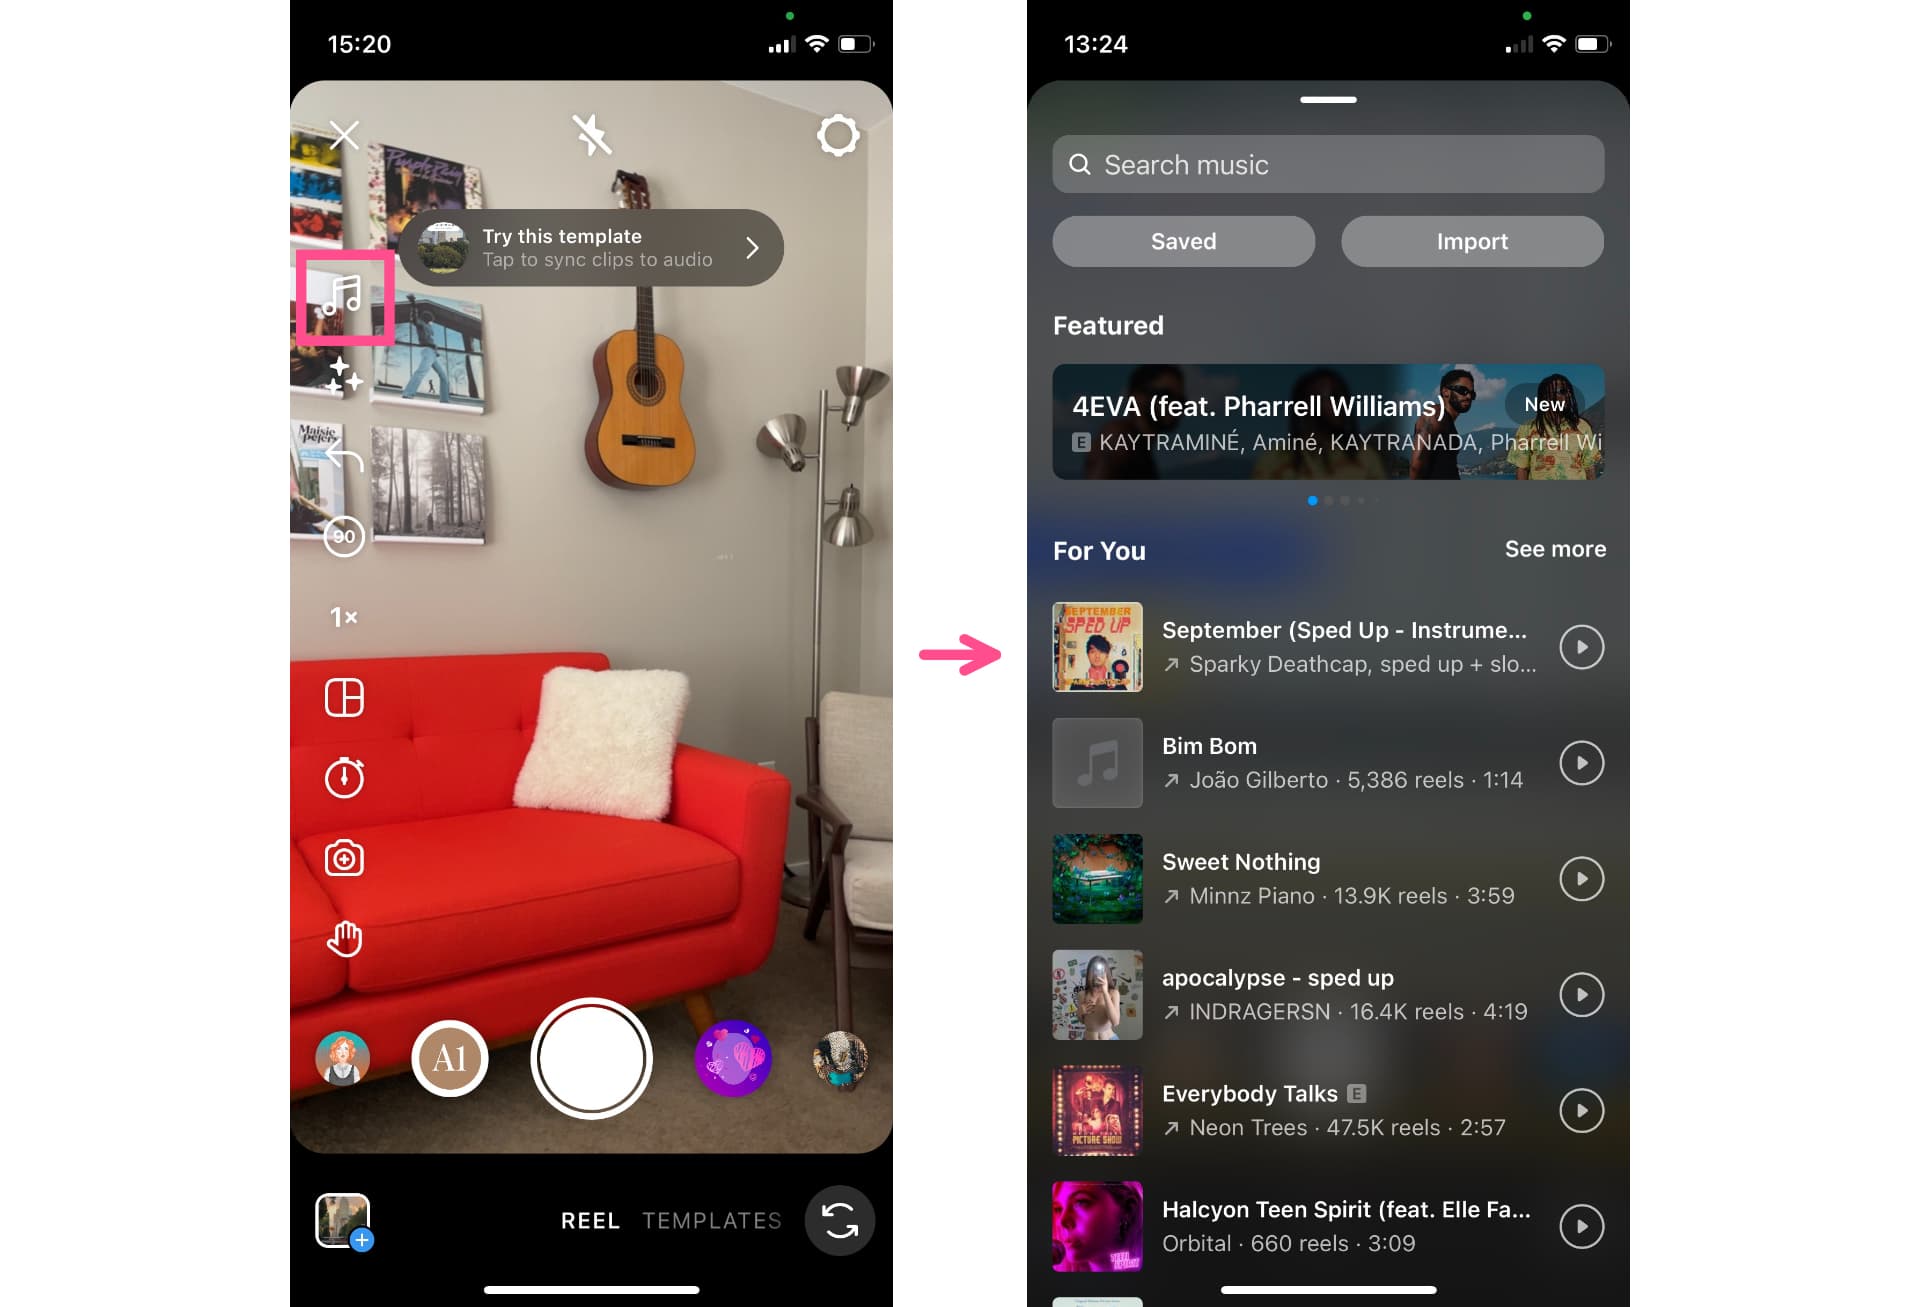
Add Music
The audio tab lets you add sounds from Instagram's music library to your Reel. Tap the play button to preview each sound and move the track from left to right to select the part you want. Some songs include lyrics to make it easy to find the right section.
Add a Filter
Next up is the filter tab, which looks like three little sparkles. You can search by name, browse your bookmarked Instagram filters, see what’s trending, or view Reels-specific filters, which are more similar to TikTok effects than your classic IG Story or photo filters.

These effects include eye-catching frames, funny face filters, and the Instagram green screen effect, which can all spice up ordinary videos. Tap to preview and when you’re happy with your filter selection, go back to the main editor screen.
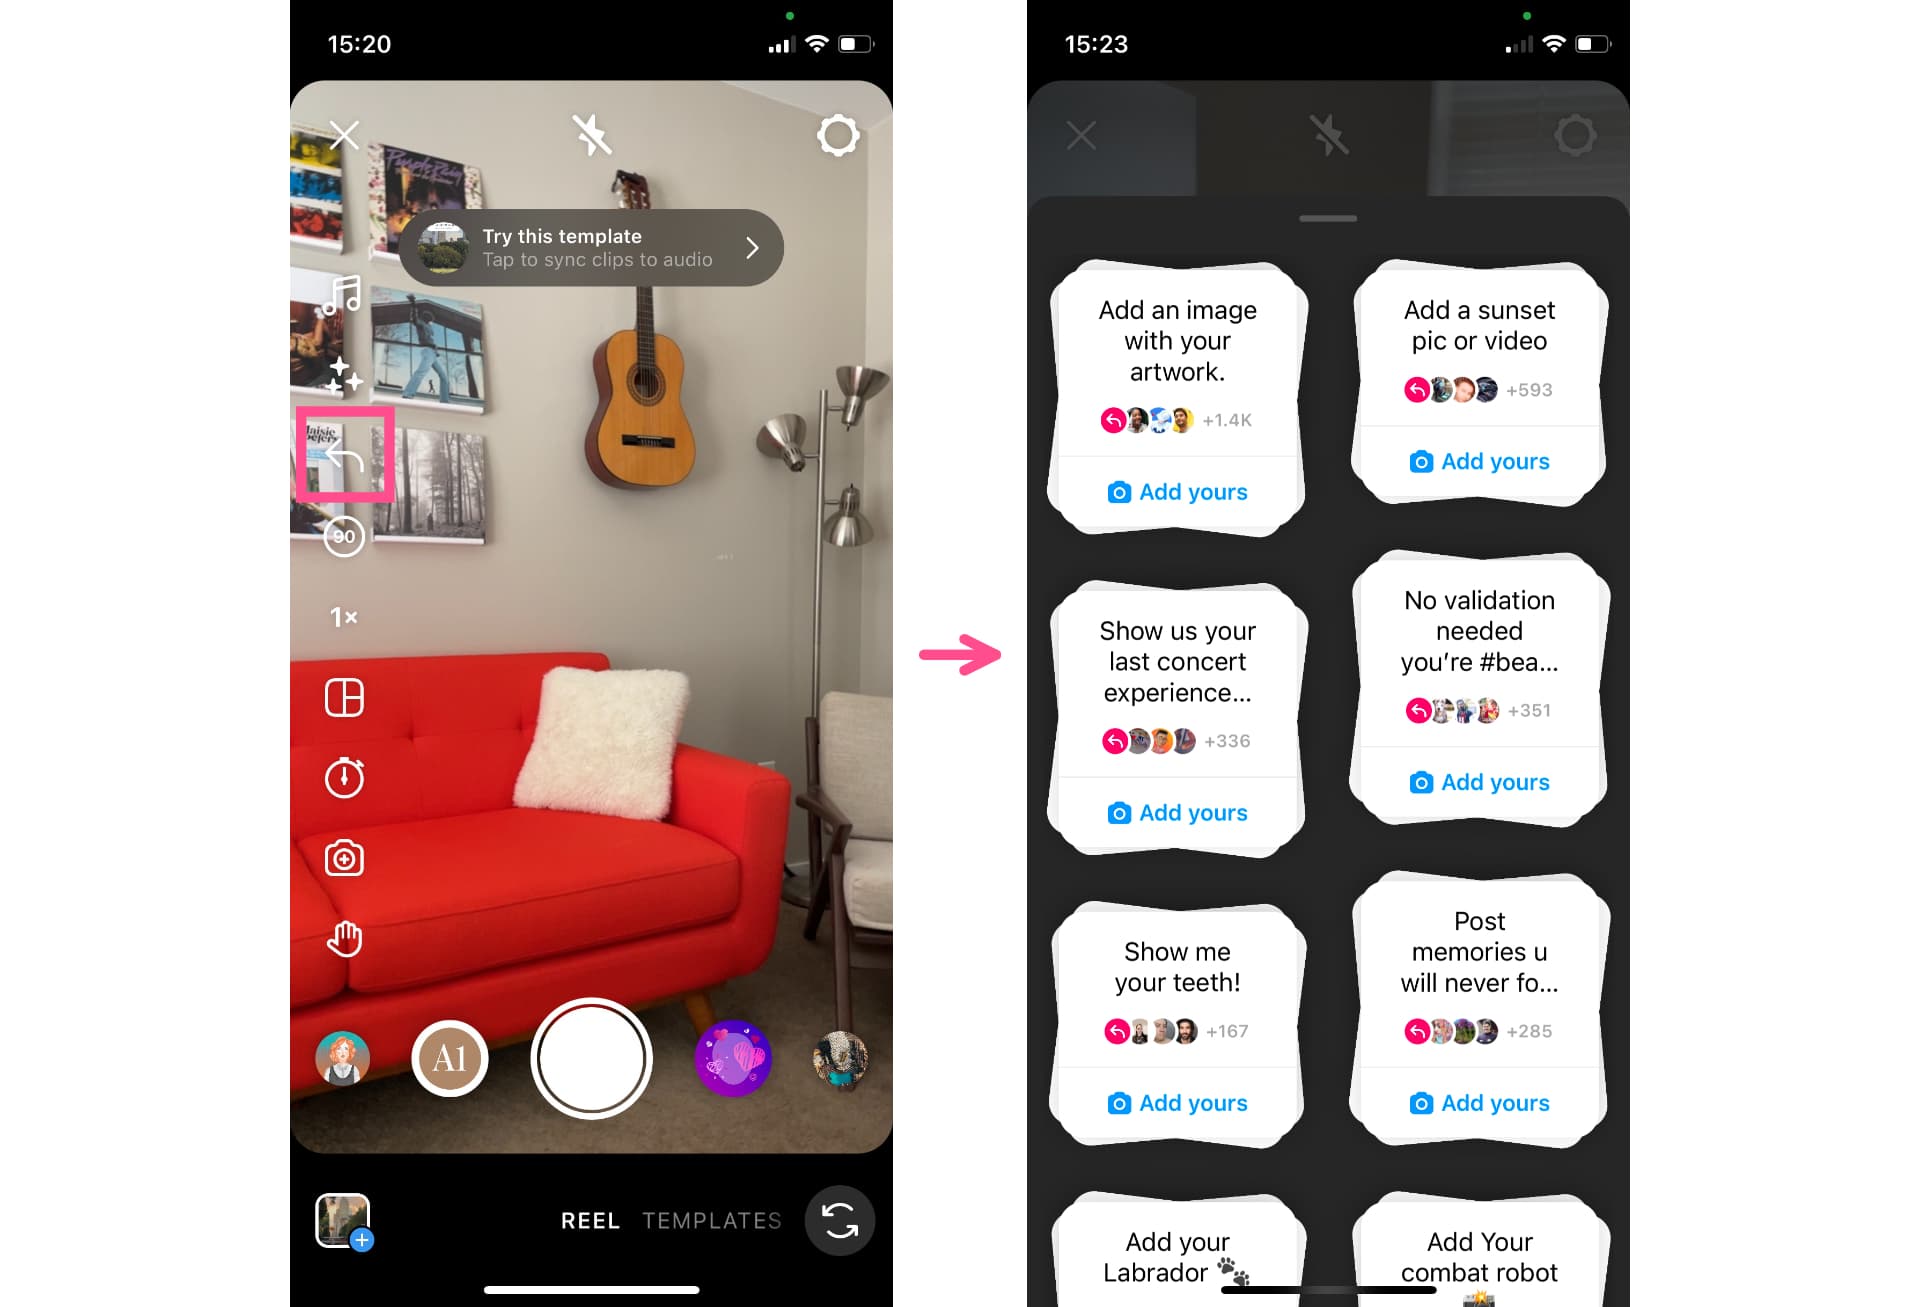
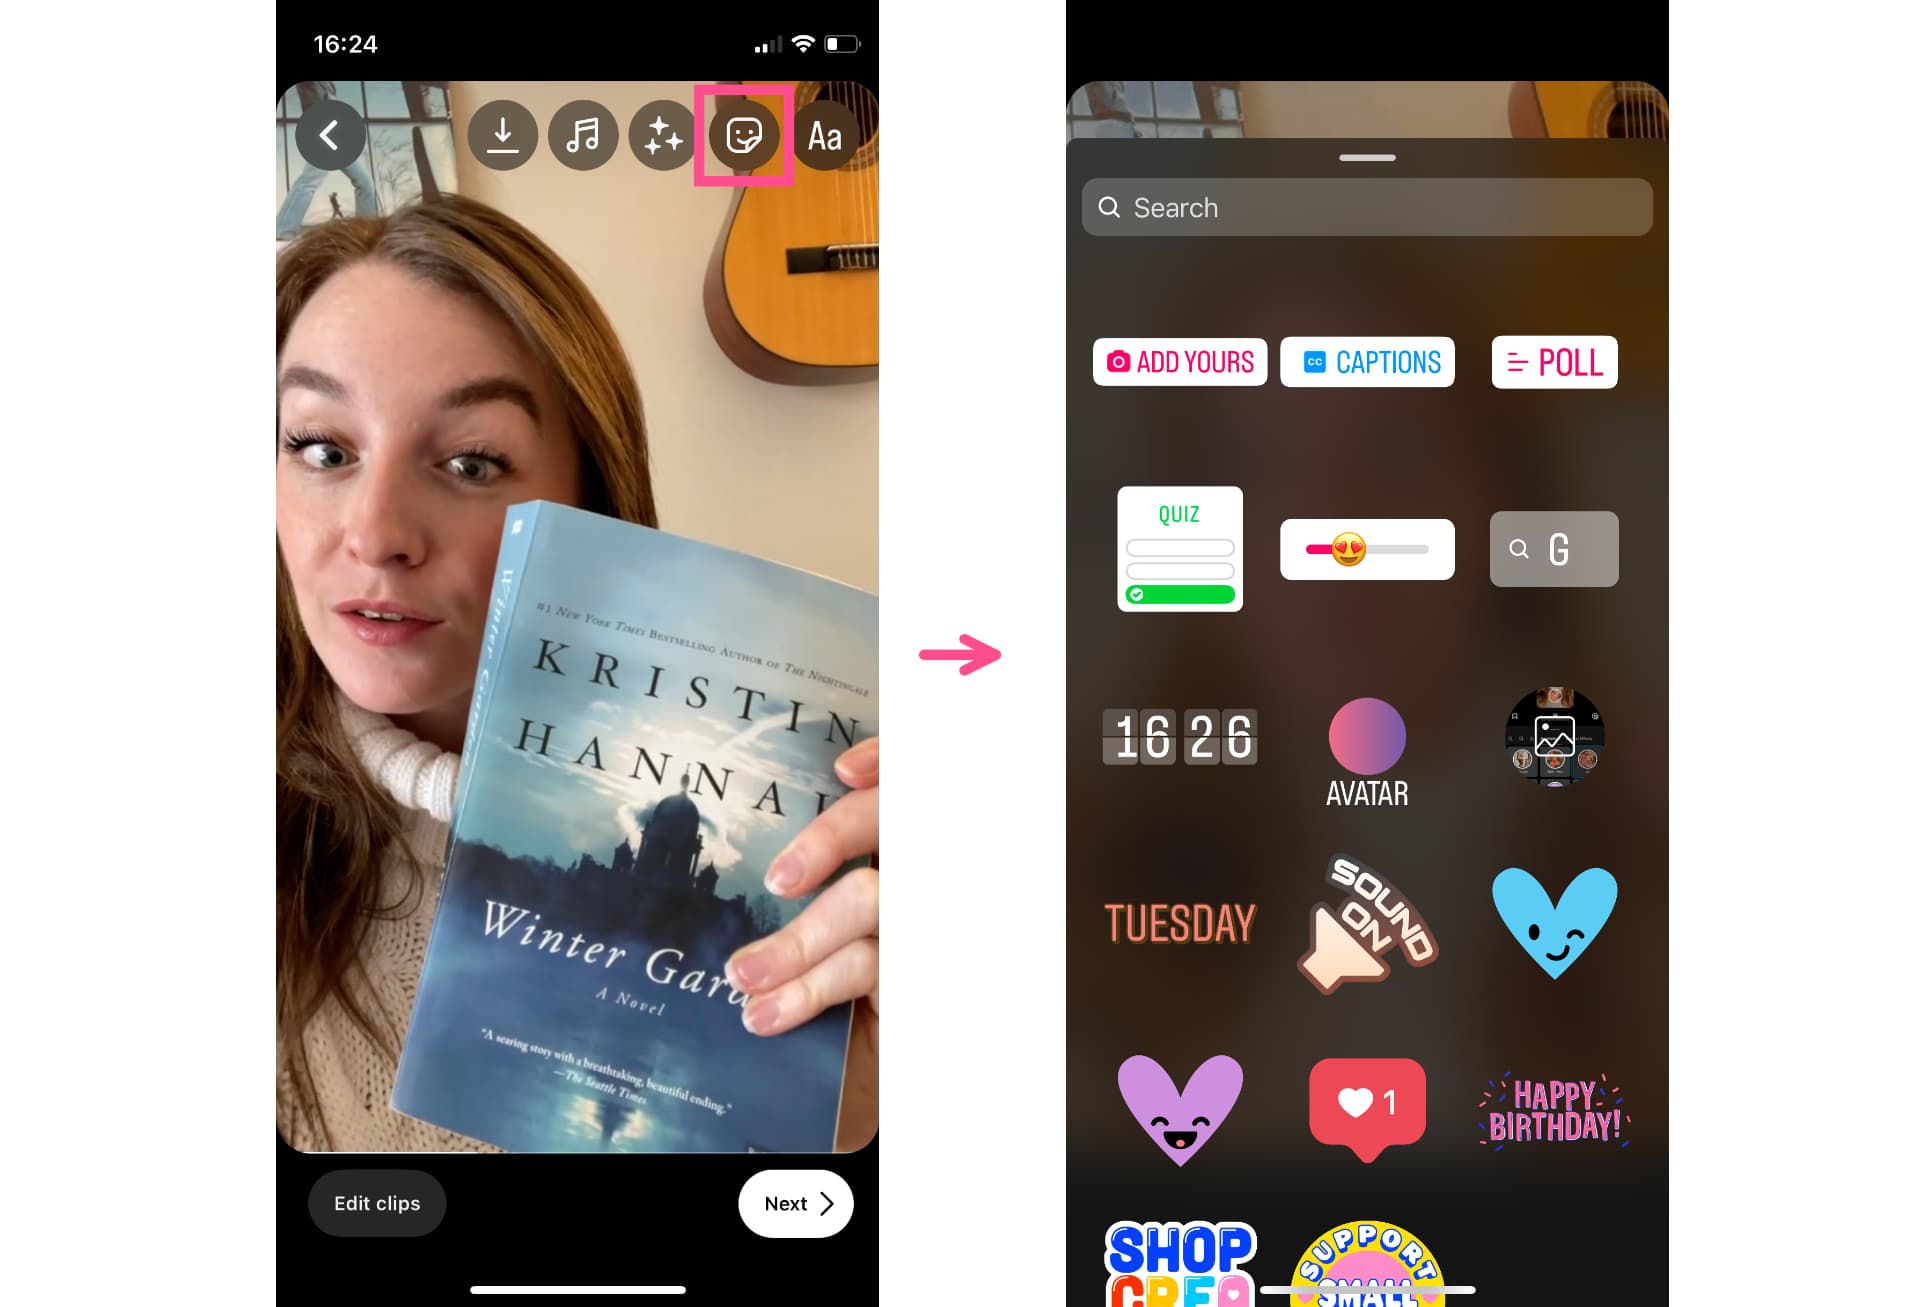
Add a Sticker
The next icon, a 90-degree, left facing arrow, is the Sticker tab. You can browse different “Add Yours” prompts, like “Show us your last concert experience” or “It’s national pet day!” By adding one of these stickers to your Reel, your Reel will show up with the other Reels and Stories posted under that sticker. It’s great for exposure to new audiences or coming up with Reels ideas if you need some inspiration.
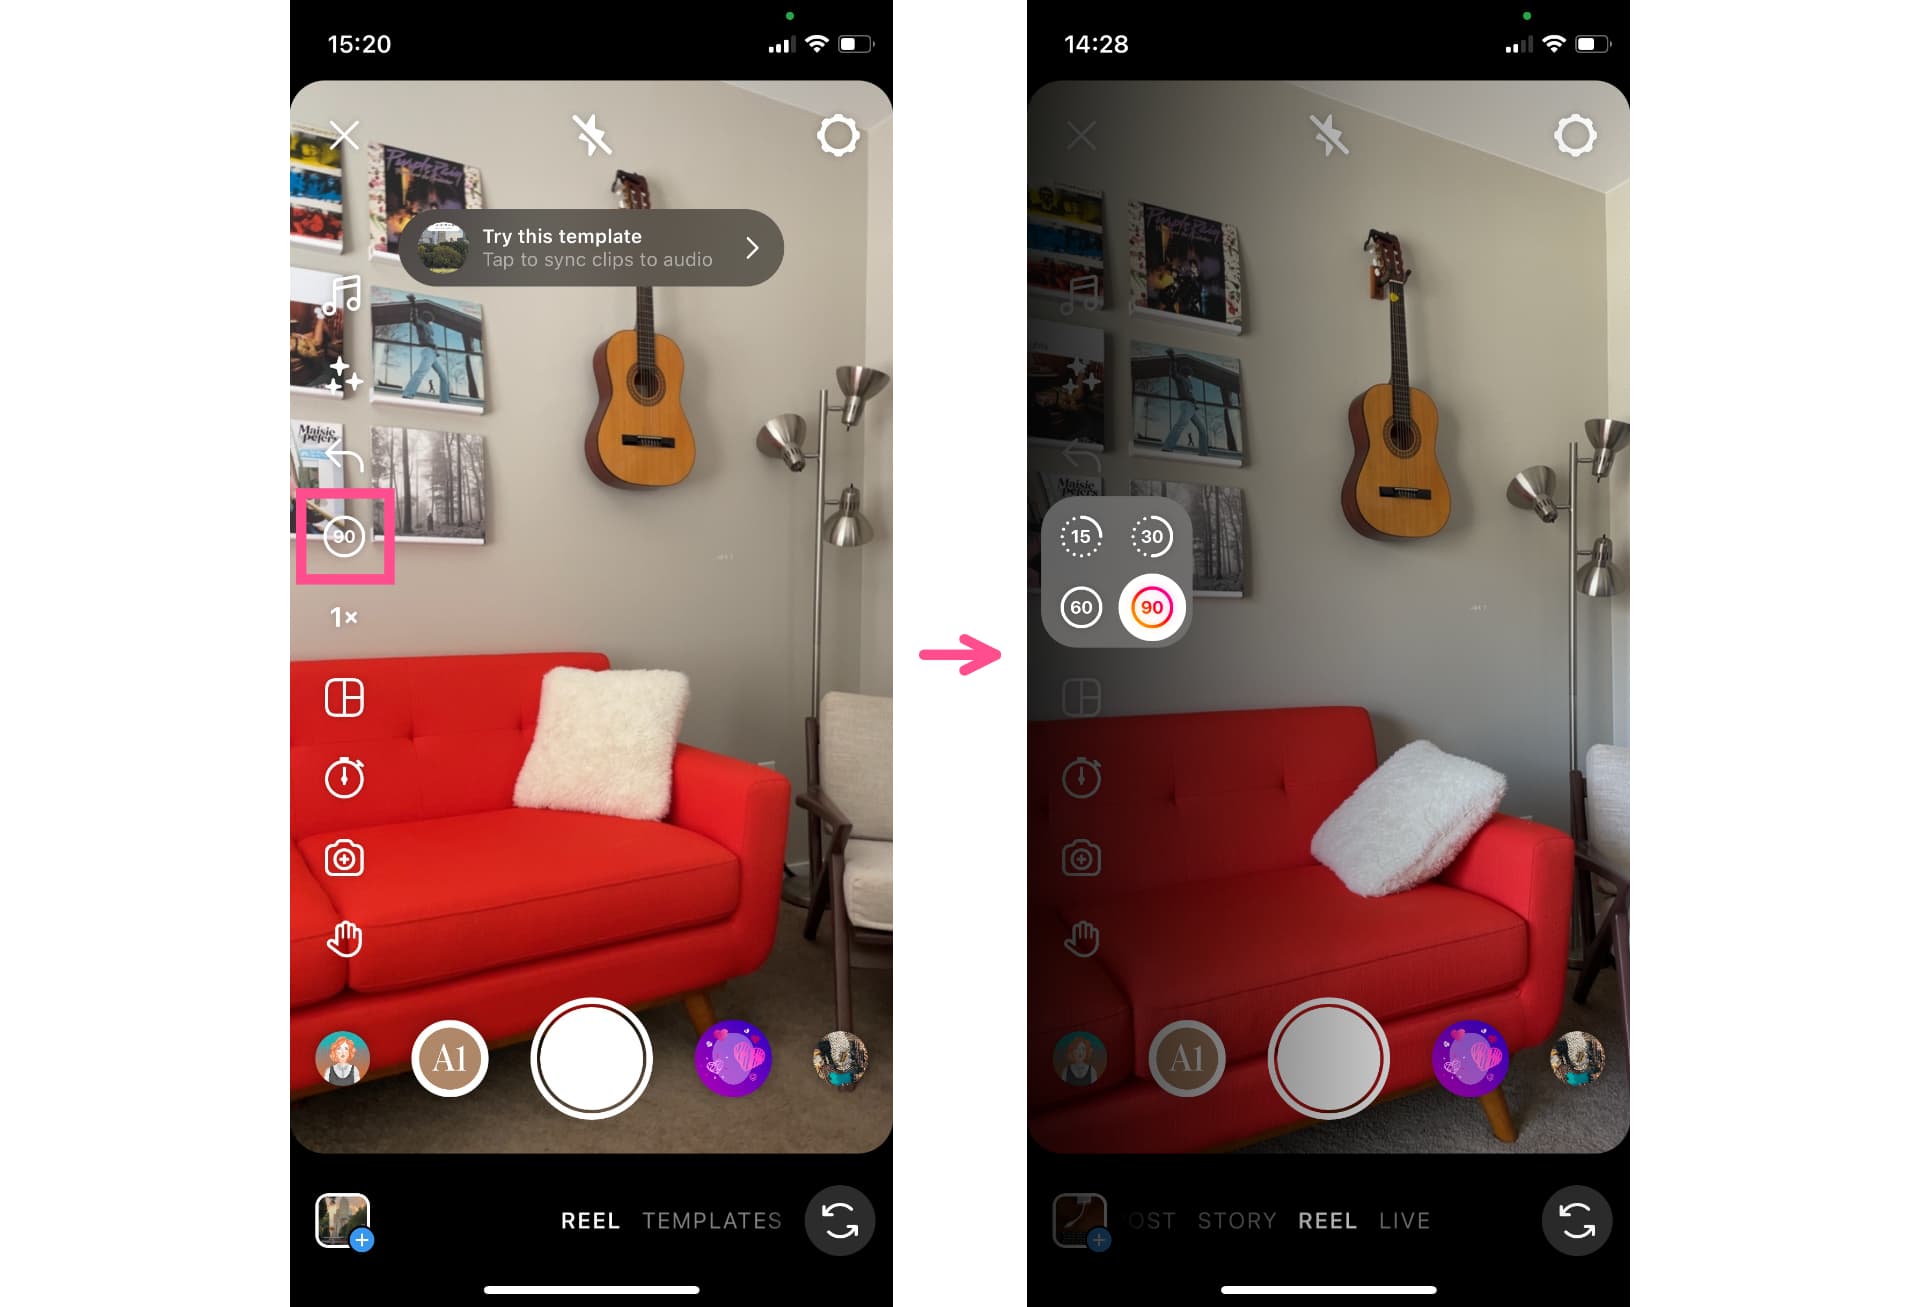
Pick Your Video Length
This tab is where you pick the length of your video. The current options are 15s, 30s, 60s, or 20m. Videos can be shorter than the length you select. I did a test to see just how short a video can be, and I was able to post a one second Reel. I doubt anyone would post a video that short, but nevertheless, you can.
Set Your Video Speed
Let's say you want to create a slow-motion video or increase the speed. This tab does exactly that. There are six different speeds to choose from: .3x, .5x, 1x, 2x, 3x, and 4x. You can only change the speed on videos that are filmed within the app.

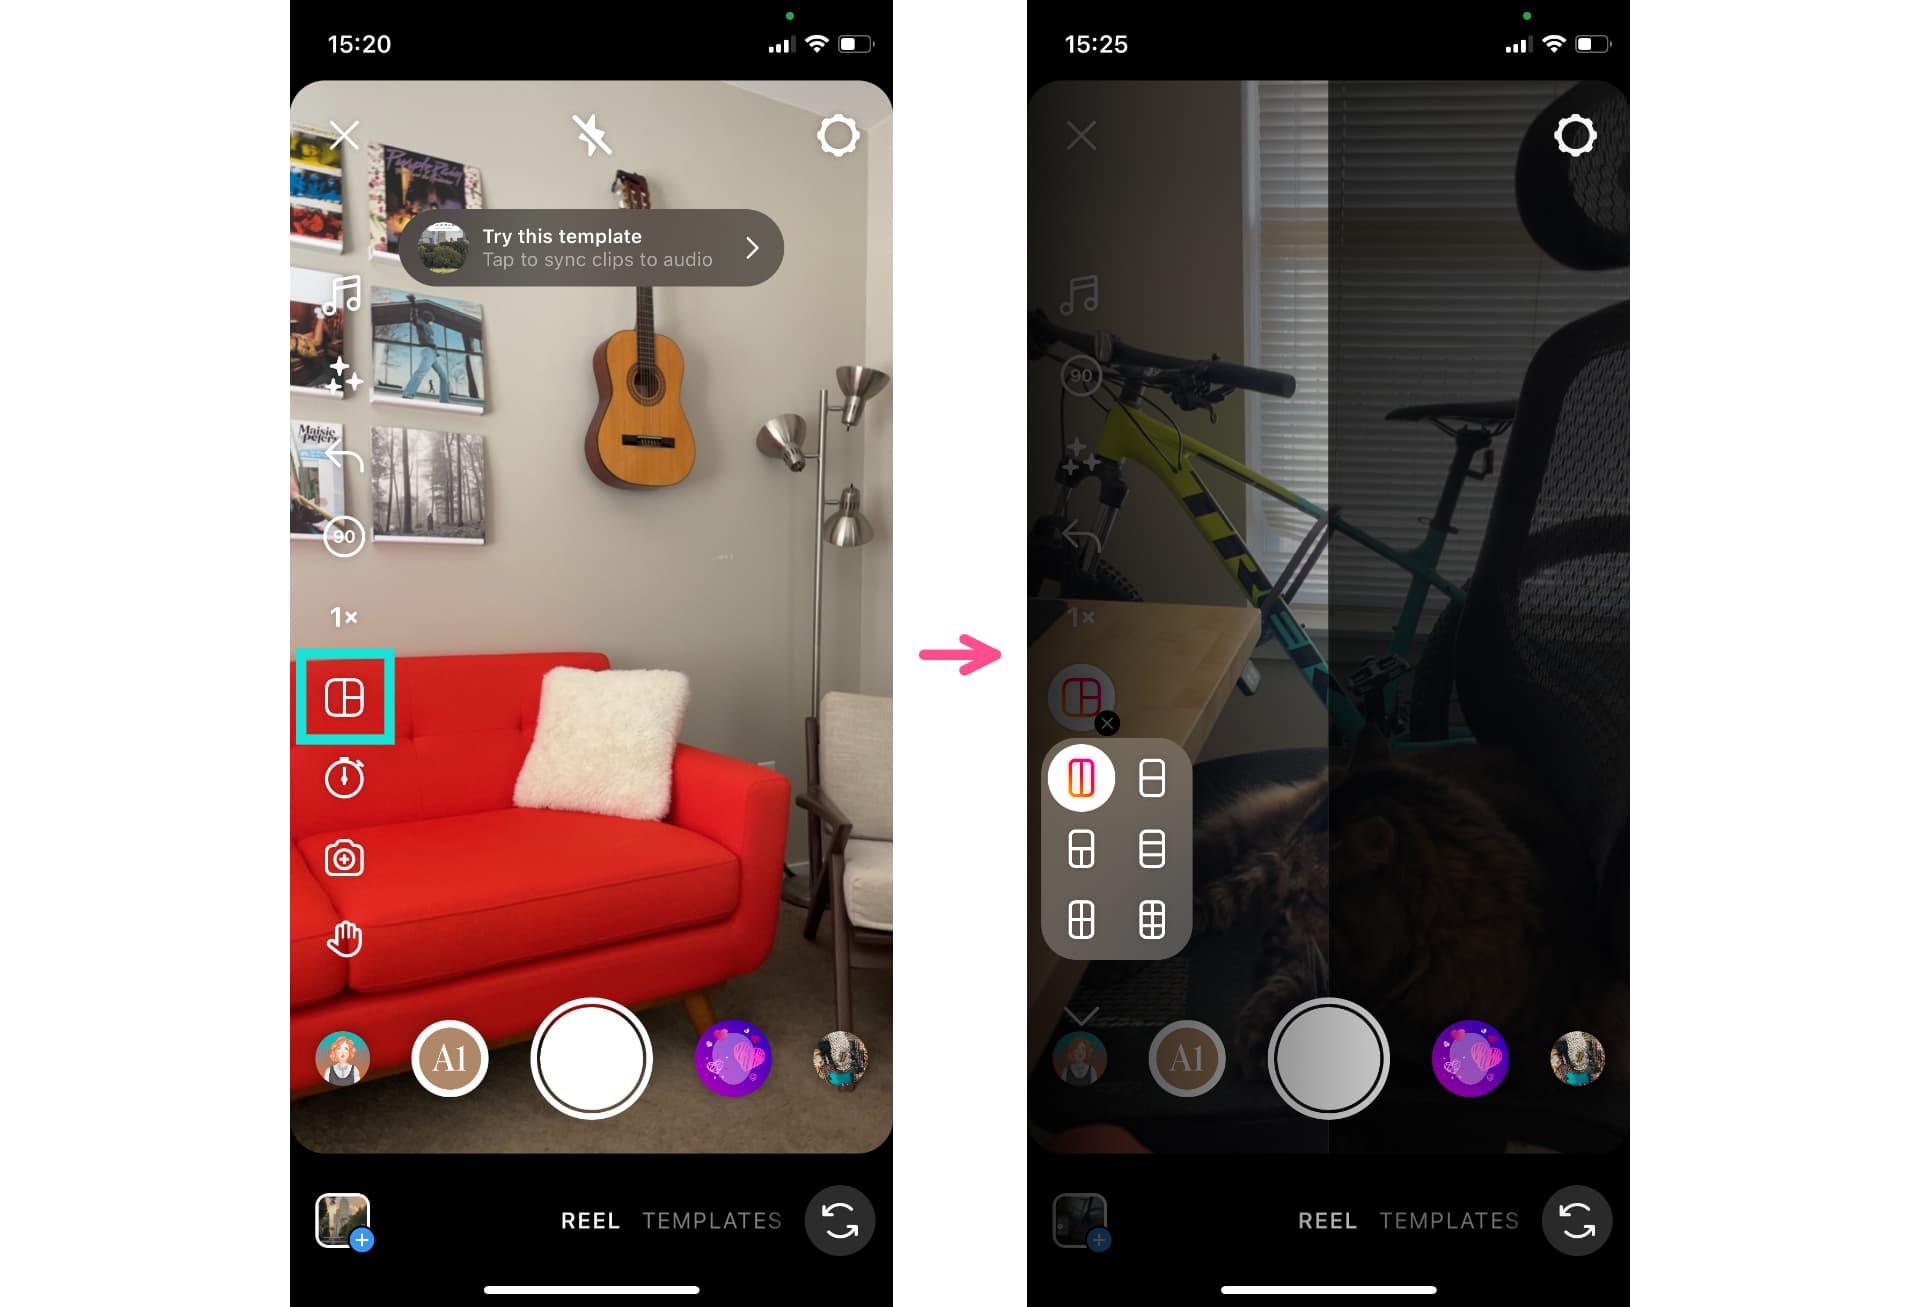
Change the Layout
This next tab lets you split your screen up into different sections. Choose which grid you want to use and you can film or upload a video for each quadrant.
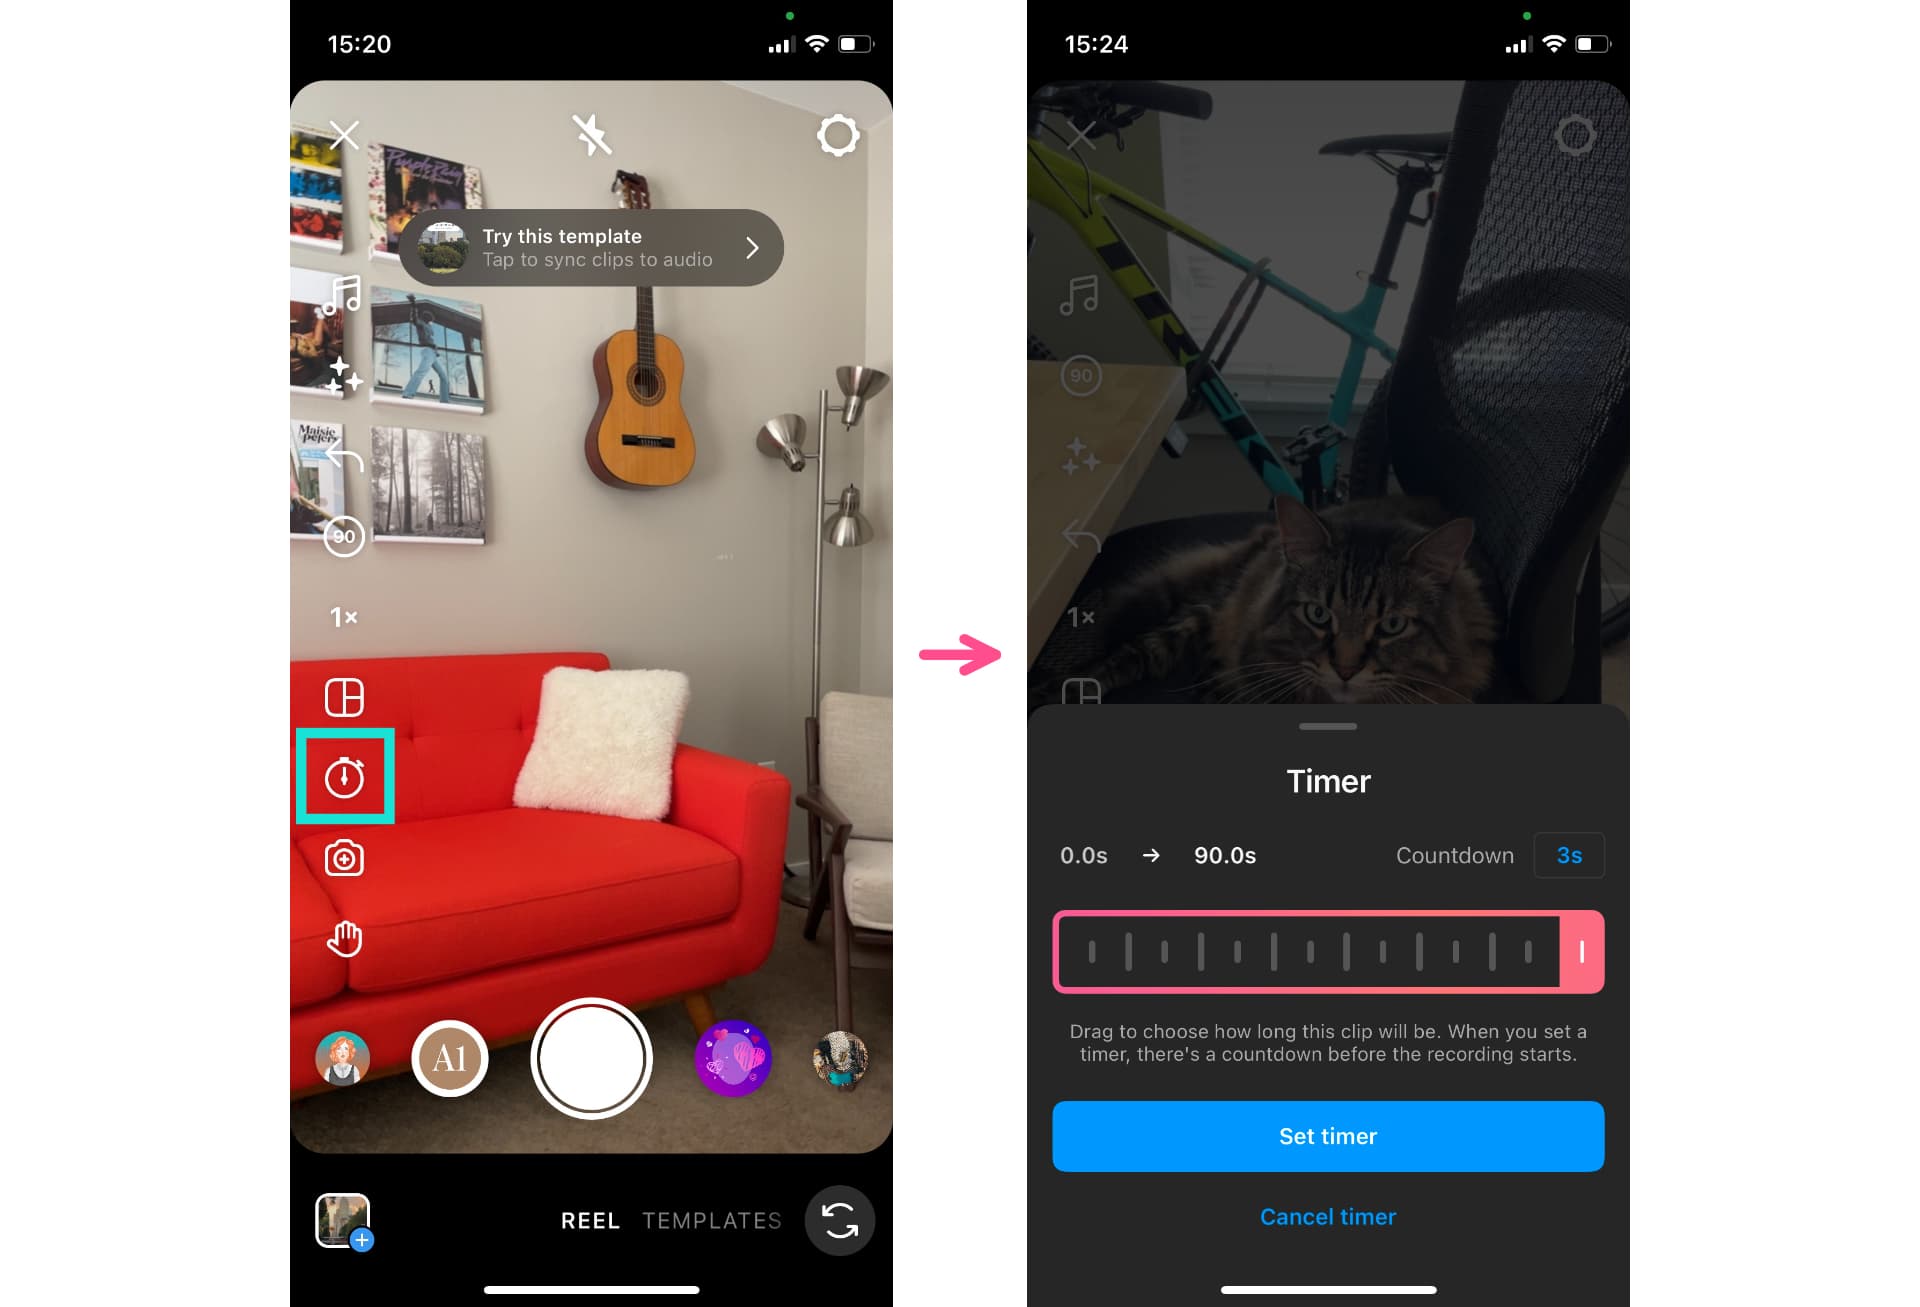
Set a Timer
The little stopwatch icon is the timer feature and trust me, it's a lifesaver. There's nothing worse than pressing the record button, then rushing to get into the right position. The timer tab helps you make the most of 15 to 90 seconds by giving you extra time to prepare before recording. Drag the track to the length of your clip and choose between a three or ten second countdown. The countdown will begin when you press the Reels icon to record.
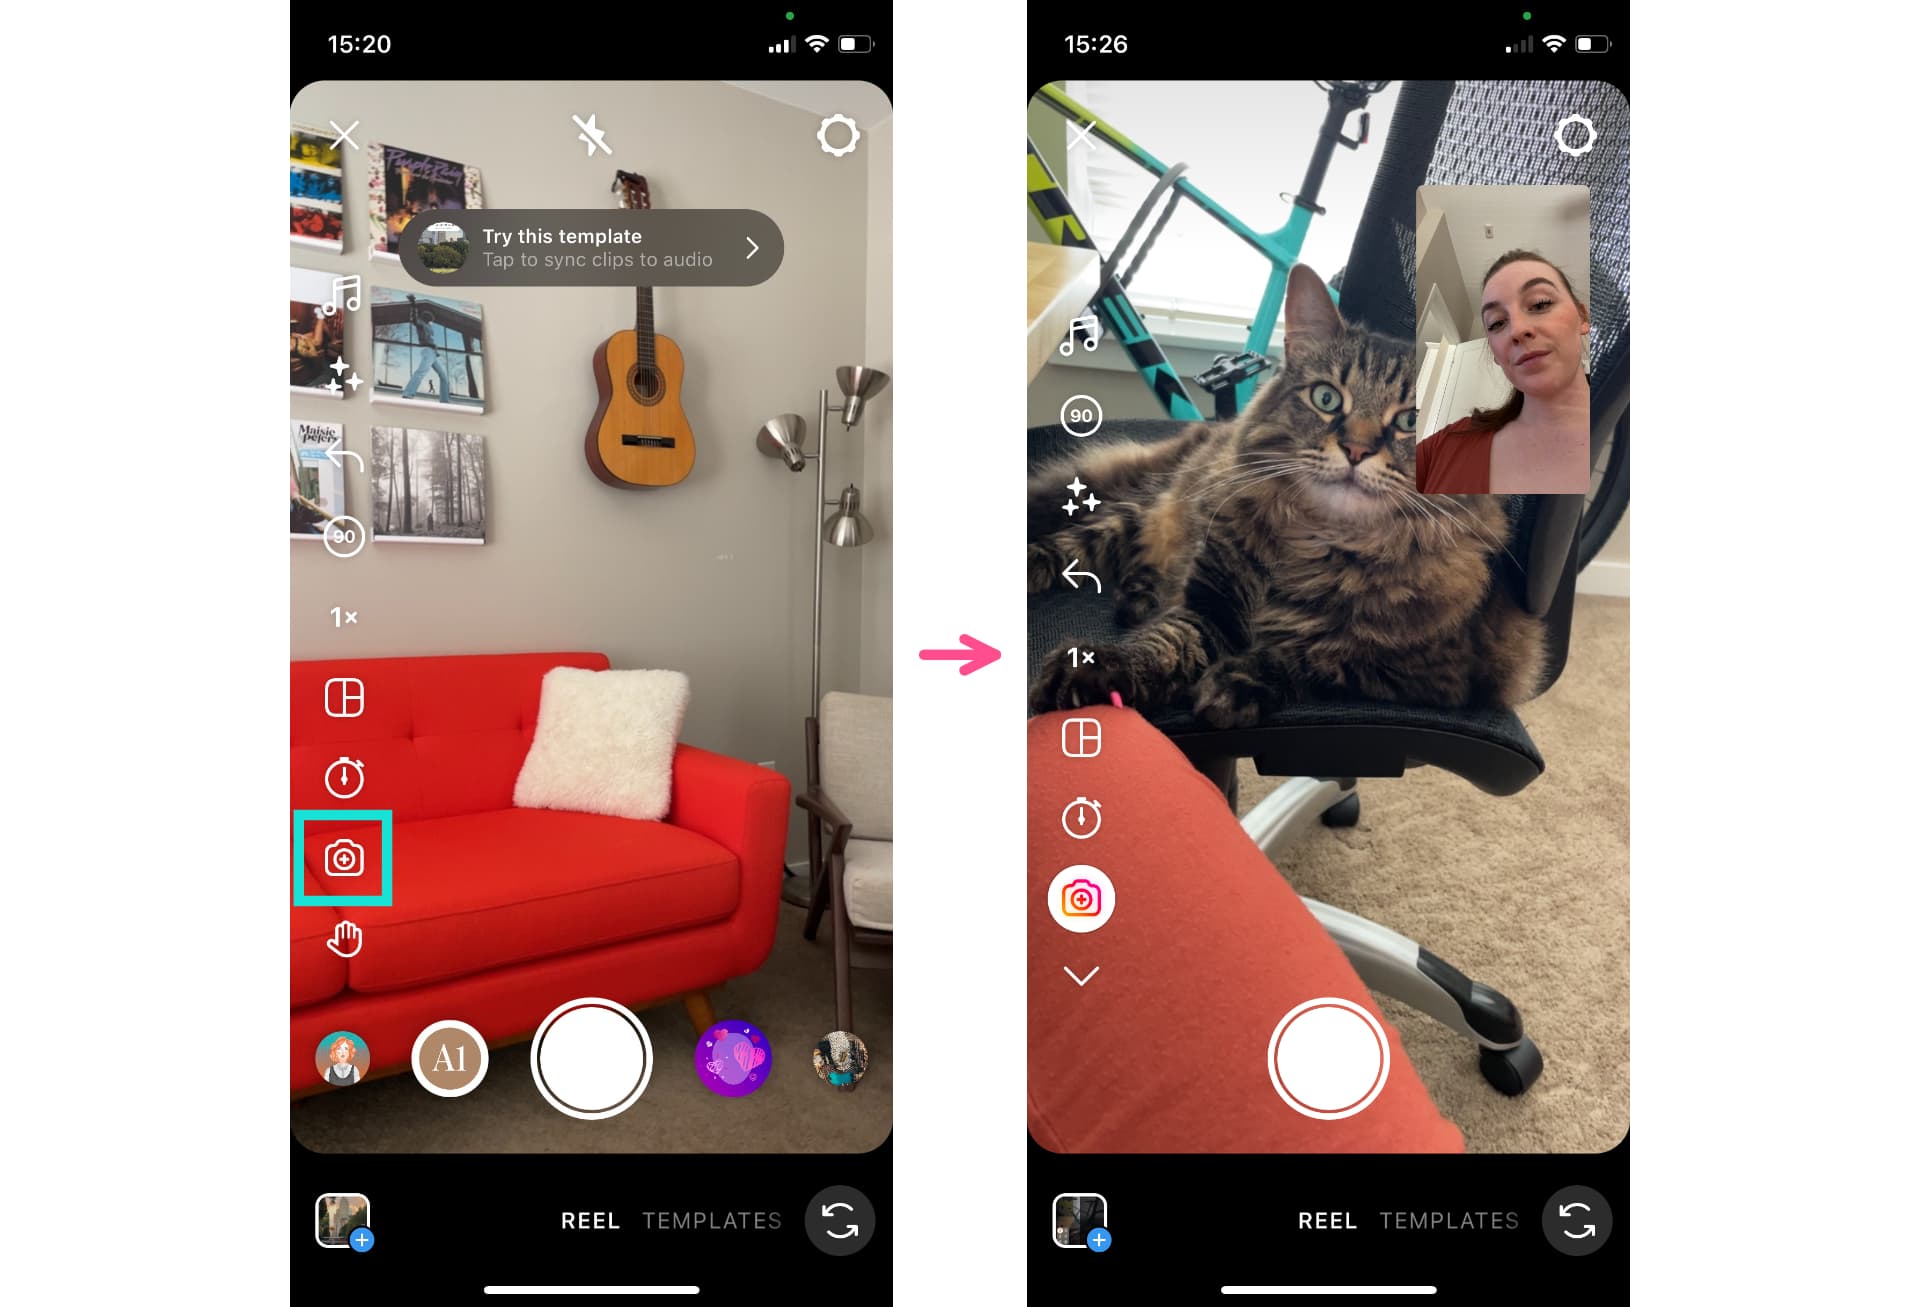
Use Dual Camera Mode
Popularized by BeReal, dual camera mode lets you turn on your front and back cameras at the same time. This is a great feature for capturing your reaction to what’s going on around you. To switch which camera shows up in the main frame versus the tiny window, just tap the circular arrow icon in the bottom right hand corner.
Turn on Gesture Control
This final tab allows you to turn on gesture control, a feature that starts and stops the camera when you raise your hand in frame. Best for filming longer Reels that require multiple takes or cuts. Not recommended for anyone who talks animatedly with their hands.

Step 3: Film Your Reel
When you're happy with the settings, tap the Reels tab to record or start the countdown if you set the timer. You can record all at once or record several short clips. You can also upload a video from your camera roll. Tap “Next” to watch your video.
From here you can add many of the same features that were available on the first tab of the editor, like adding filters and effect and adding music. There are some additional edits you can make here, too, though. Tap on the music tab to mix the audio or record a voiceover.

You can also add stickers, text, and captions to the Reel from this screen.
Step 4: Post Your Reel
When you're finished editing the Reel, tap “Share To.” From here, you can write a caption and choose a custom cover for your Reel. Your cover can be a frame from your video that you choose or you can upload an image from your camera roll.
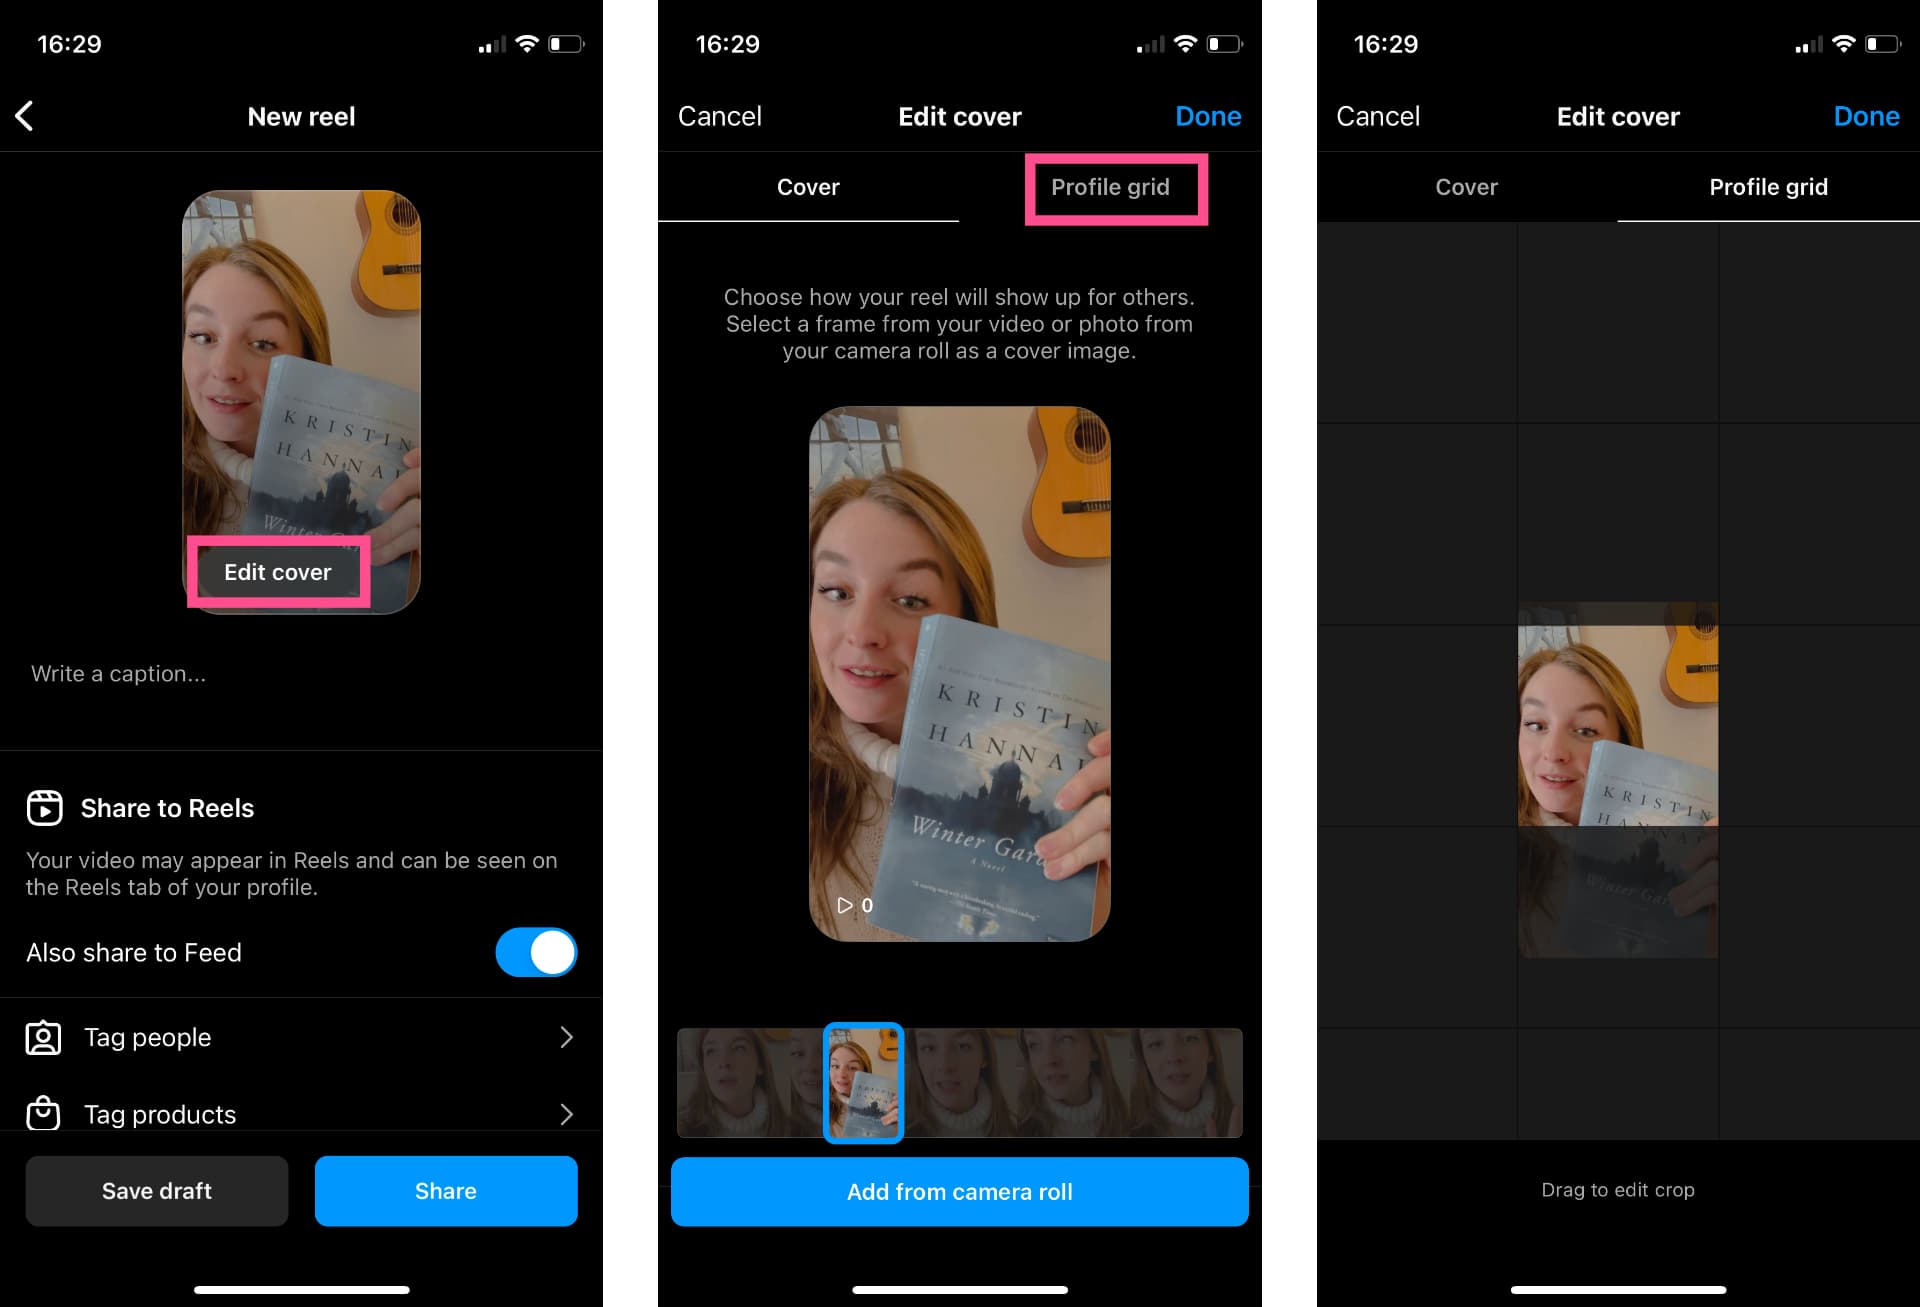
Covers have a 9:16 aspect ratio, just like your Reel, but try to keep the main content in the center. If you decide to share the Reel to the Feed, it will appear in the grid on your profile, cropped as a square. Preview and adjust what this will look like by tapping the “Grid” tab in the cover settings.
Just like with a regular Instagram post, there are several other settings you can adjust on the Share page, including tagging other accounts, naming the audio, adding a location, adding a fundraiser, and various privacy settings.
Overall, creating a Reel from scratch in Instagram is a straightforward process. There’s another, even easier way to create a Reel in Instagram, though, and that’s with templates.
How to Make a Reel with Instagram Reels Templates
Sometimes, you just don’t want to start from scratch. Or maybe you want to jump on a trending song or format. Either way, Reels Templates are where it’s at. They’re a little bit hidden inside the app, though, so I’m going to show you how to find Instagram Reels templates to make your life easier.
There are two main places you can find Reels templates in the Instagram app: 1) the Reels editor and 2) the Reels feed.
Let’s break down how each of those works.
How to Find Templates in the Reels Editor
Inside the Reels editor, you’ll notice two tabs at the bottom: “Reels” and “Templates.” In the default Reels tab, you’ll see the main Reels editor, with all the features on the left side we talked about earlier and the record button in the middle. Tap on the Templates tab instead.
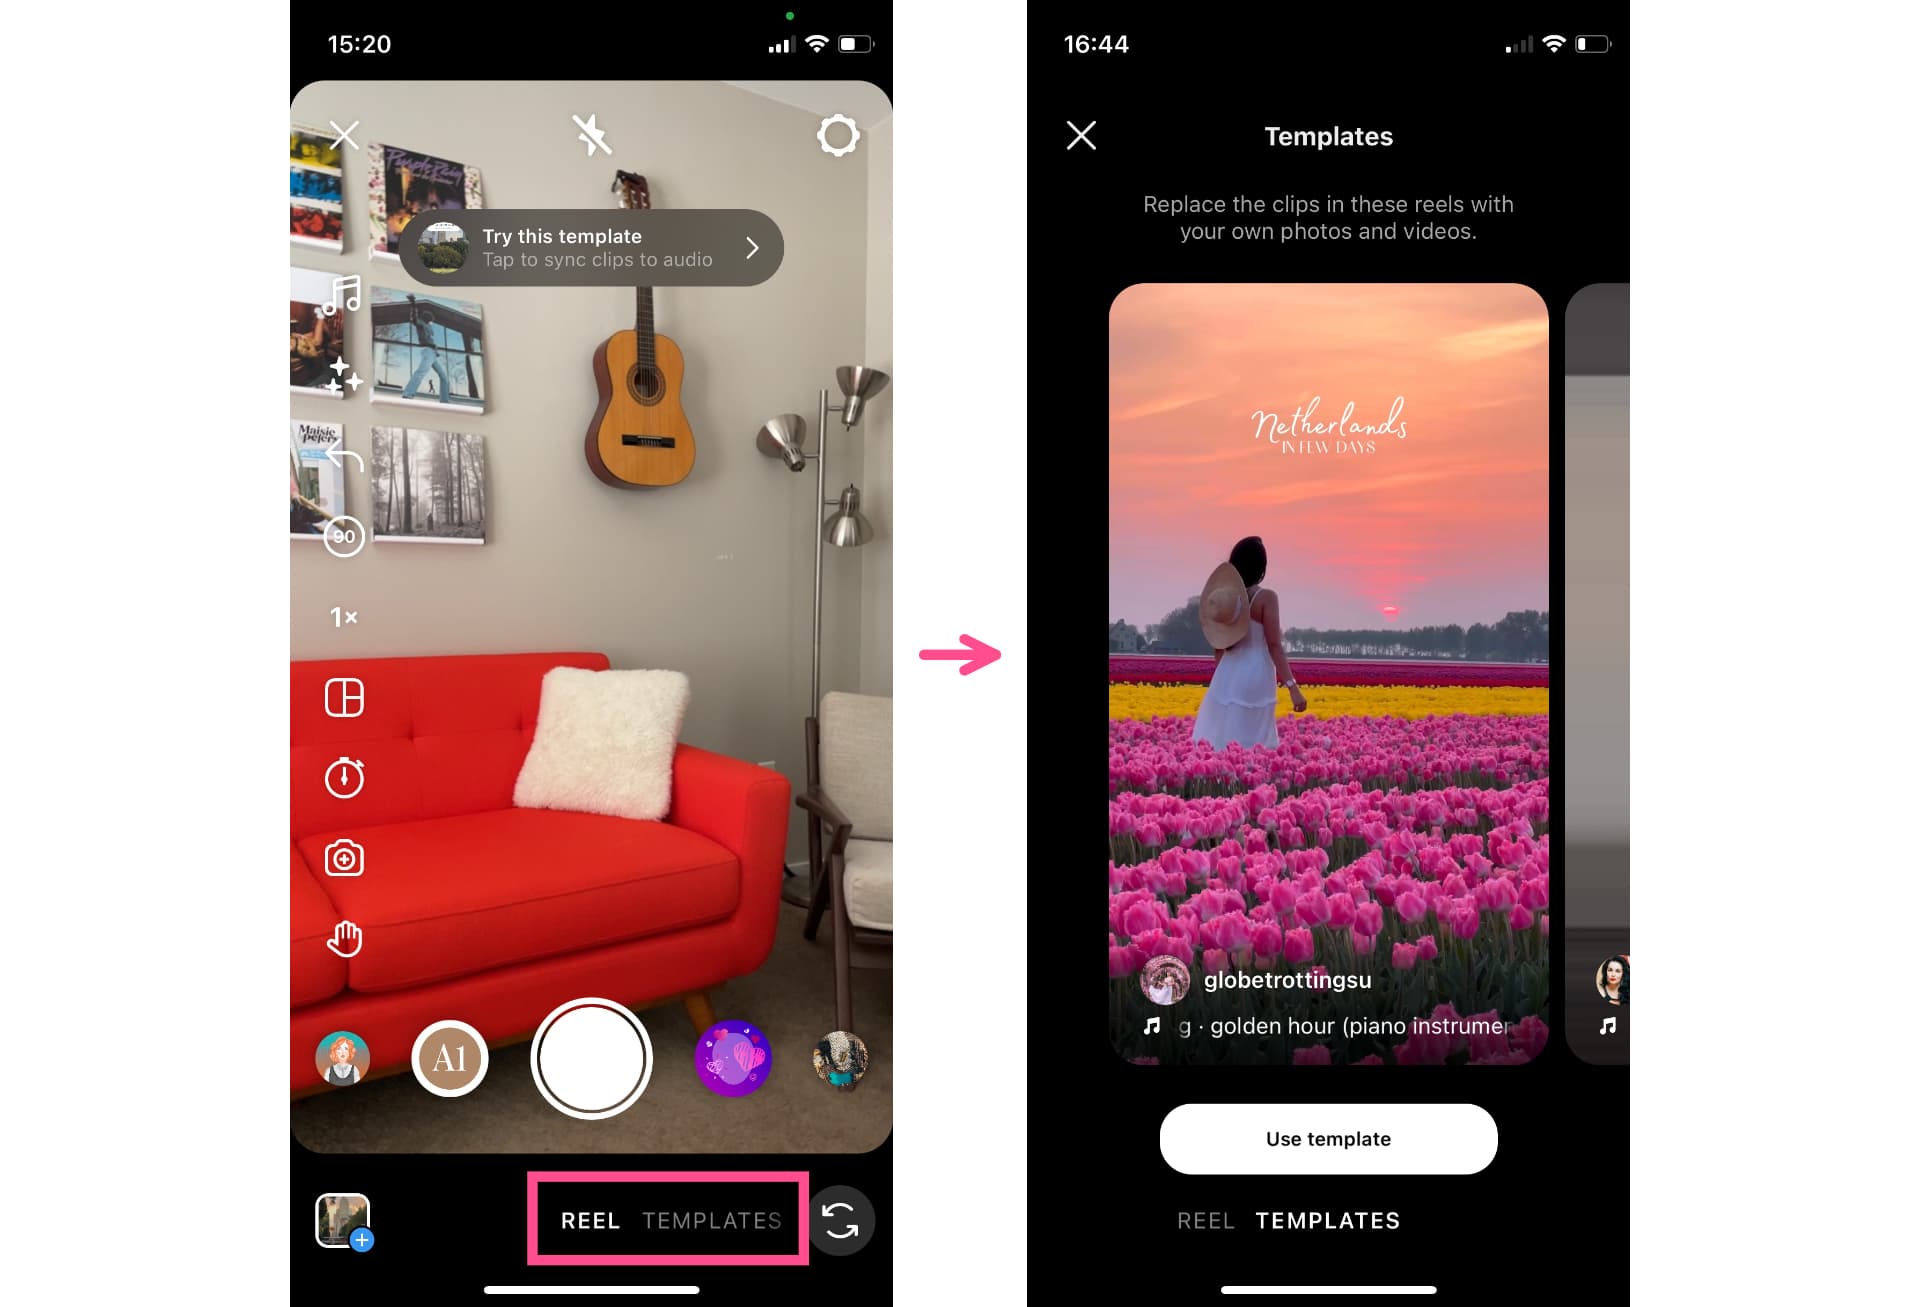
This will take you to a scrollable carousel of currently trending templates curated by the Instagram algorithm. Scroll through to find a template you want to copy, then click the “Use Template” button at the bottom of the screen.

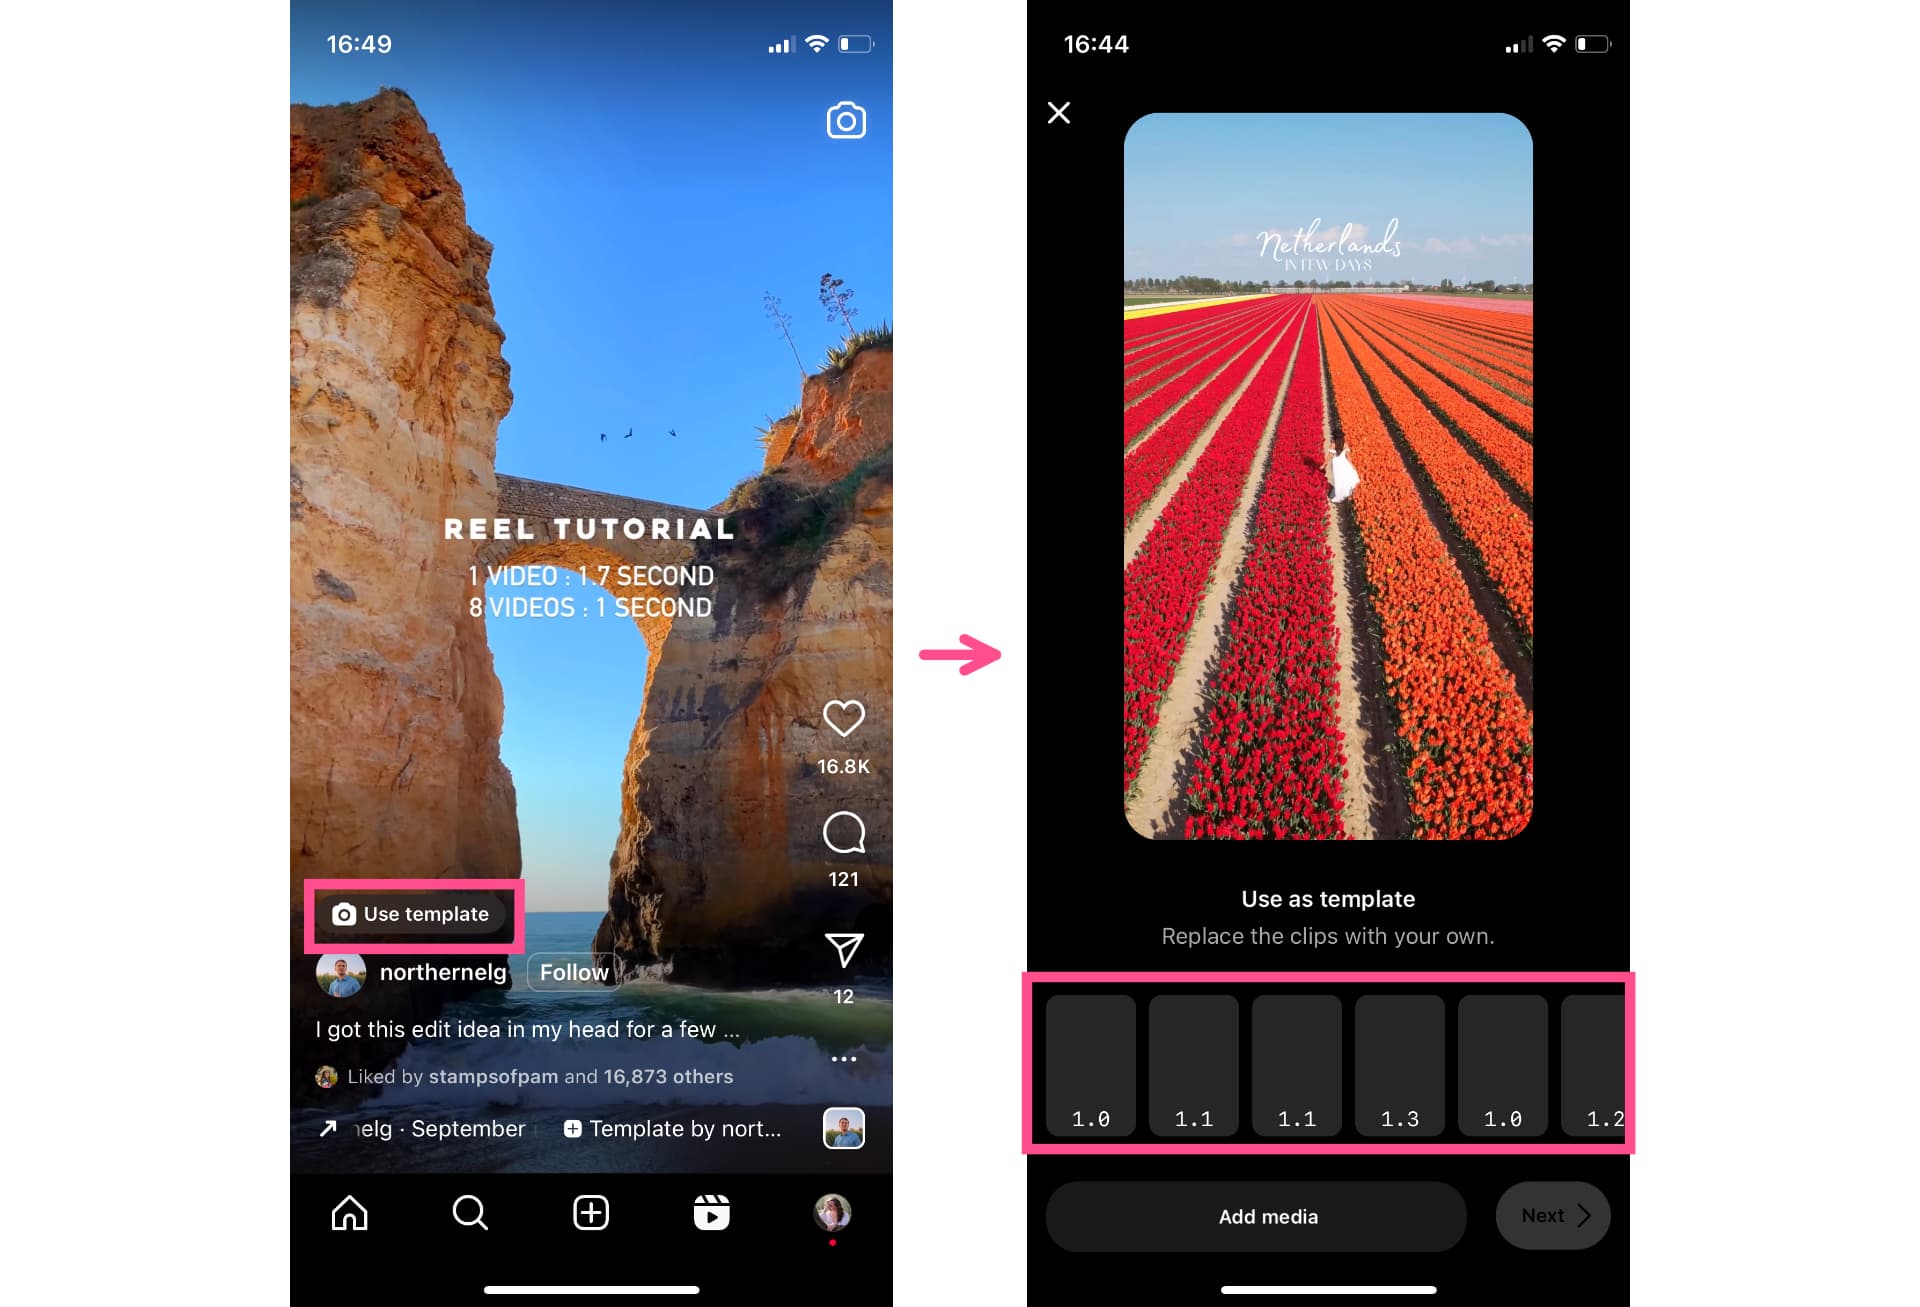
Tap the “Add Media” button or any of the timed frames in the template editor to upload your own clips or photos. Instagram will automatically trim the clips to fit the template.
One note: The Templates editor itself is fairly intuitive and easy to use. Finding it can be tricky if you make this common mistake though. You can only access the Reels Templates screen by opening the Reels editor from either a) the Reels feed by clicking on the camera in the top right corner or b) your Instagram profile, by click the plus button to create a new post, then choosing Reels.
For whatever reason, starting a new Reels post from the plus button on the bottom menu or by swiping right on the home screen doesn’t show the Templates option. Frustrating, I know.
How to Find Templates in the Reels Feed
Finding templates in your Reels Feed is as straightforward as it sounds. Simply browse Reels as you normally would until you see a Reel you’d like to copy with the “Use Template” button on it. Tap the button and the Template editor will open.
Not ready to create a Reel with the Template right now? No worries. Tap the three dot icon on the right side and then hit the save button to save the post for later. You can come back to it whenever you’re ready to start editing.

Speaking of editing, let’s talk a little bit about how to edit and create an Instagram Reel with an online editor, outside of the Instagram app.
How to Make an Instagram Reel in Kapwing
While there’s a lot you can do with the Instagram Reels editor, it’s not a powerhouse video editor by any means. For one thing, you’re relegated to the tiny screen, which can make detail work difficult. For another, there’s no way to pause the Reel audio while you edit. Maybe it’s just me, but listening to my own voice play on repeat while I try to decide between filters feels like the ninth circle of hell.
Whatever your reason, Reels supports uploading pre-edited video from your device, so you’re free to use your editor of choice to create stunning Reels on a screen larger than 2”x5”.
For this tutorial, I’ll be using Kapwing, a browser-based video editor that you can use on any device. Let's get started!
Step 1: Upload a Video to Kapwing Studio
Head to Kapwing.com and click “Get started.” When you create a new project, click “Start from a blank canvas” and choose the 9:16 option, which is the right size for Instagram Reels.
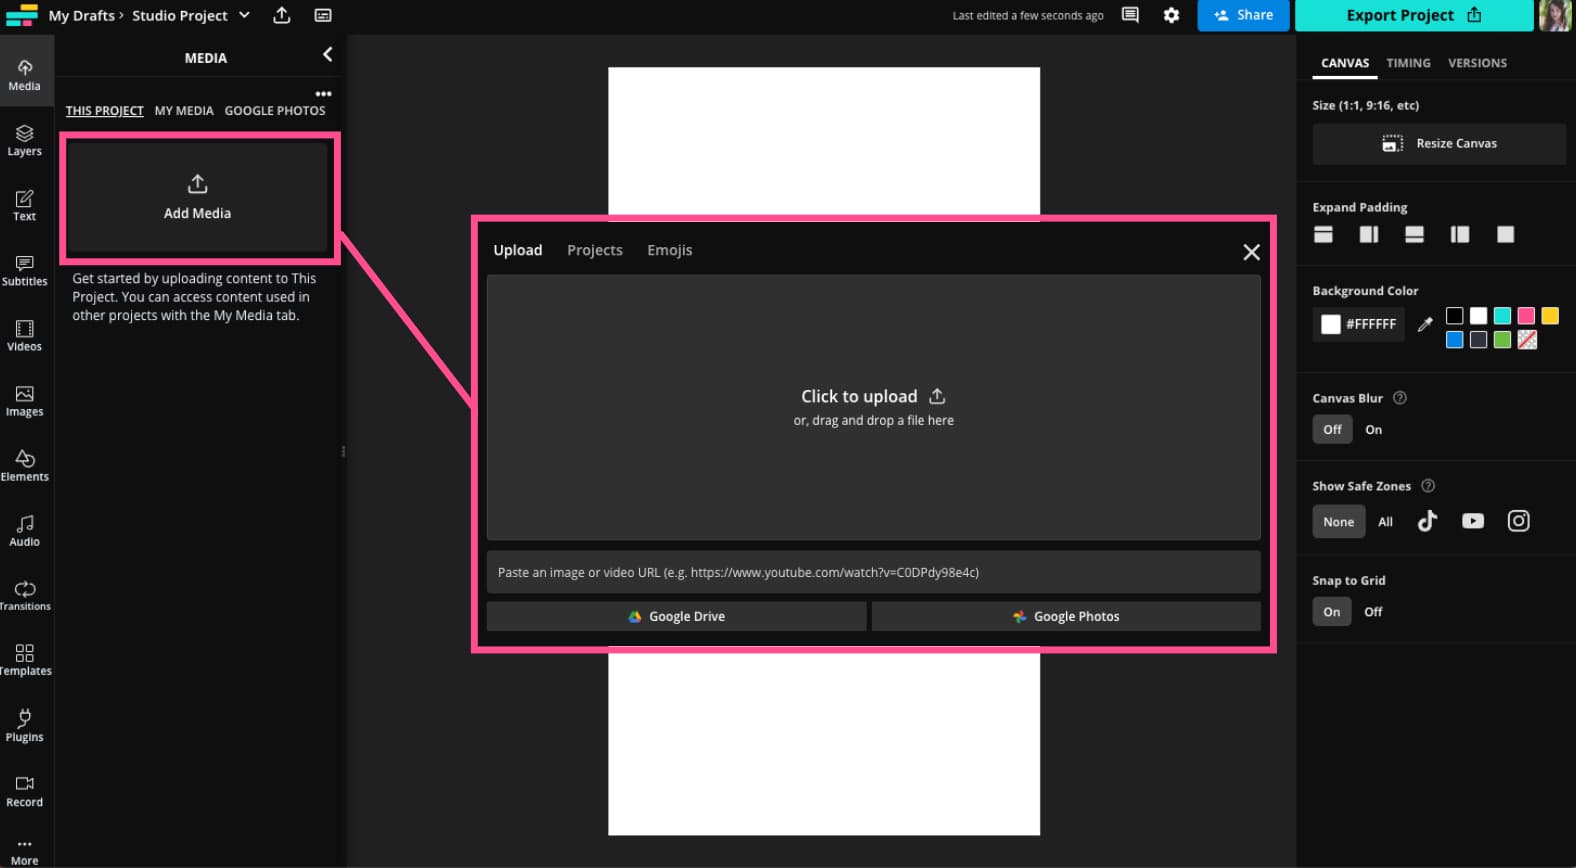
Next, click “Add Media” on the left hand side. You can upload a video directly from your device, paste a link to import from a URL, or use the Google Photos and Drive integration to import from the cloud. Once your video is uploaded, it will show up in the Media tab.
Hover over the thumbnail with your cursor and click the blue plus button that appears. This will automatically center your video on the 9:16 canvas. If your video wasn’t already 9:16, Kapwing will crop it for you.

You can always adjust the crop by selecting the video layer in the preview and clicking the “Crop” button in the right-side edit menu. You’ll be able to see what parts of your video fit within the crop guidelines as well what falls out of frame (this will show as slightly grayed out). Move the video around until the part you want to be in frame is within the blue cornered canvas. Click “Crop” again to save your changes.
Step 2: Turn On Safe Zone
Before you start editing, adding captions, music, GIFs, or other on-screen elements, you’ll want to turn on the Instagram Reels Safe Zone filter. This will show you where your content will be obscured by the Reels interface once you publish. There’s nothing more frustrating than spending time and effort editing a video only for the comment section to be full of replies saying the captions are covered up.
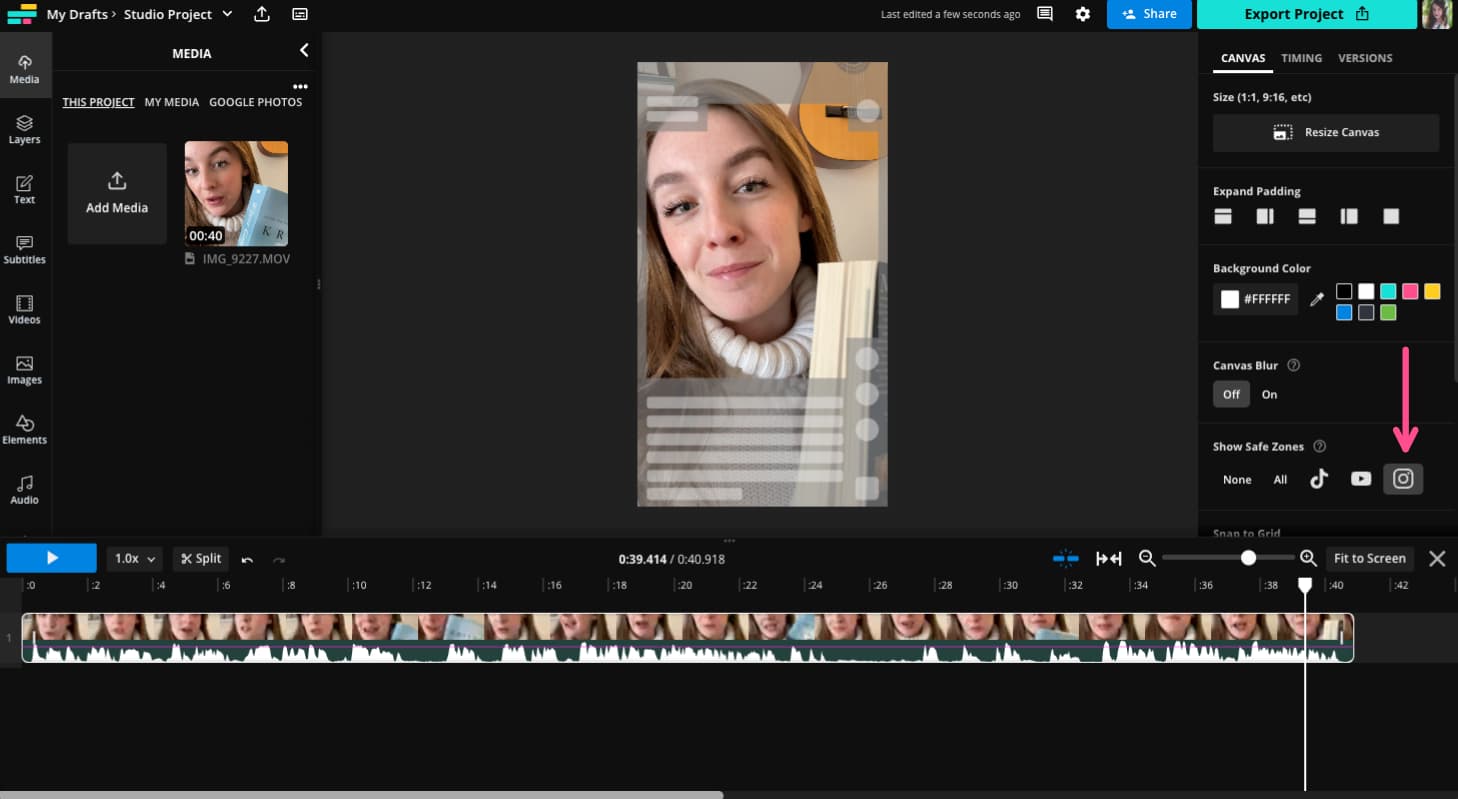
To avoid that, make sure the canvas is selected (just click on the dark gray background behind the video preview), then scroll down to the “Show Safe Zones” section in the right side menu. You’ll see four options: All, TikTok, YouTube Shorts, and Instagram Reels. Click the Instagram Reels icon.
Now you can edit the rest of your video as normal with this Safe Zone overlay on top.
Step 3: Add Captions to Your Reel
Let's start with generating captions for the Reel. Kapwing's automatic subtitler does all the work for you, taking the headache out of manually typing out dialogue. It also offers more stylistic choices and animated effects than Instagram’s native auto-subtitler (and is more accurate! 🤫).
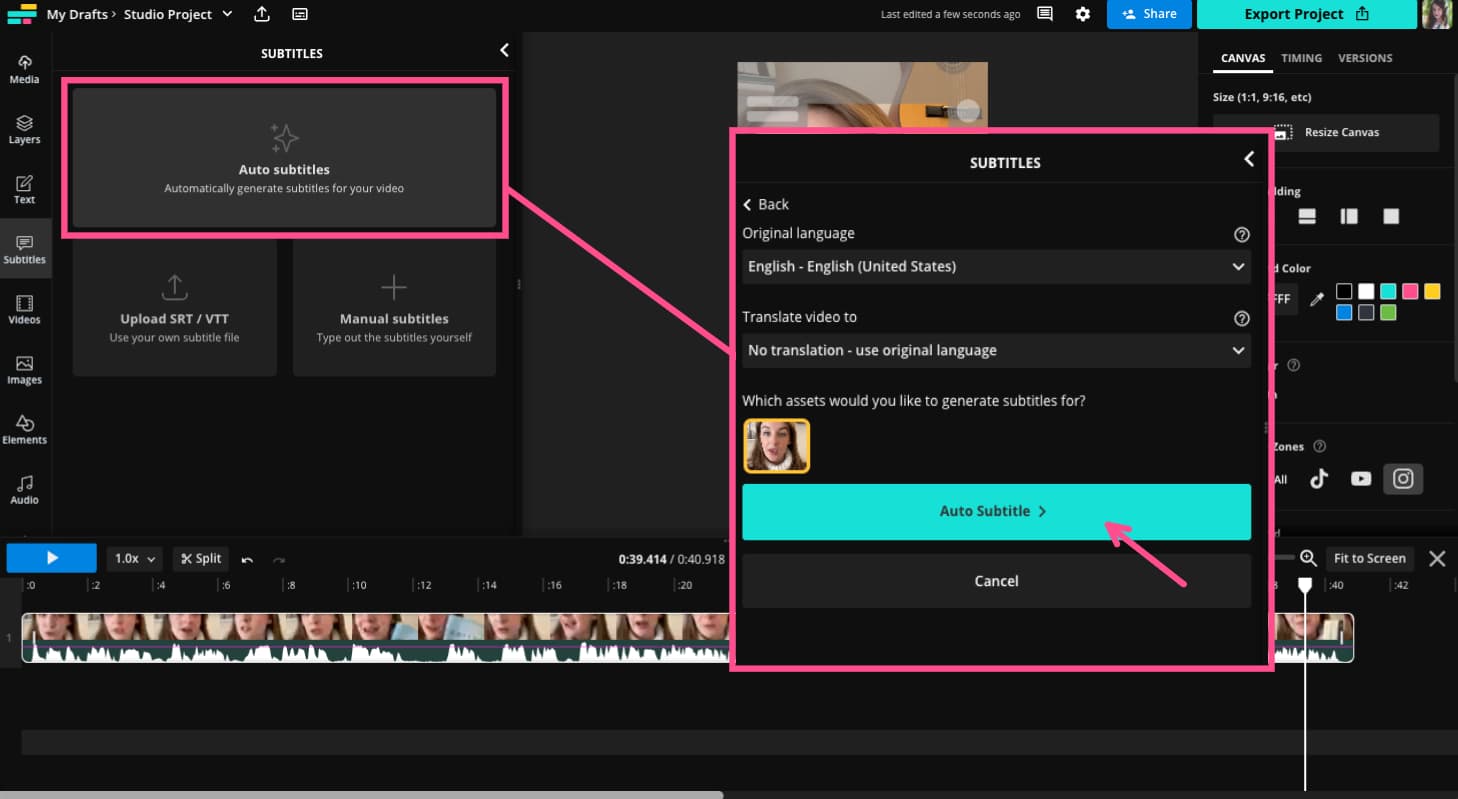
Click the “Subtitles” tab in the left sidebar or click the “Add Video Subtitles” icon (it looks like a box with lines of text) in the header bar. Click the button that says “Auto subtitles,” then select your language settings from the dropdown menus and click “Auto Subtitle.” Within a few moments, Kapwing will generate your captions.
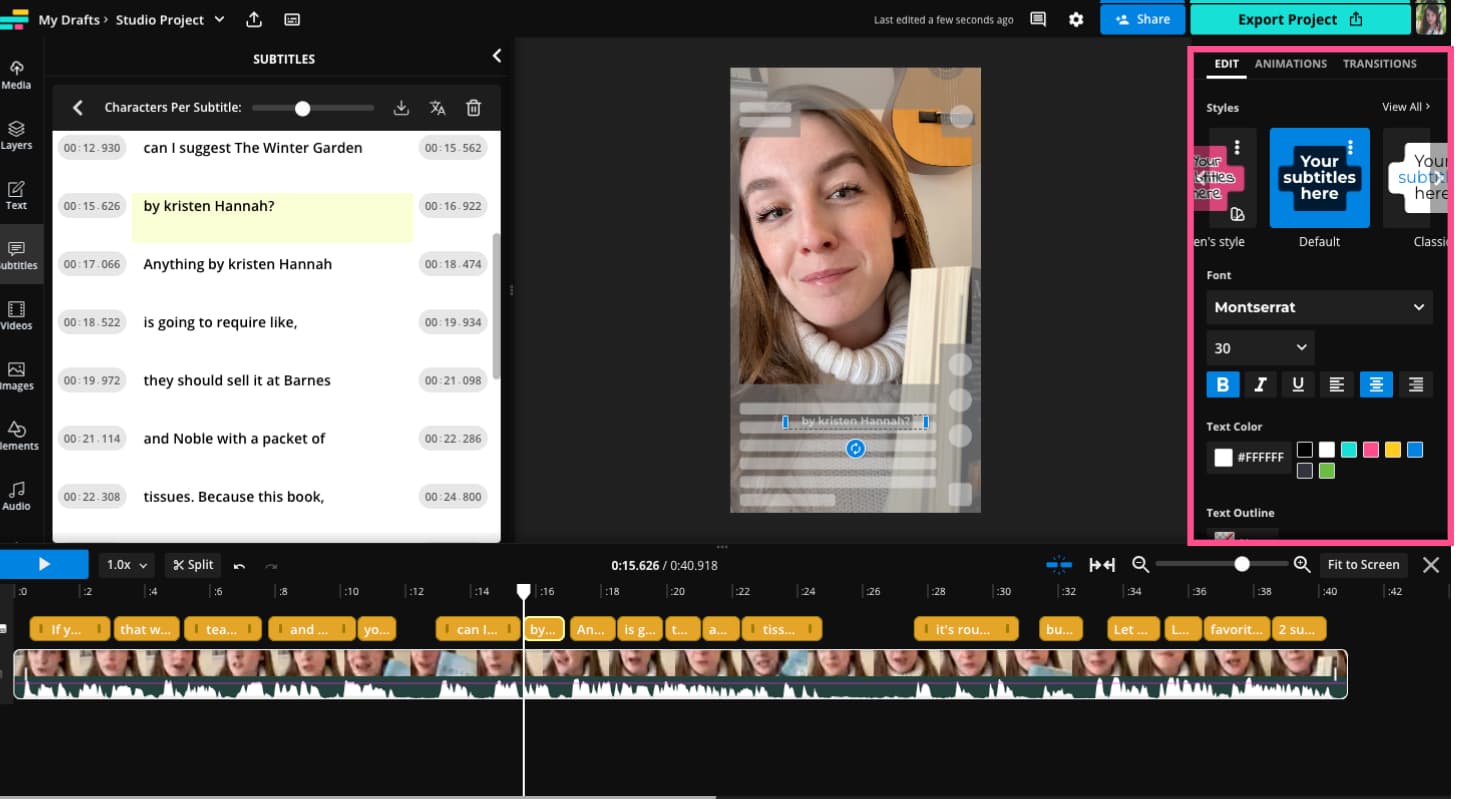
Afterwards, you can edit the text using the subtitle modal on the left to correct any spelling errors that sometimes happen. You can also change the font style, color, size, and background color in the Subtitles menu on the right side. This is where you can add animations, as well. To change how many words appear on each line, use the “Characters Per Subtitle” slider in the modal on the left.
Don’t forget to use the Safe Zone filter to make sure your captions are visible by dragging the text box up out of the gray overlay into the clear section in the middle.
Step 4: Add Music to Your Instagram Reel
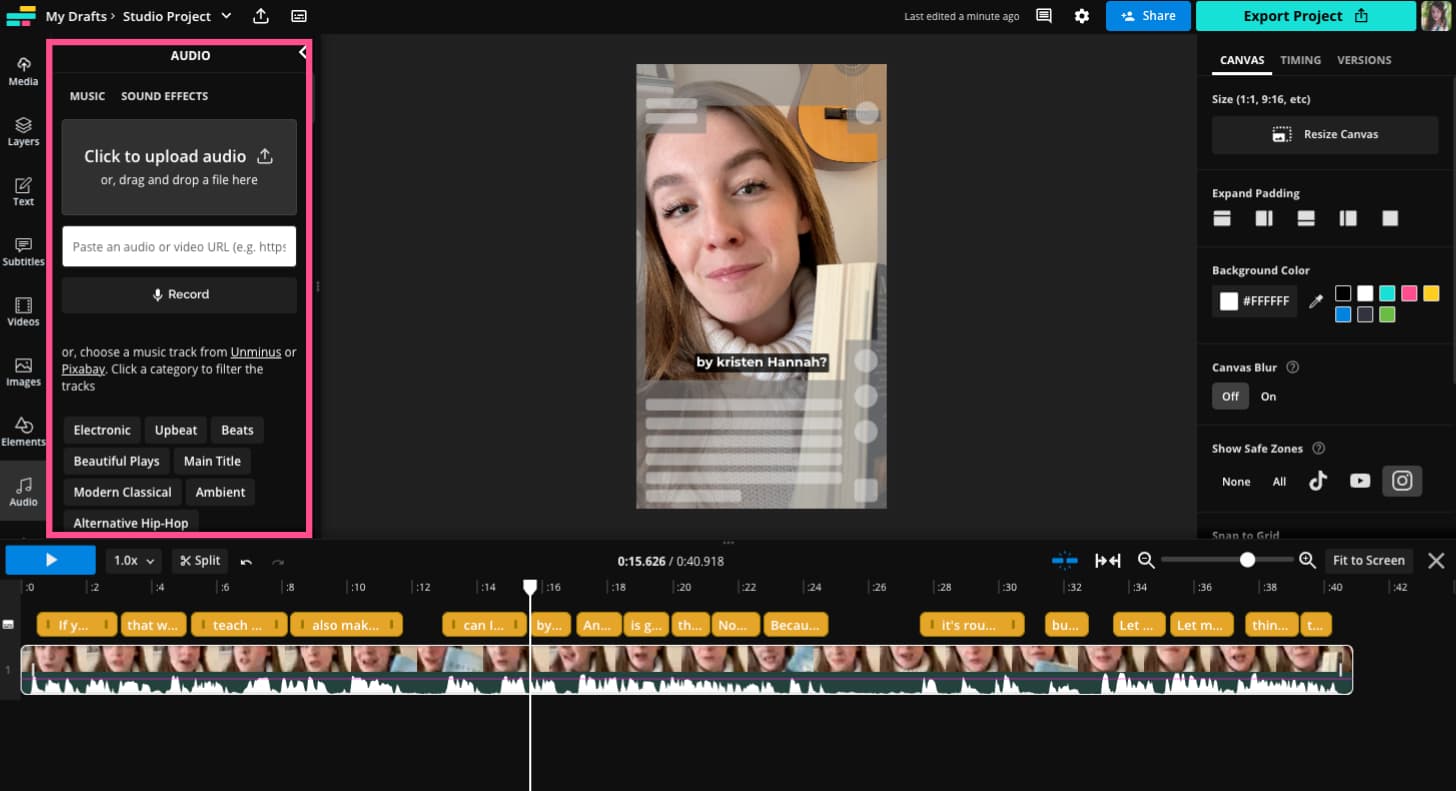
Now, let's add some background music. When making an Instagram Reel in the app, you’re limited to the sound and music options available in Instagram’s library. But with Kapwing, you can add any music to an Instagram Reel. Here’s how.
Click the “Audio” tab in the left side menu, then upload an MP3 or paste an audio URL. If you found a video with music that's perfect for your Reel, you can paste it here too.
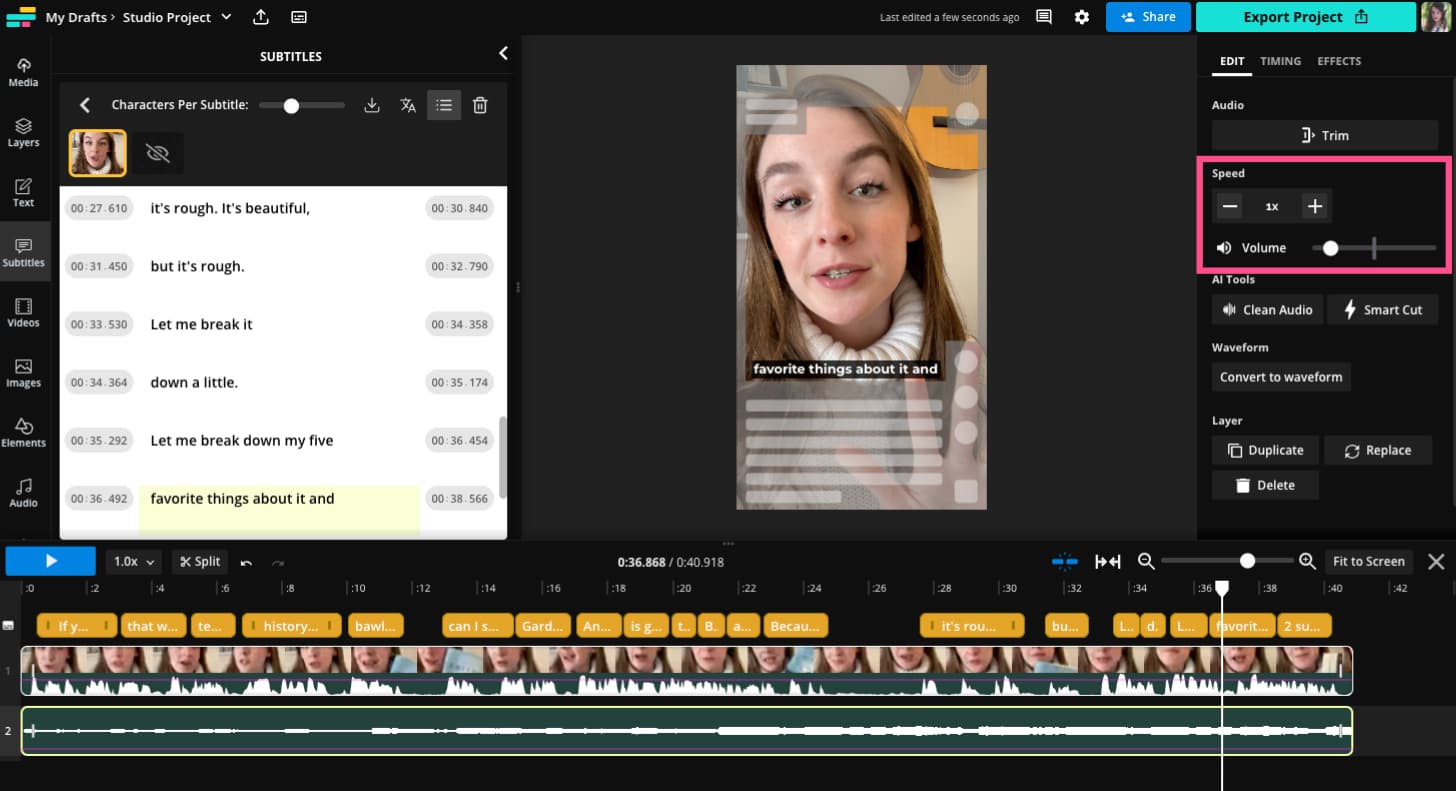
Select the audio layer in the timeline then adjust the volume in the right side menu. If you’re speaking in your Reel, 50% volume or less is usually good, so that the music doesn’t drown out your voice, but you can play with it and listen back, adjusting as necessary. You can also change the speed in this menu.
Finally, drag the ends of the audio layer to trim the length or use the split tool to edit your MP3 layer down to just parts you want.
Step 4: Export and Download
Click the export button at the top of the editor and choose your format and resolution settings. When your export is finished processing, simply click Download to save to your device. All that's left is to head over to Instagram to post your Reel!

If you make a Reel with any part of this tutorial, follow and tag us on Instagram so we can see! For more tips, tricks, and tutorials like this one, check out the rest of our Resources Library and visit our YouTube channel for the latest content.
Related Articles: