
How to Make the Kumar Method Video With AI (Prompt Included)
The original Kumar Method video has more than 34 million views, and 2 million likes.
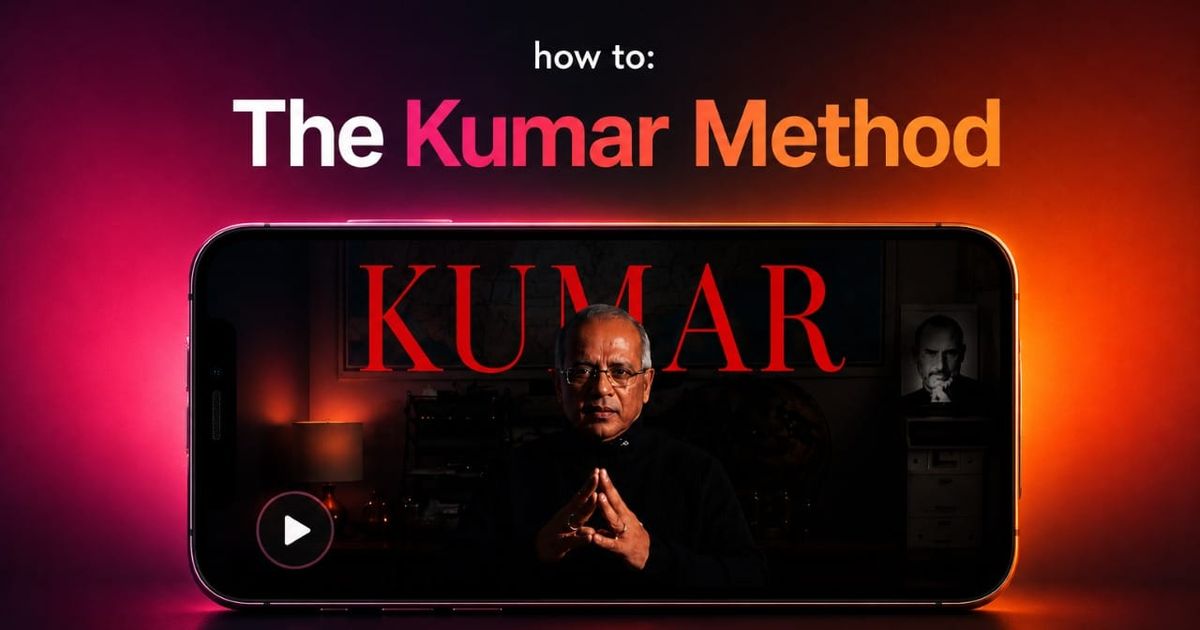
The Kumar Method is one of the fastest-growing AI video trends on TikTok, Instagram Reels, and YouTube Shorts. The original Kumar Method video has surpassed 33 million views and inspired hundreds of recreations across social platforms, with the format collectively generating well over 100 million views.
While the finished videos look like they require a professional film crew, they're surprisingly accessible to recreate. With one selfie, a short talking-head video, and Kapwing's AI tools, you can generate consistent cinematic scenes, animate them, and edit everything together in a single project.
In this guide, I'll walk through the entire workflow—including every copy-and-paste prompt used to recreate the trend.
How to Make the Kumar Method Video
- Step 1: Write Your Script
- Step 2: Film Yourself Reading the Script
- Step 3: Build a Consistent AI Character
- Step 4: Generate the Cinematic AI Scenes
- Step 5: Assemble Everything in Kapwing
Step 1: Write Your Script
The Kumar Method isn't tied to a single script; plenty of creators have put their own spin on the format. However, there is a relatively consistent structure throughout: a serious introduction, an unexpected reveal, and a ironic punchline that contrasts with the cinematic visuals.
If you're recreating the original trend, this template is a great place to start:
- "This is a message to all [YOUR NICHE]."
- "My name is [YOUR NAME]."
- "I'm a [CONTRASTING JOB], and I'm going to become the biggest [THING] in the world."
- Finish with your punchline or reveal.
The more seriously you deliver the first three lines, the stronger the contrast will be when the punchline arrives. Once you understand that formula, you can experiment with your own scripts while keeping the same overall pacing.
Step 2: Film Yourself Reading The Script
The Kumar Method typically begins with a simple talking-head video of you delivering your script in a completely deadpan, serious tone. The rest of the video then alternates between this footage and cinematic AI-generated shots, creating the contrast that defines the trend.
Keep your setup simple: position your phone at eye level, and stand or sit in front of a plain wall. You can light yourself from one side to create a more dramatic look. Wearing dark, minimal clothing—like the black turtleneck used in the original trend—also helps match the aesthetic.
Deliver the first part of your script with complete confidence, pausing briefly between each line. Then, for the final line, subtly break the serious tone by revealing the joke or showing a more relaxed side of your personality.
Don't worry about making this footage look cinematic—the AI-generated scenes you'll create later provide most of the visual impact.
Step 3: Build a Consistent AI Character
The Kumar method videos look like they were professionally filmed and color graded, with dramatic lighting and polished compositions. Luckily, you can recreate the same cinematic aesthetic without professional equiptment using KAI.
The first step is creating a reusable AI character. Start by uploading one clear headshot—or a high-quality frame from the talking-head video you recorded in the previous step. Then generate a clean, front-facing identity portrait using the prompt below.
AI Character Headshot Prompt
Using the exact person in the reference photo, create a clean front-facing identity portrait of this same person. Dead-on, looking straight into the lens, the entire head in frame, calm neutral expression, mouth closed. Keep their exact face, skin tone, hair and facial hair identical to the photo — do NOT idealise, beautify, slim, smooth, lighten or change any feature or their age. Flat neutral grey studio background, soft even shadow-free lighting, natural real skin texture with visible pores, photorealistic, zero retouching, portrait orientation 3:4.
Negative: smiling, teeth, idealised or changed face, lightened skin, altered hair, added or removed facial hair, glasses unless in the photo, harsh shadows, coloured background, text, watermark.
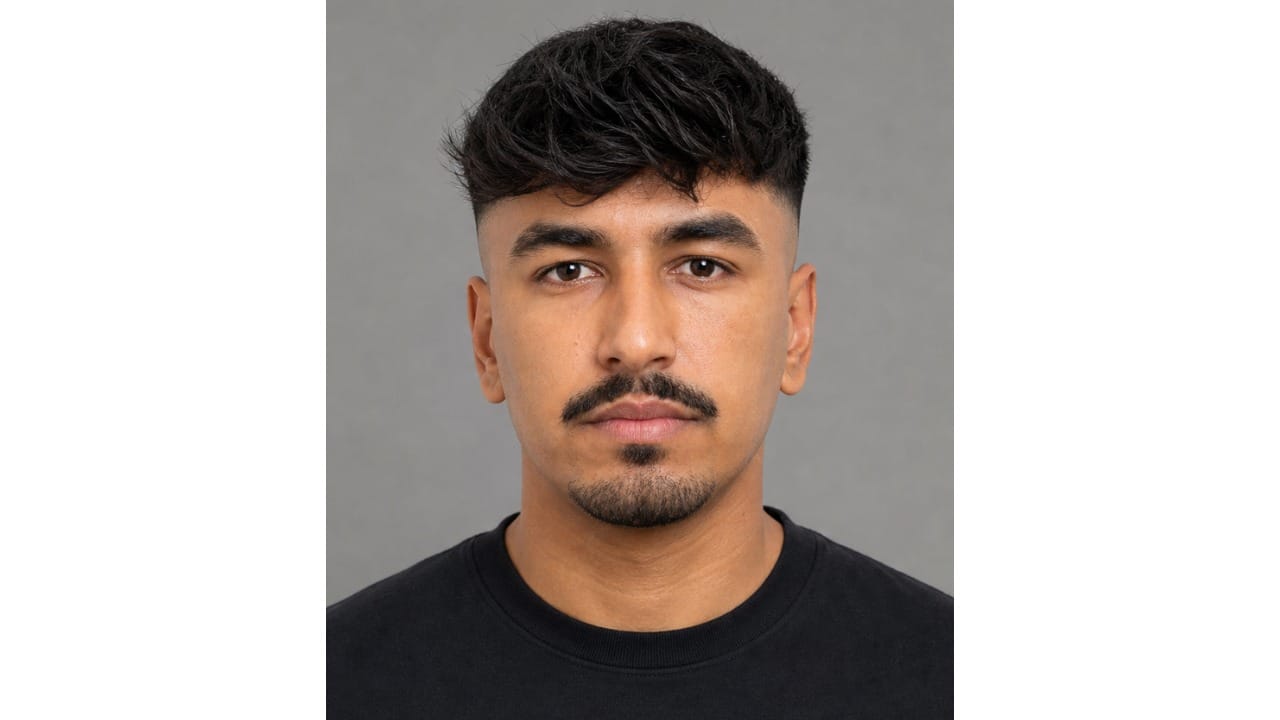
Next, use that portrait as a reference to generate three full-body studio images: one facing the camera, one in side profile, and one from behind.
Keeping your head visible in every image gives the model enough reference material to preserve your facial features across future generations.
AI Character Full Body Poses Portrait Prompt
Studio photoshoot of the same person from the reference image, full body head to toe, on a seamless pure white studio background. Keep their exact face and features identical to the reference — do not idealise or change them. [POSE]. Generous space above the head, below the feet and to both sides. Wearing a black turtleneck. Neutral expression, mouth closed. Soft even studio lighting, sharp focus, photorealistic, 9:16.
Negative: changed or idealised face, cropped head or feet, smiling, glasses unless in reference, extra limbs, distorted hands, text, watermark, grain.
Replace [POSE] for each run:
• "Facing the camera straight on"
• "In full side profile, turned 90 degrees to the side"
• "From directly behind, back view"
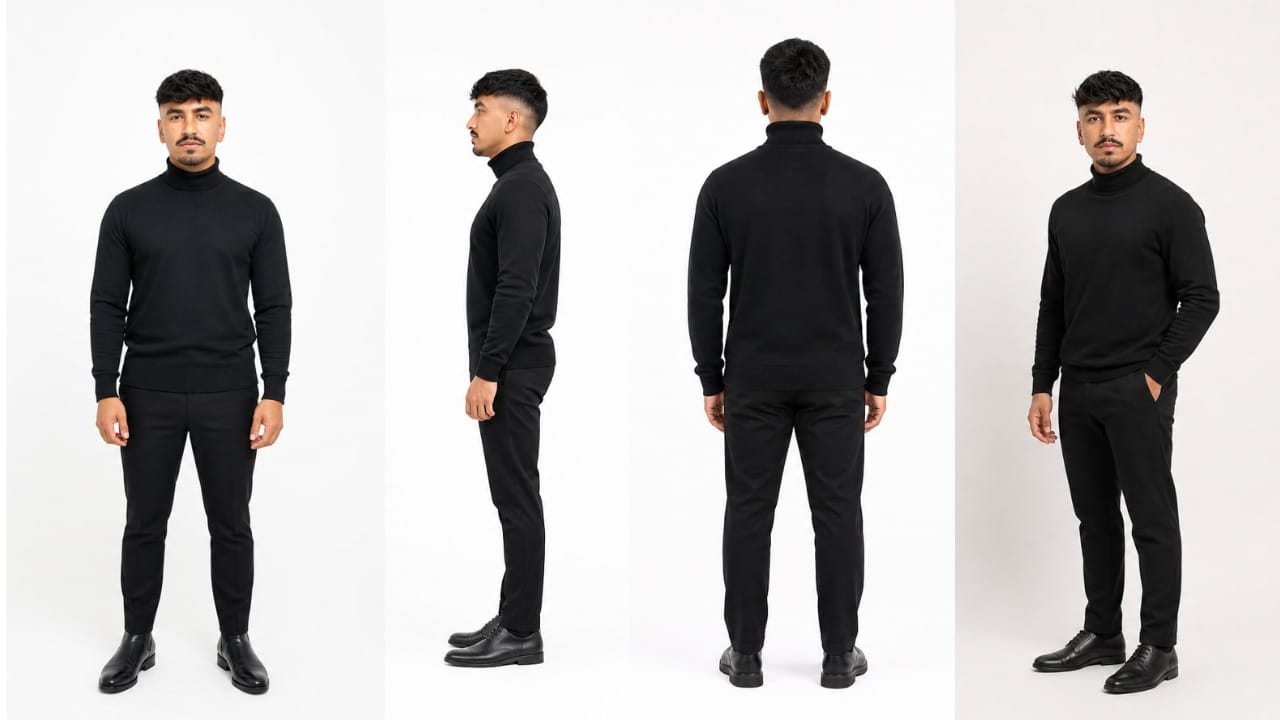
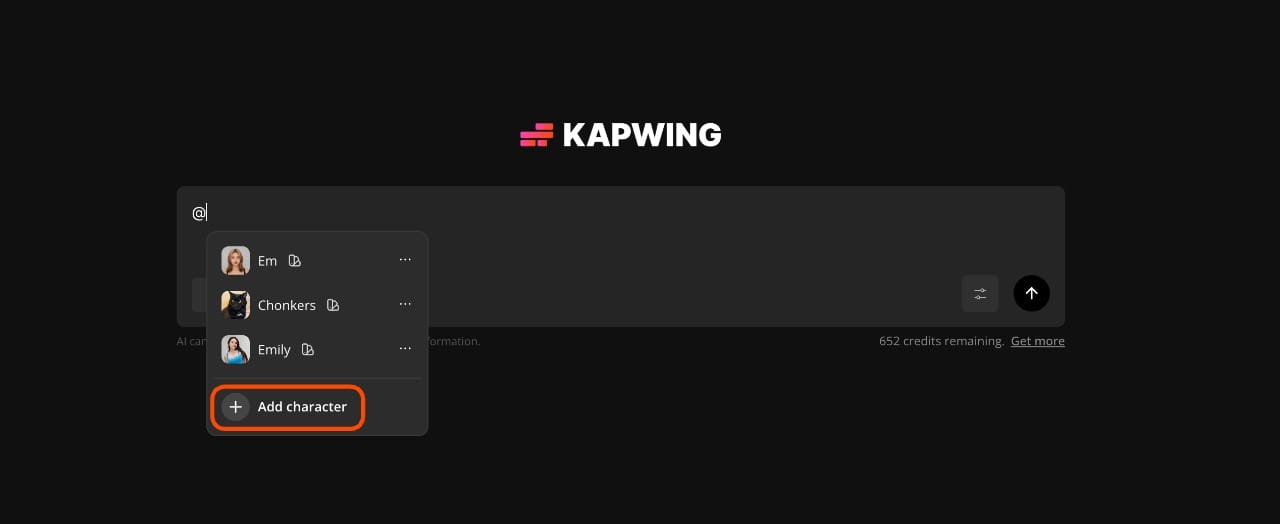
Once you've generated all four images, save them as a new character inside Kai. You'll use this saved character throughout the rest of the guide to generate cinematic scenes that look like they feature the same professionally filmed subject.
To create a new character, type @ in the chat-box or press the @ button in the bottom left corner. In the pop-up menu that appears, select "Add character".
From there, upload your generated reference photos, and add a short optional description.
Step 4: Generate the Cinematic AI Scenes
With your character ready, it's time to generate the cinematic shots that define the Kumar Method.
For our video, we replicated Kumar's poses and scenes with AI. To generate these images, simply replace @kumar with the name of your saved character in each prompt below.
Generate Cinematic Starting Frames
Rather than relying on one long video prompt, we'll generate five images, that will be animated into short videos.
If you want to recreate another creator's composition that isn't included, you can take a screenshot from their video and upload it to ChatGPT or Claude. Ask it to describe the framing, lighting, camera angle, and subject position. You can often use that description as the starting point for your own AI prompt.
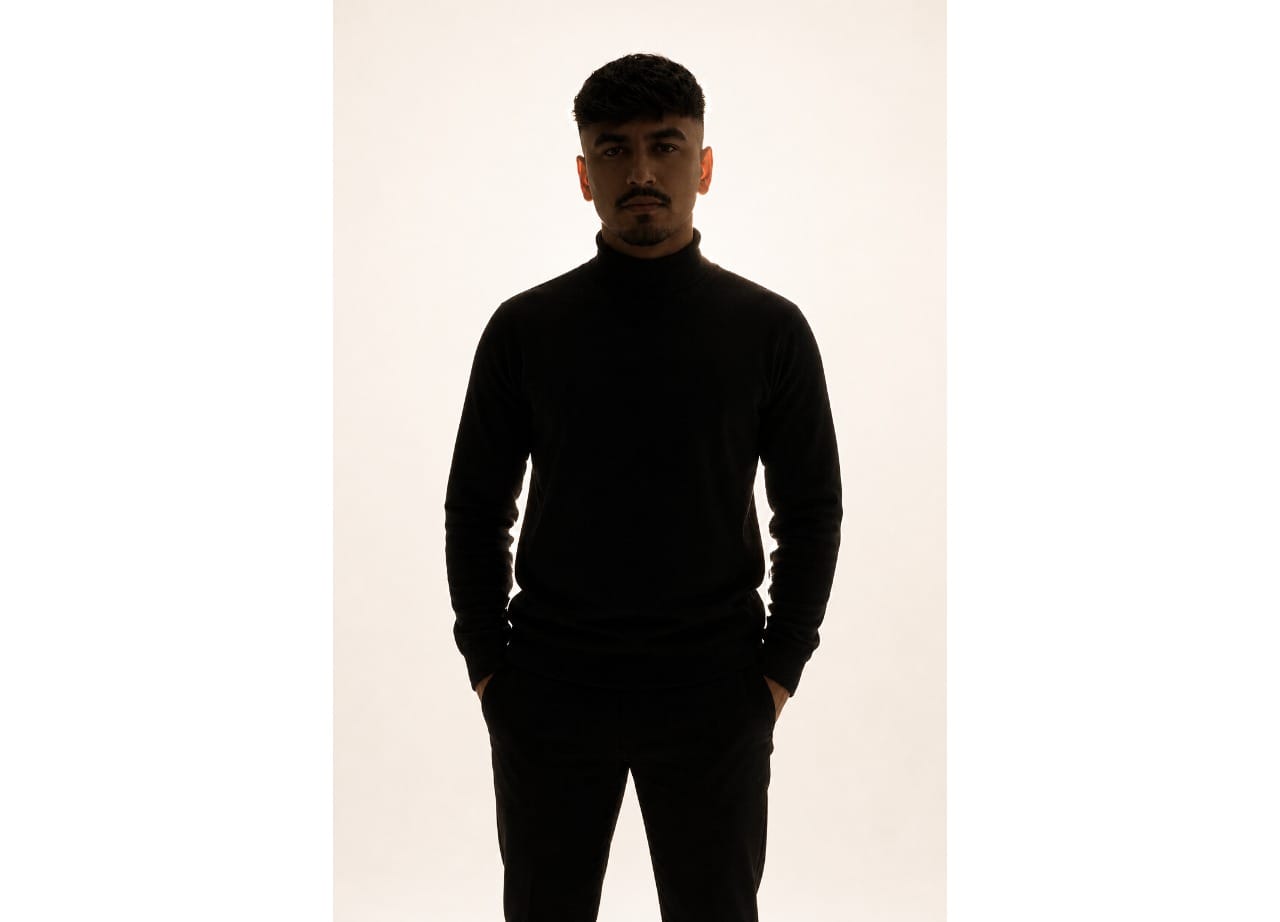
Standing With Hands In Pocket Prompt
@kumar standing, hands in his pockets, calm deadpan, strongly backlit so he is a near-silhouette with his face in shadow, only a bright rim of light down one edge of the body. Bright warm-white seamless studio background, low-key subject on a high-key background, cinematic. Medium shot, photorealistic, 9:16.
Negative: dark or black background, evenly lit bright face, flat lighting, smiling, extra limbs, text, watermark, blur.
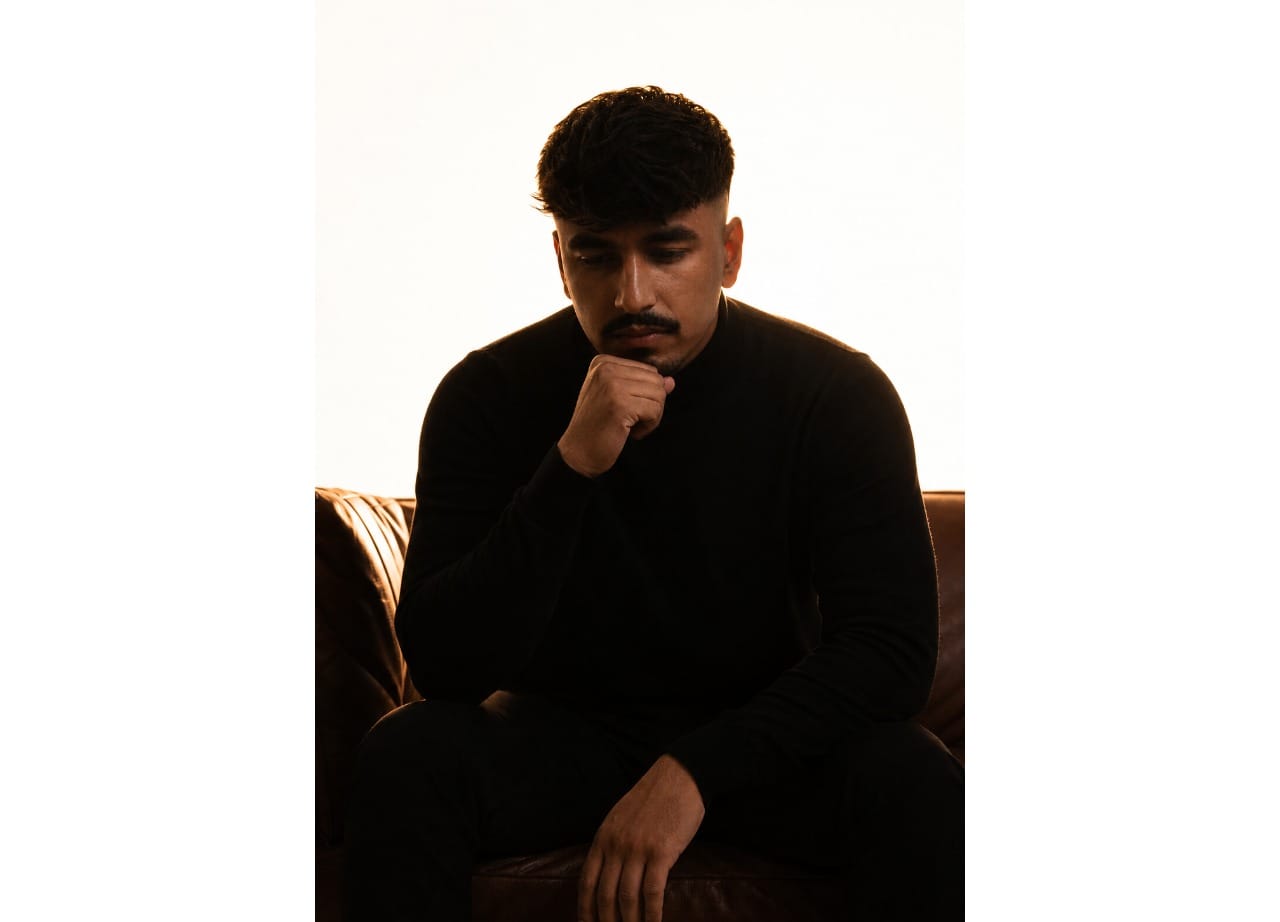
Sitting On Sofa Prompt
@kumar seated on a brown leather sofa, leaning forward, elbows on the thighs, one hand raised with the knuckles to the chin, head slightly down, gaze lowered, deadpan, strongly backlit so he is a near-silhouette with his face in shadow, only a bright rim of light along the top of the head and one side of the face. Bright warm-white seamless studio background behind, the leather sofa catching a little warm light. Low-key subject on a high-key background, cinematic. Framed from mid-thigh up, eye-level medium shot, 50mm, shallow depth of field, photorealistic, 9:16.
Negative: dark or black background, evenly lit bright face, flat front lighting, smiling, extra fingers, distorted hands, text, watermark, blur.
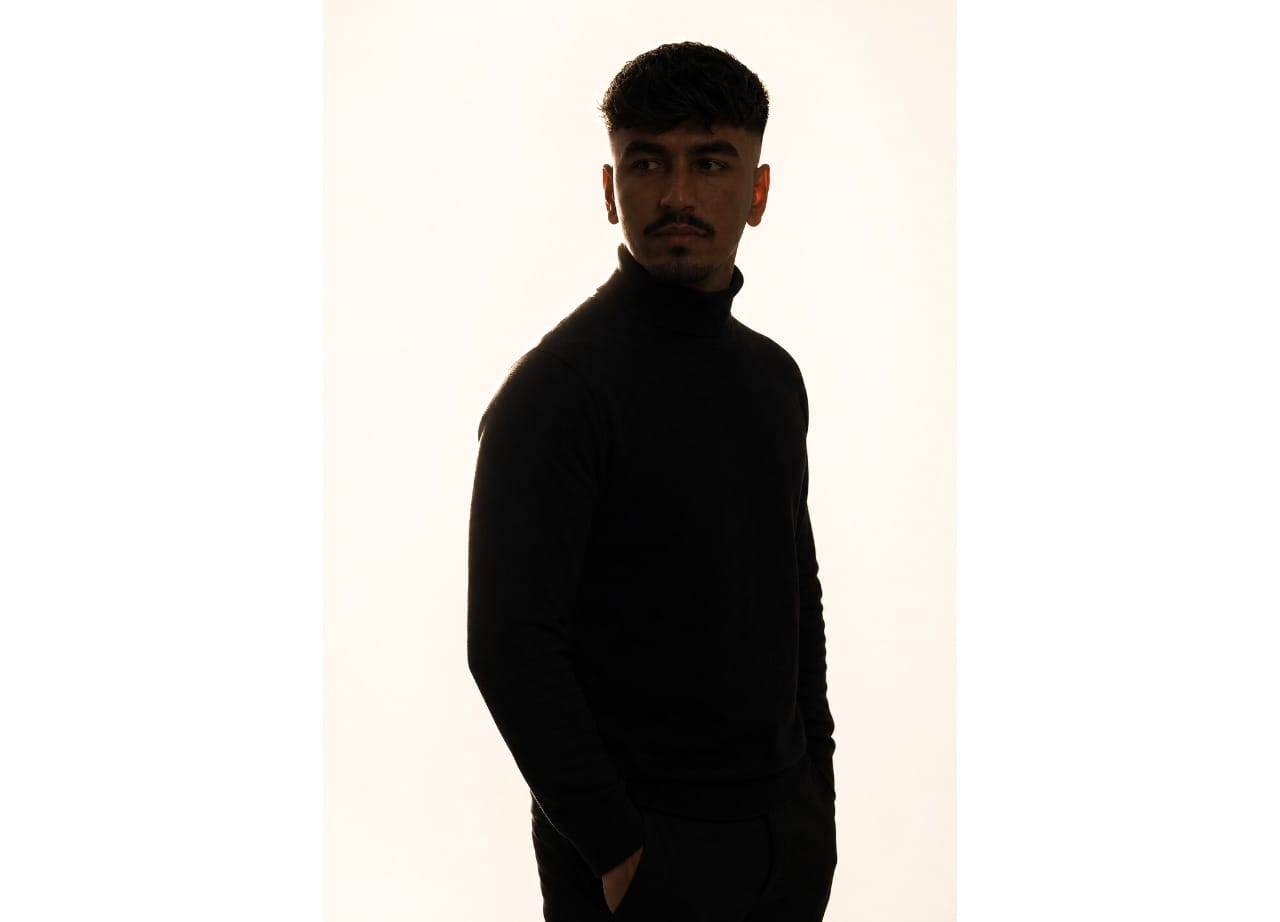
Side Profile Prompt
@kumar seen from a three-quarter angle, body in profile and head turned so the face is angled toward the camera, strongly backlit so he is a near-silhouette with his face in shadow, only a bright rim of light along the forehead, nose and shoulder. Bright warm-white seamless studio background, high contrast, low-key subject on a high-key background. Medium shot, photorealistic, 9:16.
Negative: dark or black background, evenly lit or bright face, flat front lighting, motion blur, smiling, text, watermark.
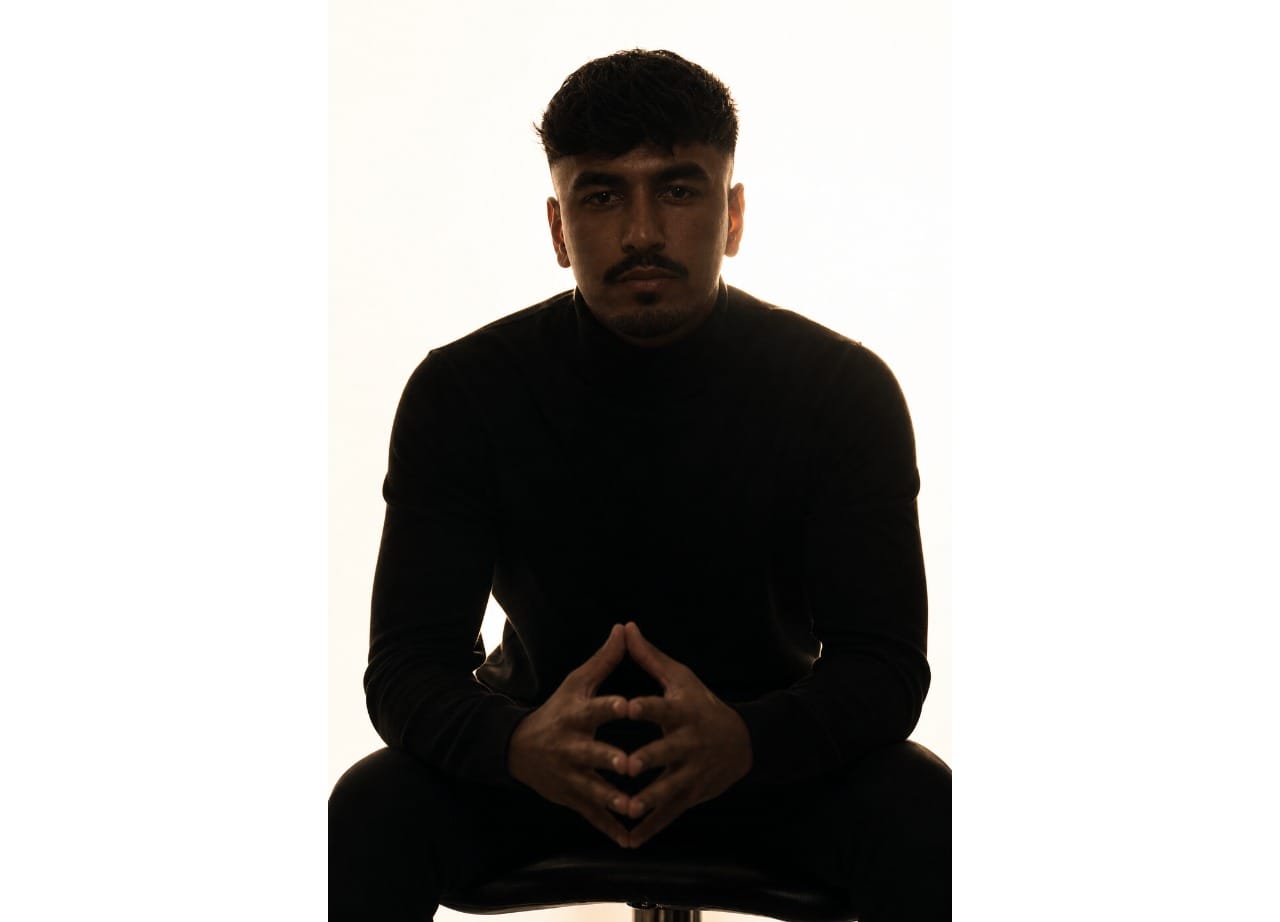
Seated With Hands Clasped Prompt
@kumar seated on a stool leaning forward, forearms on the thighs, hands loosely clasped between the knees, serious deadpan look to the lens, strongly backlit so he is a near-silhouette with his face in shadow, only a bright rim of light down one edge of the head and shoulders. Bright warm-white seamless studio background, low-key subject on a high-key background, cinematic. Eye-level medium shot, 50mm, shallow depth of field, photorealistic, 9:16.
Negative: dark or black background, evenly lit or bright face, flat front lighting, smiling, extra fingers, distorted hands, text, watermark, blur.
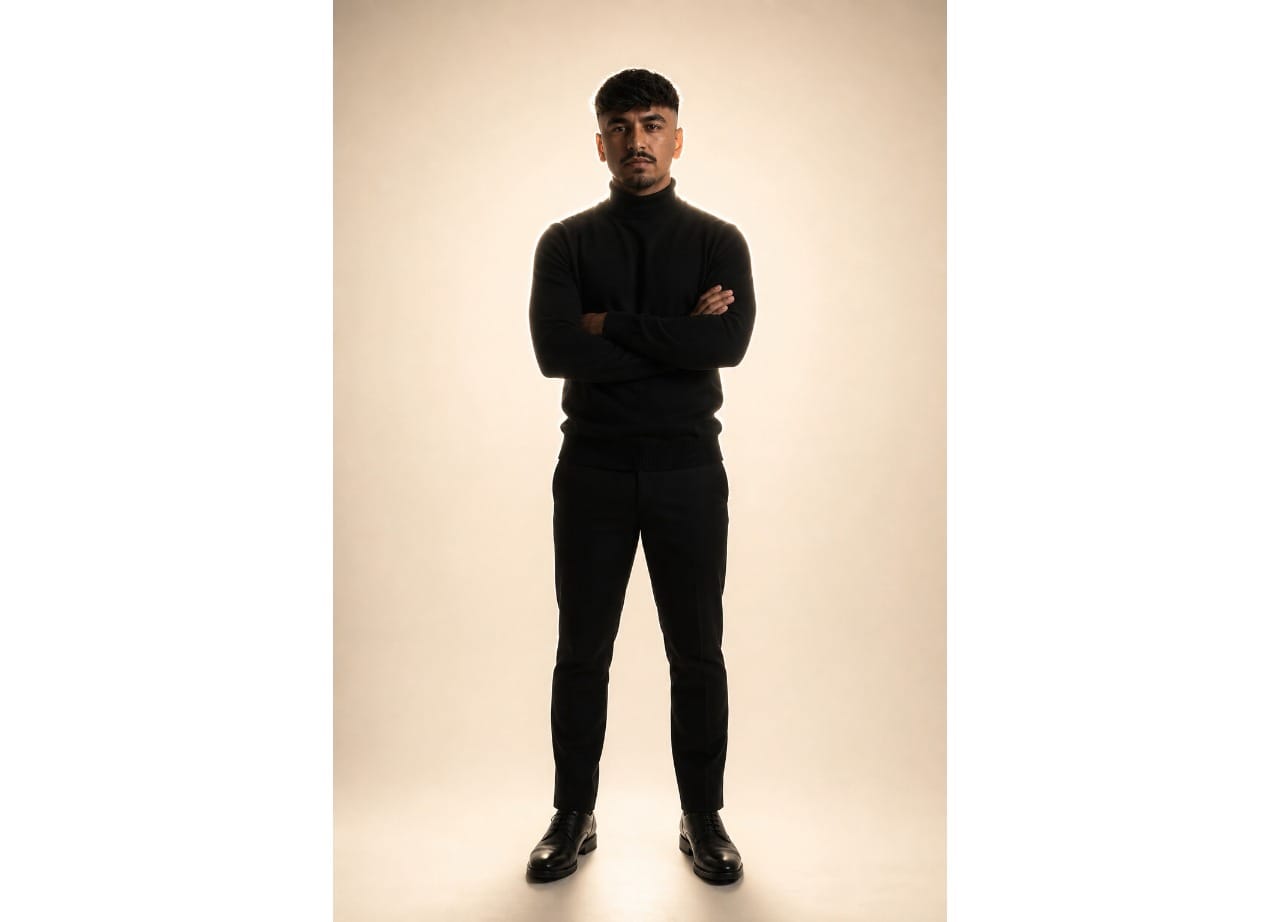
Prompt 5: Power Pose Prompt
@kumar standing centre-frame, full length, arms crossed, deadpan, strongly backlit so he is a near-silhouette with his face in shadow, only a bright rim of light down the edges of the head, shoulders and arms. Bright warm-white seamless studio background, low-key subject on a high-key background, cinematic film-poster look, photorealistic, 9:16.
Negative: dark or black background, evenly lit bright face, flat lighting, cropped body, smiling, distorted hands, text, watermark.
Generate Your Starting Frames Into Videos
Once your images are generated, animate each one into a short four-second clip.
The biggest mistake people make is asking AI to animate too much. The Kumar Method feels cinematic because the movement is incredibly restrained. Instead of walking, gesturing, or making exaggerated expressions, the subject usually remains almost perfectly still while the camera slowly pushes in.
The video prompts below are designed to recreate that look, using subtle movements like blinking, breathing, or gently shifting weight.
Since each animation can take several minutes to generate, it's worth starting a new generation for each image rather than waiting for one to finish before beginning the next.
Standing With Hands In Pocket Animation Prompt
Animate this image into a 4-second vertical 9:16 video clip with no audio. The camera slowly pushes in while he shifts his weight slightly and gives a slow blink, deadpan. Subtle movement only, no major body movement.
Sitting On Sofa Animation Prompt
Animate this image into a 4-second vertical 9:16 video clip with no audio. The camera slowly zooms in while he lowers his hand from his chin and settles, deadpan. Subtle movement only, no major body movement.
Side Profile Animation Prompt
Animate this image into a 4-second vertical 9:16 video clip with no audio. He slowly turns his head from profile toward the camera and holds the deadpan look. The camera stays locked, no major body movement.
Seated With Hands Clasped Animation Prompt
Animate this image into a 4-second vertical 9:16 video clip with no audio. The camera slowly pushes in while he lifts his gaze to the lens, a slow blink, deadpan. Subtle movement only, no major body movement.
Power Pose Animation Prompt
Animate this image into a 4-second vertical 9:16 video clip with no audio. The camera slowly pushes in on him standing still, arms crossed, only a slow blink and a breath. Locked framing, no major body movement.
Step 5: Edit Everything Together in Kapwing
At this point, you have everything you need: your talking-head footage, AI-generated scenes, and animated clips. The final step is assembling them inside the Kapwing editor.
Start by opening the Kumar Trend Video Template and creating your own copy. The timeline is already structured to match the original trend, so most of the editing involves replacing the placeholder assets with your own.
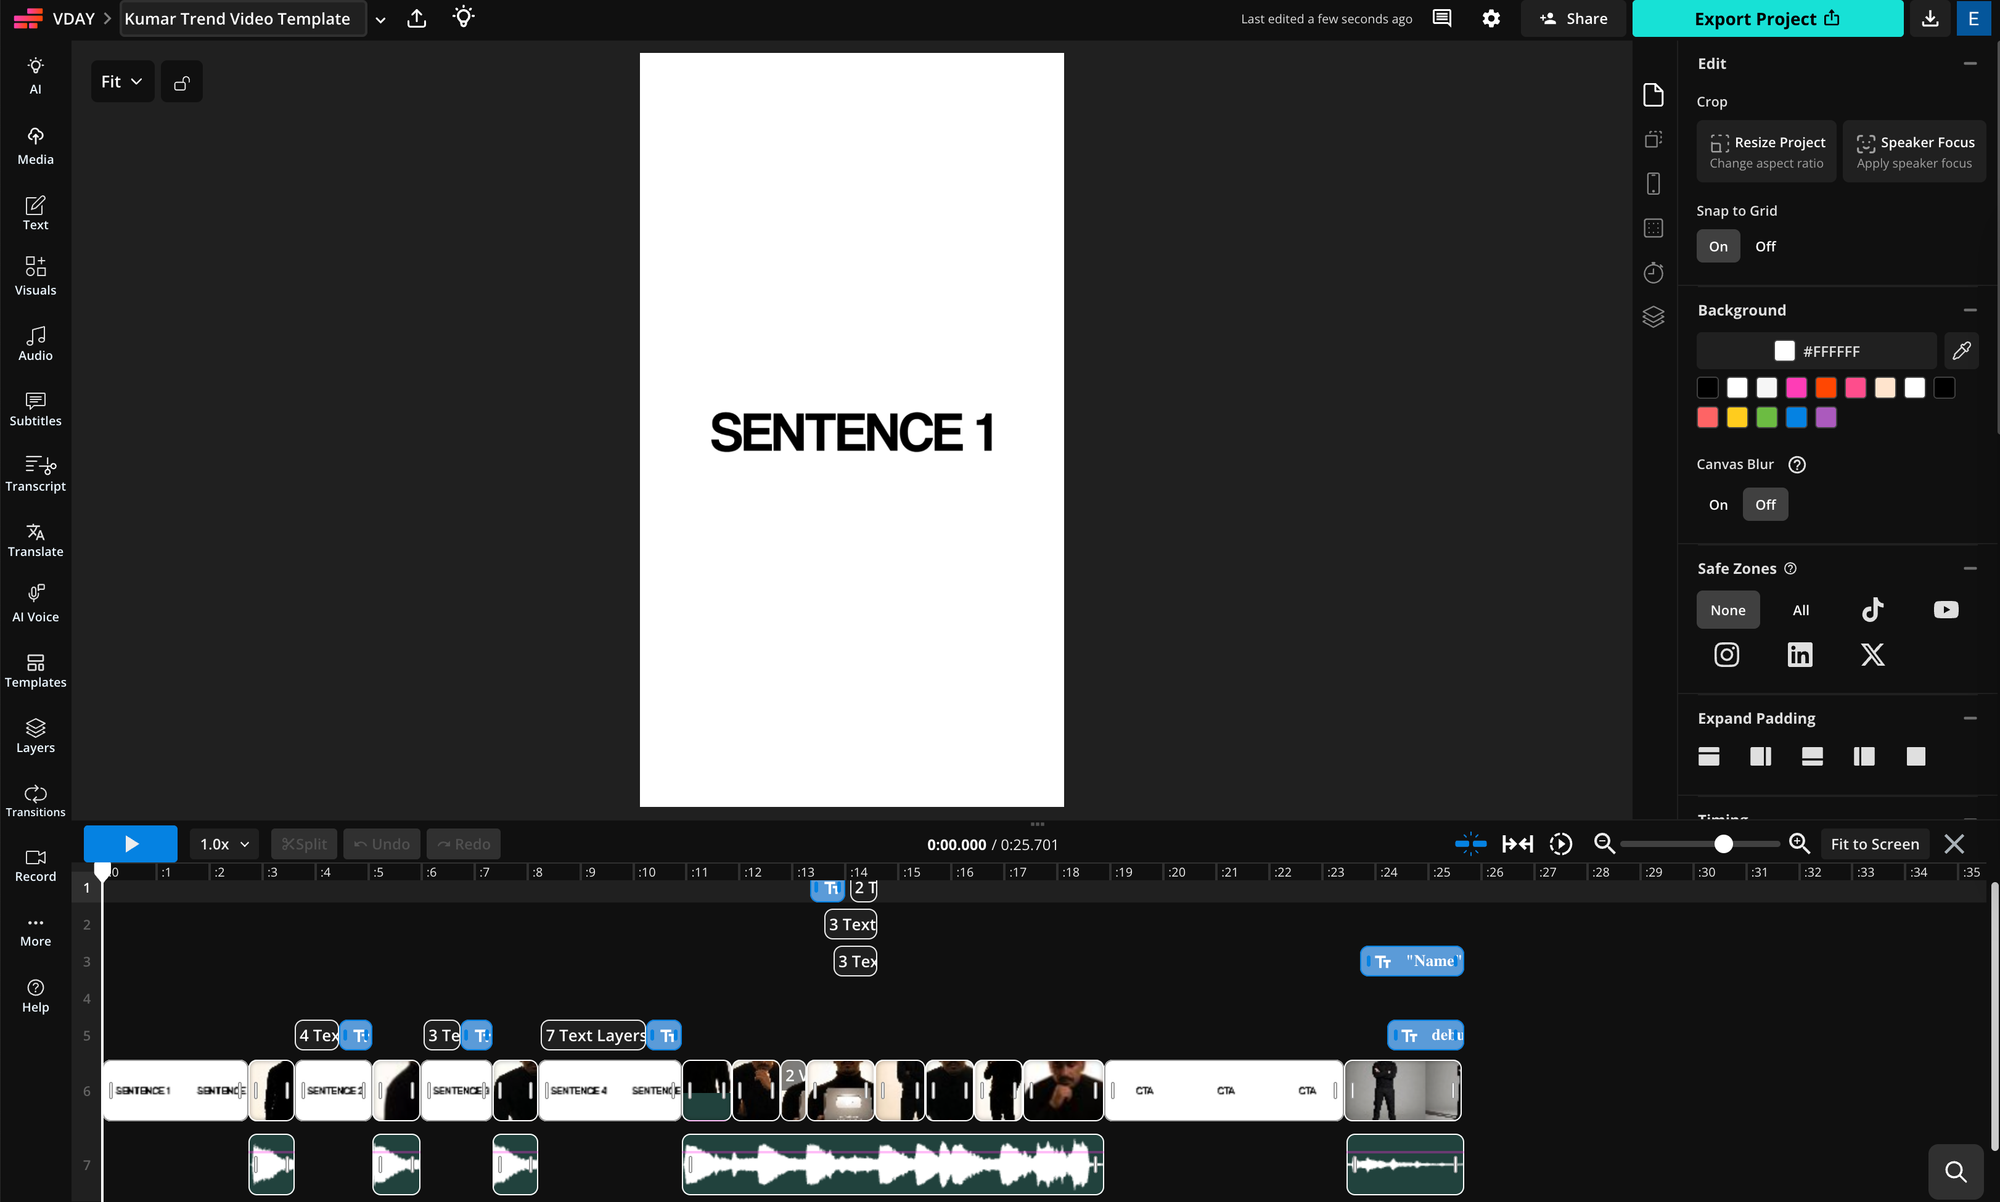
Replace each talking-head clip with your recorded footage, aligning each sentence of your script to the corresponding section of the timeline. Then replace the placeholder AI clips with your generated animations.
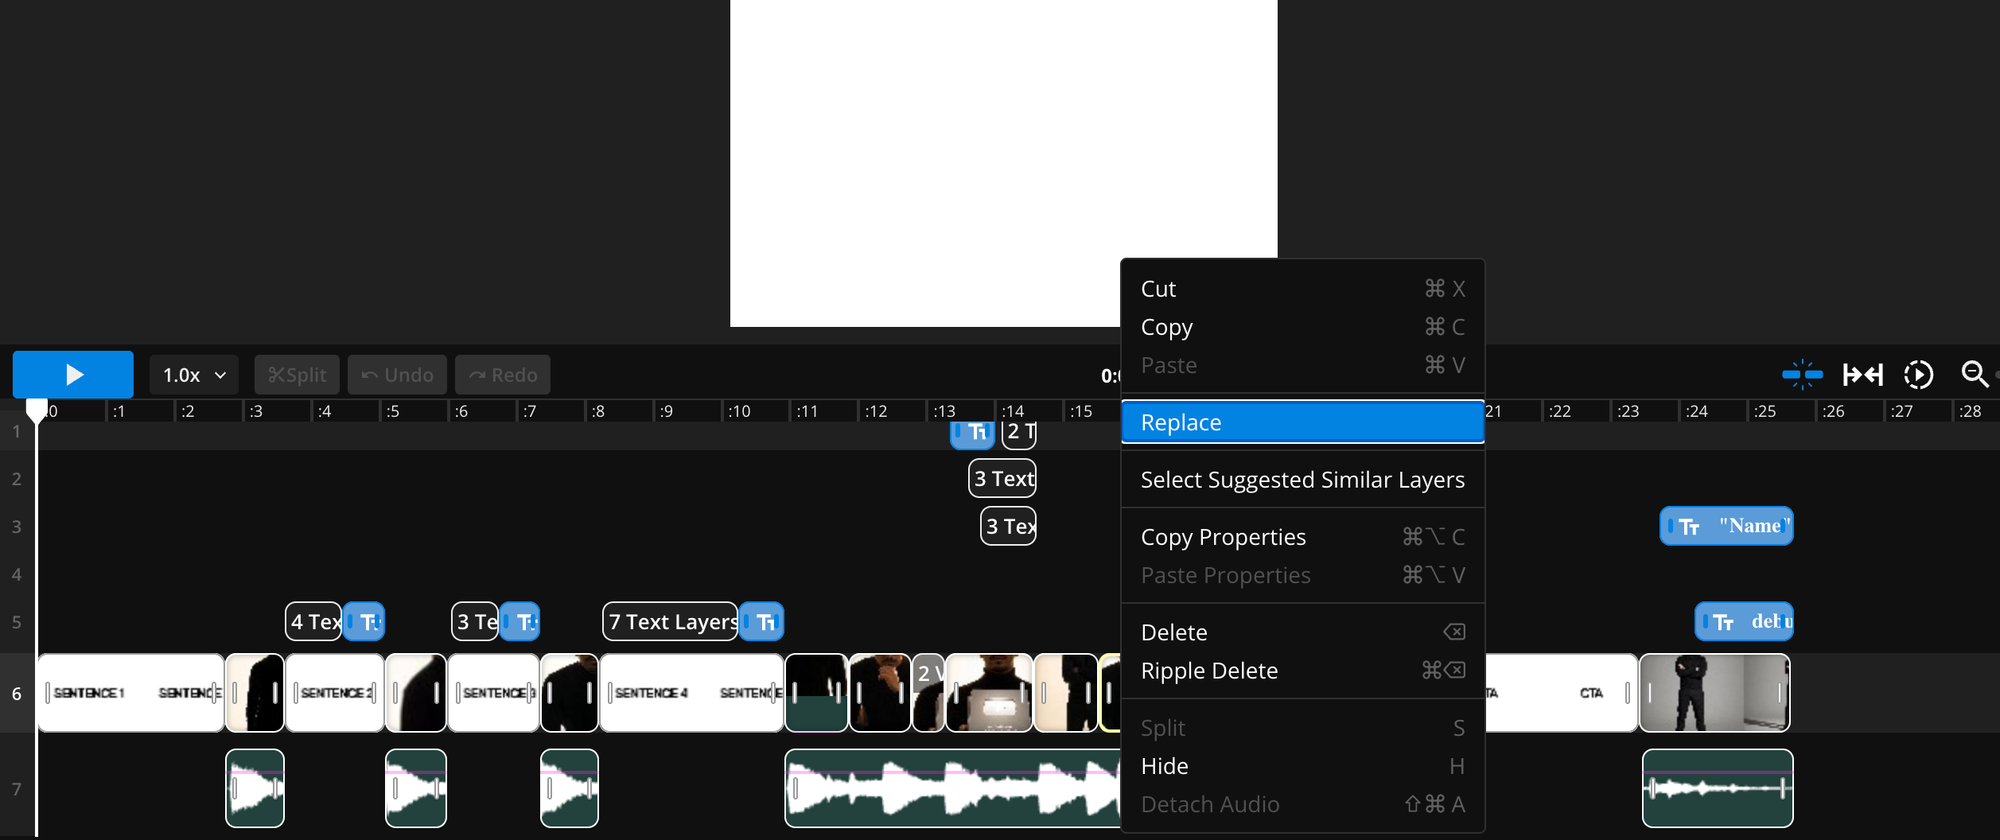
To easily replace assets in the Kapwing editor, simply right click on them in the timeline, and select the "Replace" option.
Next, open the Subtitles panel and select Auto Subtitles. When prompted, choose your talking-head clip as the audio source rather than the template audio, then generate subtitles.
Go through the transcript and clean up any mistakes. Delete extra caption fragments so that each caption contains one complete sentence and begins as you start speaking. For the main captions, set:
- Font: Arial
- Size: around 55
- Color: Red
- Animation: Reveal
The final CTA uses a slightly different style. Create a second speaker so you can customize it independently, then use:
- Font: Arial
- Size: around 42
- Color: White
- Position: Centered just below your chin
- Drop shadow: Slight blur
- Animation: Reveal
Option: Create the "Text Behind Your Head" Effect
One of the signature effects in the Kumar Method is having captions appear behind the speaker.
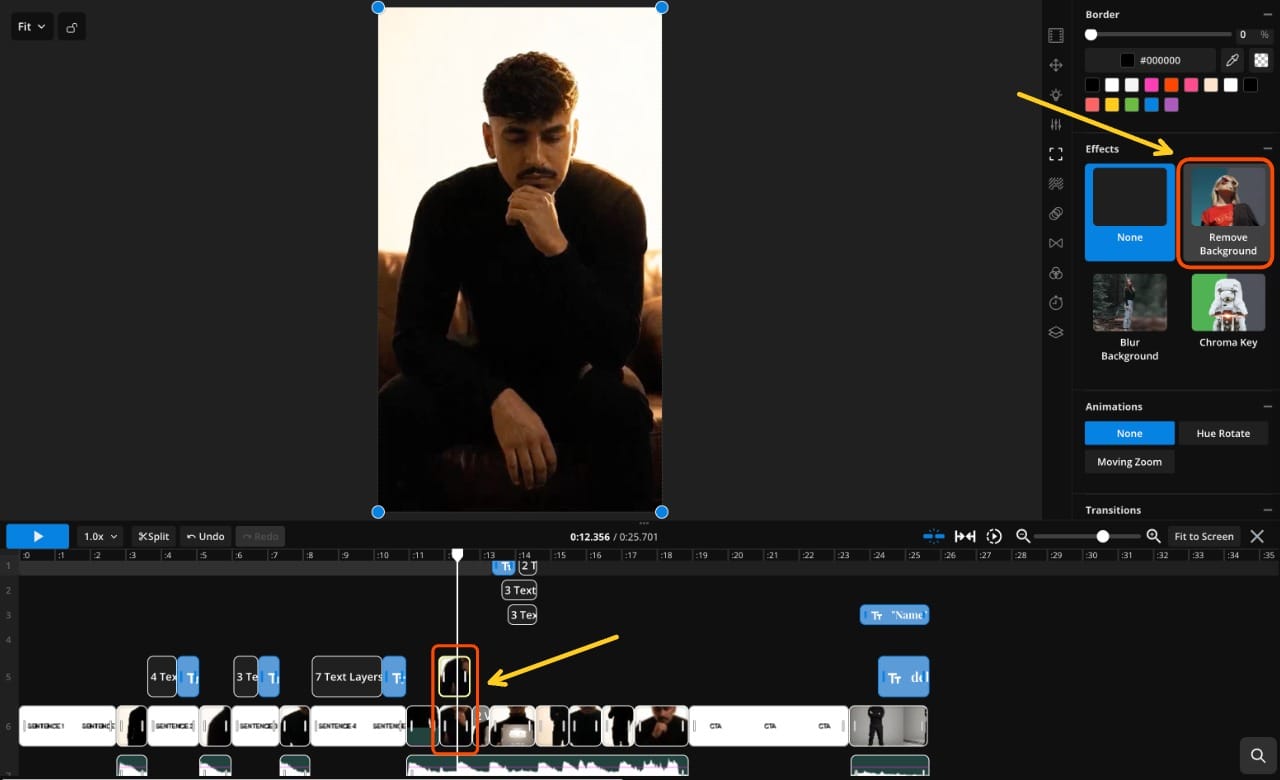
To recreate it, duplicate your talking-head clip and place the copy directly on the layer above the original. Right-click the duplicate, choose Detach Audio, and delete the duplicated audio track.
Next, open Effects and apply Remove Background. Because this cutout now sits above the subtitles, the text appears to pass naturally behind your head.
If captions accidentally disappear behind the wrong layer, open the Layers menu, right-click your talking-head clip, and select Bring to Front.
Frequently Asked Questions
Why doesn't my AI character look consistent across every scene?
If your face changes between generations, the AI probably doesn't have enough consistent reference material. Always use the same headshot and full-body reference images when creating your Kai character, and include instructions like "do NOT idealise" or "keep the exact face and features identical to the reference" in every prompt.
Why are my AI images framed differently?
If the model crops your head or body differently between scenes, add instructions such as "generous space above the head, below the feet, and to both sides" to your prompt. Giving the model extra room helps produce more consistent compositions.
How do I get rid of grainy AI backgrounds?
If your backgrounds look noisy or textured, explicitly ask for a clean seamless studio background and include "no grain" or "clean background, no grain" in your prompt. This helps create the bright, polished look seen in the original trend.
Why do my AI animations look unnatural?
The Kumar Method works because the movement is subtle. Keep each animation between three and four seconds and include instructions like "subtle movement only, no major body movement." Small details—such as a slow blink, gentle breathing, or a slight camera push—feel much more realistic than large gestures.
Why doesn't my Kumar video feel like the original?
The visuals are only half of what makes the trend successful. The humor comes from the contrast between serious, cinematic filmmaking and an unexpected or absurd script. If your finished video feels flat, revisit your script and make the contradiction between the visuals and the punchline even stronger.
Which AI model is best for recreating the Kumar Method?
Any image generation model capable of maintaining character consistency can work, but using a saved AI character inside Kapwing AI (Kai) makes it much easier to generate multiple scenes featuring the same person. This reduces the amount of prompt engineering needed and helps keep your appearance consistent throughout the video.