
What is Color Correction and Color Grading?
90% of product choices are influenced by color — color correct your content to make it more attractive.
Color correction — and similarly, color grading — are techniques used by photographers and videographers to enhance their content and make it more visually engaging.
Whether you're adjusting the exposure to fix lighting issues or applying a cinematic filter to match a certain mood, both processes play a key role in shaping how your audience experiences your visuals. And they're not just for professional video editors — creators of all levels use these tools to make their work stand out.
In this article, we’ll cover how to color correct your content, show clear examples comparing color correction and color grading, and explain how you can apply color grading to any video or image, even if you don’t have editing experience.
Table of Contents
- What is Color Correction?
- What is Color Grading?
- How to Do Color Correction (Step-by-Step)
- How to Do Color Grading (Videos and Photography)
What is Color Correction?
Color correction is the process of adjusting or “correcting” the colors in an image or video to improve clarity and visibility. This could mean boosting brightness, reducing shadows, or fine-tuning elements like warmth and saturation
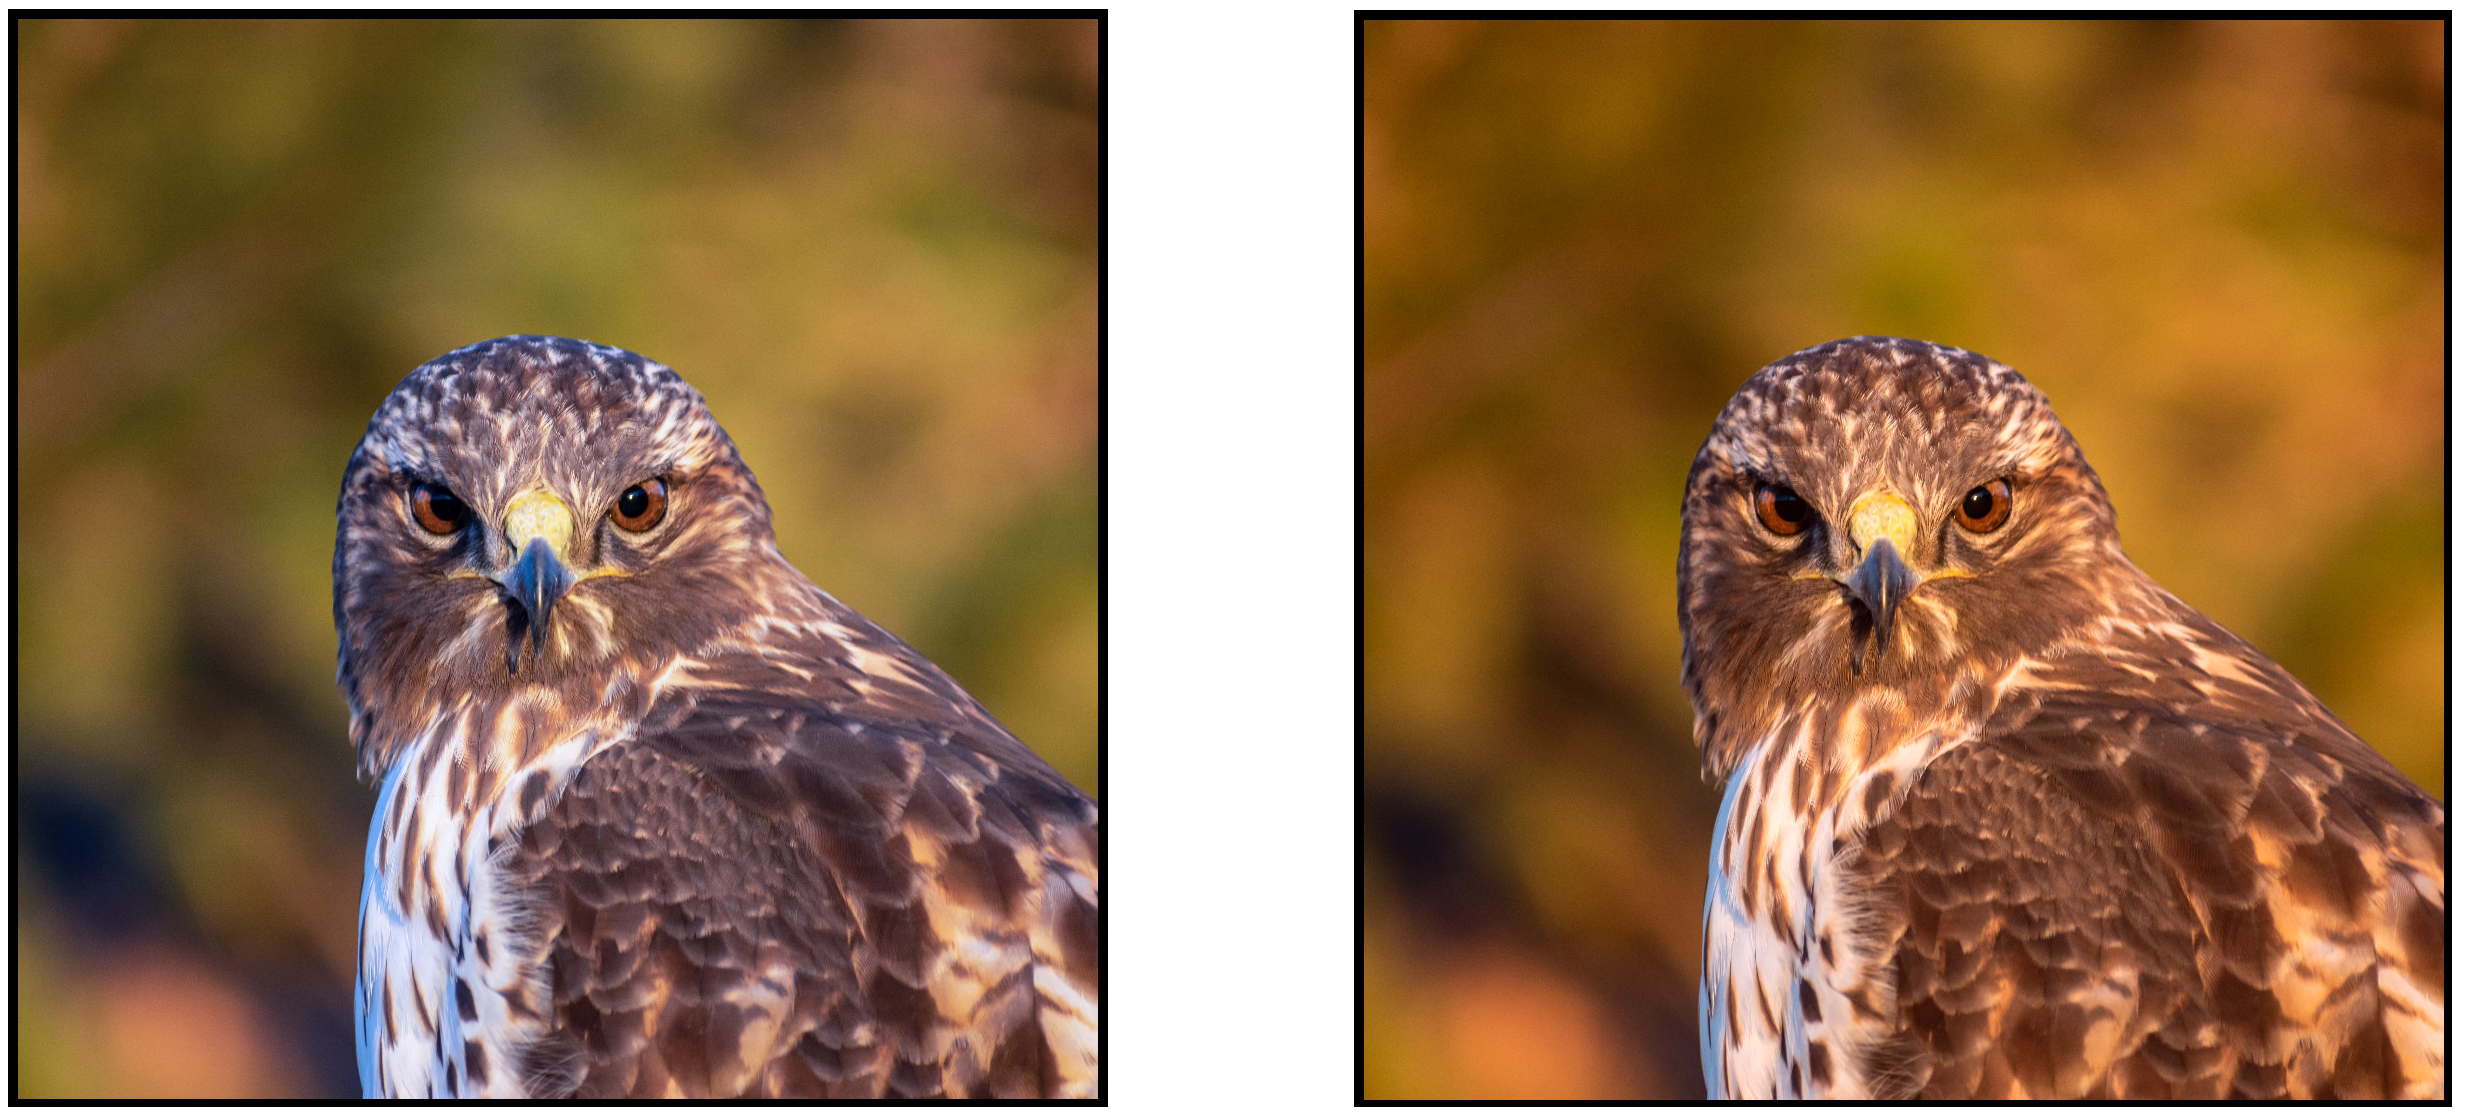
Below is a photography example of this process, showing how changes to brightness, contrast, and exposure can make an image more visually engaging.

As you can see, the overall image appears brighter, and the subject becomes much easier to see.
One highly practical example of color correction is adjusting the 'temperature' of an image.
Below is a comparison between a cooler-toned image and a warmer-toned image, achieved by modifying the warmth setting.
The effect can be subtle or exaggerated depending on your editing goal. Here are the two primary reasons an editor would adjust temperature:
- Match a desired aesthetic: Change the overall tone to suit a warmer or cooler environment based on stylistic preferences.
- Maintain consistency across clips: Fix differences caused by mixed lighting sources so the tones appear uniform.
This second point is especially important when editing videos, where lighting often changes from scene to scene. We’ll dive deeper into this later.
What is Color Grading?
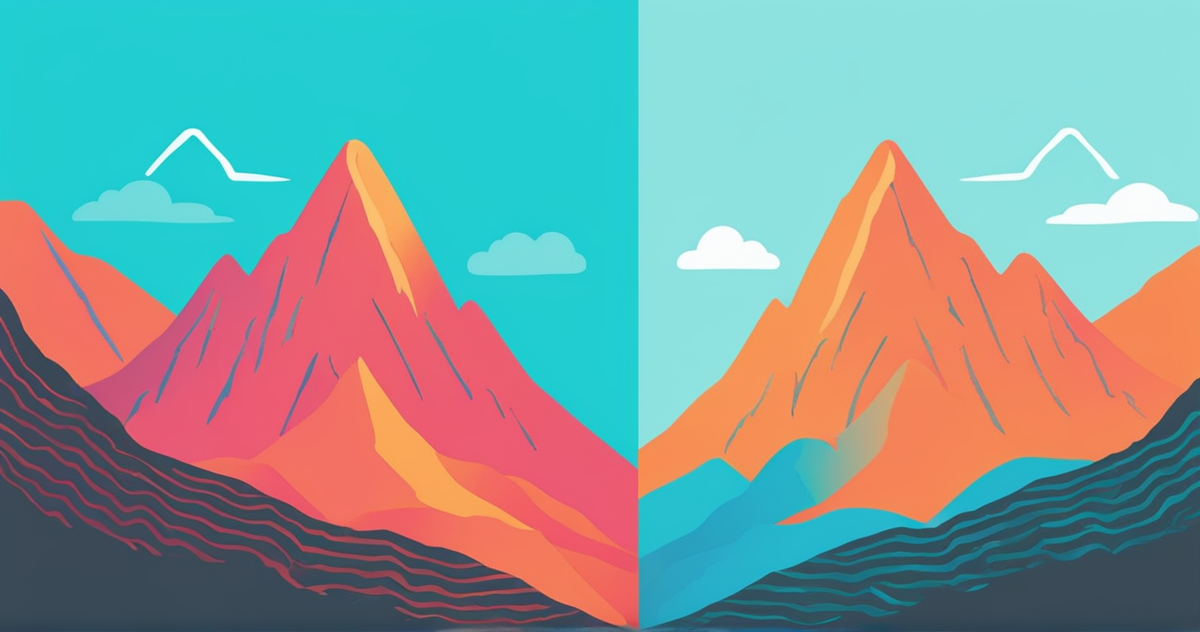
Color grading, on the other hand, is a more creative process where the editor applies bold color shifts or stylistic filters to transform the entire look and feel of the footage to match a specific artistic vision.
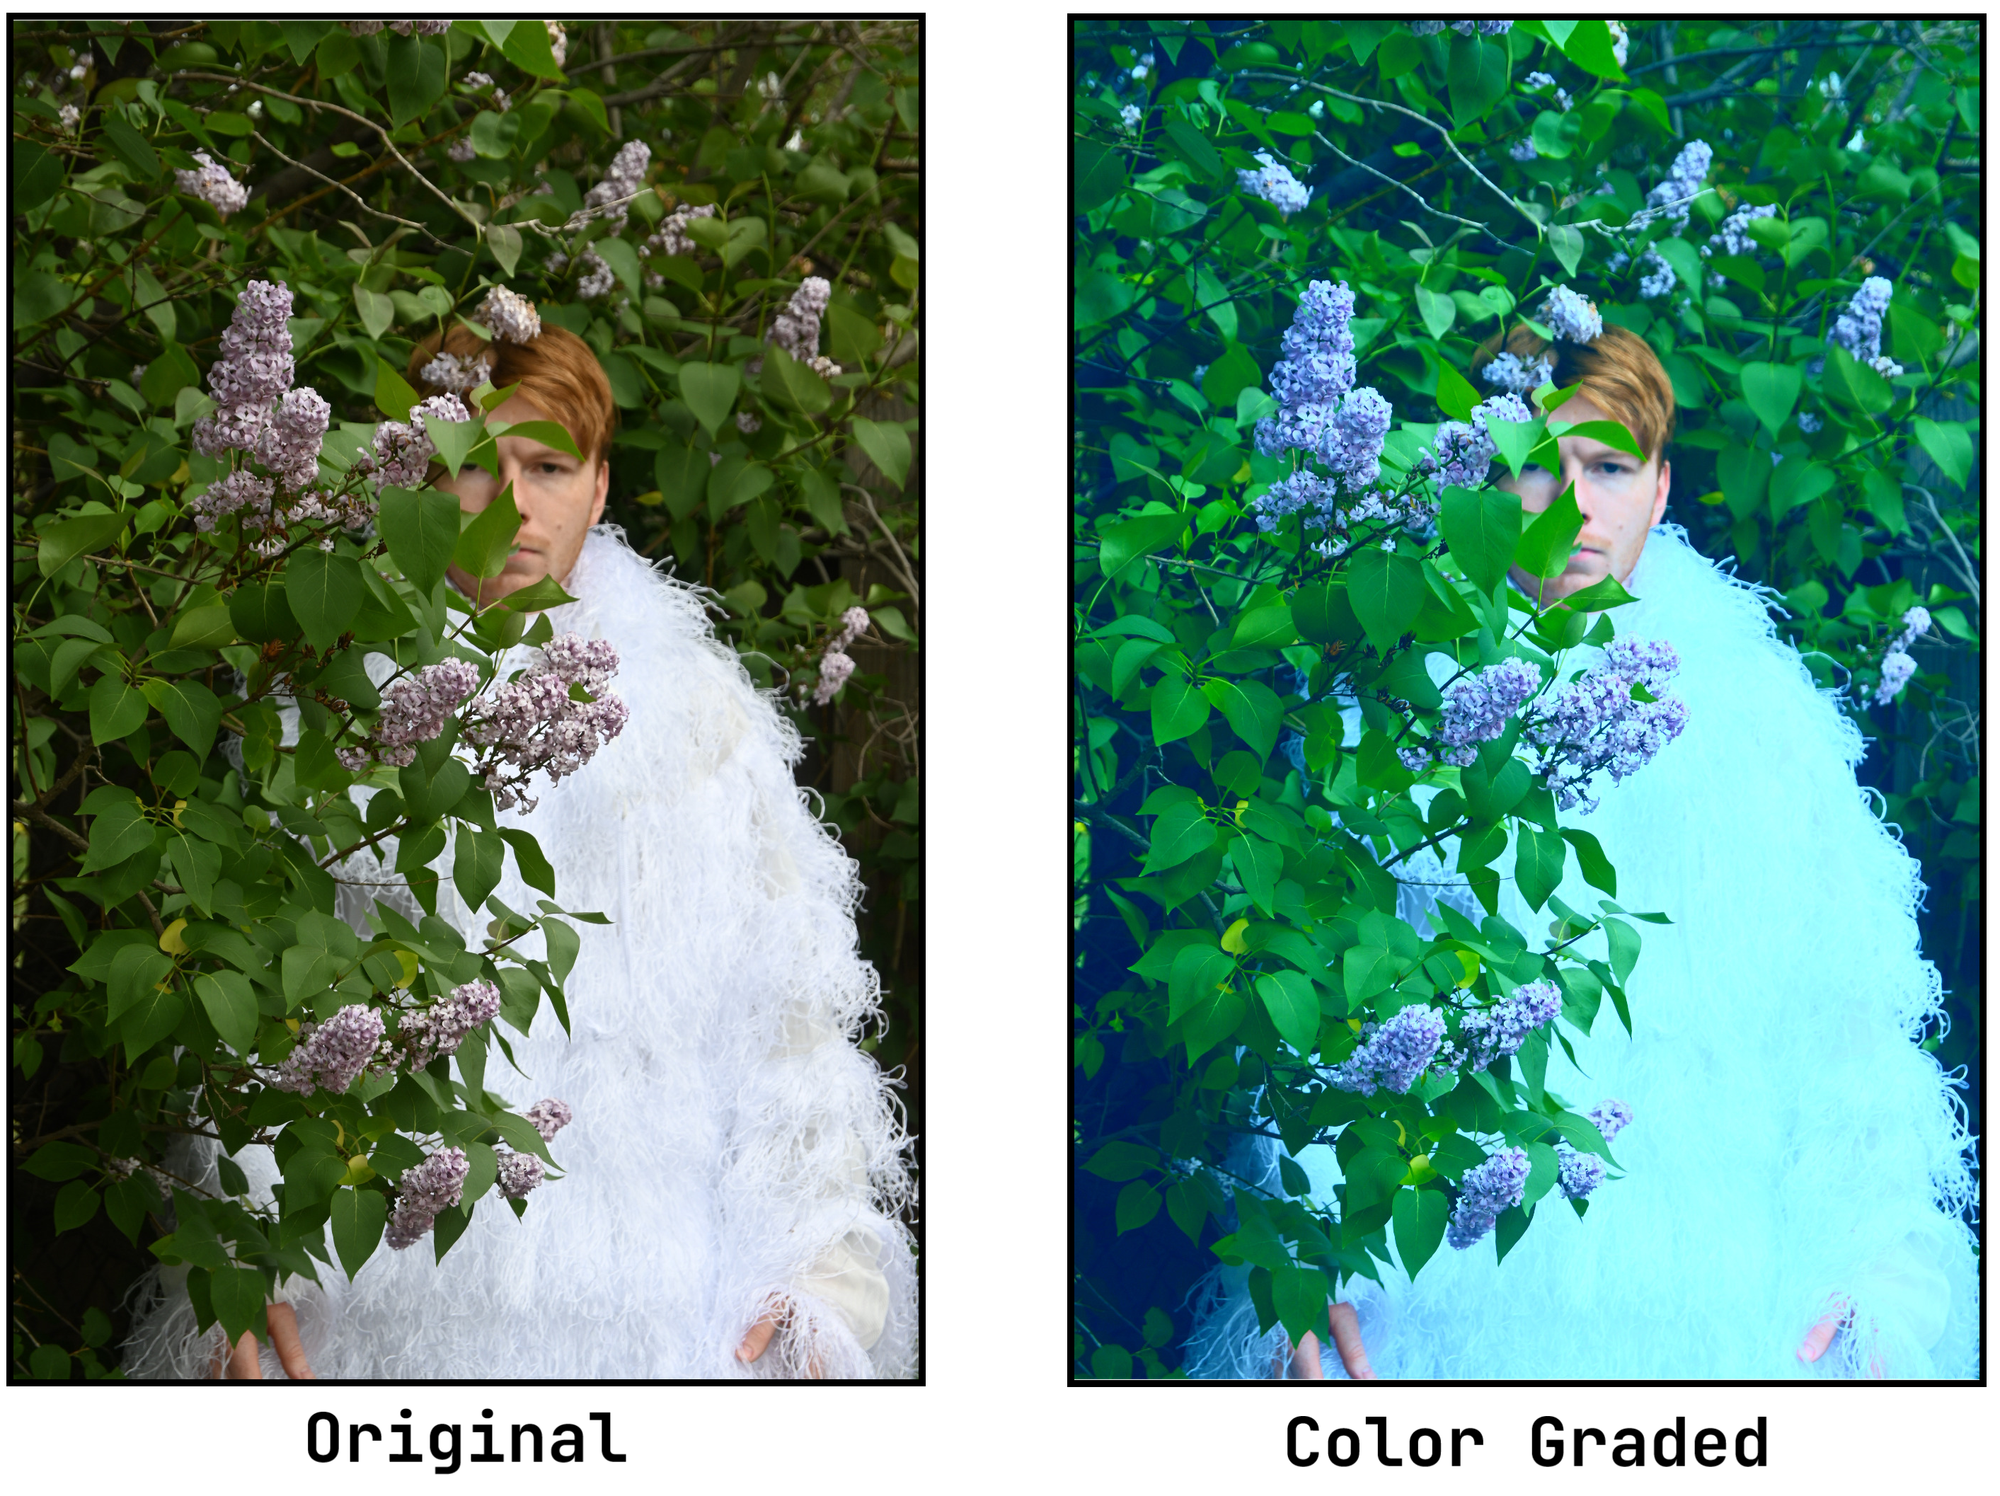
In comparison, the example below shows a color-graded photo. Along with basic adjustments like brightness and contrast, certain colors have been selectively boosted, and the saturation increased.
This creates an entirely different look and feel. While it’s less faithful to the original, color grading is often used for creative or artistic purposes, such as album covers, video thumbnails, or stylized content for social media.
How to Do Color Correction (Step-by-Step)
Color correcting can take as much or as little time as you need. In general, I’ve found that editing images takes no more than a minute or two, while color correcting videos tends to take longer. The time required often depends on the video’s length and how close your original footage is to your desired look.
Whether you’re applying color correction to photography or videos, the process starts the same way — upload your media to an editor with built-in color correction tools.
Color Correcting (Photography)
After uploading your photo, select it to access the color correction tools.
These tools appear in the Adjust menu on the right-hand side of the editor.
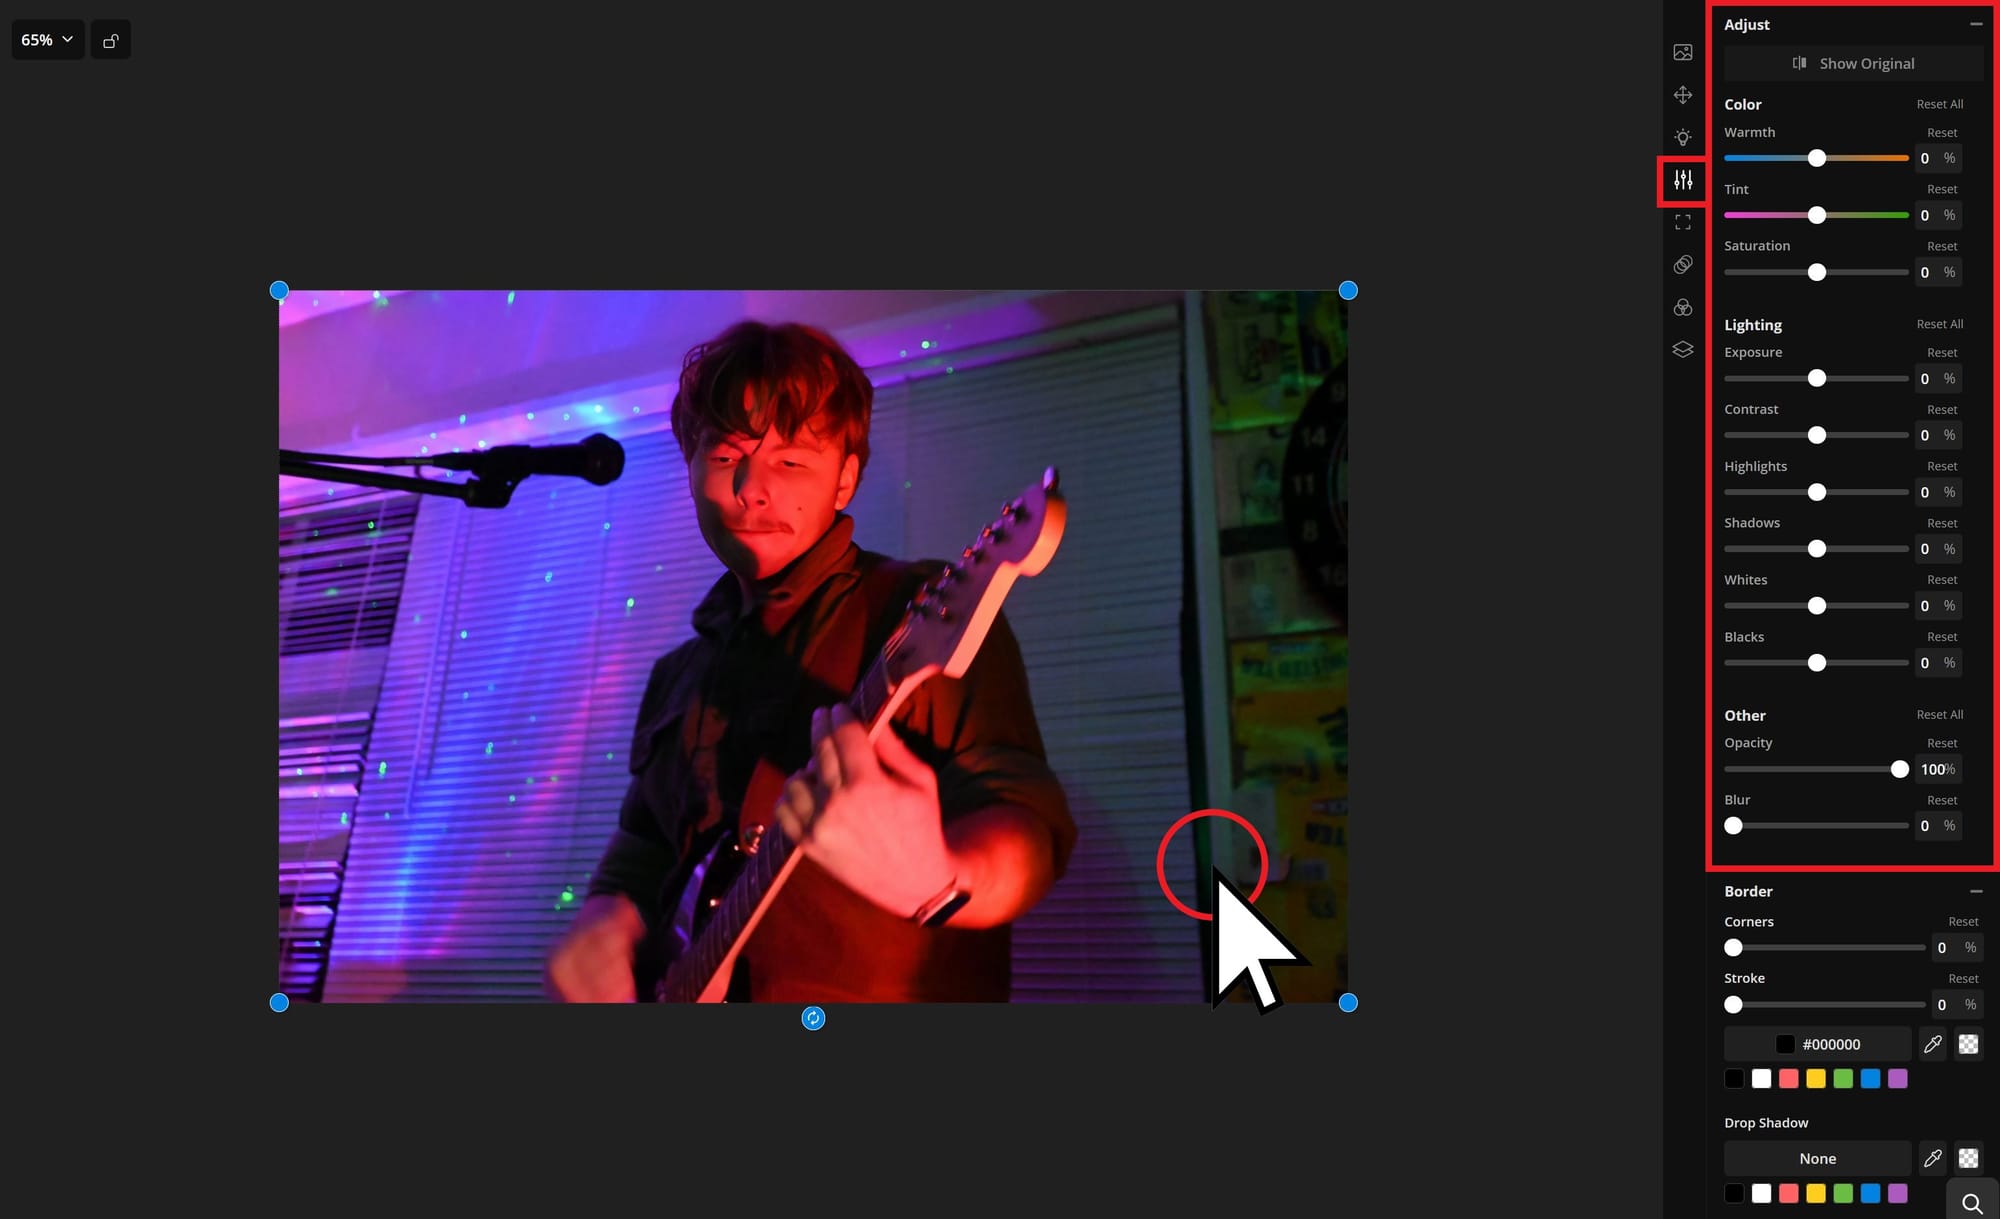
From here, the process mostly comes down to personal preference. You don’t need to memorize every tool to color correct an image effectively. Instead, try adjusting the sliders in different directions and decide what looks best. Here are a few things to consider when experimenting with these tools:
- Balance brightness and contrast: These sliders have the biggest impact. Well-lit images help ensure details are visible and easy to read.
- Zoom in for precision: Focusing on a small area of your photo lets you see exactly how each adjustment is affecting fine details, helping you make more accurate edits.
- Check skin tones: When working with photography portraits or people in the frame, keep an eye on skin tones. They should look natural, not overly red, green, or washed out.
- Use the original as a reference: If you're unsure about your edits, toggle back to the original image. Comparing side by side is a great way to evaluate your progress and make sure you're enhancing, not overdoing it.
To view your original image while editing, select the Show Original button at the top of the color correction panel. This will temporarily revert the image to its unedited state.
To return to your adjustments, select the same button again — now labeled Show Adjustments.
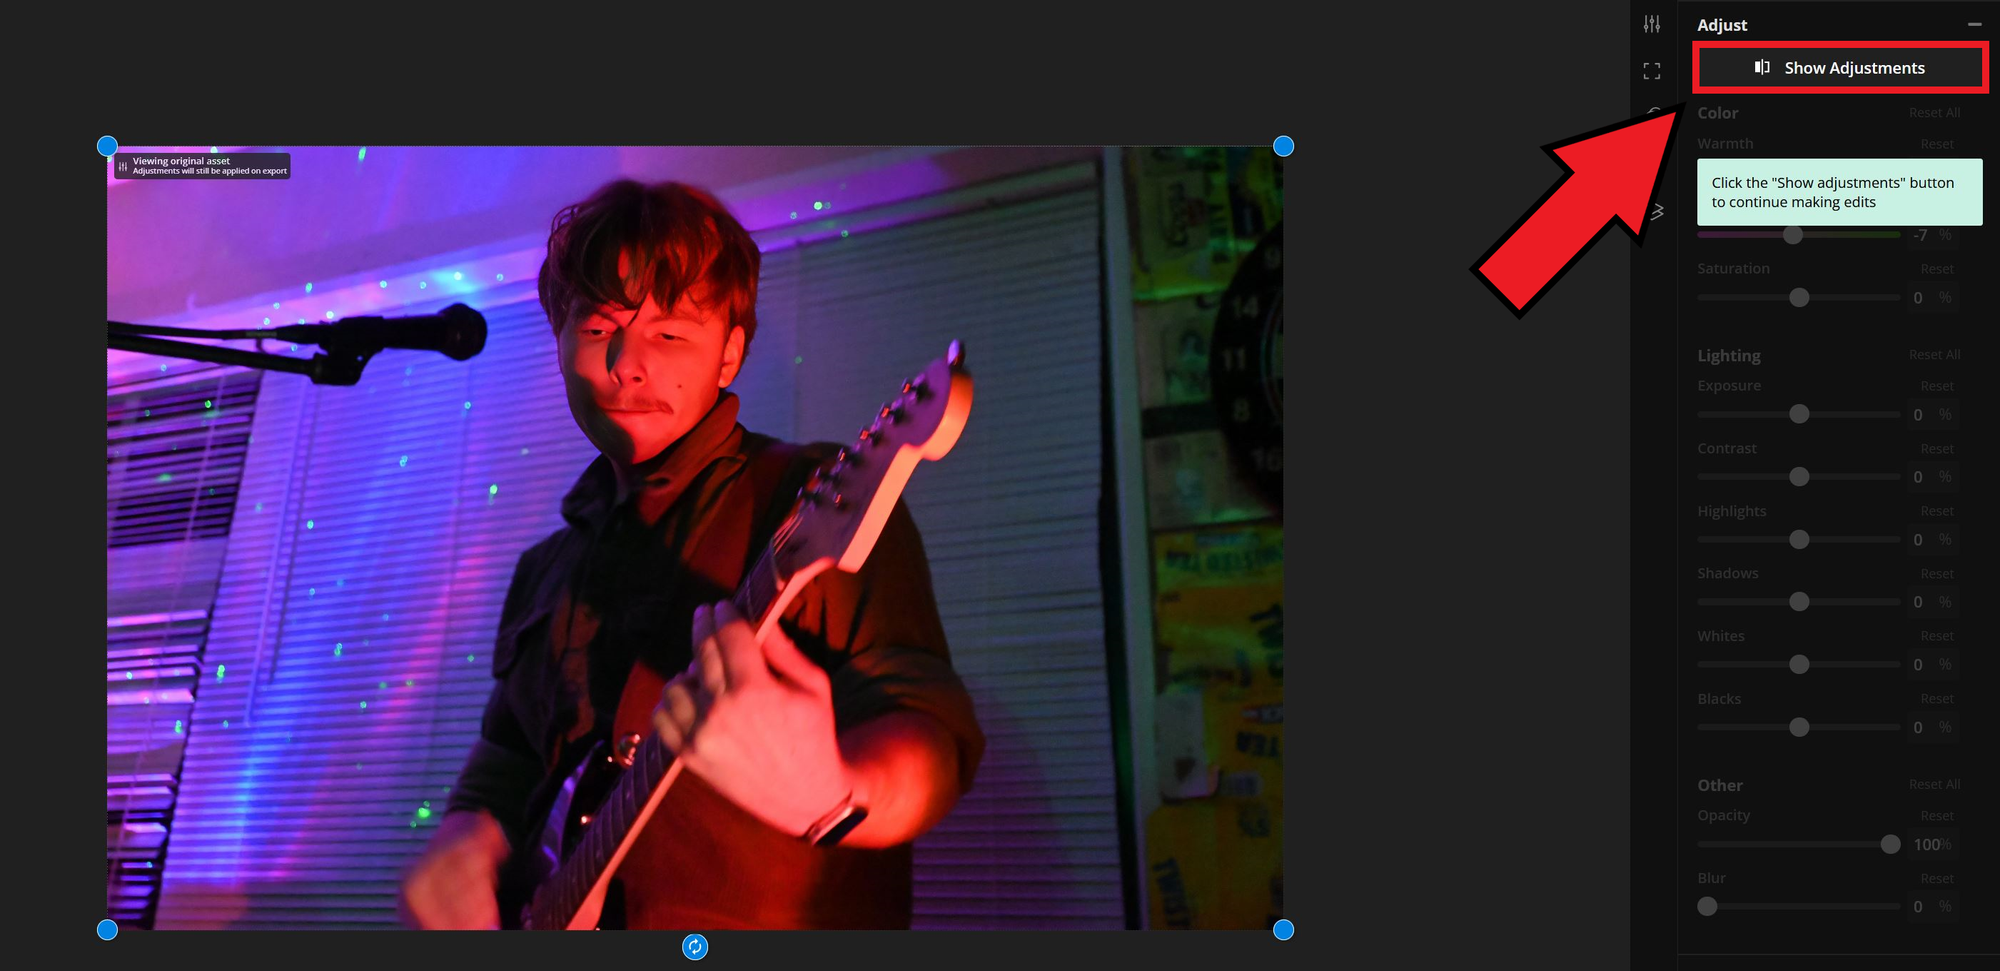
You’ll notice the sliders are grouped into two sections: Color and Lighting. These aren’t just labels — they can guide your workflow:
- Use the Color section when fine-tuning temperature, tint, saturation, or vibrancy.
- Use the Lighting section when your image needs better exposure or clarity.
If your photo already has decent lighting, you may not need to touch the lighting section much. Similarly, if your image already has accurate color balance, you might not need major color adjustments.
Below is an example of a color-corrected image and the exact settings used. You’ll notice the Color settings were adjusted more than the Lighting ones.
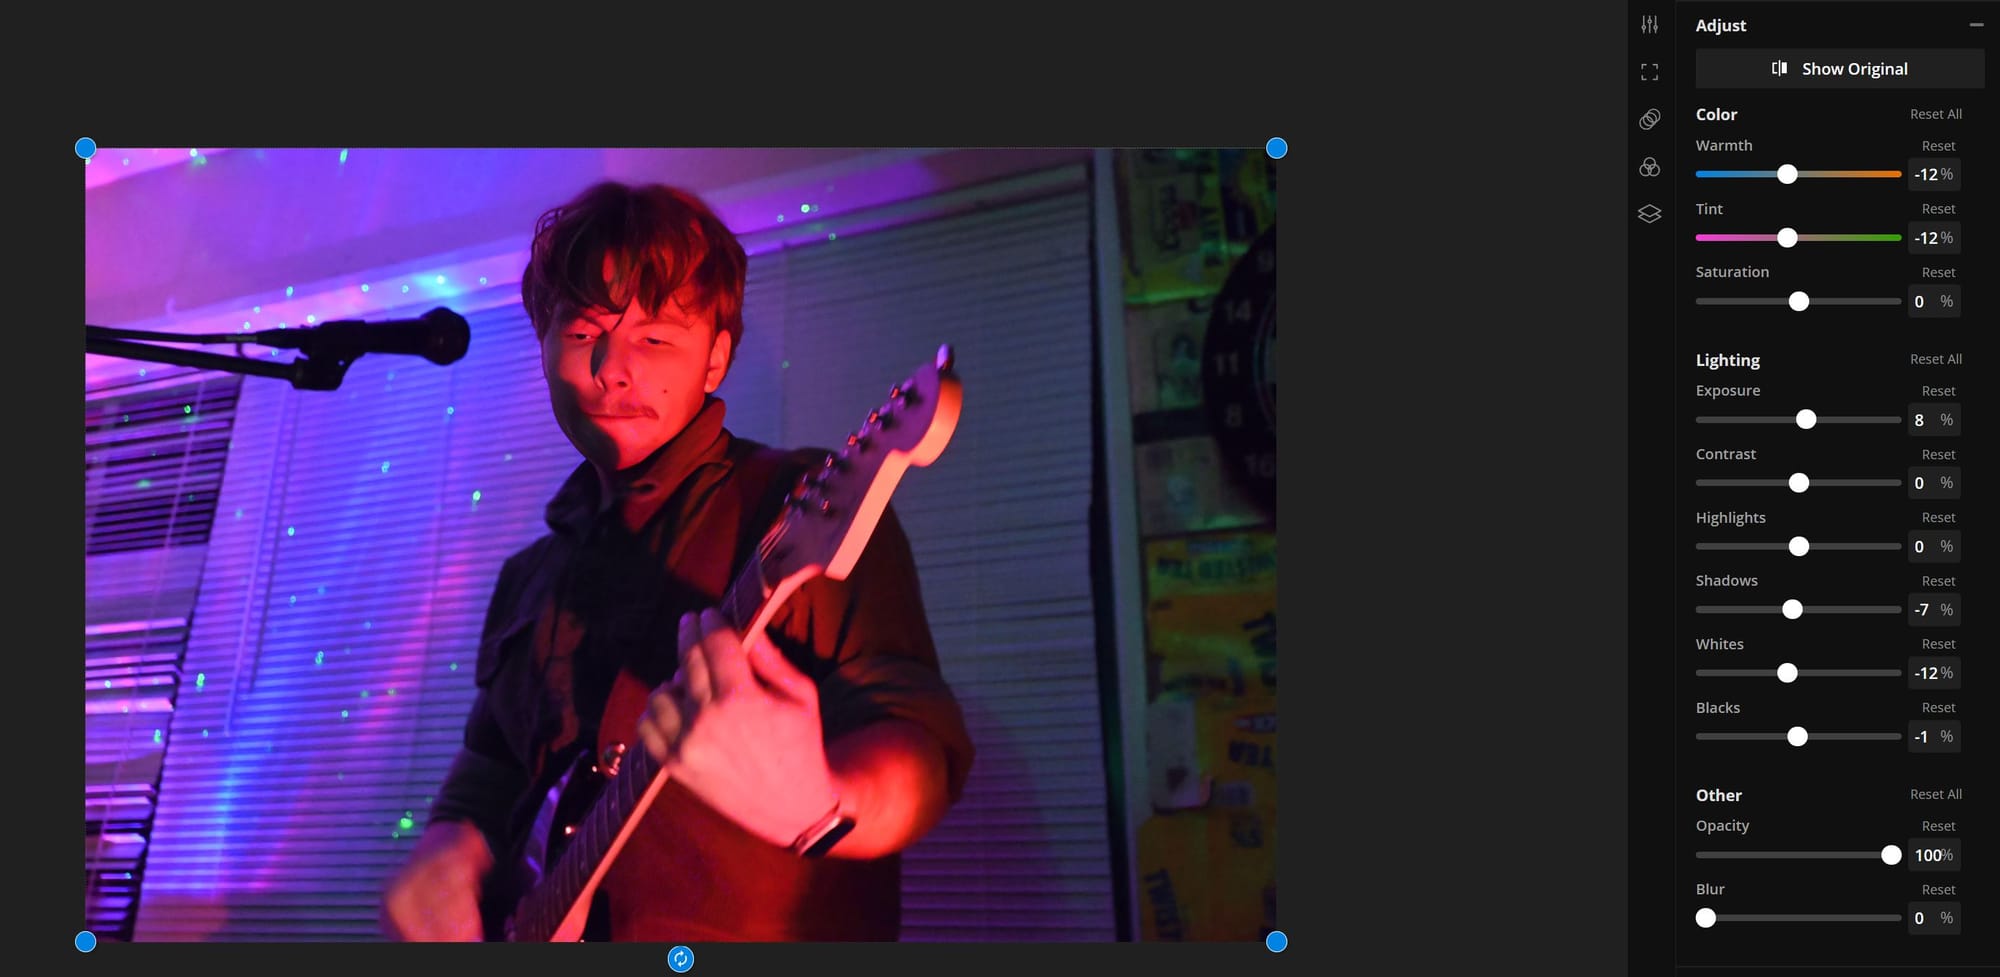
All sliders start at zero by default. In this case, I only adjusted warmth, tint, shadows, whites, and blacks.
The changes were minimal — a reminder that small edits often make the biggest difference. Extreme slider values can create a stylized effect, but they also risk blowing out the image and reducing its overall quality.
Here’s a side-by-side comparison between the original and color-corrected image.

This comparison highlights how the Warmth and Tint sliders can subtly transform an image:
- Warmth: I moved the slider to the left to reduce orange tones and introduce more blue. This made my skin tone look more natural and cooled the overall appearance.
- Tint: I shifted the tint slightly to the left to reduce green tones and add a hint of violet. This better matched the scene’s lighting and softened the contrast.
You may also notice the edited photo looks sharper. That’s because I used Kapwing’s AI Image Enhancer before applying any color correction. This gave me a cleaner foundation to work from and helped improve overall image clarity.
Color Correcting (Videos)
Color correcting a video follows the same process as an image, but there are a few additional things to consider:
- Consistency for continuity: Match color tones across clips in the same scene to avoid distracting shifts in lighting or color.
- Correct lighting differences: Longer clips often pass through multiple light sources. Use temperature and tint settings to maintain a natural balance throughout.
- Keep it clean: Over-editing — especially with saturation or contrast — can amplify video noise or introduce banding. Edit diligently to preserve video quality.
Below is an example of a short video clip and its color correction settings. My goal was to boost the natural tones without over-editing or making the footage look artificial.

Here’s a comparison of the original video (on the right) with the color-corrected version (on the left).
Color corrected videos appear cleaner and more captivating than unedited ones.
As you can see, the edited version is brighter and clearer, helping cut through harsh front lighting. Here’s how I adjusted the color settings:
- Warmth: Increased slightly to reduce coldness and add natural warmth to the scene.
- Tint: Shifted to the right to introduce more green, further warming up the environment.
- Saturation: Raised slightly to bring out more color contrast and visual interest.
Since this clip was not a part of a broader video project, I edited purely based on visual preference. Alternatively, I could have gone in the opposite direction — darkening the scene and using cooler tones to make it feel more dramatic.
This is the beauty of color correction: it’s a subtle yet expressive way to shape the mood of your photo or video without having to rely on obvious visual effects.
How to Do Color Grading (Videos and Photography)
Despite having similar names, the process of color grading differs from color correction in both purpose and execution. While color grading builds on the foundation of correction, often exaggerating tones to create a stylized or cinematic effect, there are multiple ways to approach it.
One method is to manually adjust the color sliders used earlier to more extreme values. This technique allows you to create a bold, distinct look that transforms the original appearance of your photography or videos.
However, relying solely on slider adjustments can be limiting in terms of the styles and tones you’re able to achieve.
A faster and more flexible method is to use filters. By applying a preset filter, you can instantly create a color-graded aesthetic without needing a deep understanding of lighting or color theory. This is especially useful for beginners or anyone working on a tight schedule.
To apply a color grading filter, select your photo or video in the editor, then navigate to the Filters menu on the right-hand side.
Here, you’ll find a wide range of preset filters designed to give your content a cinematic or stylized look.

Once a filter is applied, you can continue fine-tuning your image or video using the color correction tools from earlier. If a filter gets you close to your desired look, small adjustments to warmth, tint, brightness, or contrast can help you customize it even further.
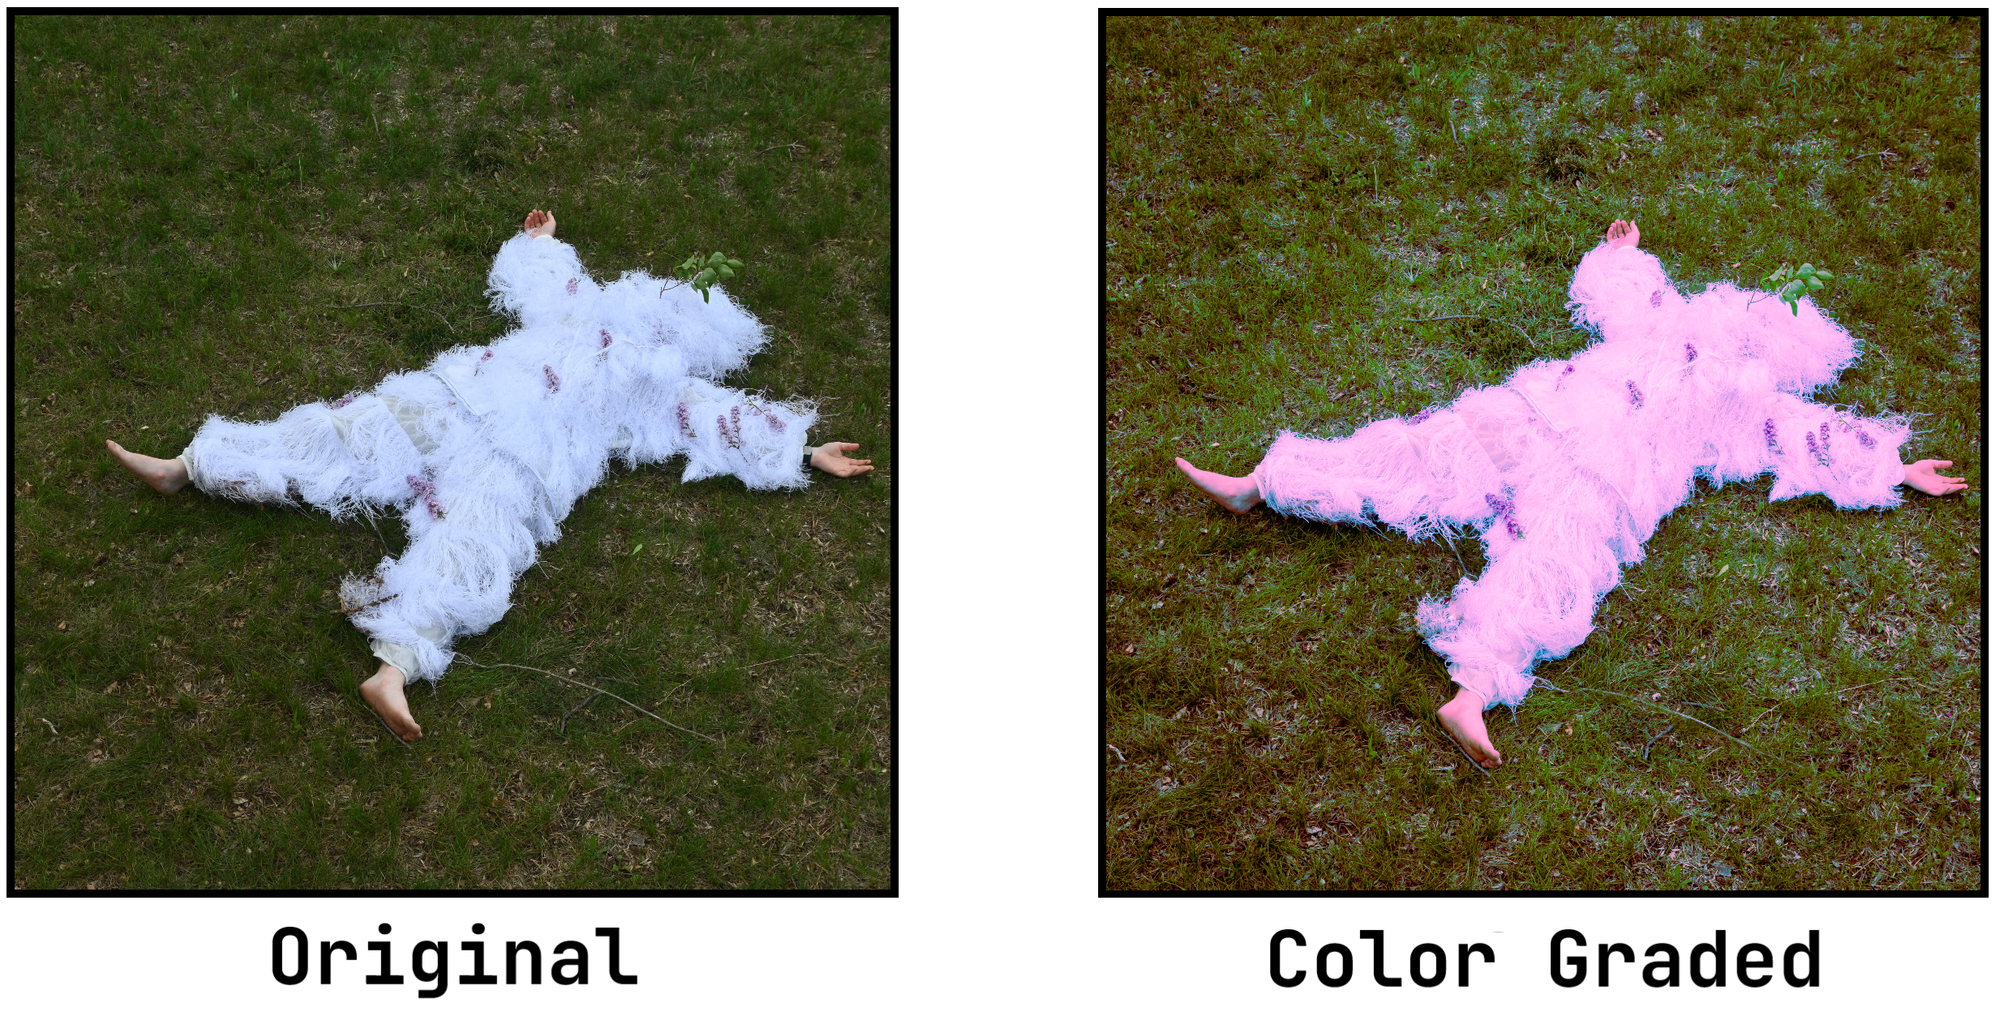
Below is an example of an image that has been color graded using only a filter, alongside another image that combines a filter with manual adjustments.
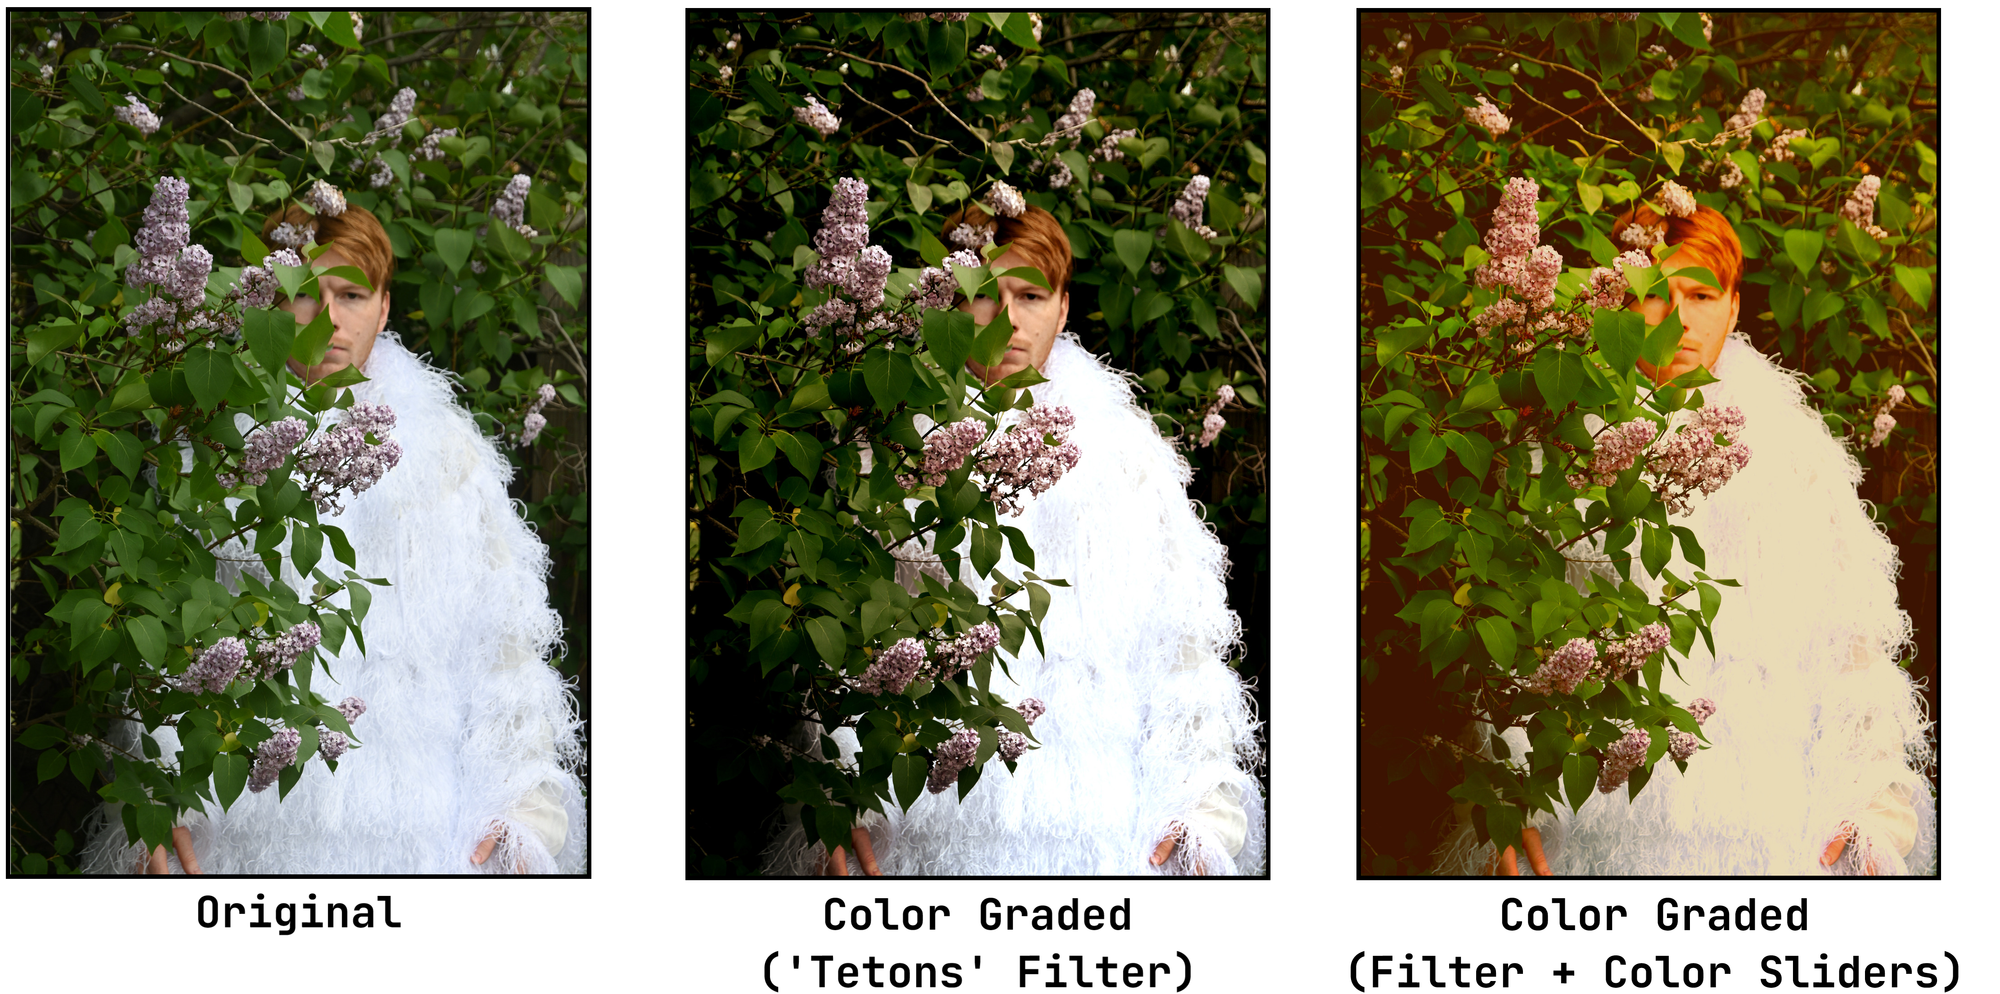
As you can see, applying a filter makes an immediate visual impact, while adding fine-tuned edits enhances the effect and gives you full control over the final result.
This same process can be applied to all types of content, including videos and GIFs. Below is a comparison between an unedited video (left) and a color graded version (right), showing how color grading can dramatically change the overall tone.
The clip on the right uses the Yosemite filter to instantly apply color grading.
By simply applying a color grading filter, you can transform the look and feel of your content — adding a sense of drama, whimsy, or emotion that enhances the viewer’s experience.
With this method, you can confidently color grade your content in just a few steps — no advanced editing experience required.


