
4 Steps to Making a Clear Video Storyboard
Here is a 4-step framework to making a clear video storyboard that will help plan and cover all the important points of your video.

You’ve finally thought of what you want your next video to be. Your idea is as clear as the night sky right? The reality is, we can’t understand each other’s ideas unless it’s communicated.
That’s where a video storyboard comes in.
A video storyboard consists of several thumbnails that help you outline and breakdown the entirety of your video into its most important key shots. Think of your storyboard as your translator that carries your creative ideas and relays the message to the rest of your team– the editor, the director, the actors, the animators, everyone involved. At the end of the day, video production is a collaborative process.
Here are 4 steps you can take to make a clear video storyboard that everyone will be able to understand. Towards the end of the article, I’ll provide you with a video storyboard template you can use and add to your video planning toolkit.
Step 1. Set your main goal.
Before you get started, be clear with yourself what your goals and objectives for your video are. Don't get lost in the creative process that you've forgotten why you came up with your idea in the first place.
Think of what you want your end-goal to be and how you want to structure it: You can think of this step into 3 different points:
- the type of video (vlog, documentary, commercial, etc).
- the emotion you want to elicit from your audience.
- the message, or call to action.
Generally, the type of video will help you envision the mood of the project. Emotion demonstrates that you genuinely understand your audience, how they feel, and how they'll react to certain things. Your overall message is the cherry on top– do you want your audience to walk away from your video and feel so inspired they need to share it with their friends and family? Or do you just want them to subscribe to your YouTube channel or give you a follow?
Planning for these three will ultimately help you uncover and support the objective of your video. In short, know your objectives and plan for taking action.
Step 2. Finalize your story's key elements.
Before you start breaking down your video, finalize what the entirety of the video is going to look like.
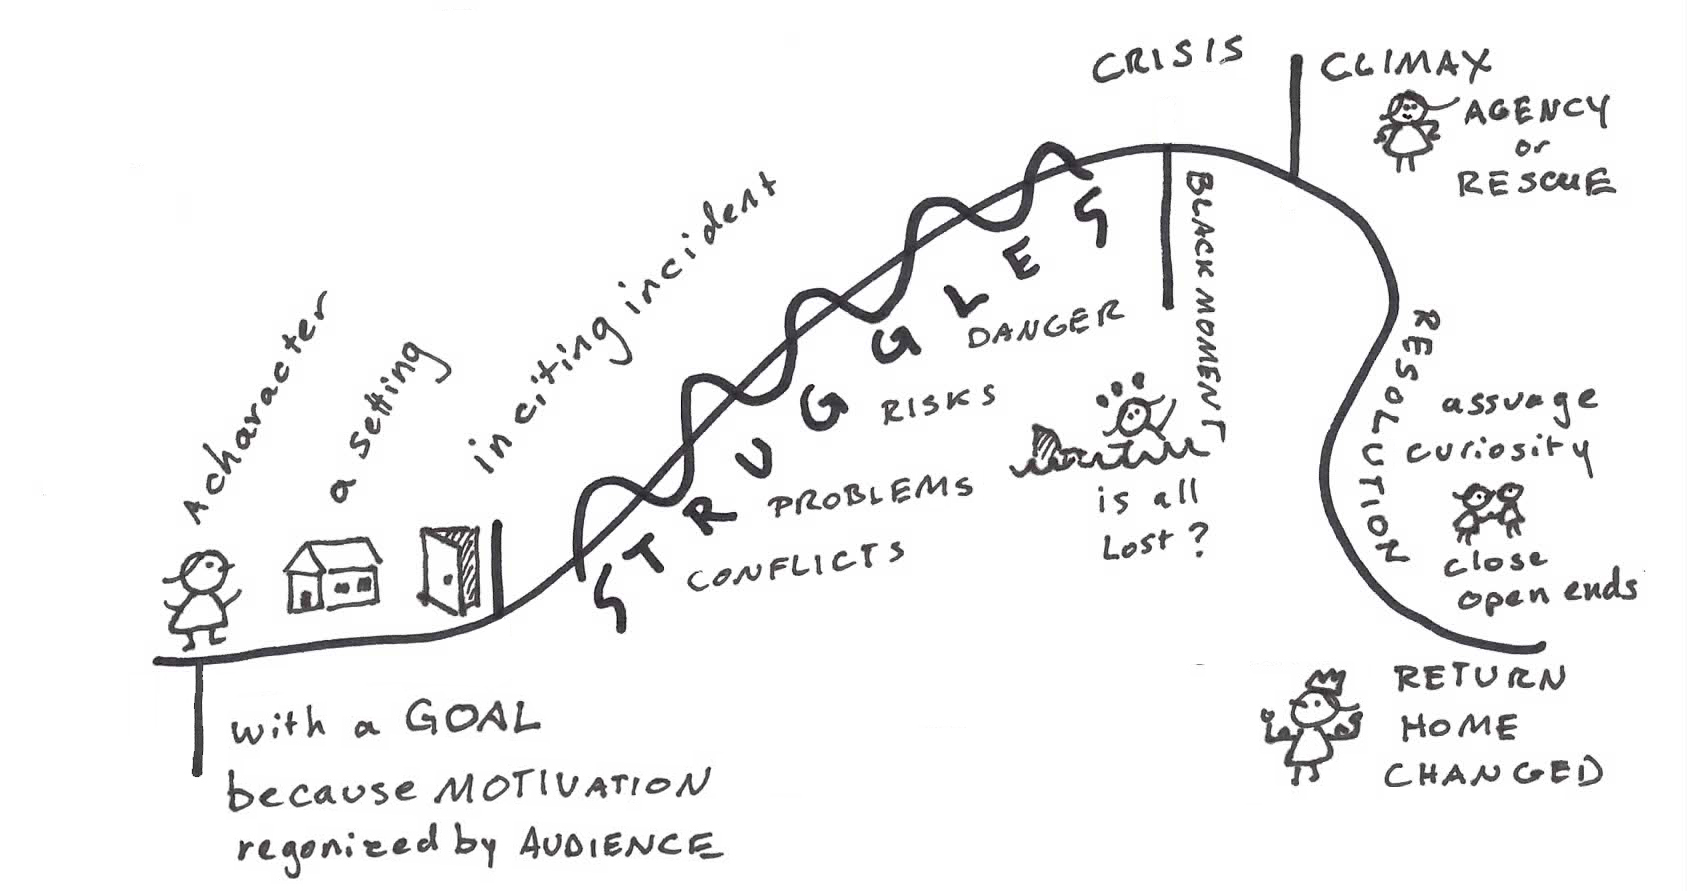
Define who the characters in your story are, their development, and how that plays into the project in this particular storyboard. Draw out what the setting looks like, when these characters will appear on the screen, and how it all ties back to the message of your video. This is all fundamental to making sure your overall video is cohesive and ties together.
Step 3. Add your script and descriptions.
A video storyboard helps you map out or outline the entire project, scene, or sequence of events. With this in mind, describe each shot in your storyboard. These elements of your storyboard sections would include the following:
- shot angles
- duration of the shot
- shot distance from the camera
- sound FX
- dialogue
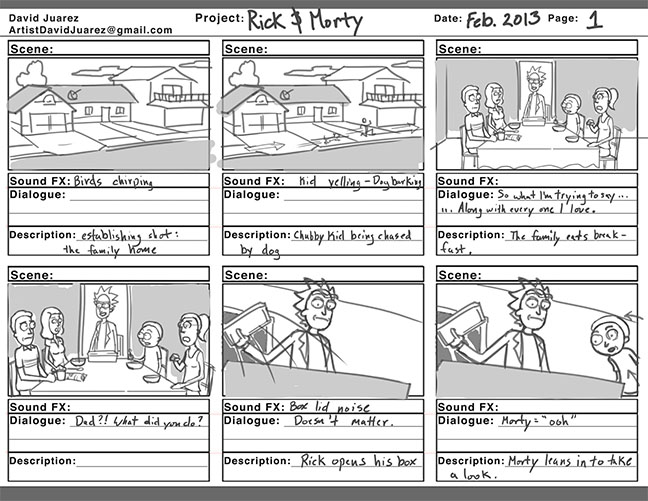
Remember, producing a video is collaborative. Even if you're working on this project on your own, you're still communicating with your audience. Think of the details for each shot in your scene to not only explore your own creativity, but also get your message across your team and audience.
Step 4. Collaborate to revise and finalize.
Once you're finished sketching out your idea into your video storyboard, collaborate with your team. If you're using Kapwing, you can share your workspace with your team and edit your video storyboard altogether.
Using a Video Storyboard Template
Use this template to storyboard your video, and click "Edit This Template." You'll automatically be taken to the Kapwing Studio where the template will be ready for you to add your story to!

With this template, you'll be able to upload any existing media (like any hand-drawn illustrations or still images) to each box by clicking "Add Media" on the left sidebar. If you don't have these assets on hand, you can add your own figures that represent specific objects, actions, and context by clicking the "Elements" tab one the left sidebar and adding shapes, emojis, or even animations.
Below are two video storyboard examples using Kapwing's free template. In example 1, I uploaded pre-drawn media from Creative Template to demonstrate the detail in each shot. In example 2, I added emojis and an animated element to present how the story unfolds within this one scene.
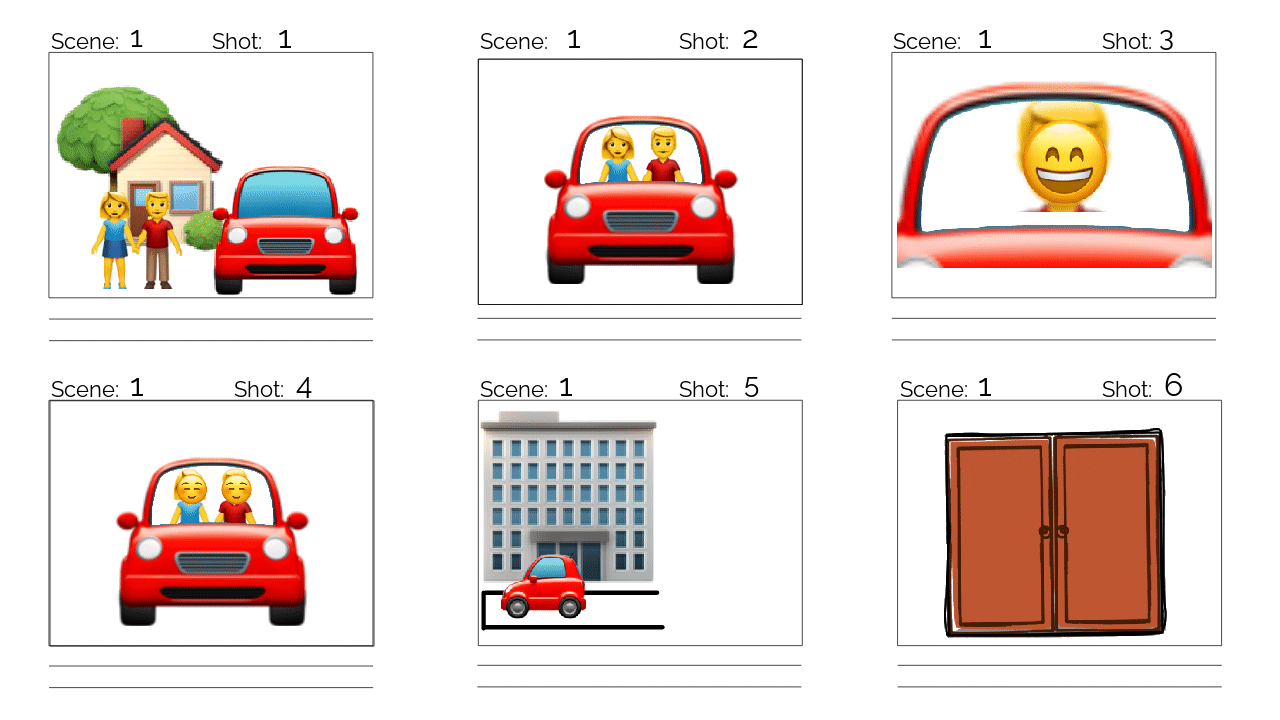
Depending on how comfortable and confident you are with your own drawing skills, you can decide whether or not to upload your own illustrations, or quickly add elements to present the idea you have for your video.
Keep in mind, this is your story. Your video. Your message. Add however many boxes, illustrations, text, elements you need. This article and video storyboard template is only a guide for you. Your vision is in the driver's seat.
Stay updated with more video planning and production tips by subscribing to our newsletter below or visiting the Kapwing Resources Page. You can also find more step-by-step video editing tutorials on our YouTube channel. If you're on social media, follow our Instagram or Twitter at @KapwingApp to keep up with new features as we launch new updates!
Related Articles


