How to Embed Subtitles Into a Video Permanently
Permanently burning subtitles into your video ensures they show up correctly across every platform. Here's how to do exactly that.
To permanently embed subtitles into a video you need to upload an SRT file into a video editor that can burn or overlay the subtitles into your footage. Kapwing, Adobe Premiere, Final Cut Pro, and VLC Media Player are all capable of embedding subtitles in this fashion.
There is, however, more to consider. What if you don't have an SRT or VTT file on hand? What if you only have video footage? What if you're using a lightweight device like a Chromebook and can't download video editing software to your hard drive? What if you want to edit and customize your subtitles before permanently burning them into your video?
All of these are important questions. In this guide, we'll go over how to permanently add subtitles to any video and review the best software options for doing so. Regardless of where you're starting in your search, by the end of the guide you'll be equipped to permanently embed video subtitles and have the right tools to fit your needs.
How to add subtitles to a video permanently
You can permanently burn subtitles into your video in just a few steps with Kapwing. There's no software to download—our video tools and subtitle editor are all available in your browser. Here's how to get started:
1. Upload a video
First, upload your video to Kapwing to get started. Any video will work; we support all popular video formats. Drag and drop a video from your device or add the link to any video online that you'd like to add subtitles to—we can import videos from YouTube, Instagram, Twitter, and more.
2. Add or auto-generate subtitles
There are three ways to add subtitles to a video. First, you can import a subtitle, closed caption, or SDH file you've already created. These subtitle files usually come in the form of a SRT, VTT, or a simple TXT file.
What if you don't have a subtitle file? No worries. Kapwing also features an AI-powered Subtitle Generator that instantly creates highly-accurate, word-by-word subtitles based on the narration or spoken voice that appears in your video. Head over to the 'Subtitles' section in the left menu of the editor, then click 'Auto subtitles' to get started.
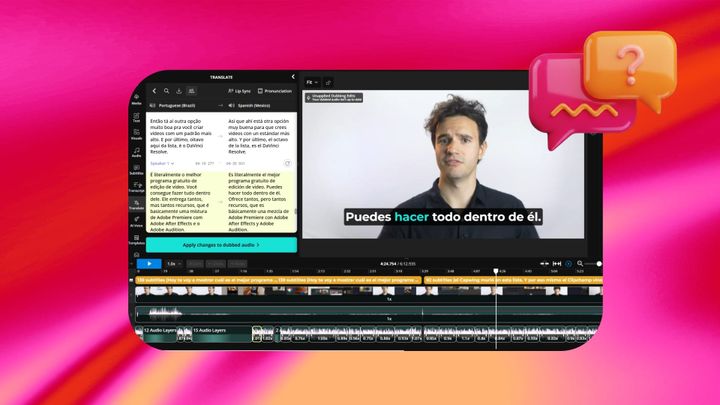
Your subtitles will be generated in seconds—and with our video translator, you can also convert your subtitles to and from over 70+ languages.
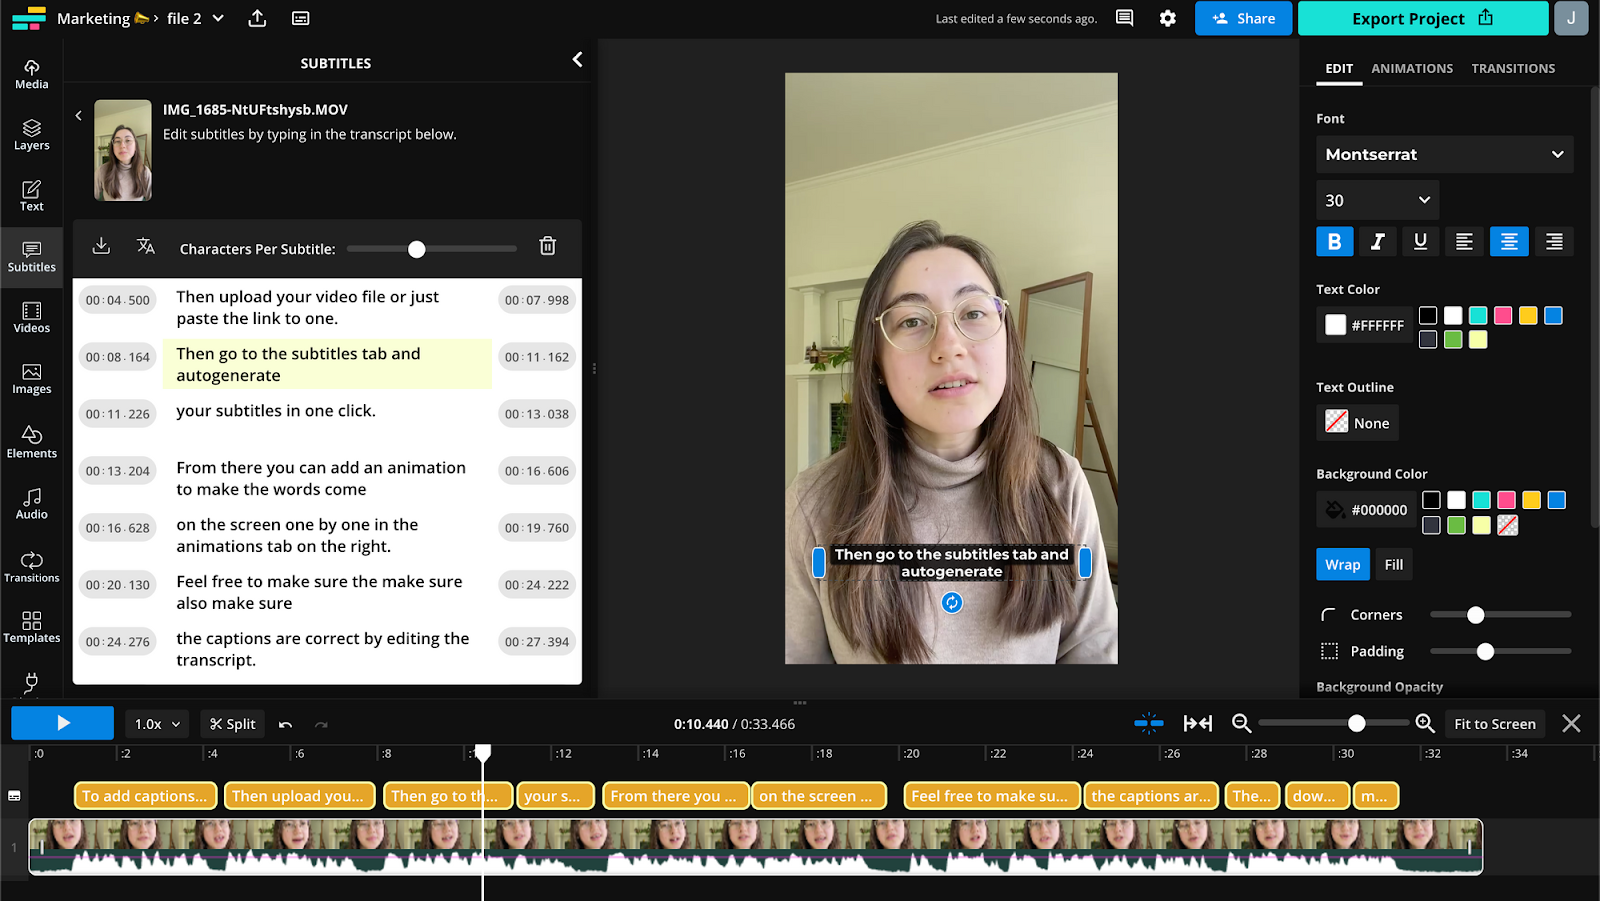
3. Edit and customize subtitles
After adding your subtitles, you can now adjust the subtitle font, text color and background, corner padding, or opacity using our video editor. If you'd like to adjust the timing of your subtitles—when they appear in the video—in a more detailed way, you can click on each timestamp to edit the text individually.
Need to position your subtitles? Click and move the subtitles to any location in the editing canvas so they appear at the top, middle, or bottom of your video. To avoid accidentally cutting off your subtitles, use our Instagram Reels safe zones and TikTok safe zones to show the native overlay for TikTok or Instagram Reels.
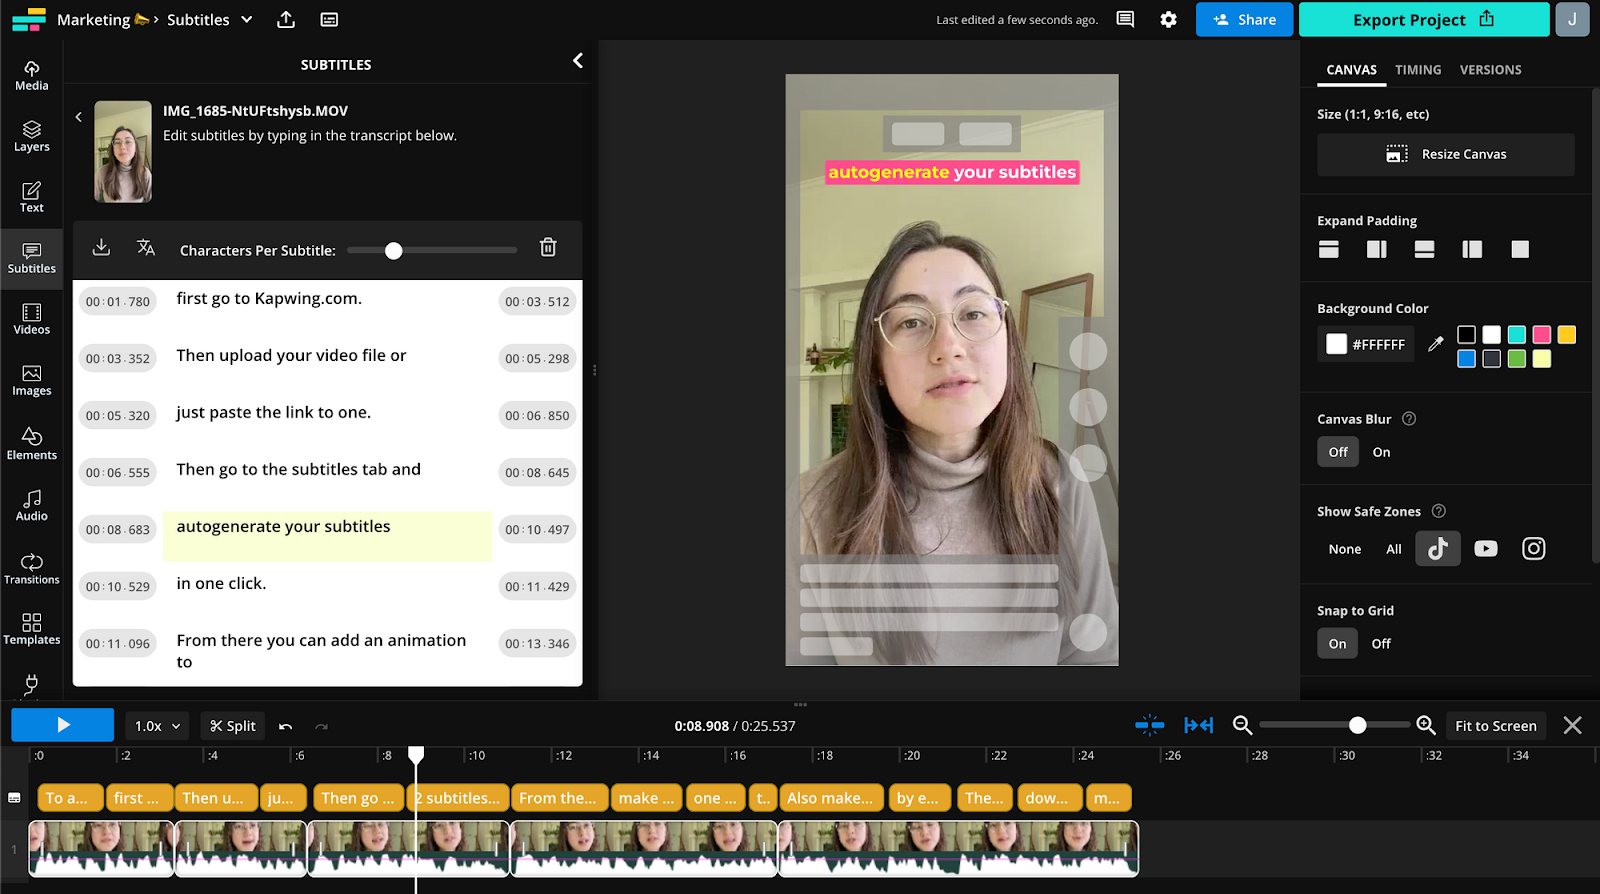
4. Permanently embed the subtitles
Last step! Click on the 'Export Project' button in the top right when you're finished editing your subtitles.
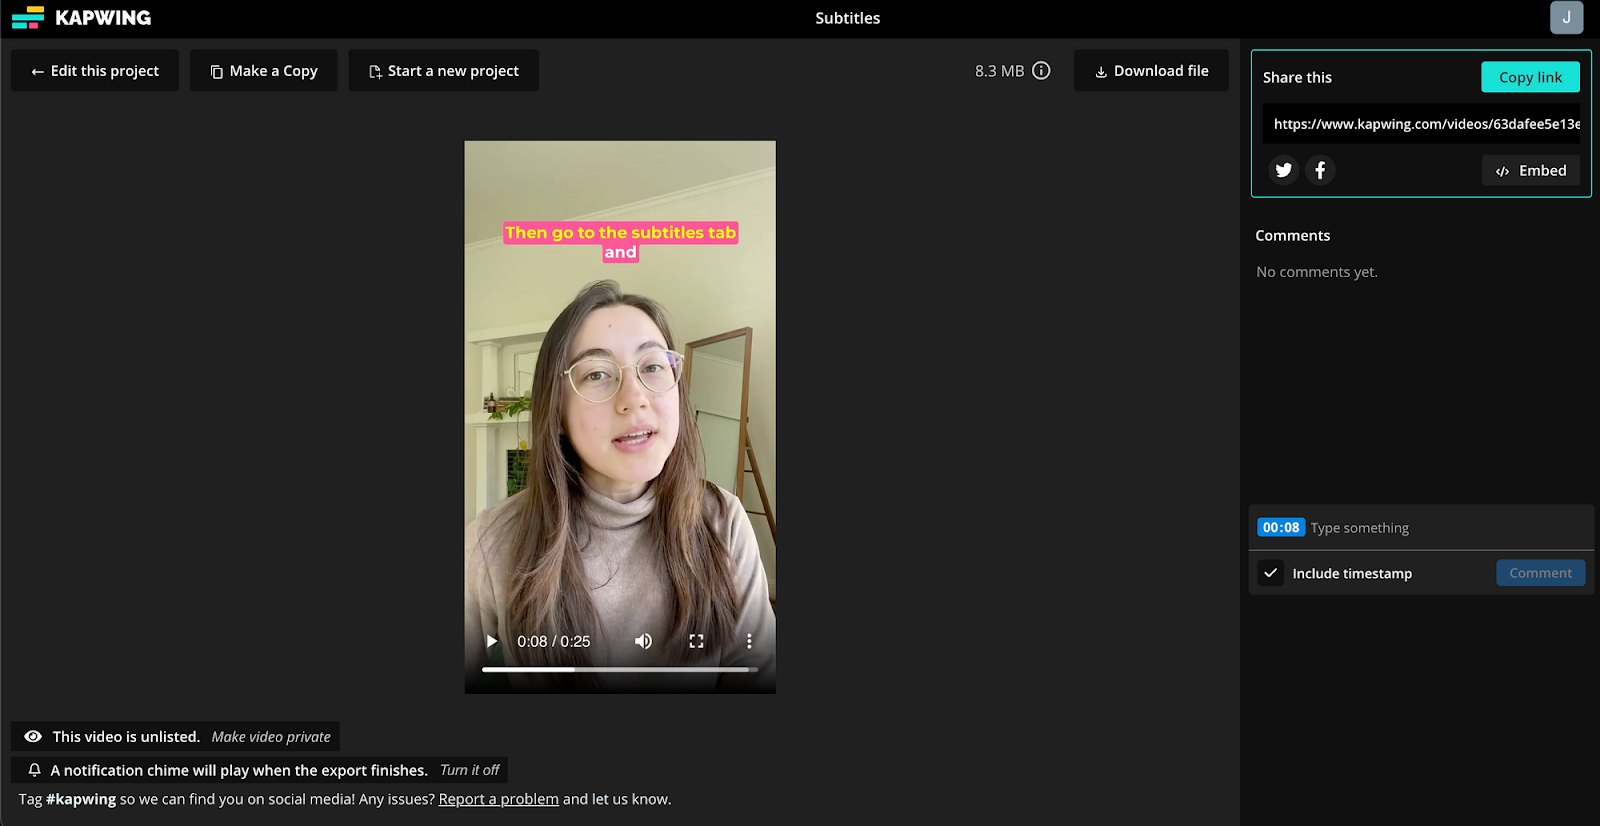
Kapwing will automatically burn the subtitle layers directly into your video so they appear permanently wherever the video is shared. Known as open captions, the subtitle text you've added appears the same for everyone, everywhere—rather than needing to be uploaded separately as an SRT file.
You can now download your video as an MP4 for easy sharing to any video platform or social networks. Kapwing works on all mobile and desktop devices, even Chromebooks, and it's free to get started.
That's it, you're done!
The best tools for permanently embedding subtitles
Option #1: Kapwing
Kapwing is a web-based video editor that simplifies the process of creating, editing, and embedding subtitles into videos. Kapwing's Magic Subtitles tool automatically generates video captions, making your content more engaging and accessible.
To get started, upload your video directly or paste a link, and then use Kapwing's AI-powered tools to transcribe your video to text so you can use the text as subtitles. Once created, you can manually edit your subtitles for greater precision or fine-tune the timing so they perfectly match your video's audio.
Kapwing's subtitles tool puts you in full control—you can alter every detail of your subtitles, including font, size, color, position, and background. It's also possible to adjust your video's size for the subtitles to fit any dimensions on any platform. Kapwing supports diverse subtitle animations, too, such as word-by-word color fill, reveal, highlight, and bounce, all of which make subtitles feel more energetic and dynamic.
If you have subtitles prepared as an SRT or VTT file, Kapwing can effortlessly incorporate these into your video. Upload the file, and Kapwing will take care of the rest. Export your final video as an MP4 and Kapwing will permanently embed the subtitles into the video.
💲 Pricing:
- Free: Add and edit videos with subtitles up to 7 mins long; export in 720p; use auto-subtitles for up to 10 mins of video footage per month.
- Pro: $32 USD/month; Add and edit videos with subtitles up to 2 hours in length; export in 4k resolution; unlimited auto-subtitling; unlimited storage; access all automatic and AI-powered editing tools.
Option #2: Adobe Premiere Pro
Premiere Pro offers a full set of tools for adding, editing, styling, and exporting captions in all supported formats. After uploading a video to Premiere, a transcript of the video can be automatically created and then edited in the Text panel. Next, select the 'Create captions' option to add text from the transcript as subtitles to the Premiere Pro timeline.
You can edit the subtitles directly from the Text panel and stylize them using design tools in the Essential Graphics panel. Once you're finished editing your video captions, you can export them as burned-in subtitles, a .srt text file, or embed them in a QuickTime or MXF file.
Adobe Premiere Pro also includes speech-to-text features and the ability to import subtitles from a third-party subscription service, if those options work best for you. Lastly, Premiere Pro provides a number of subtitle styling options, including font, size, and location, and lets users convert captions to source graphics for advanced edits like animations or effects.
💲 Pricing:
- Standard: $21 USD/month per user
- Creative Cloud: $55 USD/month per user; unlocks access to other creative tools from Adobe
Option #3: Final Cut Pro
Final Cut Pro is Apple's flagship editor that enables users to add and embed captions, or timed text, into their video projects. Subtitles, video translations, and transcriptions are all available in Final Cut Pro.
In Final Cut Pro, a caption role is created for the specific file format, and a sub-role is assigned for each language used in your captions. These captions are always linked to clips, and can also be associated with other connected clips, which is helpful for video that needs to meet stricter requirements for broadcasting and streaming regulations. Captions created by Final Cut Pro can also be imported and exported as separate files.
Captions in Final Cut Pro are superimposed over everything in the video frame and can typically be toggled on or off by viewers. However, Final Cut Pro does offer the option to burn captions into the output file so that they appear as permanently embedded subtitles, regardless of where your video appears.
💲 Pricing:
- $299 USD one-time payment
Option #4: Clipchamp
Clipchamp provides a straightforward way to permanently add subtitles to your videos. You can start by uploading your own files or pulling in available stock footage. Once you've selected a video, drag and drop it into your library and then onto the project timeline.
Clipchamp's subtitle tools are accessed with the 'Text' feature. You can then navigate to the 'Captions / Lower Third' option. Subtitles can be dragged onto your video timeline adjacent to the video clip itself. From here, there are a few subtitle editing options, including the ability to adjust the font, size, and color of the text. The duration of each subtitle can also be changed via the sidebar.
Click 'Export' when you're finished customizing your subtitles. You'll be asked to choose your export options to download the final video with the subtitles burned in. Here is Clipchamp's primary shortcoming: you can only export in HD, or 1080p resolution, with no option to export in 4k. Clipchamp offers a number of features for free, but even on paid plans this limitation exists.
💲 Pricing:
- Free plan is available but will watermark all videos that use premium features
- Essentials: $12 USD/month to use premium effects, filters, backups, etc. without a watermark on your video.
Option #5: DaVinci Resolve
DaVinci Resolve is a popular free video editing software known for its color grading and visual effects. DaVinci Resolve allows for subtitle and caption creation even on the free plan. You can get started by heading over to “New Track > Subtitle” to create a new subtitle track for your video.
To add subtitles in DaVinci Resolve, you can manually input them into the editing software. This involves creating a subtitle track on your timeline, adding subtitles at the appropriate points, typing the desired text into the inspector, and adjusting the duration of each subtitle to match the audio. You can also customize the font, color, and size of your subtitles.
Unfortunately, DaVinci Resolve does not currently support automatic subtitle generation. To add subtitles, you must manually input them into the editor. DaVinci is an otherwise great editing program, but be forewarned that manually adding subtitles can be time-consuming and may result in video transcription errors.
After making changes to the font and style of your subtitles, DaVinci Resolve allows you to either burn them directly into the video or export them as a separate file, such as an SRT.
💲 Pricing:
- Free version available with certain features/effects gated behind a paywall. Resolve doesn't make it super easy to understand what's gated; this page offers an overview.
- Studio: $295 USD one-time payment
Why should you add subtitles to your videos?
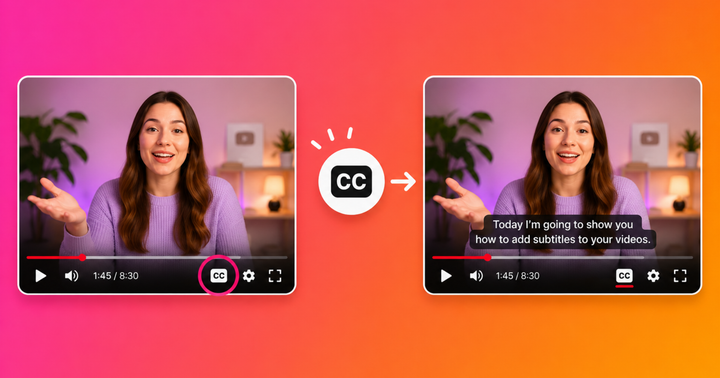
Captions have always made videos more accessible, but in modern times they've gained traction even with viewers without hearing impairments. Subtitles are also a great way to localize video content by translating it for international audiences. How many people use subtitles, exactly? Well, 80% of viewers aged 18-25 say they watch videos with subtitles "some or most of the time."
While there are an array of ways you can add subtitles to your videos, baking them in is a great solution for platforms that don't have auto-captioning features (like Twitter, for example). Everyone prefers subtitles and video captions—and the subtitle software we've shared above makes them easy to permanently add to any video.