How to Post Different-Size Photos On Instagram (2026 Update)
Instagram posts with multiple images earn 2.14x more engagement than single-photo posts.

In late 2024, Instagram rolled out an update that lets users post different-size photos in the same Carousel. Until now, Instagram forced all of the images in a post to match the aspect ratio of the first photo. While this cropping behavior is still the default, there's now a workaround that allows you to post portrait and landscape photos together.
However, there are still limitations. Instagram will automatically crop any image taller than a 4:5 portrait (like a screenshot) or wider than a 1.91:1 landscape (like a panorama). To work around this, some photos may still need to be resized, bordered, or split.
In this guide, we’ll show you how to post different size photos on Instagram, and work around current limitations by adding borders or splitting wide images into multiple slides.
Table of Contents
- How to Post Different-Size Photos On Instagram
- How to Resize Photos for Instagram Without Cropping
- How to Post One Long Image as Two Slides on Instagram
How to Post Different-Size Photos on Instagram
In 2024, Instagram introduced a Resize toggle that lets users post vertical, horizontal, and square photos together in a single carousel. Previously, the app would automatically crop every image to match the aspect ratio of the first photo.
Although this is still the default behavior, turning on the Resize toggle allows you to preserve each photo’s original format. Here’s how to enable it and post different-sized photos on Instagram:
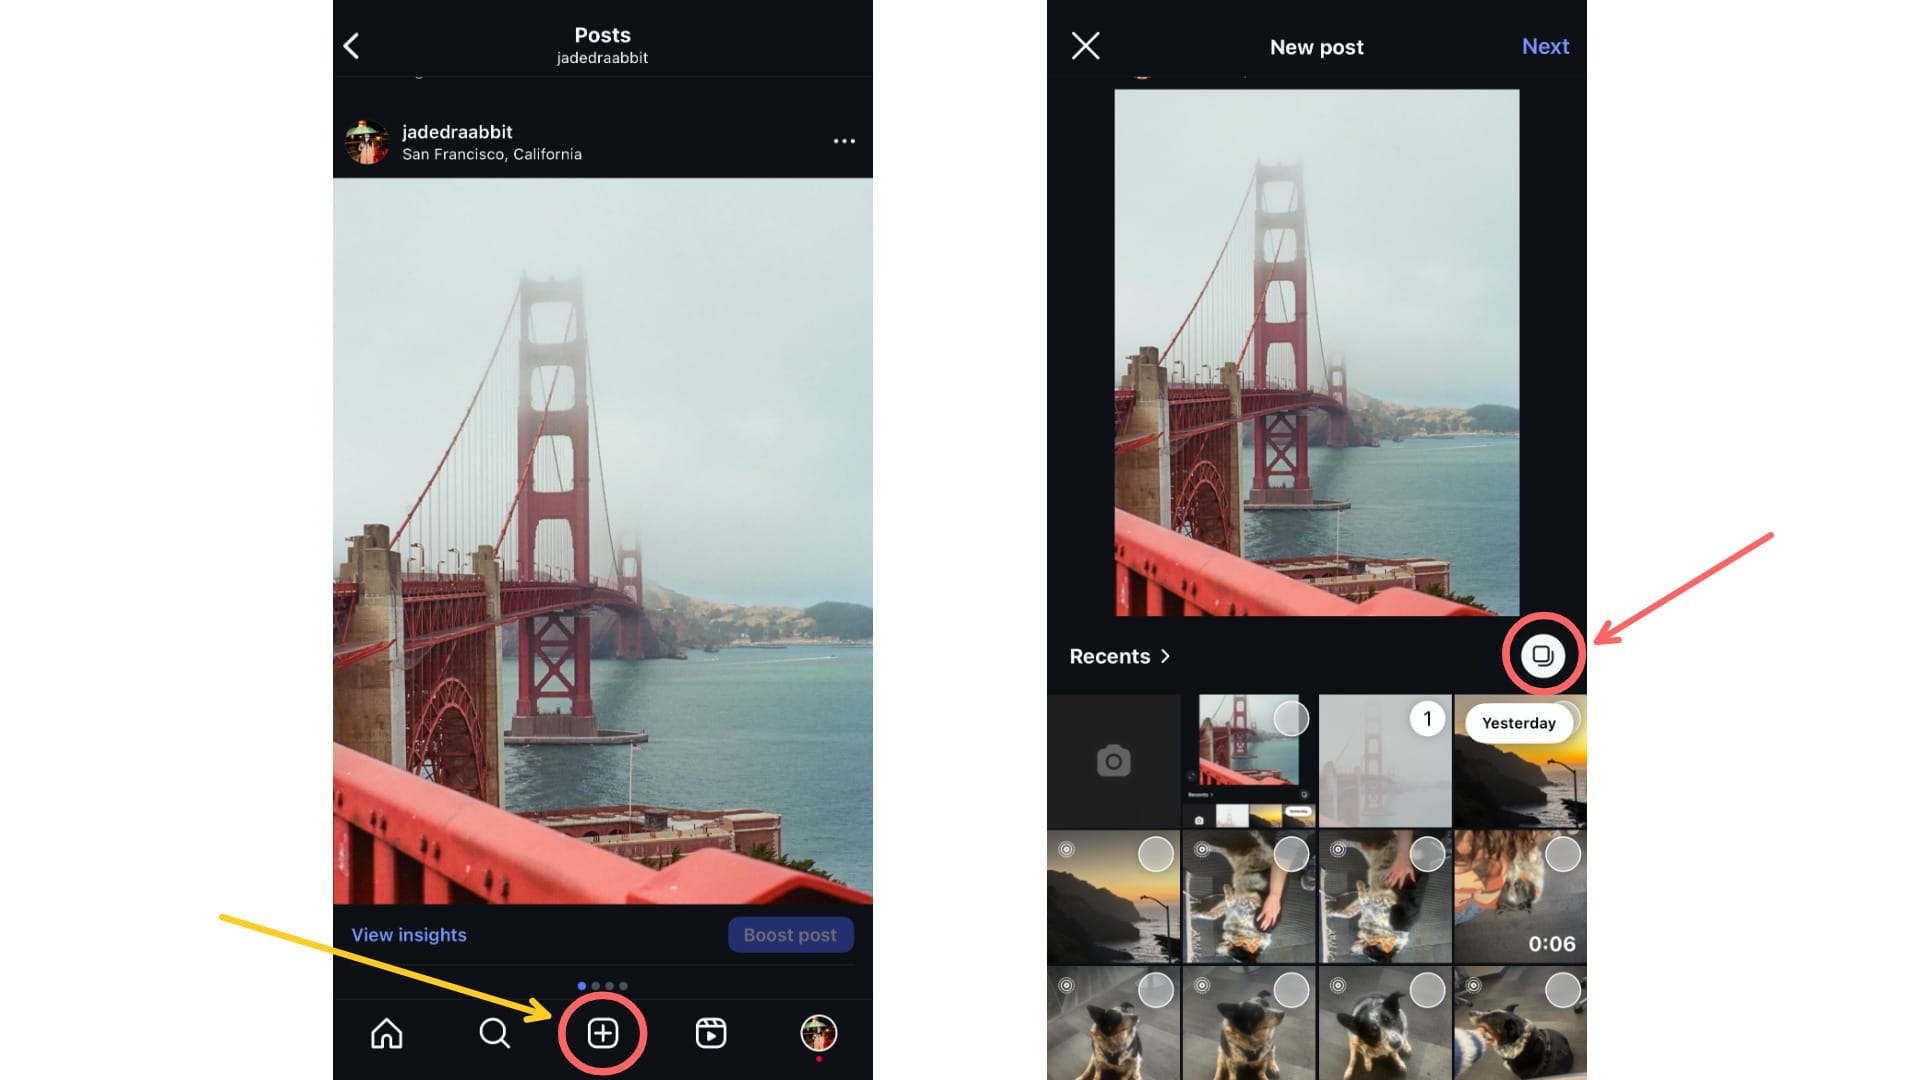
Step 1: Open Instagram and Create a New Post
Once you’ve opened Instagram, tap the ➕ icon to start a new post. To create a carousel, tap the multiple-image icon above your photo library on the right. From there, you can choose up to 20 photos or videos for your post.
After making your selections, tap Next in the top-right corner.
Step 2: Select the Resize Option
Tap the resize/expand icon in the bottom-left corner of the preview. You’ll see three options: mixed, portrait, and square.
To post horizontal and vertical photos together in the same carousel, make sure to select Mixed.
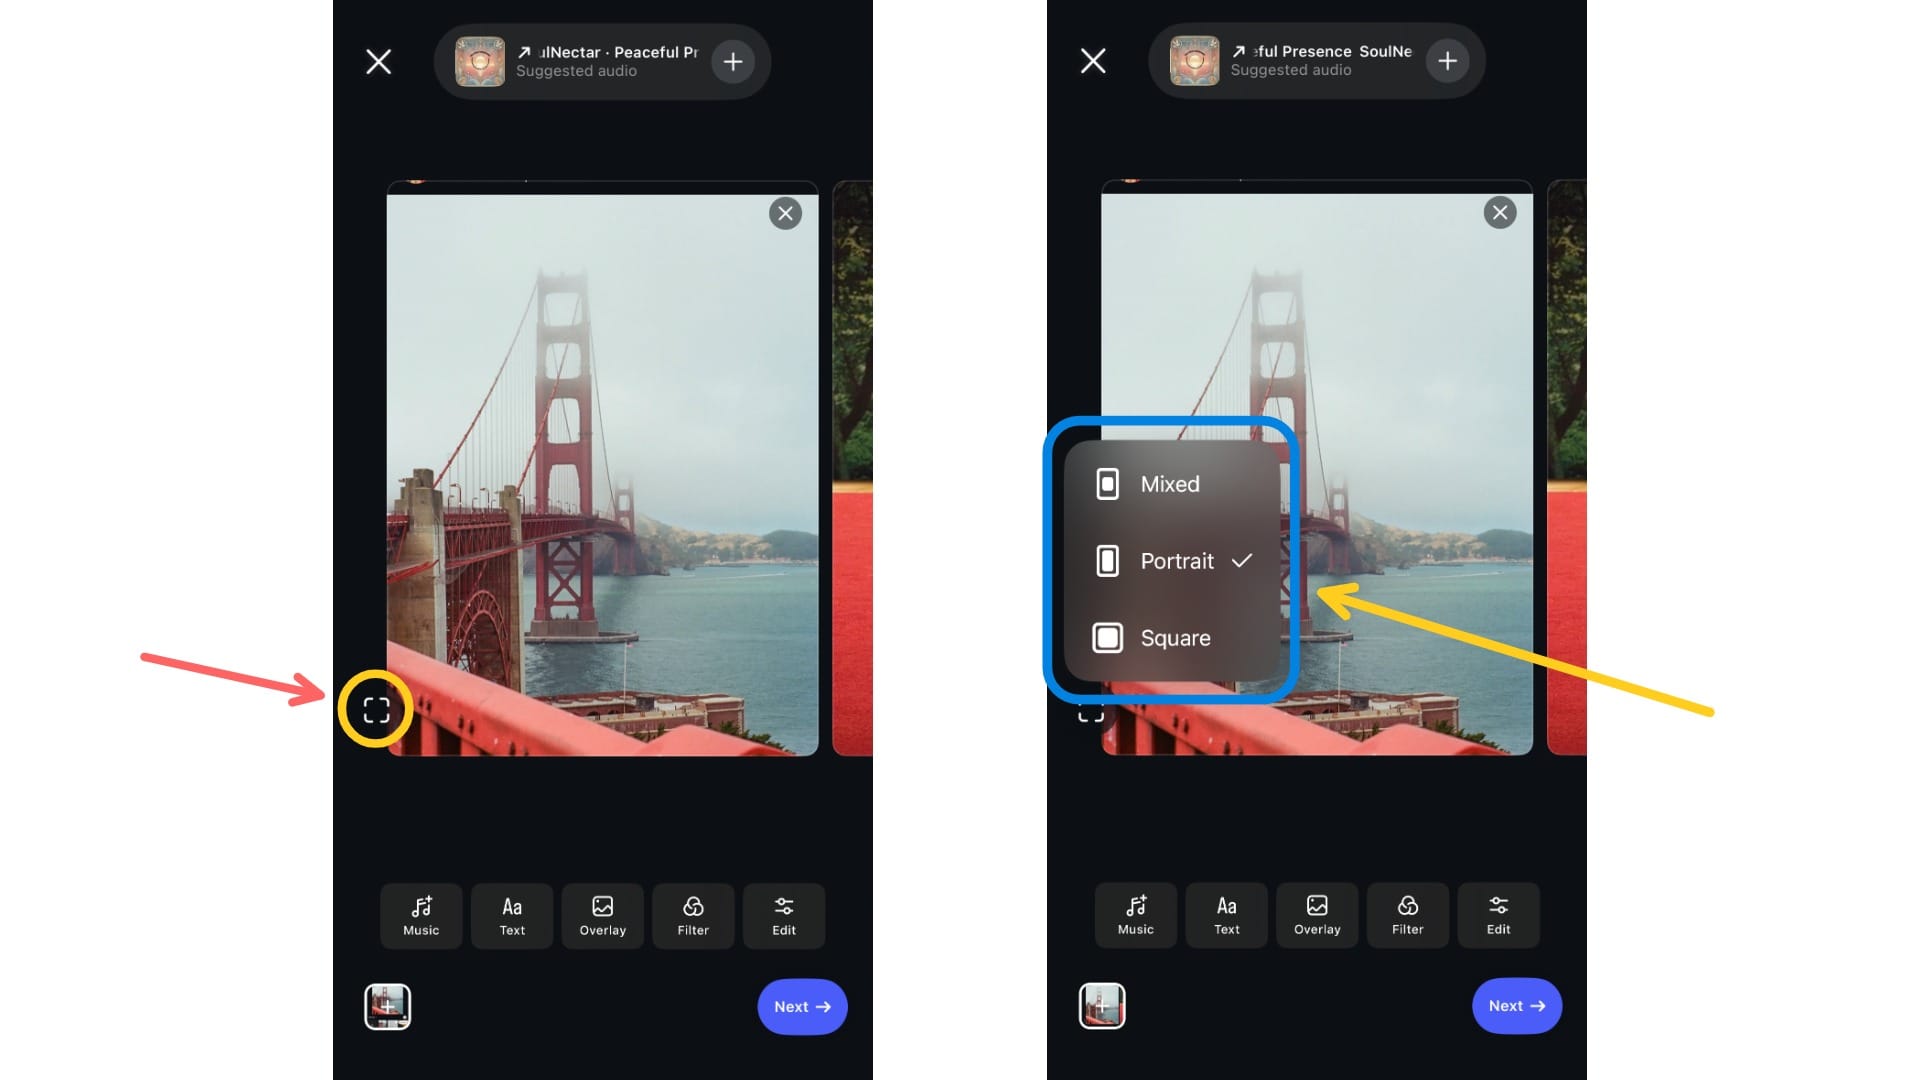
Here is what option looks like in practice:
- Mixed: Keeps each photo’s original aspect ratio.
- The only setting that allows multiple aspect ratios in one carousel.
The Mixed option preserves the original aspect ratio of each photo, unless it exceeds Instagram’s limits (taller than 4:5 or wider than 1.91:1)
- Portrait: Crops all images to a vertical 4:5 frame.
- Wider or taller images will be trimmed to fit.
The Portrait option crops every image in the carousel to a vertical 4:5 aspect ratio.
- Square: Forces all images into a 1:1 square
- Any other aspect ratio will be cropped to fit
The Square option crops every image in the carousel to a square 1:1 aspect ratio.
Step 3: Preview Your Carousel and Share Your Post
Before posting, check how your photos look in the carousel preview. You can still reorder, delete, or re-edit any images.
Once everything looks right, tap Next to add your caption and hashtags, then tap Share to publish your post.
Make sure to preview your carousal before posting.
How to Resize Photos for Instagram Without Cropping
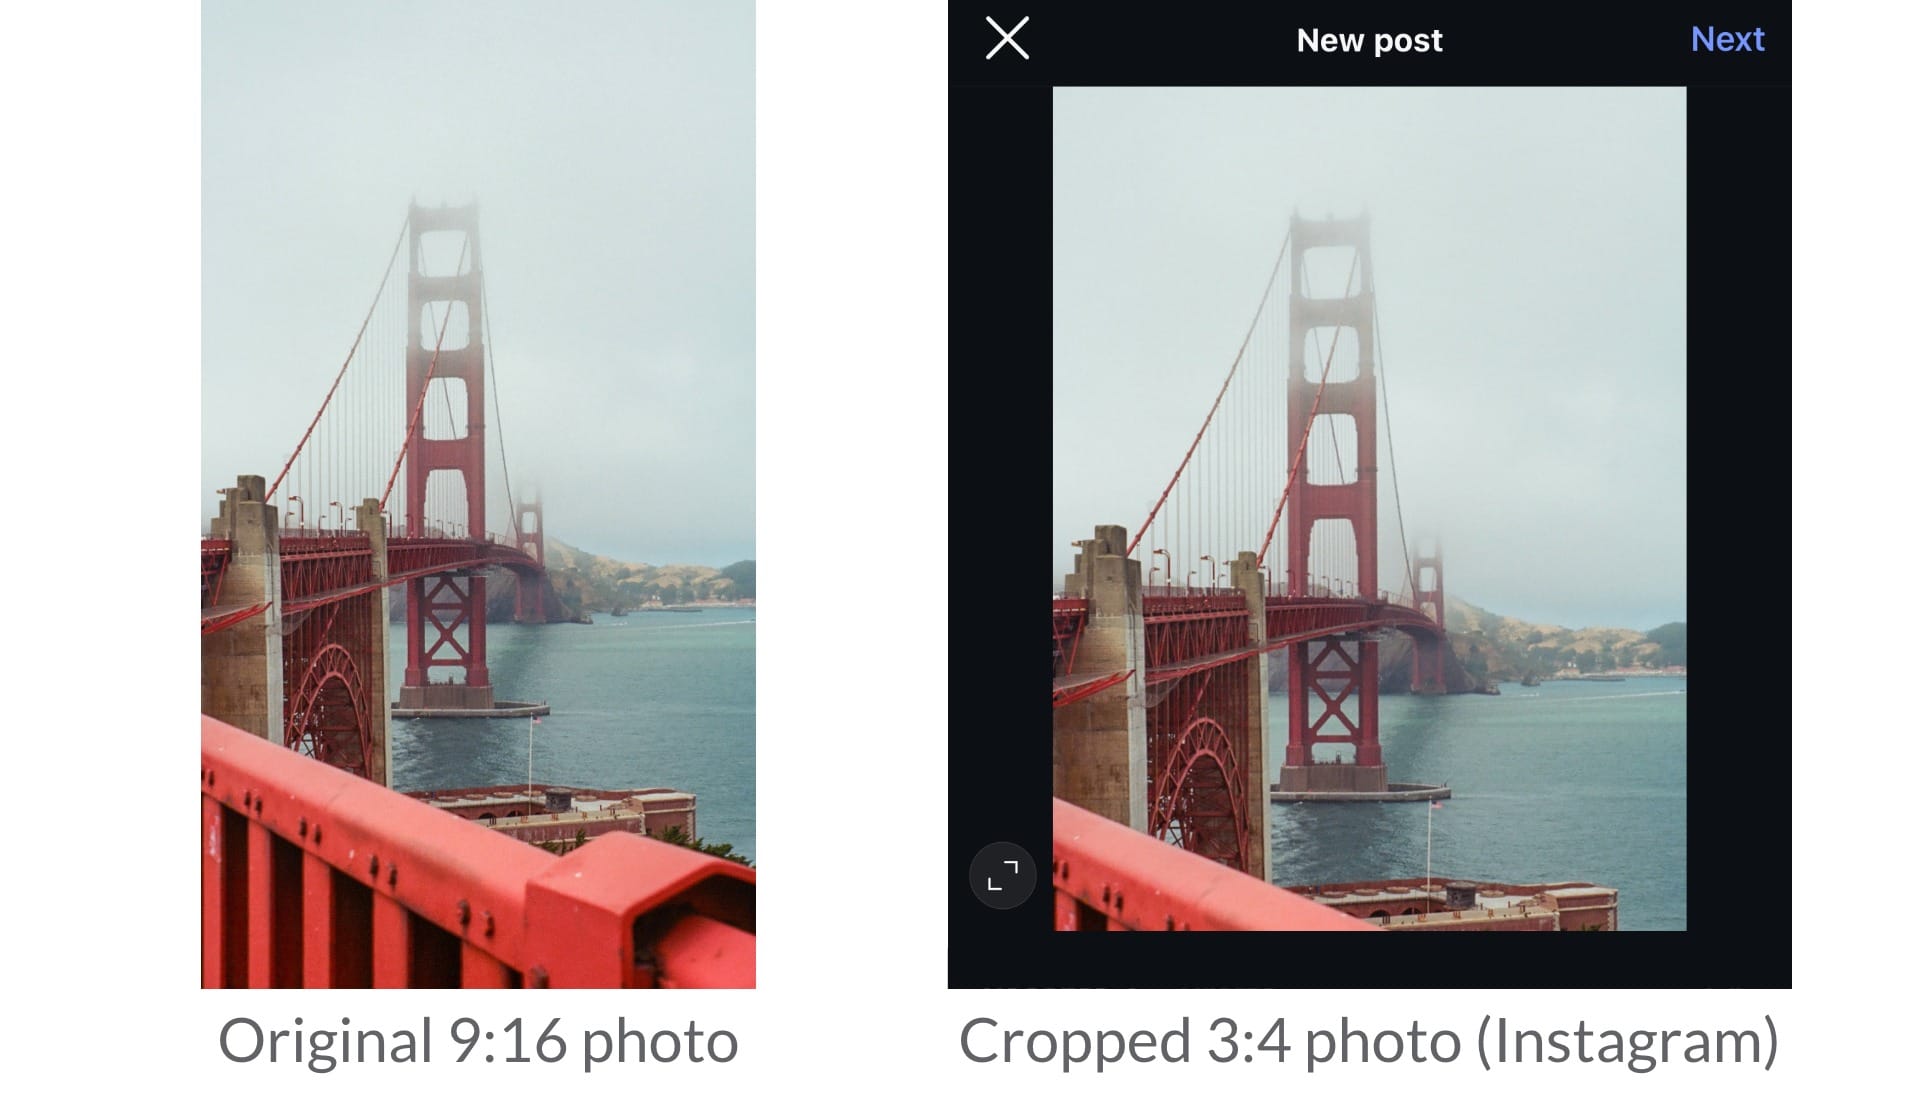
Anything taller than 4:5 or wider than 1.91:1 will still be cropped by Instagram’s aspect ratio limits, even if you use the Mixed option in carousels.
Resizing or editing your photo prior to uploading it on Instagram ensures that it won’t be incorrectly cropped.
Adding borders is a simple way to make a photo fit Instagram’s supported sizes without cropping.
In her engagement post to Travis Kelce, Taylor Swift used this exact trick, adding borders to a portrait image in a carousel filled with landscape shots.
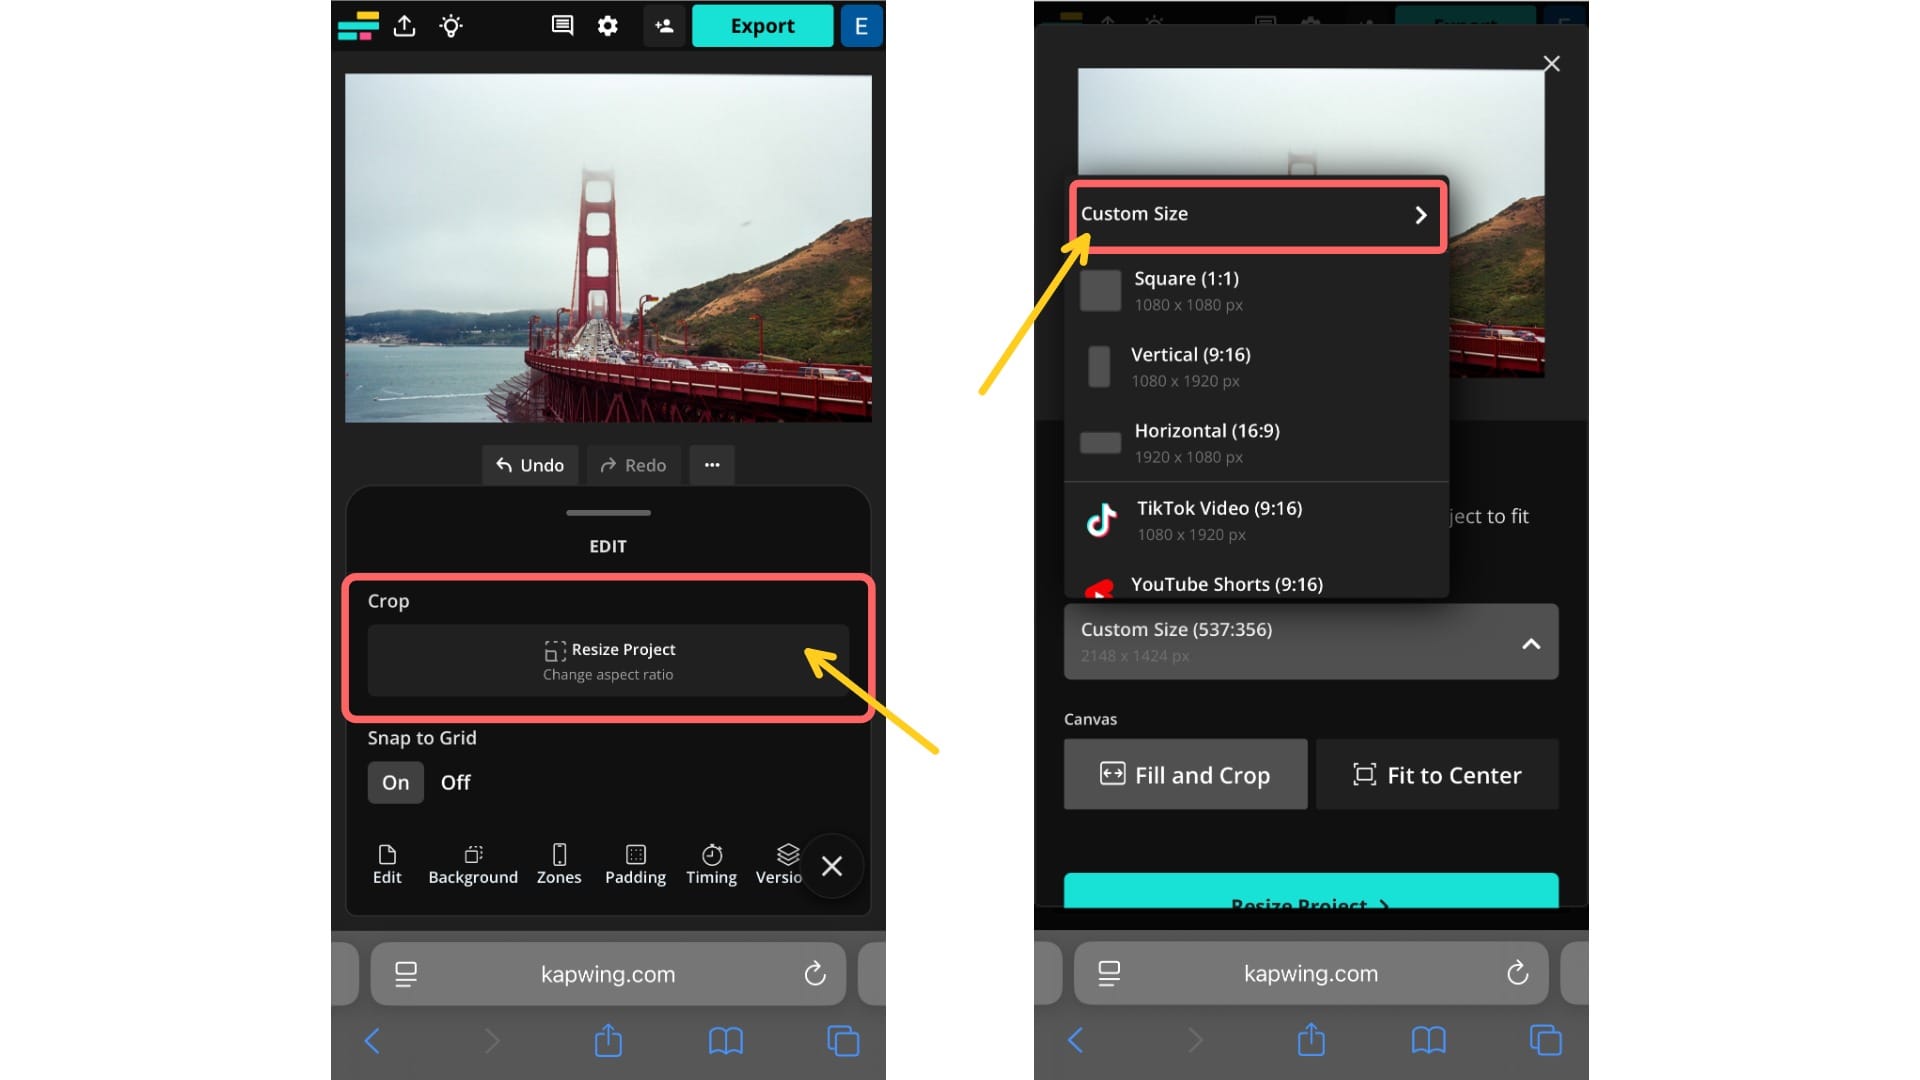
Step 1: Open the Resize Project Tool
Upload your photos into the Kapwing Studio.
In the bottom toolbar, click the Project tab, then select Resize Project. This will open a menu with different sizing options.
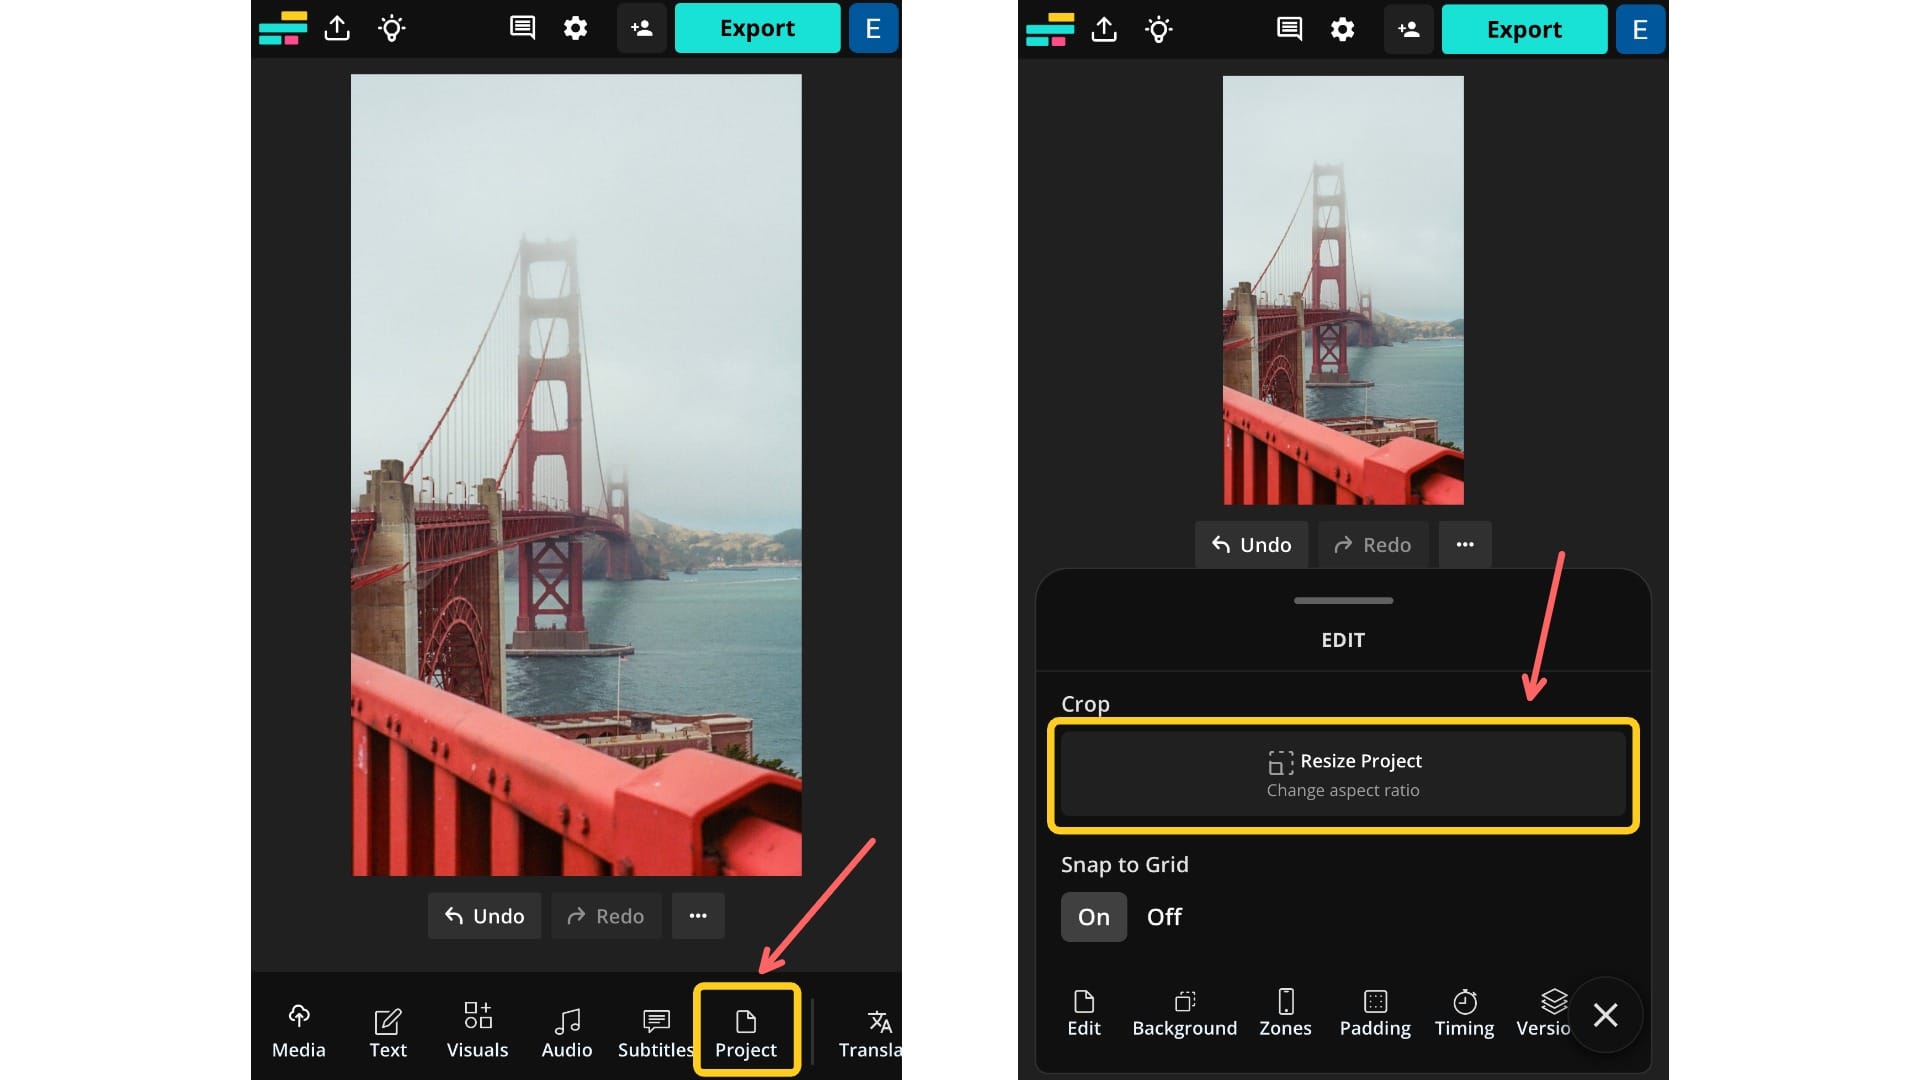
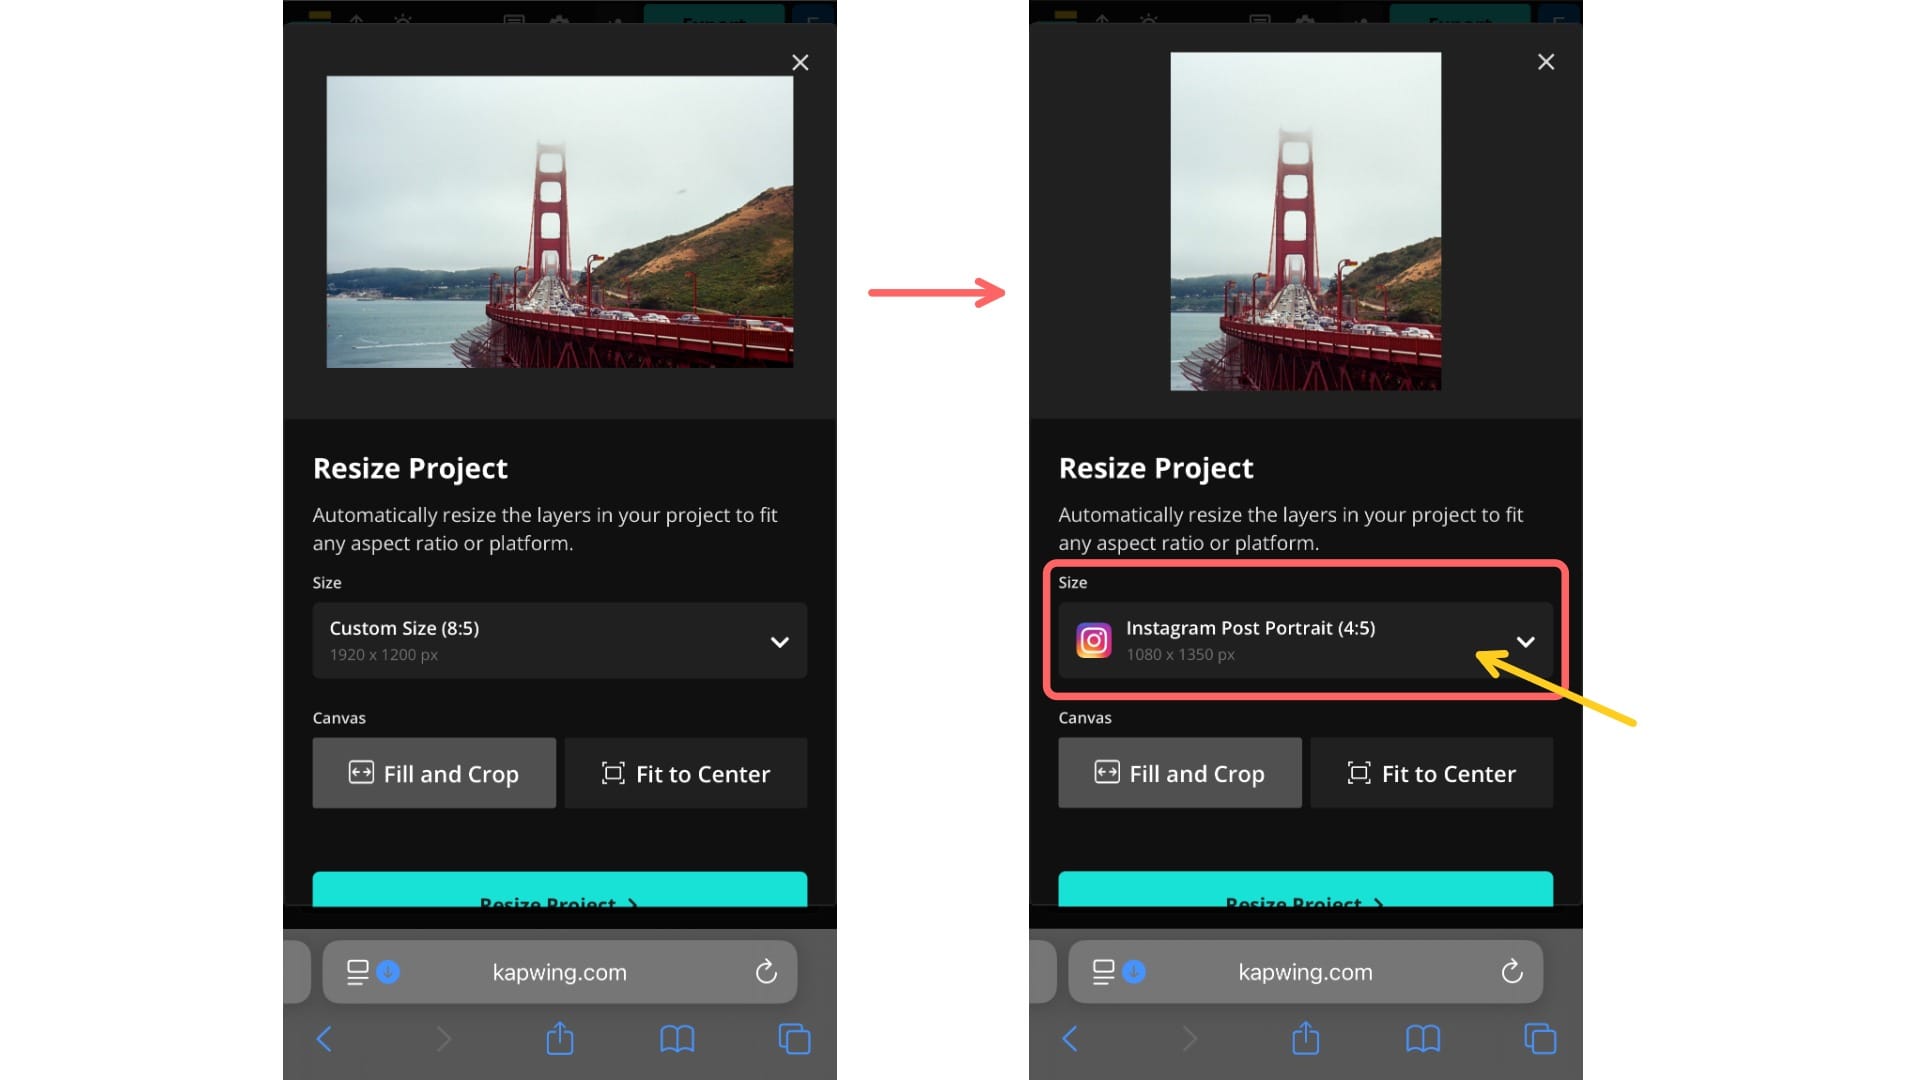
Step 2: Select the Right Aspect Ratio
Once you click on the Resize Project button, you can select an aspect ratio from the drop-down menu. We recommend 4:5 (portrait) or 1:1 (square), since these are the most consistent with how Instagram displays posts in the feed or on your profile grid.
Make sure to remember that anything taller than 4:5 (like a screenshot) or wider than 1.91:1 (like a panorama) will still be cropped.
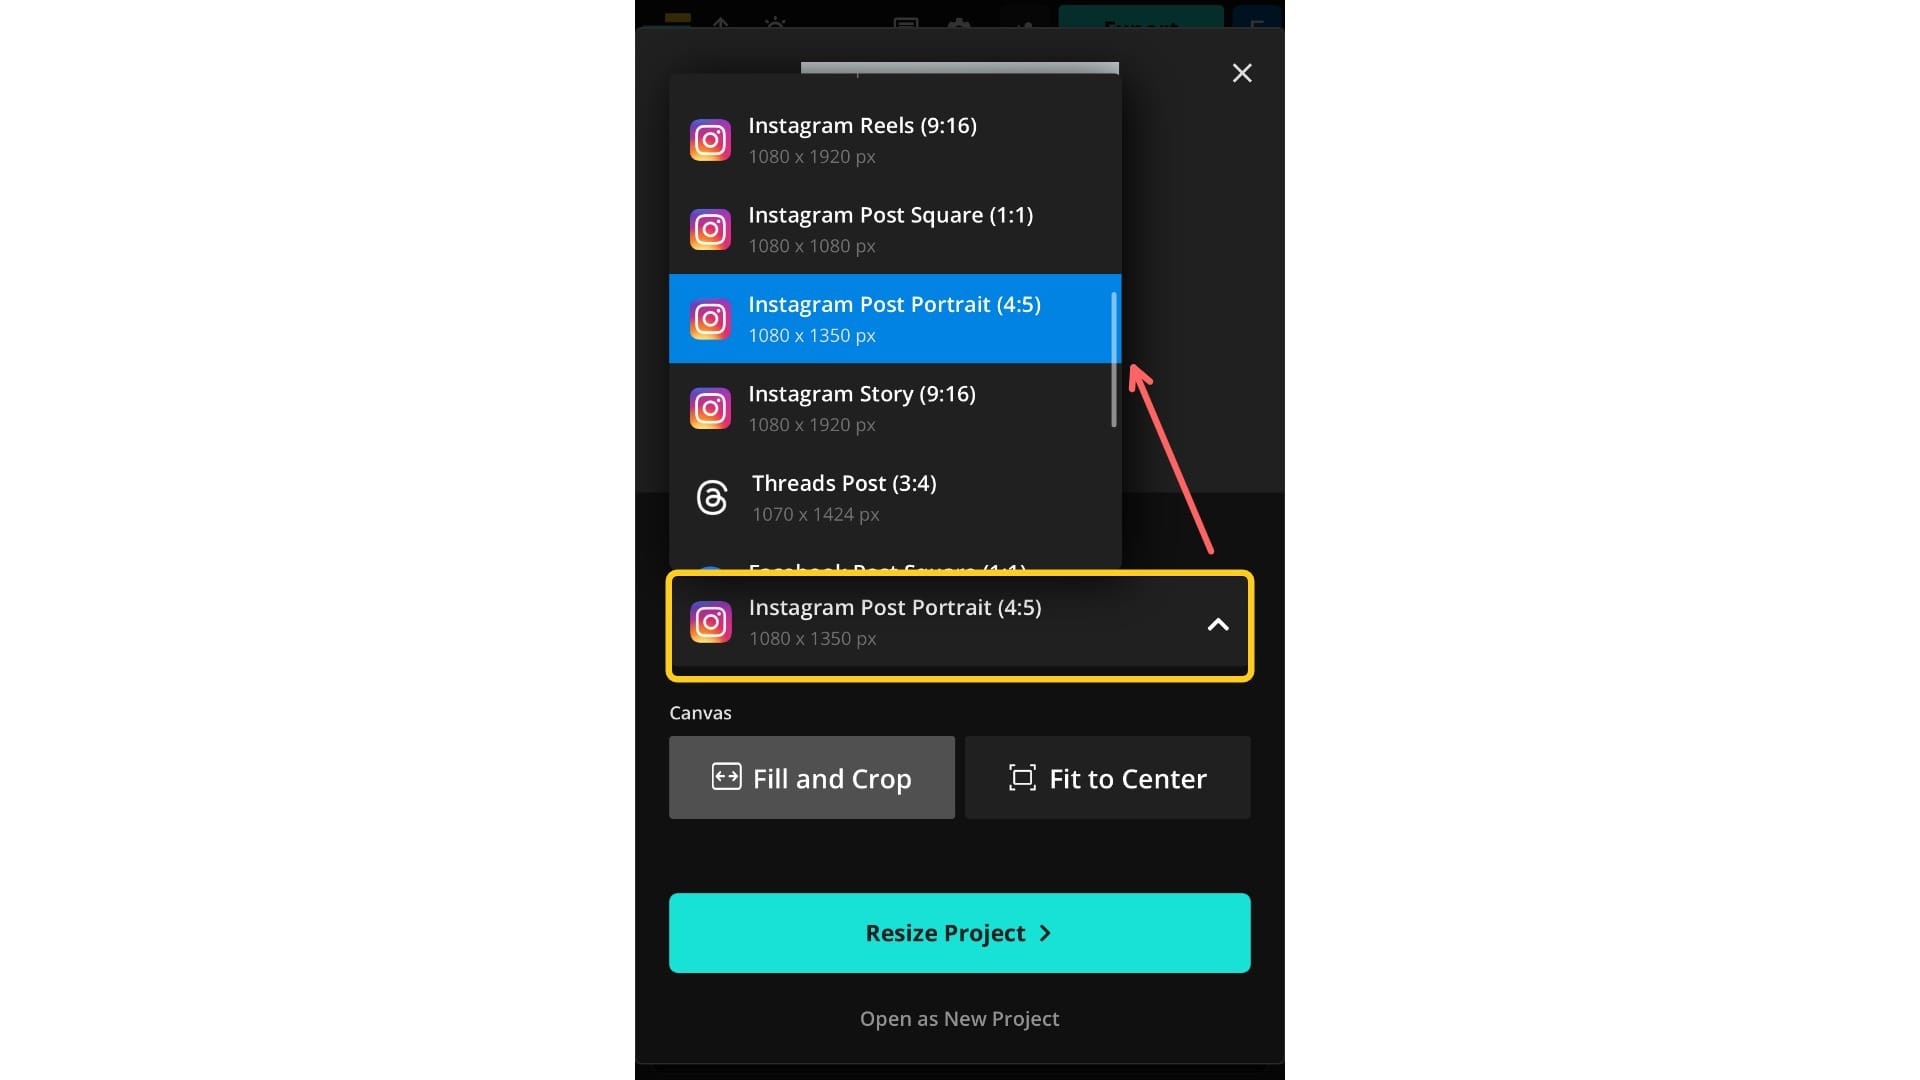
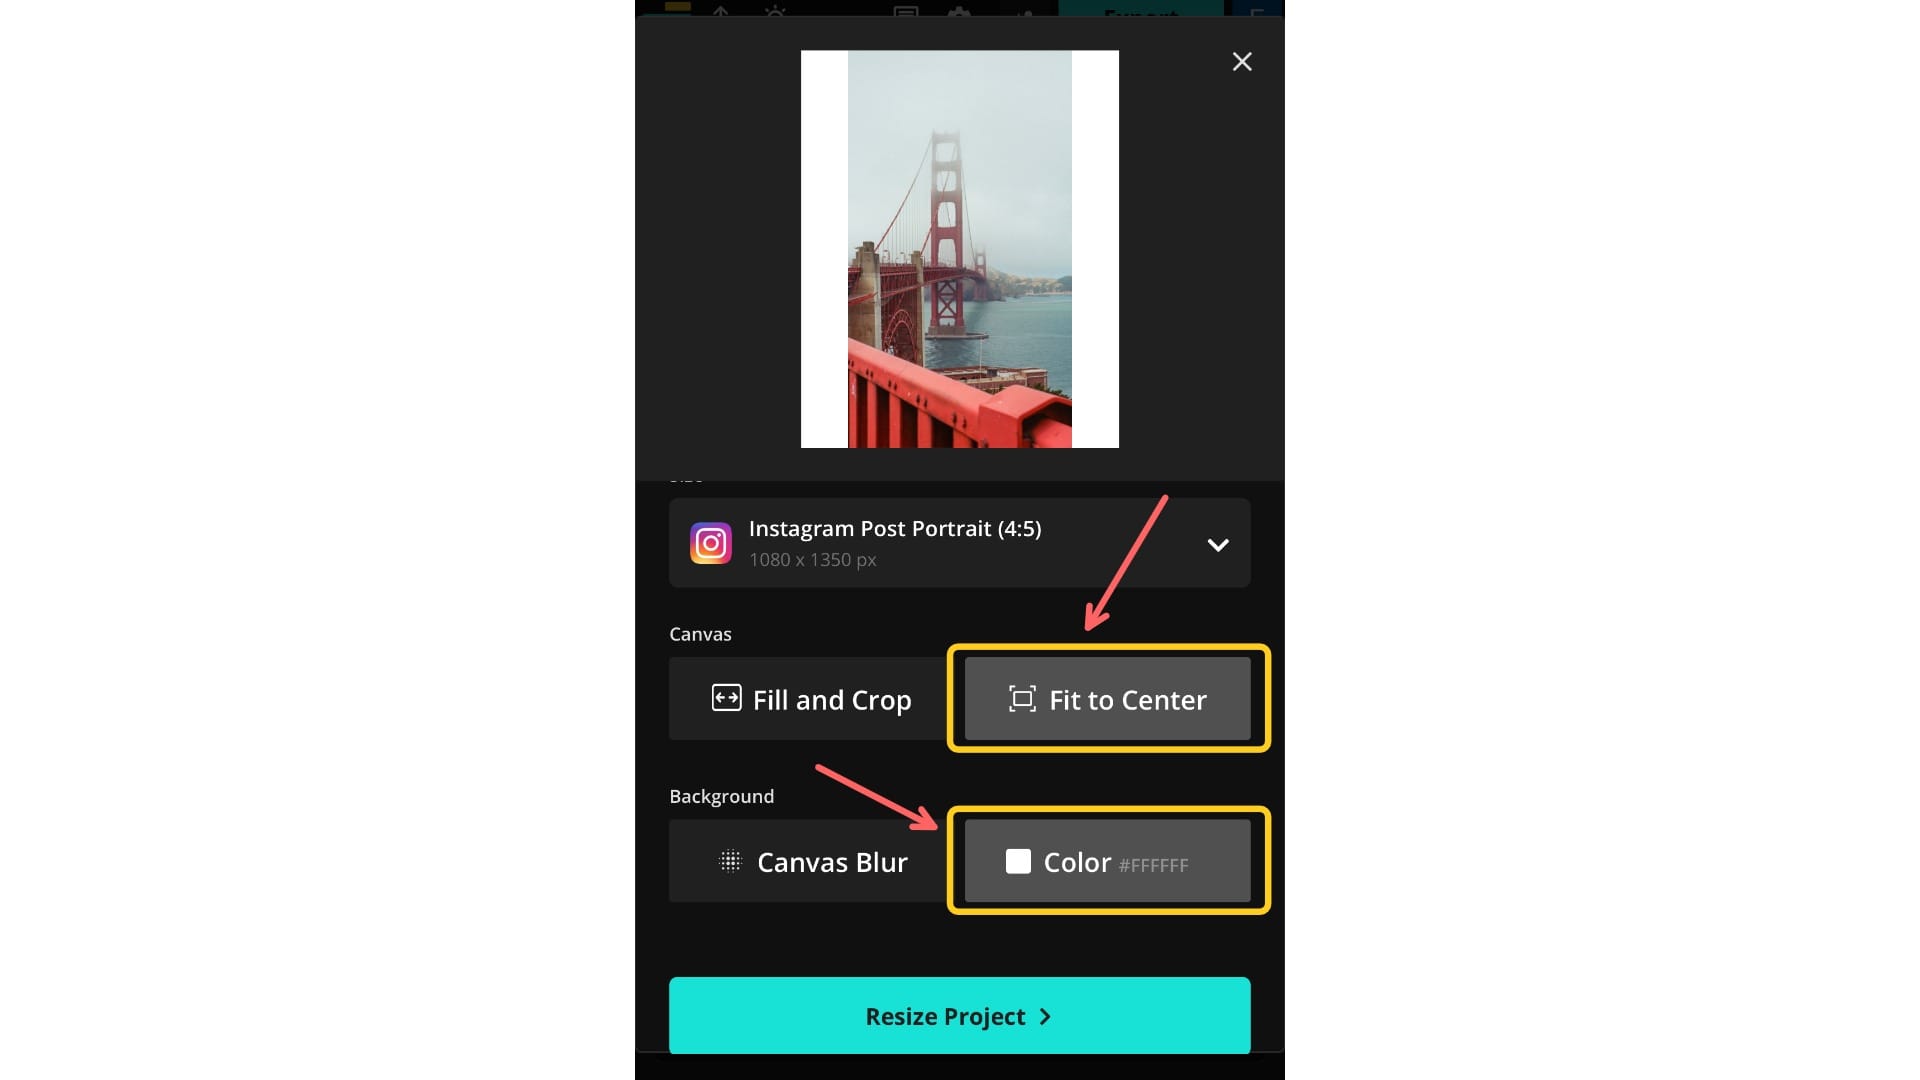
Step 3: Fit Your Photo to the Canvas
Next, click Fit to Center to place your photo in the middle of the canvas. Then, choose a background color. This will become the border around your image. You can choose an aesthetic color, match it to the scheme of your photo, or go with black for a clean look that blends into Instagram’s dark mode.
Click Resize Project to apply and finalize the border.
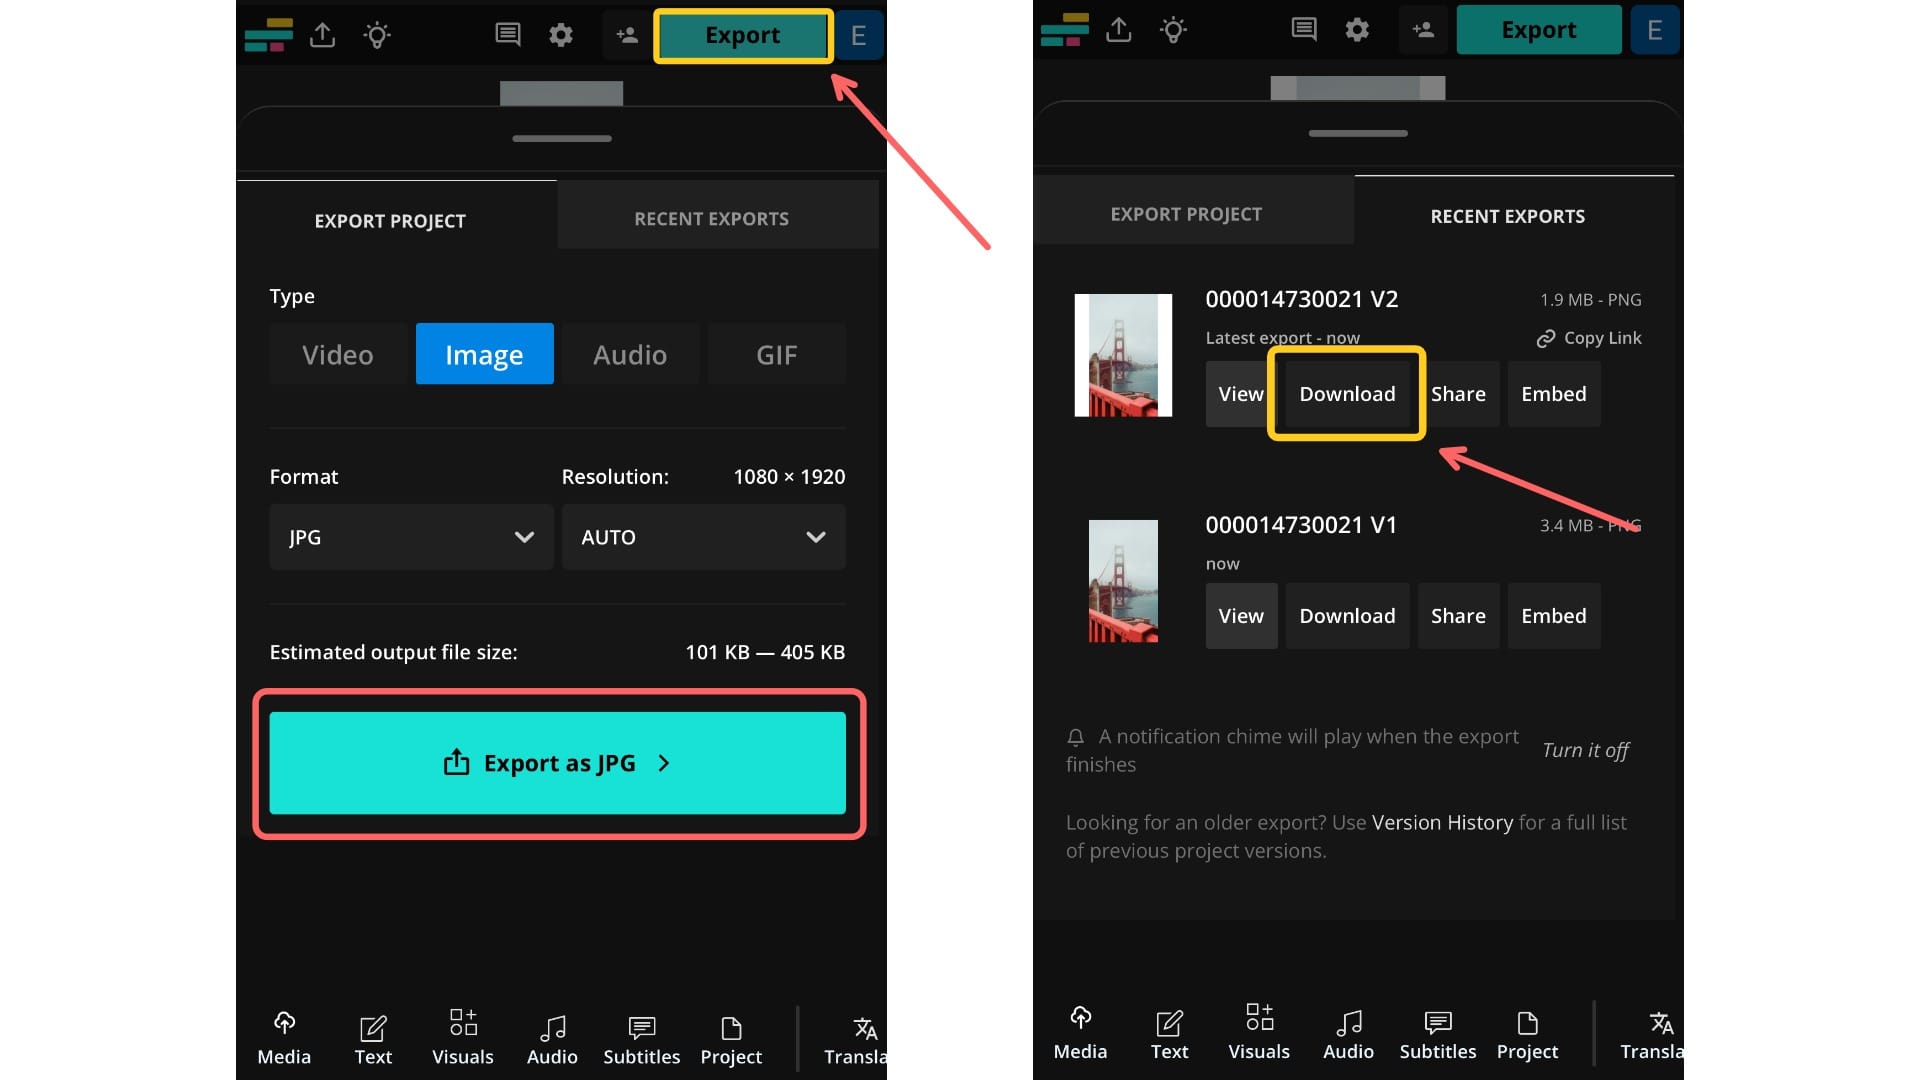
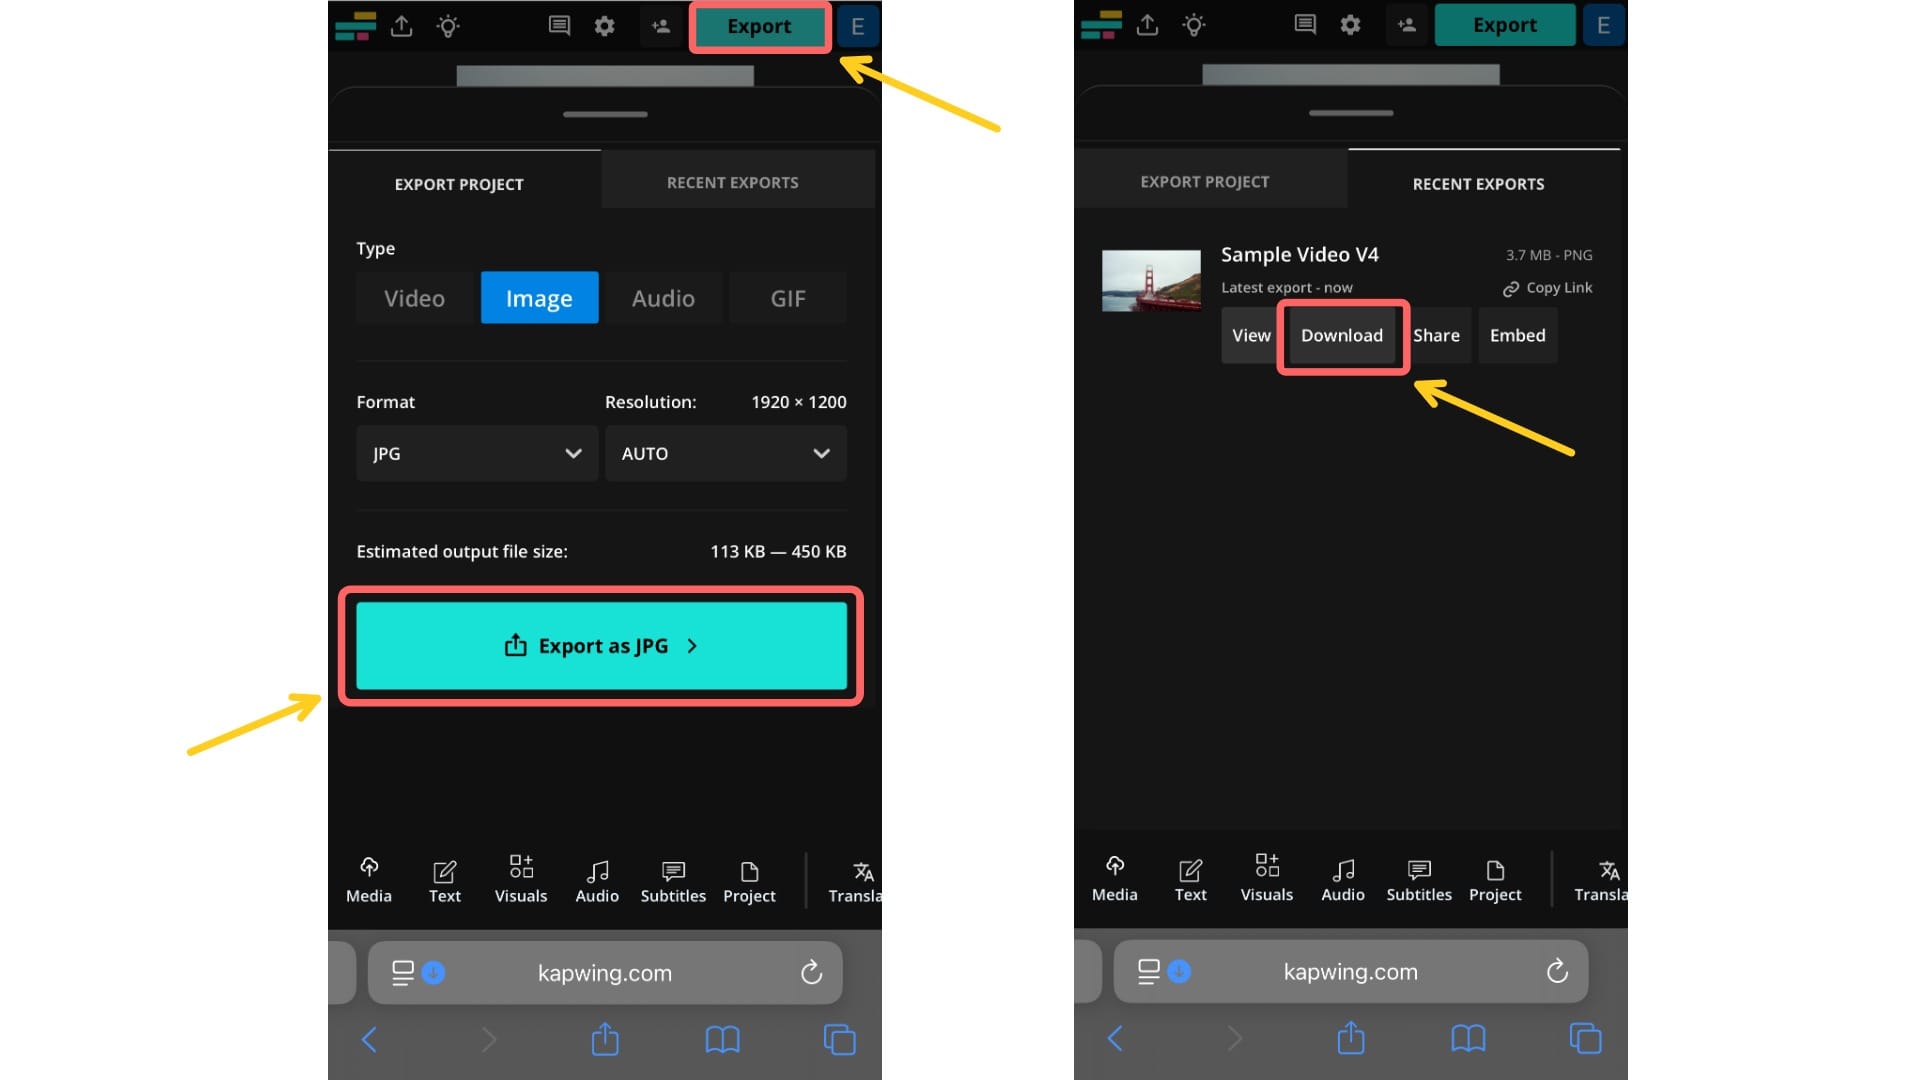
Step 4: Export and Download Your Photo
Finally, export your photo. Click the Export button in the top-right corner to open a menu where you can choose your file type and resolution.
Once you’ve finalized your settings, click Download to save the resized photo to your device.
Step 5: Post Your Carousal to Instagram
You can now upload your resized image. Open Instagram and tap the ➕ icon to start a new post. Select the multiple image icon to create a carousel, then upload your cropped or bordered slides in order.
Keep in mind: if your first photo has borders, it’ll also appear in your profile grid. To keep your feed looking clean, consider using bordered images only on later slides.
Here’s an example of how your carousel will appear:
Here's how a bordered image looks when posted in a carousel with mixed aspect ratios on Instagram.
How to Post One Long Image as Two Slides on Instagram
If you want to share an extra-wide image, posting it with either of the other methods can make it look small or compressed in the feed. A better solution is to split the photo across two slides in a carousel, so viewers can swipe to see the full image without losing quality.
Photographer Gareth Llewellyn uses this technique often, splitting panoramic photos across two slides in a carousel.
Step 1: Select Your Canvas Size
Start by deciding what aspect ratio you’d like to use. We recommend using either 4:5 (portrait) or 1:1 (square), both of which display well on the Instagram grid and feed.
We’ve included a chart below with common aspect ratios for two-panel posts. However, if you’re working with a different layout or custom dimensions, you can still follow the same process: just calculate your total canvas width by multiplying the width of one panel by the number of slides, and keep the height consistent.
| Aspect Ratio | Dimensions for 2 Slides |
|---|---|
| 4:5 (Portrait) | 2160 × 1350 |
| 1:1 (Square) | 2160 × 1080 |
| 5:4 (Landscape) | 2700 × 1080 |
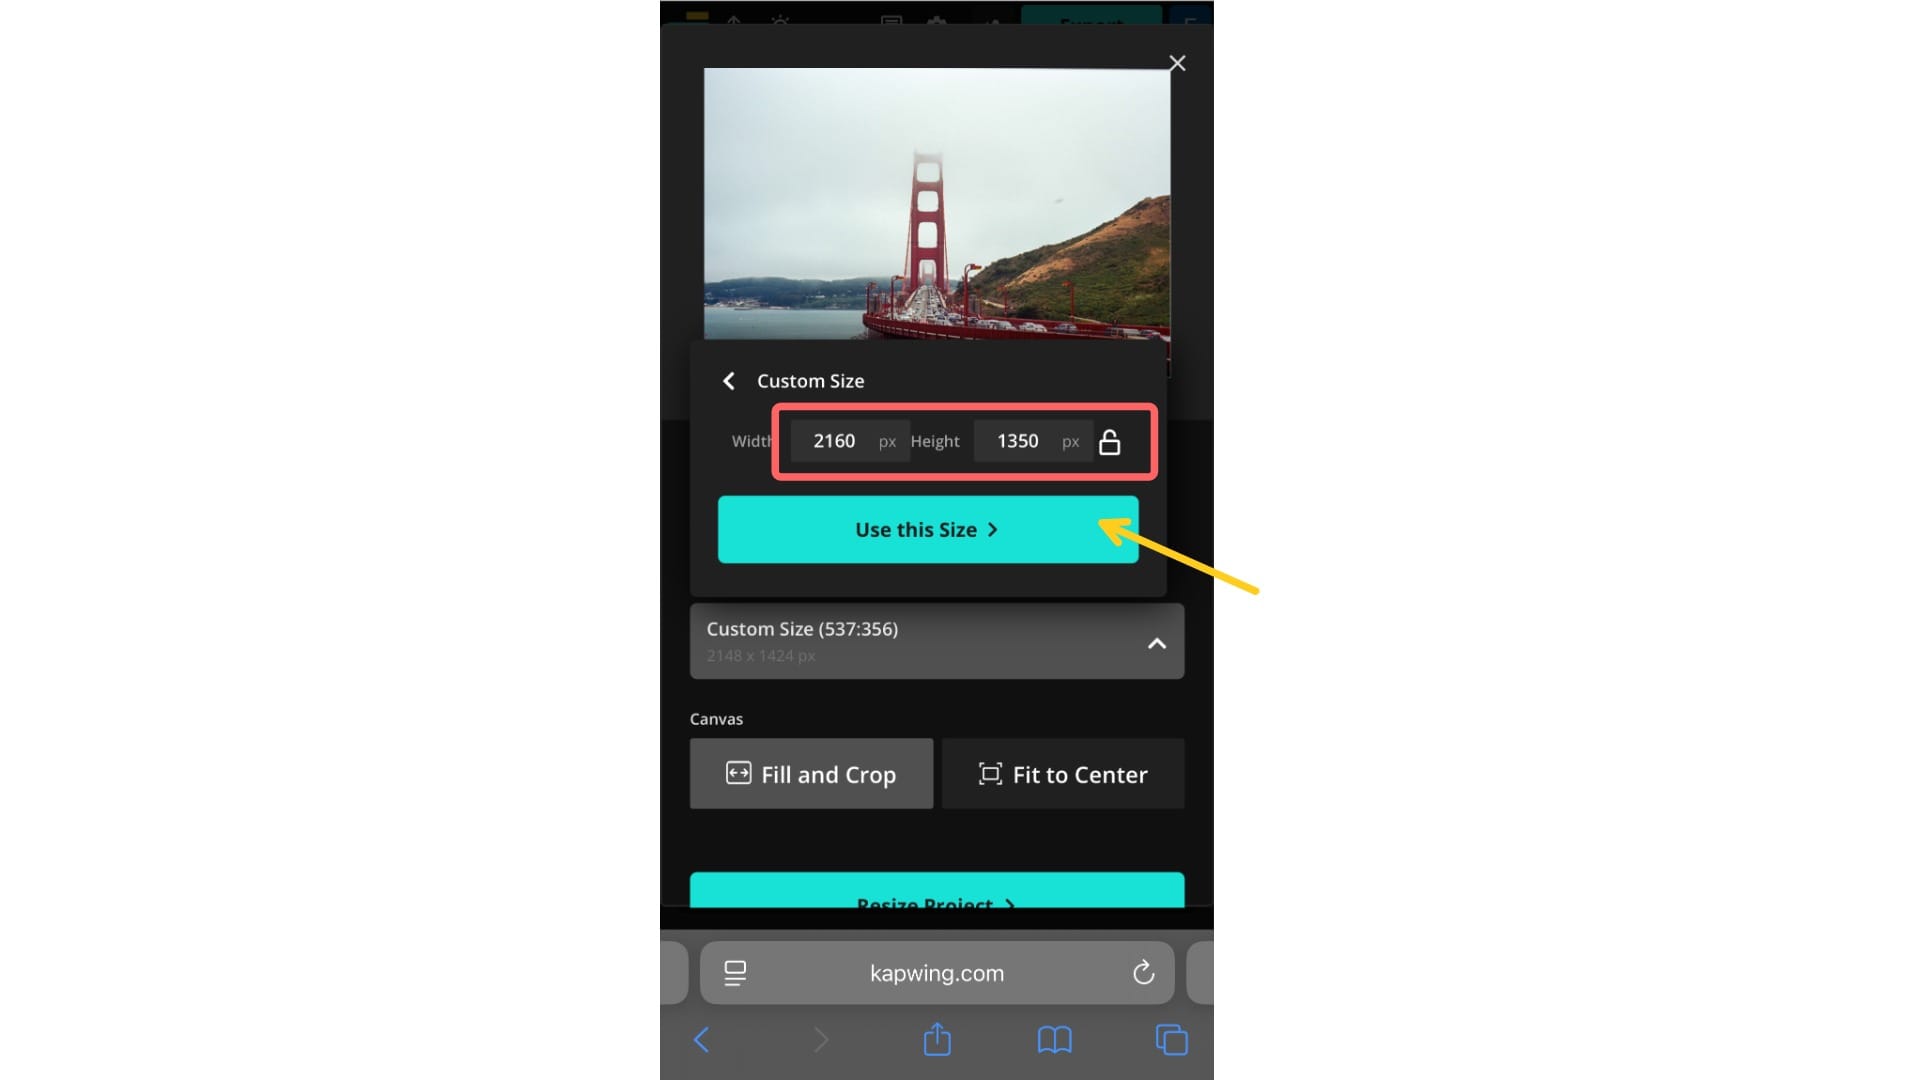
Step 2: Resize Your Wide Image
Upload your wide image into the Kapwing Studio.
Click the Project tab in the bottom toolbar, then select Resize Project. Choose "Custom Size", which is the first option.
In the Custom Size menu and enter your calculated dimensions. For example, to split a photo into two vertical 4:5 panels, input 2160 × 1350.
Once entered, click Use This Size, then confirm by selecting Resize Project to apply the new canvas size.
Step 3: Export the Resized Image and Re-Upload
Export your resized canvas and re-upload it into Kapwing as a new project. This is important because Kapwing preserves the full image after cropping to allow for future edits. However, when splitting an image for a carousel, this can lead to misalignment.
Click the Export button in the top-right corner to open a menu where you can choose your file type and resolution.
Once you’ve finalized your settings, click Download to save the resized photo to your device. Then, upload the resized image as a new project.
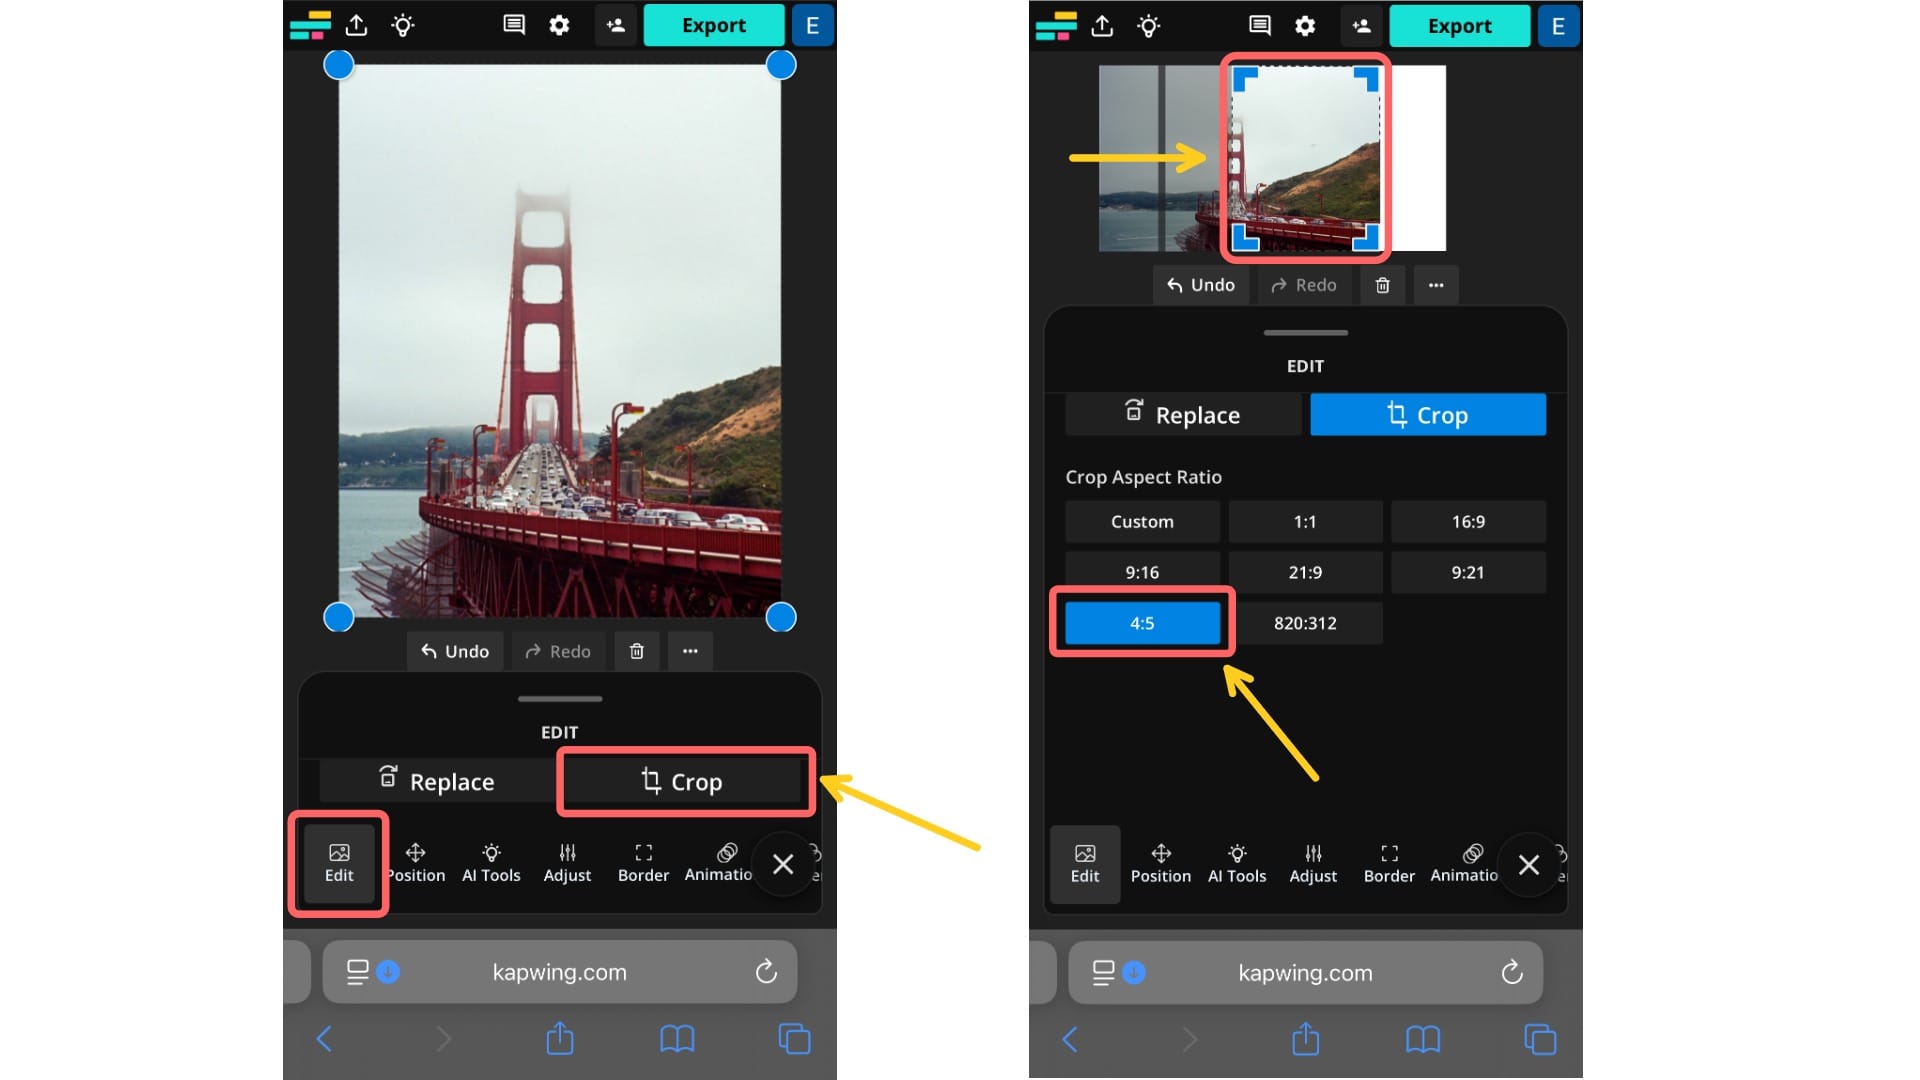
Step 4: Resize the Canvas and Crop Each Slide
Now that your cropped image has been re-uploaded, resize the canvas to match the aspect ratio of each individual slide. In our example, each panel was 4:5.
Click the Project tab in the bottom toolbar, then select Resize Project. Choose the correct aspect ratio, or enter the custom size if needed. Then, click Resize Project to apply the new canvas.
Your image will be centered by default. To adjust it, click on the photo, tap Edit in the bottom toolbar, and select Crop.
Set the aspect ratio to 4:5, then drag the image to the left side of the canvas. This will crop your image so that only the left half of the photo is visible. Export and save this version. This will become the first slide of your Instagram carousel.

Repeat the process for the second slide, but this time drag the image to the right side so that only the right portion is visible.
Once it's aligned, export and save this version as the second slide of your carousal.
Step 5: Post to Instagram
Finally, post the finished product to Instagram. Tap the ➕ icon to create a new post. Select the multiple image icon, then upload your cropped sections in the correct order.
When posted as a carousel, the slides should appear as one continuous, wide image.
Whether you're posting portraits, landscapes, or extra-wide images, tools like the Resize toggle, borders, and cropping tricks can help you showcase your content without losing quality.
Frequently Asked Questions
Can you post different size photos in one Instagram post?
Yes. With Instagram’s new Resize toggle, you can post vertical, horizontal, and square photos together in the same carousel. To keep each photo at its original aspect ratio, select Original when uploading.
Why does Instagram crop my photos?
Instagram crops photos that don’t match its supported aspect ratios. Only 4:5 (portrait), 1:1 (square), and 1.91:1 (landscape) are allowed. Anything taller or wider than these ratio will be automatically trimmed to fit the feed.
Can I post both landscape and portrait photos in the same carousel?
Yes, but only if you use the Mixed in the Resize toggle. If you skip this, Instagram will crop all photos in the carousel to match the first image’s aspect ratio.
How do I stop Instagram from cutting off my photos?
The best way to prevent cropping is to resize your photos before uploading. You can do this by adding borders (to fit within 4:5 or 1:1) or by splitting wide images into multiple slides in a carousel.
What is the best aspect ratio for Instagram photos?
The best aspect ratio for Instagram posts is 4:5 (portrait). It takes up the most space in the feed without being cropped, making your post more noticeable.