How to Get Closed Captions That Meet European Accessibility Act (EAA) Requirements
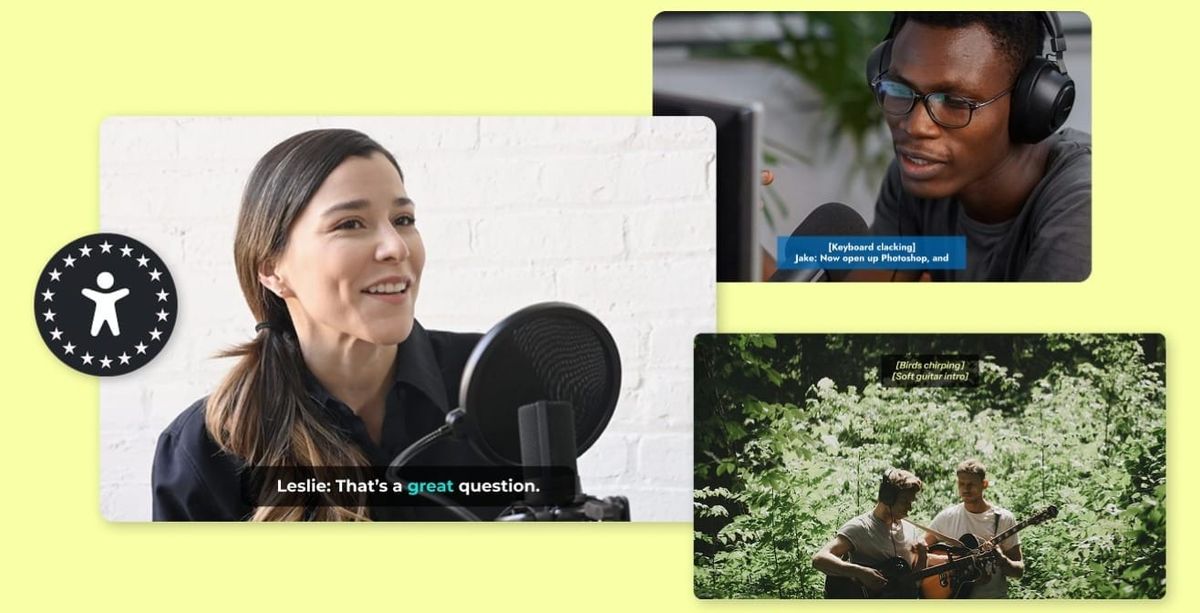
80% of people who use captions do not have an audio impairment — reach everybody with accurate video captions
As the European Accessibility Act (EAA) begins enforcement in June 2025, video creators and businesses distributing content in the EU must meet updated accessibility requirements.
While these new content rules may seem daunting, features in modern video editors make it easier than ever to create captions that meet compliance standards. This ensures you can continue promoting your brand while fulfilling legal requirements.
In this article, we’ll walk through what the EAA requires for video captions, how to generate them using an AI Video Editor, and the specific steps needed to ensure your captions are fully compliant, including speaker labeling, audio cue formatting, and exporting in the correct caption file format.
Table of Contents
- What is the 2025 European Accessibility Act?
- What Are the EAA Requirements for Video Captions?
- How to Get Closed Captions
What is the 2025 European Accessibility Act?
The EAA (European Accessibility Act) is an EU Directive that requires all EU countries to enforce accessibility standards starting June 28, 2025.
While each country handles enforcement individually, the rules are consistent across the EU for businesses serving the public. This means that the EAA applies to all new public-facing digital products and services. "Public-facing videos” means any video content that is accessible to the public, such as videos on your website, social media, or platforms like YouTube.
Private, internal-use-only videos (like team training or private livestreams) generally aren't covered unless they’re intended for public access.
Any videos published after June 28, 2025, must include accessibility features such as captions to comply with the law. Videos that were published before June 28 are not immediately subject to these requirements, but they must be made accessible by June 28, 2030.
Additionally, micro-enterprises, defined as businesses with fewer than 10 employees and an annual turnover or balance sheet below €2 million, may be exempt from some of these requirements, depending on how the directive is implemented in each EU country. Even if exempt, small creators are encouraged to follow accessibility best practices to reach wider audiences and improve user experience.
While there’s a lot to understand about the new compliance rules, here’s a quick summary of what matters most:
All videos must include closed captions. Your captions must follow the WCAG 2.1 AA standard, which means they must:
- Accurately reflect all spoken words
- Be synchronized with the audio
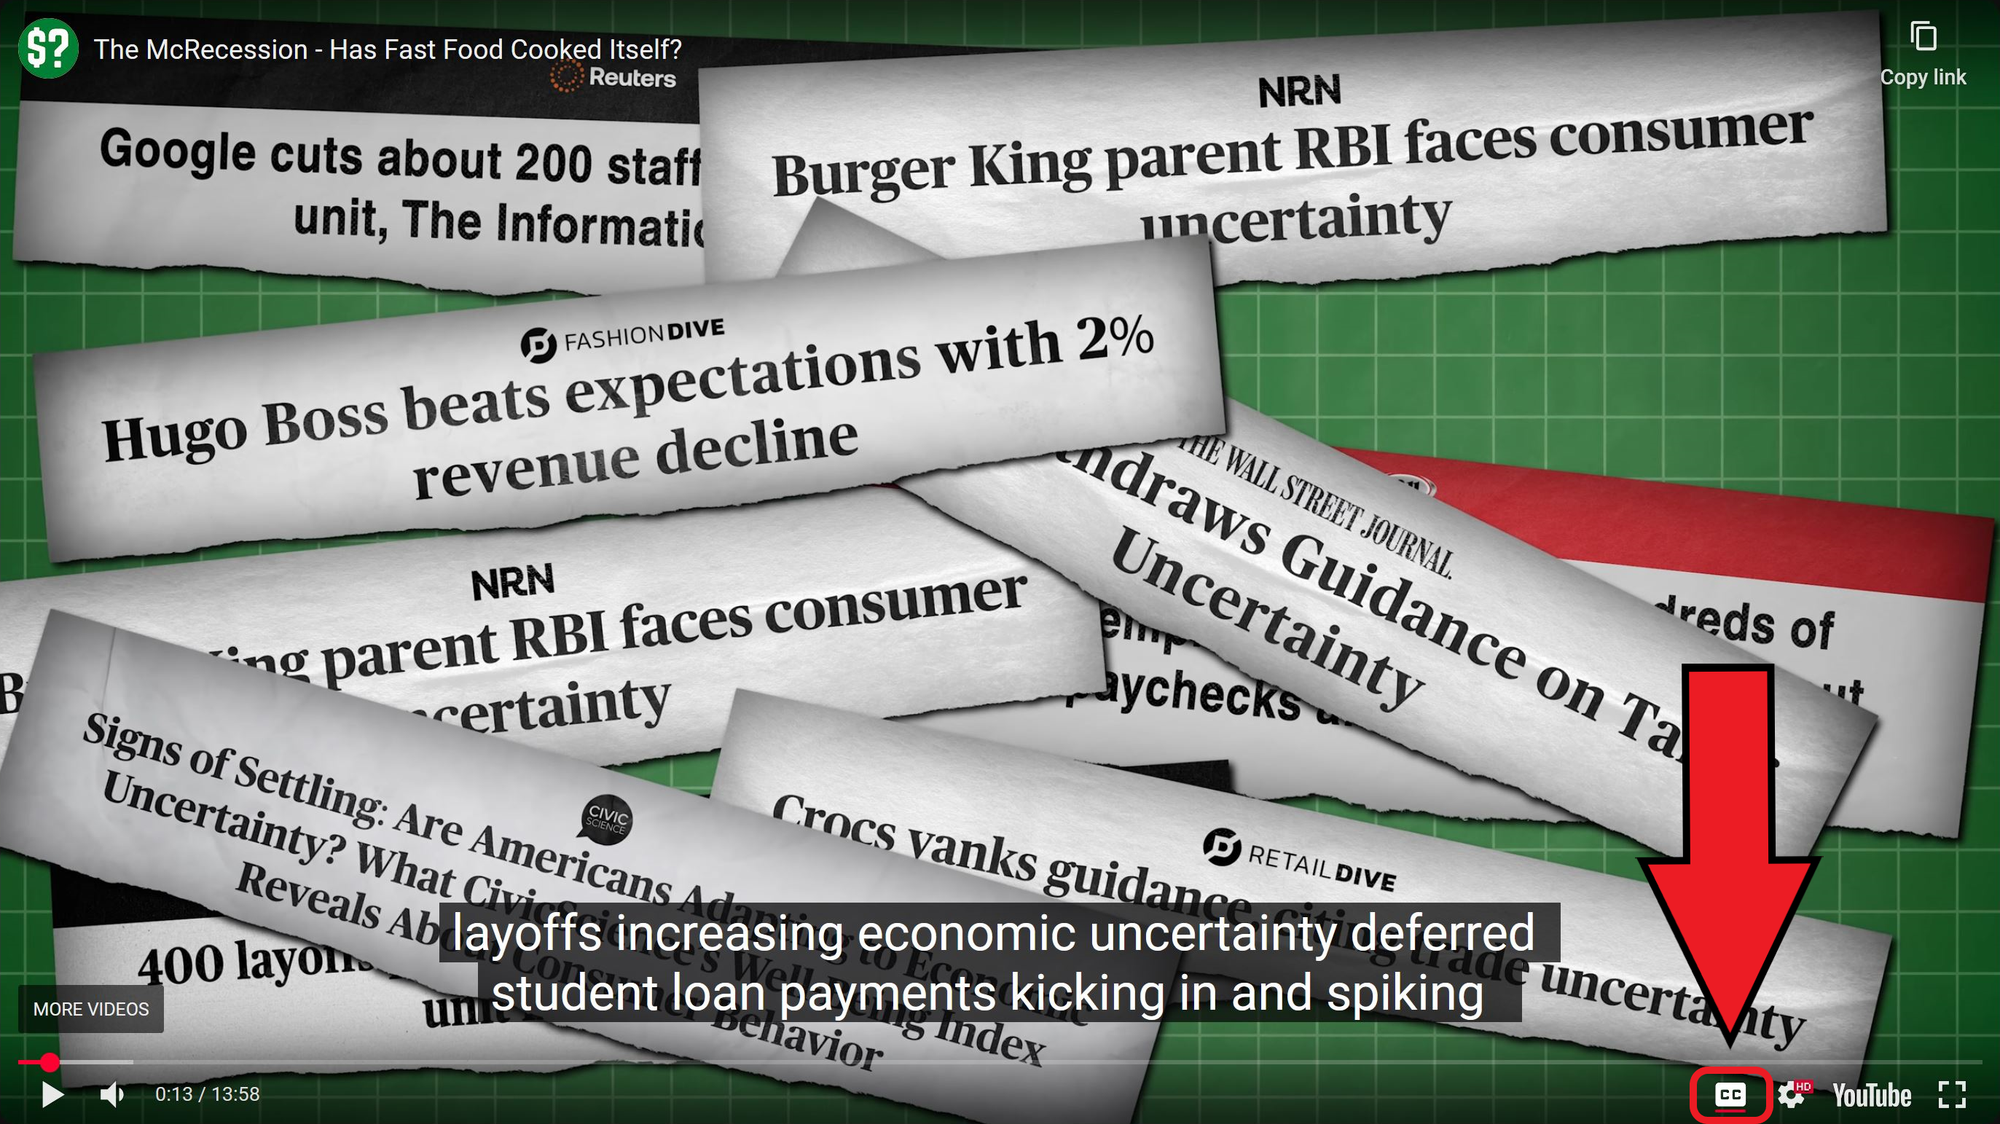
- Include important sounds like music or laughter (e.g., “[dramatic music]”, “[laughter]”)
- Be visually readable with sufficient size and contrast
In the sections below, we’ll break down exactly what’s required under the EAA and walk through how to create closed captions that meet these standards, including speaker labels, audio cue formatting, and exporting in the correct file format.
What Are the EAA Requirements for Video Captions?
To meet the 2025 European Accessibility Act (EAA) standards, video content must follow specific accessibility guidelines, which vary based on the type of video and its intended audience.
Below is a breakdown of what's mandatory, what is sometimes required, and what is considered best practice under the new law:
Mandatory for All Public Videos
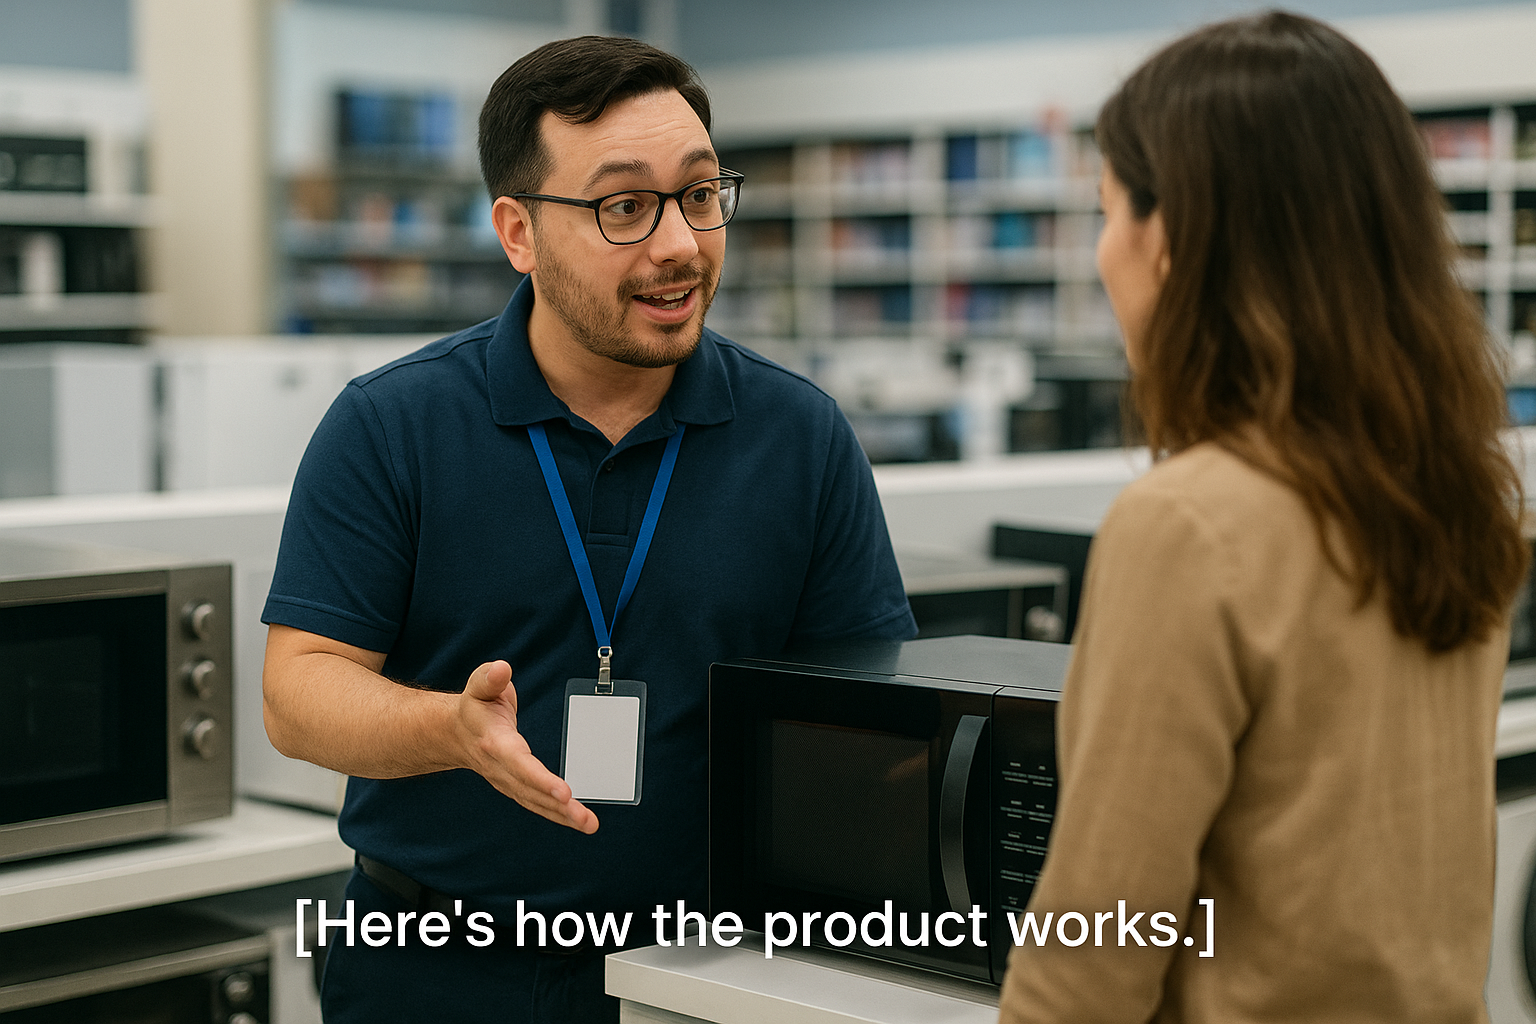
- Closed Captions for Spoken Audio: All public-facing videos must include closed captions for all spoken dialogue. Captions must be accurate, time-synced, and provided in the primary language of the intended audience.
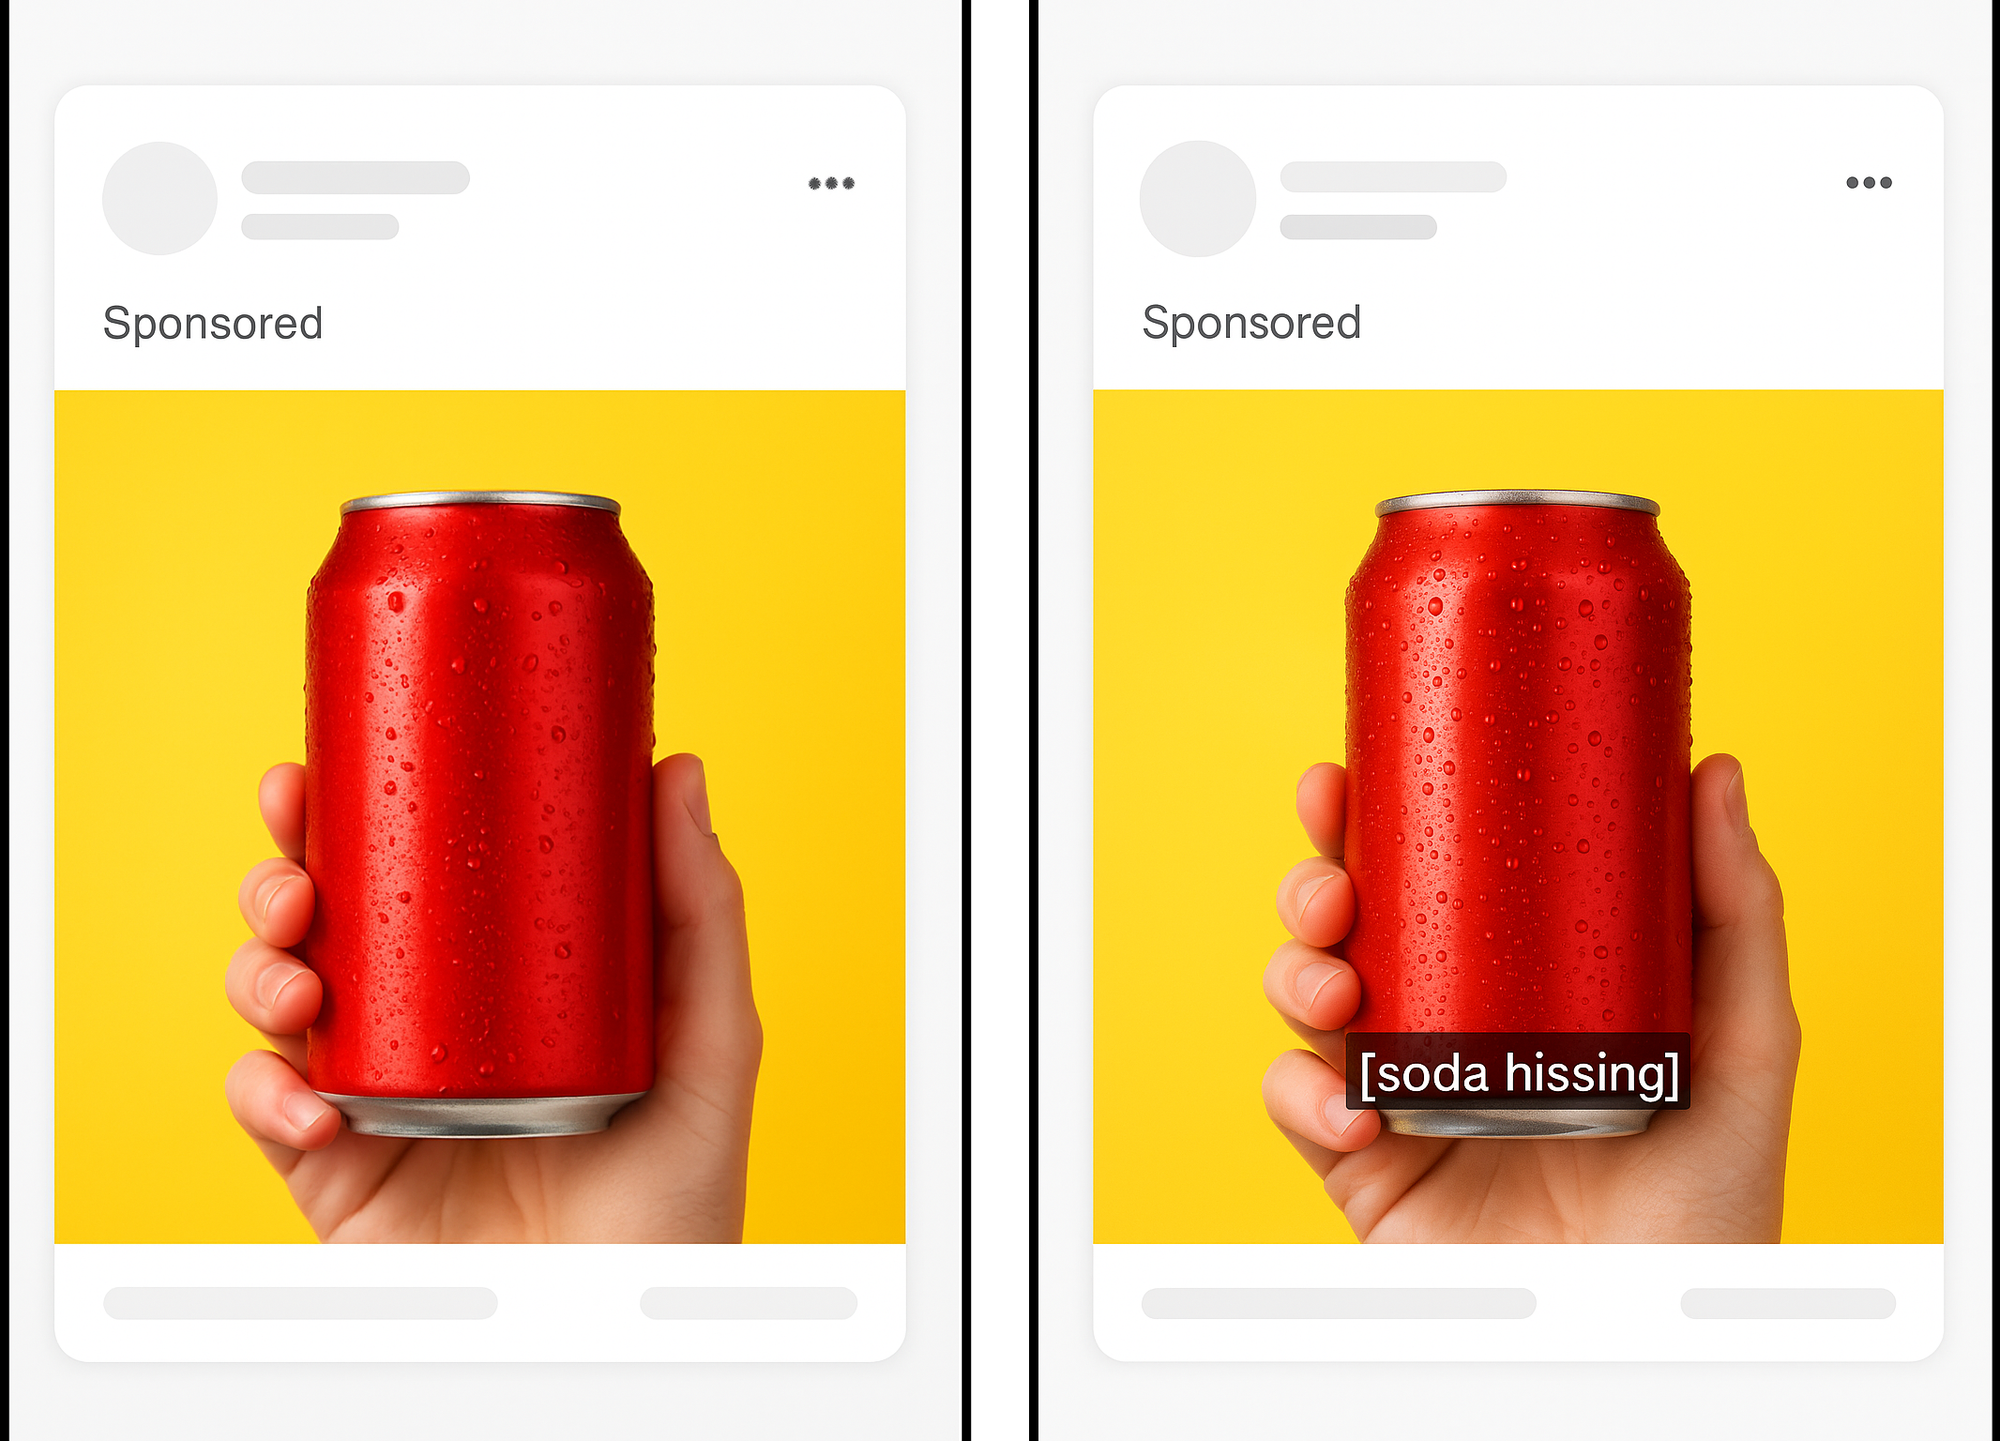
- Text for Non-Speech Audio: Closed captions must also include sound cues for significant audio elements such as music, sound effects, and ambient noises (e.g.,
[applause],[wind blowing]).
- User-Controlled Captions: The EAA specifically requires user-controlled captions, meaning viewers must be able to turn captions on/off as needed. Closed captions satisfy this by letting the user toggle them via the video player, whereas open captions (burned-in text) cannot be turned off.
- Legible Styling: Captions must use a clear, readable font with sufficient size and contrast. They should be placed in a consistent location on screen, typically at the bottom, without obscuring important visuals.

Sometimes Required (Depending on Content Type or Audience)
- Audio Description For Visuals: If important information is shown visually (characters doing something important, on-screen text, scene changes) but not spoken, you may need to add an audio description – a spoken narration of those details. This can be a separate audio track or built into the video’s narration.

- Multiple Language Captions: If you serve viewers in different languages or countries, providing captions in each relevant language will make your content accessible to all. The EAA requires accessibility in the language of the content/audience, so ensure that for every language you publish a video in, captions are available in that language. For instance, a French-subtitled version for a French audience, if your video targets them.
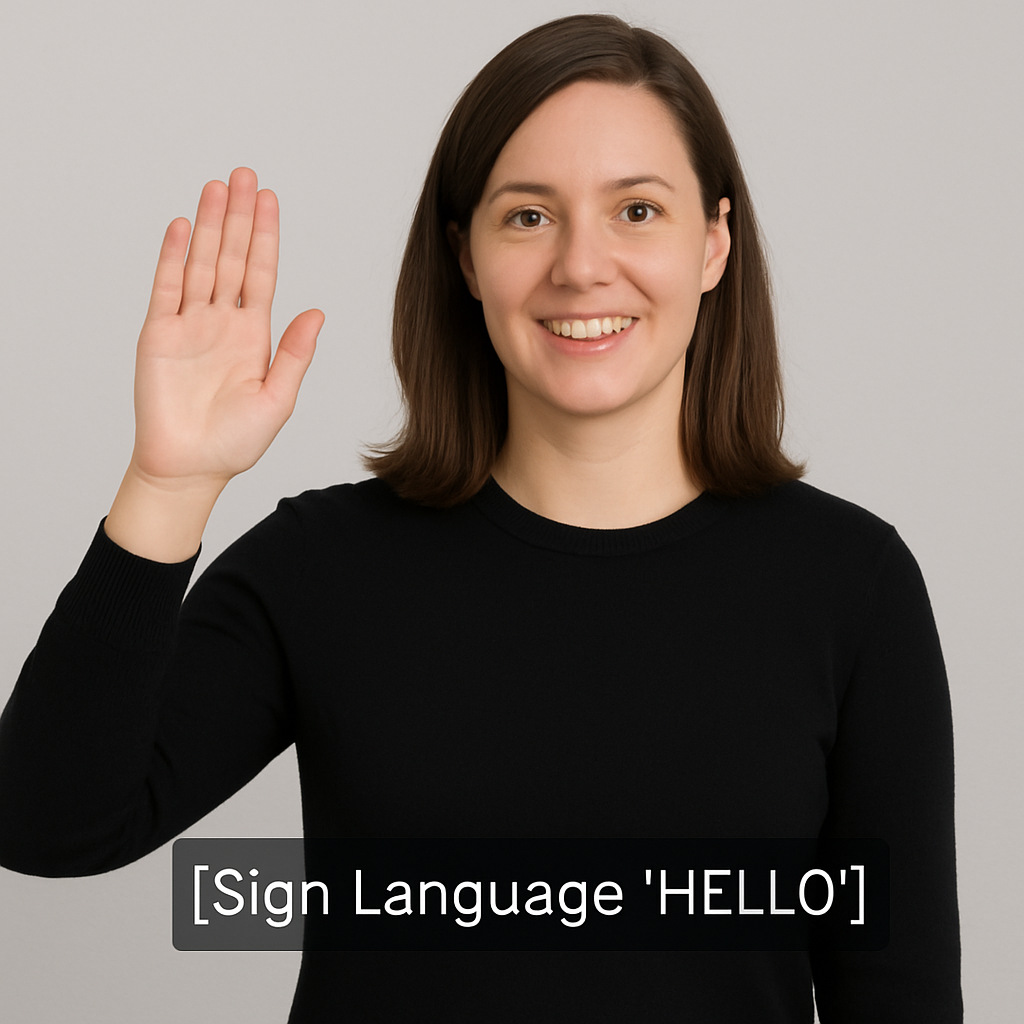
- Sign Language Interpretation: In some cases – for example, an educational video or a public service announcement aimed at the Deaf community – providing a sign language interpreter on-screen is expected. If your target audience includes Deaf viewers who use sign language, or local laws for that type of content call for it, you’ll need to include a sign language interpretation.
- Live Streams/Webinars: If you host live video events (e.g., webinars, live streams) for the public in the EU, the EAA expects you to provide live captions as well. Many platforms offer live captioning features, or you can use a third-party service to caption your live audio in real time. While this article focuses on editing captions for recorded videos, be aware that live content has accessibility obligations, too.
- Transcripts: Besides captions, consider offering a text transcript of your video’s audio. This isn’t mandated by the EAA for videos with captions, but it can benefit users who need to read or search the content.
For more information about requirements, Kapwing put together a European Accessibility Act Compliance Checklist. It covers when closed captions are needed in full detail, alongside accessibility requirements for other content such as audio.
How to Get Closed Captions
Step 1: Auto-generate Captions
Fortunately, creating Closed Captions is quick, easy, and cost-effective.
To start, import your video into Kapwing Editor. If you’re creating content from scratch, you can upload it directly from your computer or mobile device. Otherwise, you can import existing videos by copying and pasting published links from sites such as YouTube.
Import your video by uploading or linking.
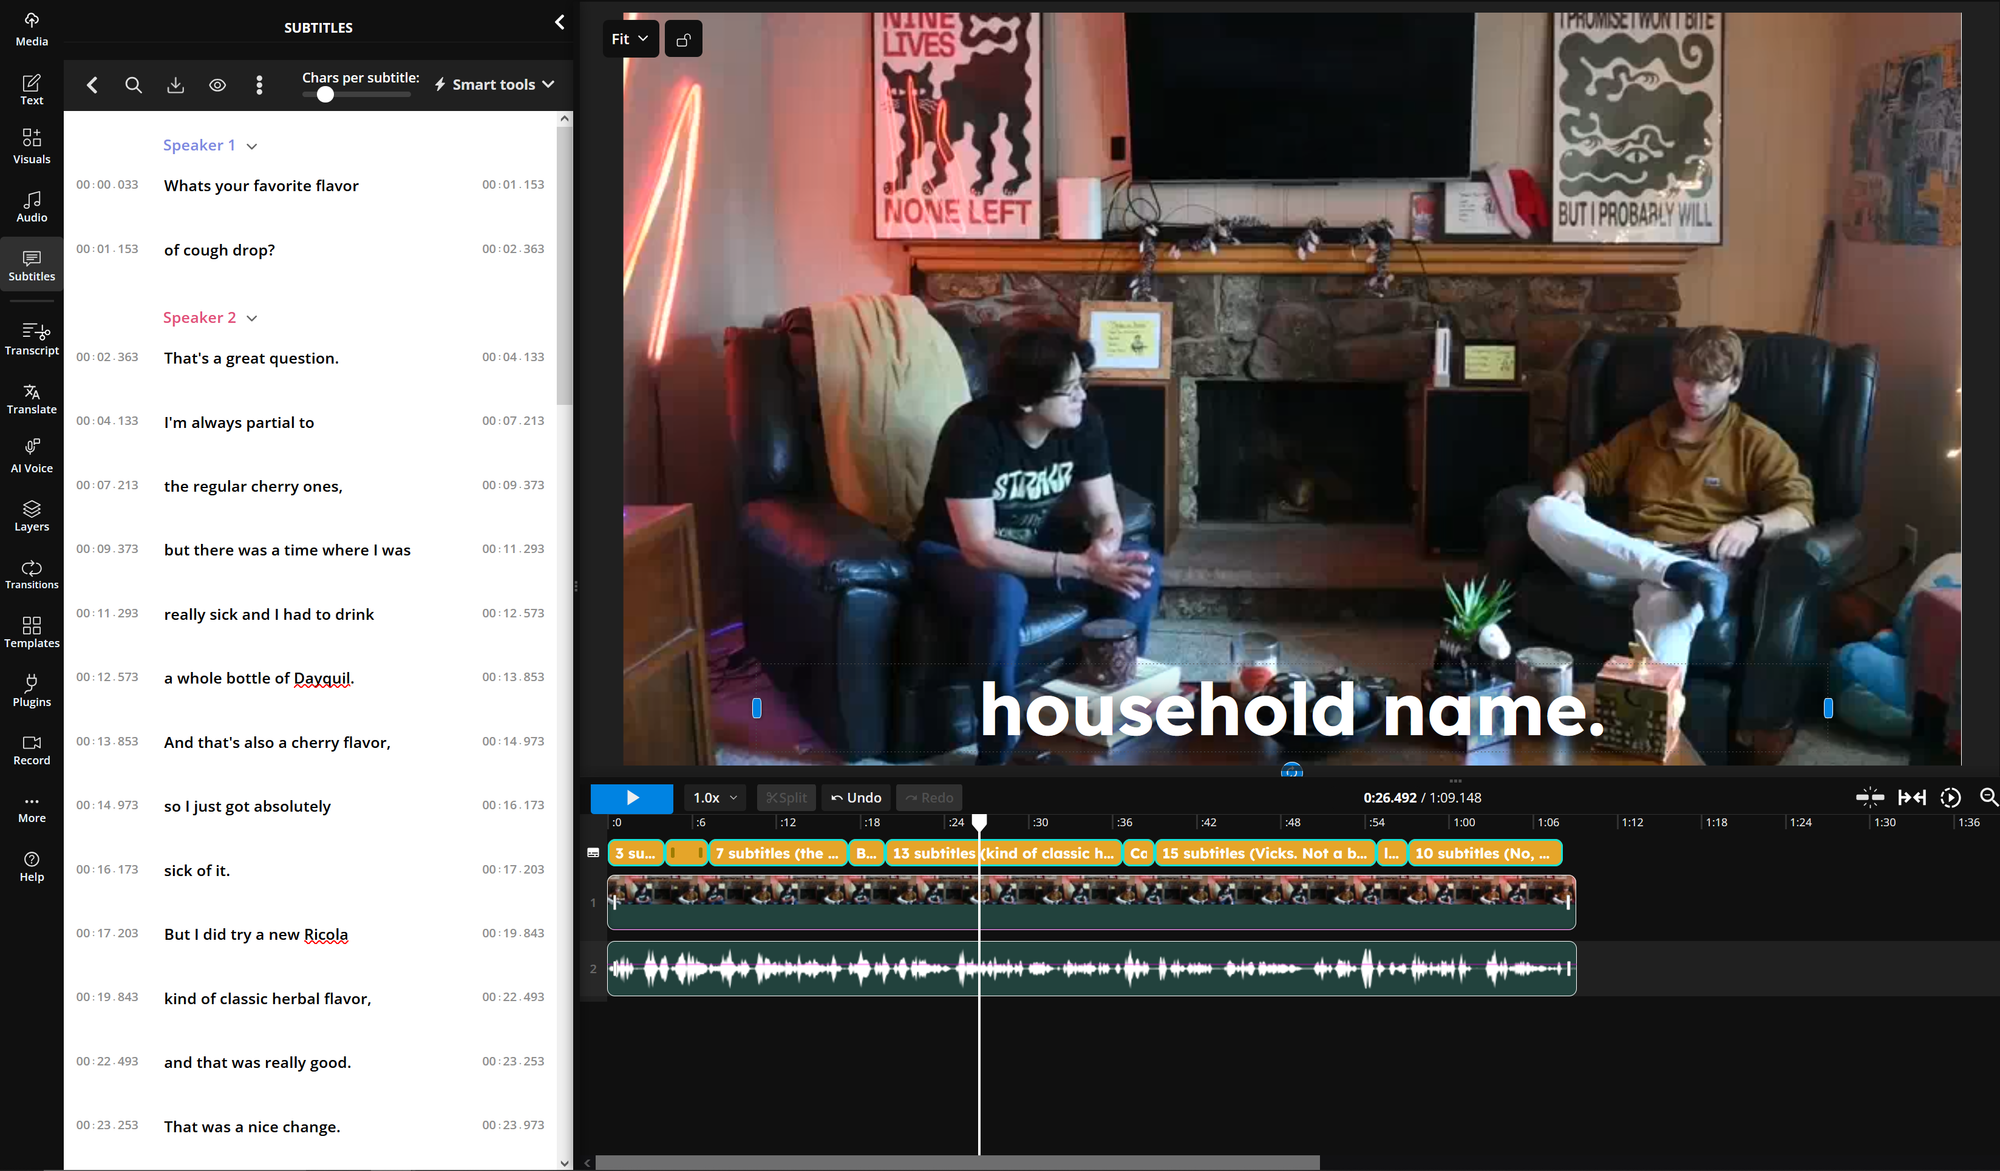
Then, open the Subtitles menu in the left-hand sidebar and select Auto Subtitles.
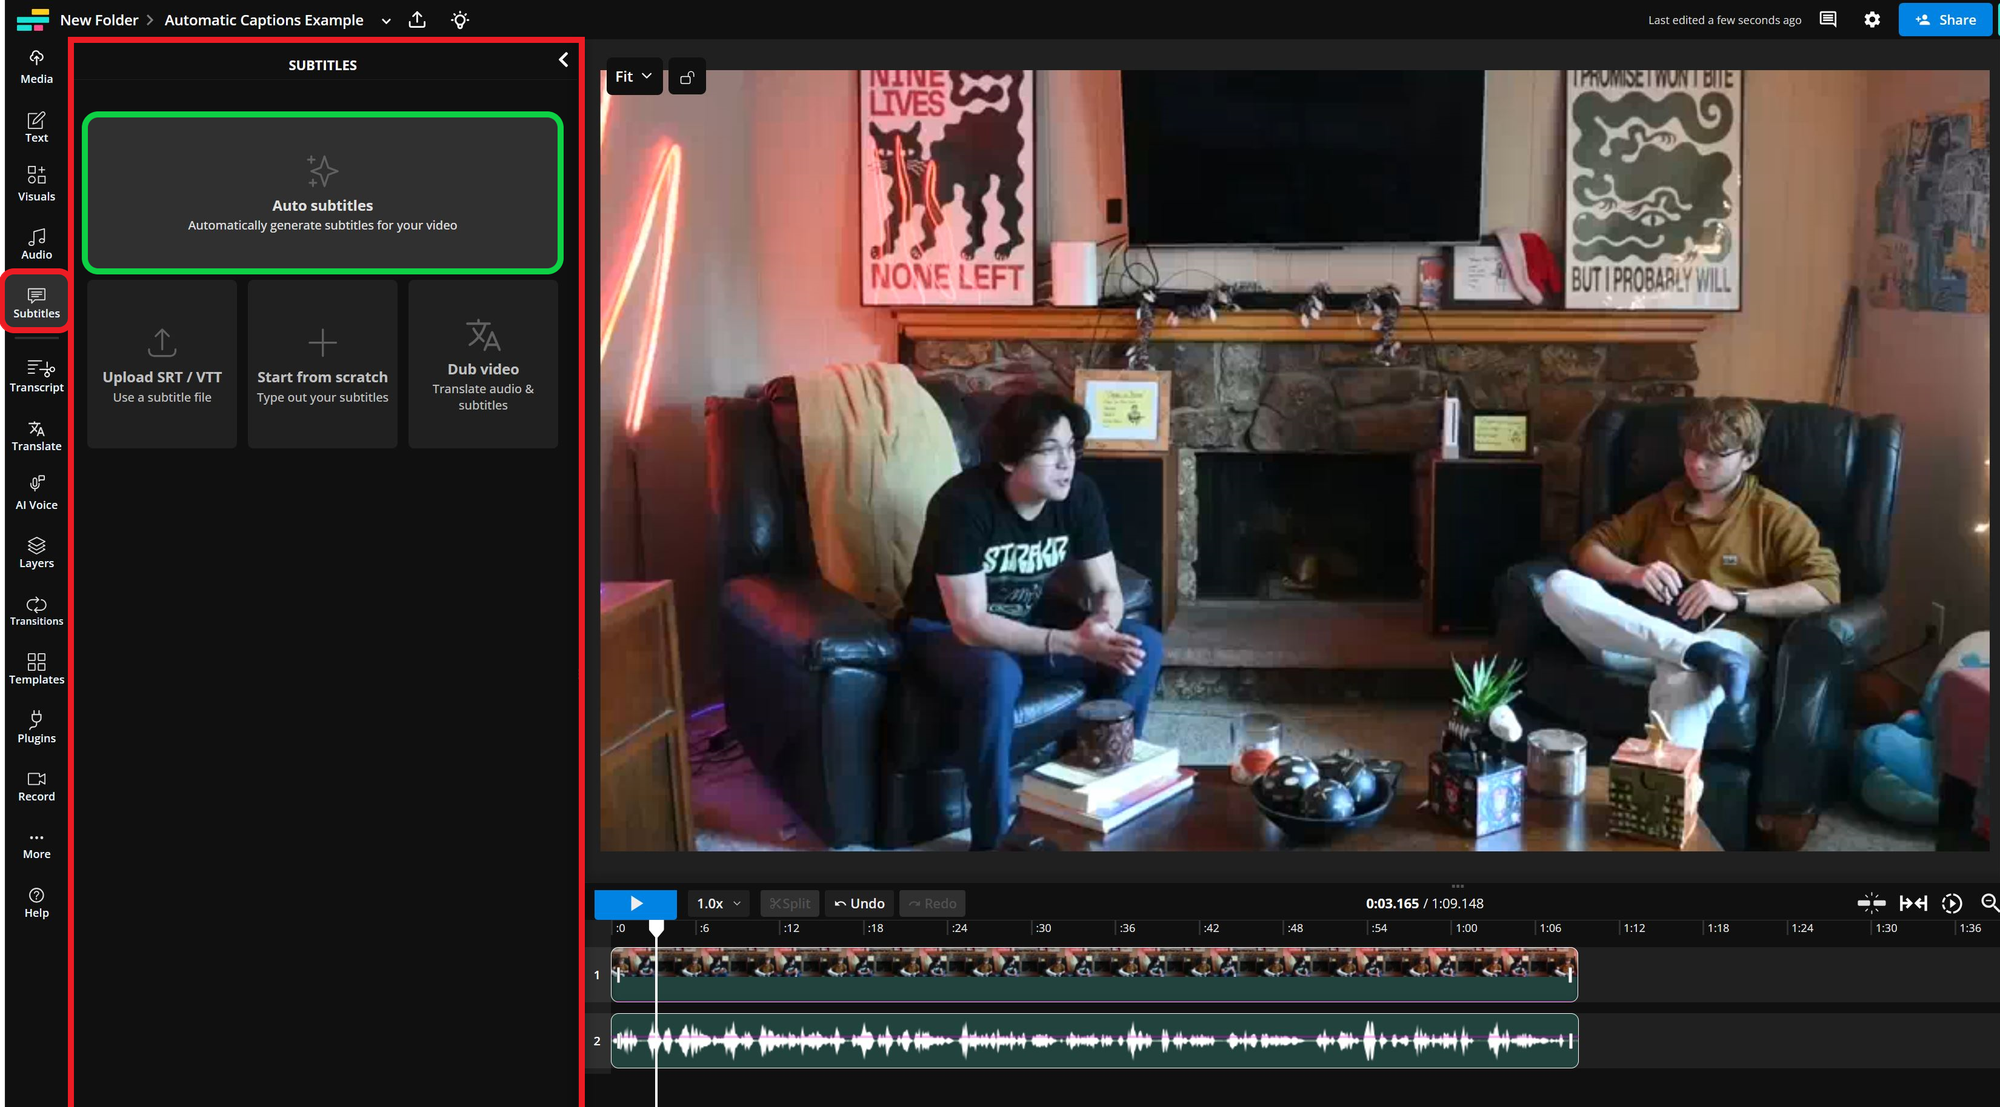
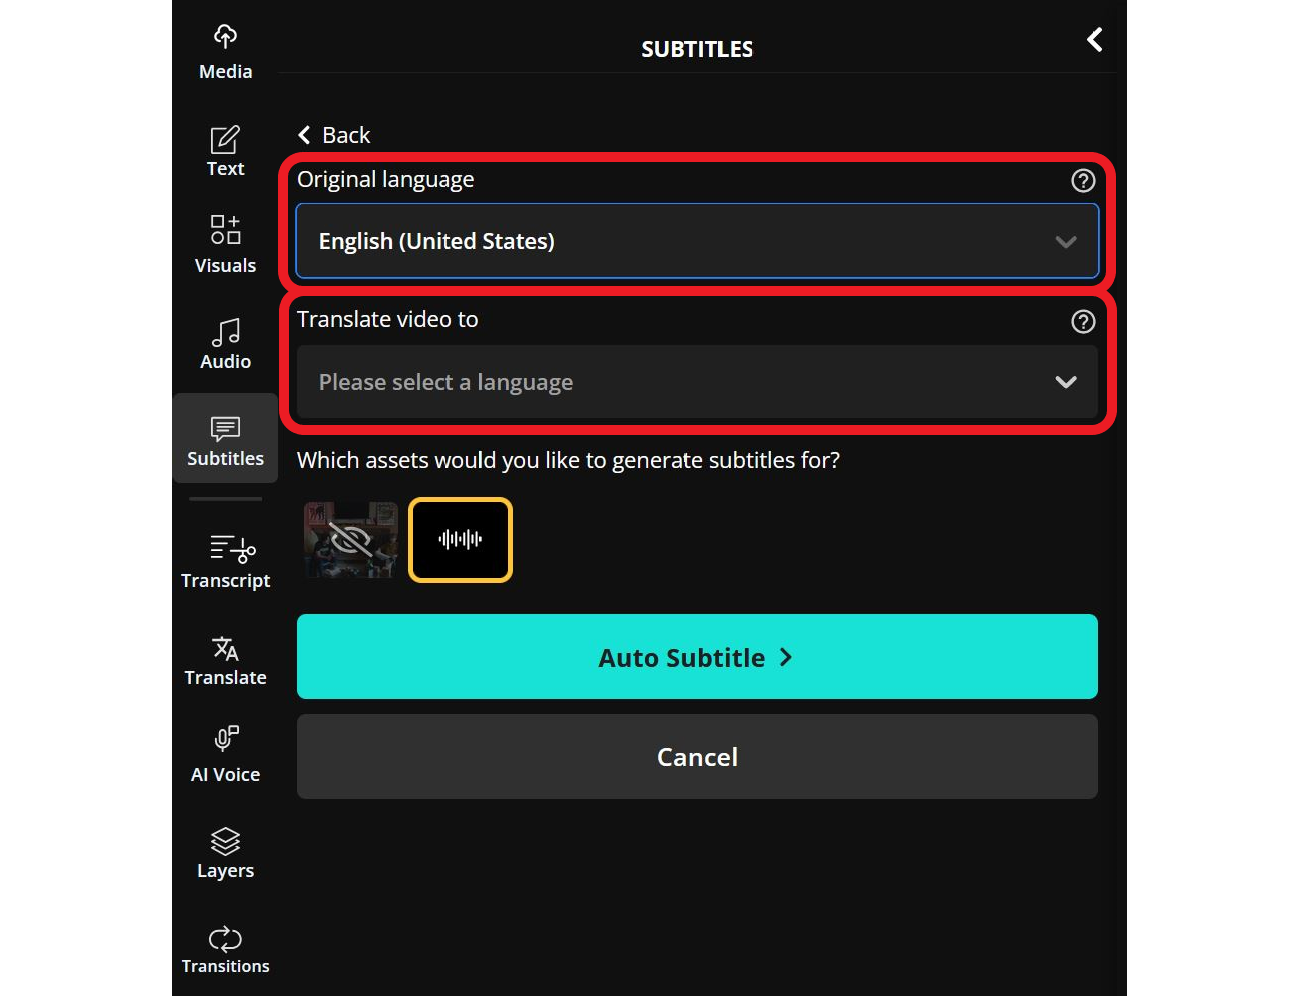
From there, confirm the target language of your subtitles to begin generating.
If you need to generate translated subtitles, you can select a translation language at this stage as well.
In either case, click the Auto Subtitle button to start generating captions.
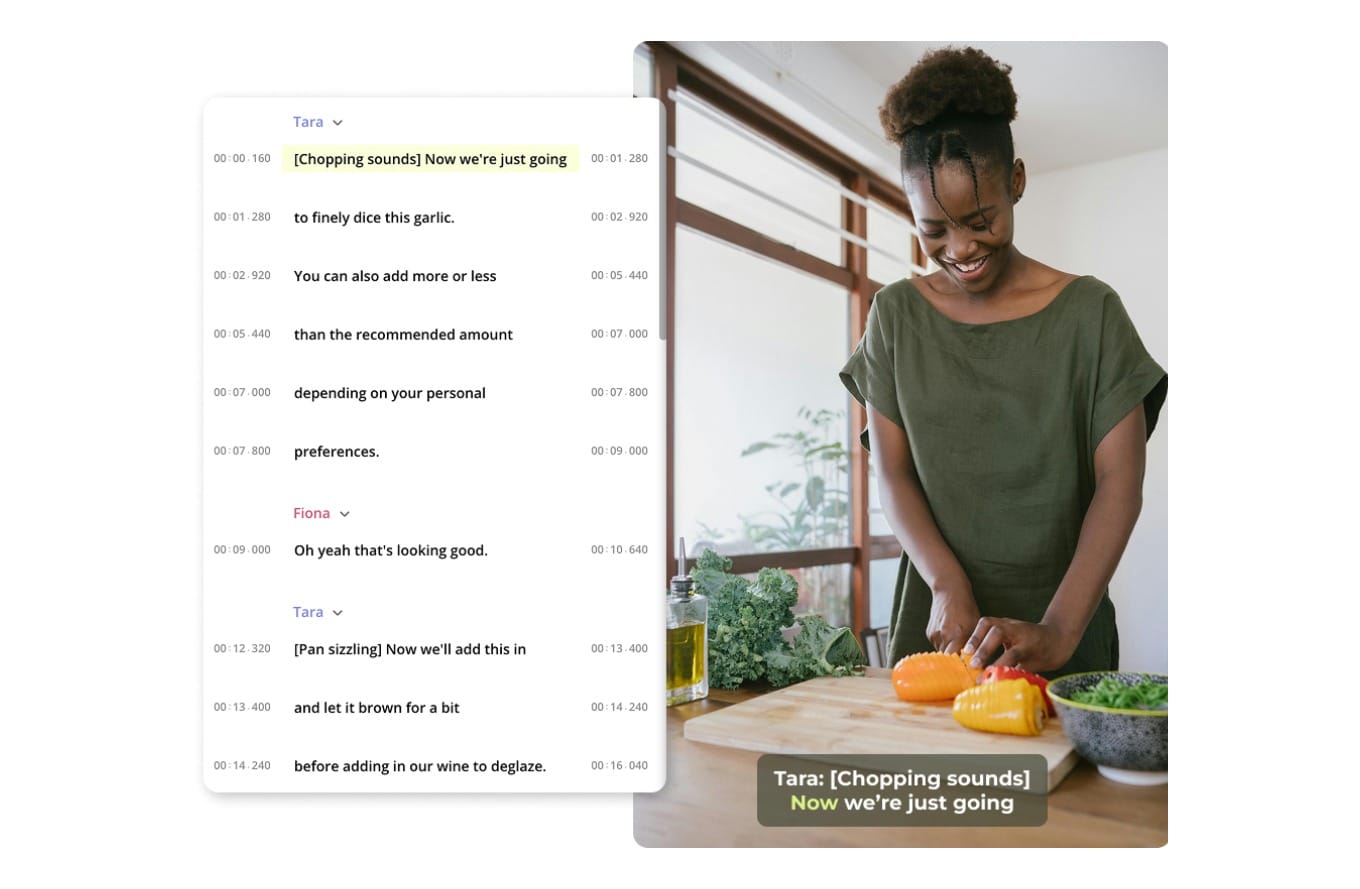
Once generated, your video captions will automatically appear synced with your audio. They will also feature speaker diarization, meaning captions from each individual speaker will be grouped together.
EAA standards expect captions to convey who is speaking, not just the words. Therefore, you must include speaker names in the captions whenever whose talking isn’t obvious visually.
At this point, your first priority should be reviewing your captions to ensure accuracy. Here are some specific areas to pay attention to:
- Names and proper nouns: Watch for names of people, products, or brands.
- Areas with noise or interruptions: If two speakers talk over each other, their captions may need correction. External noise can also interfere and should ideally be cleaned before captioning.
- Caption length: You may find that individual captions need adjusting to better match the speaker’s cadence or to optimize display for smaller screens. The Characters per subtitle slider allows you to quickly control this.

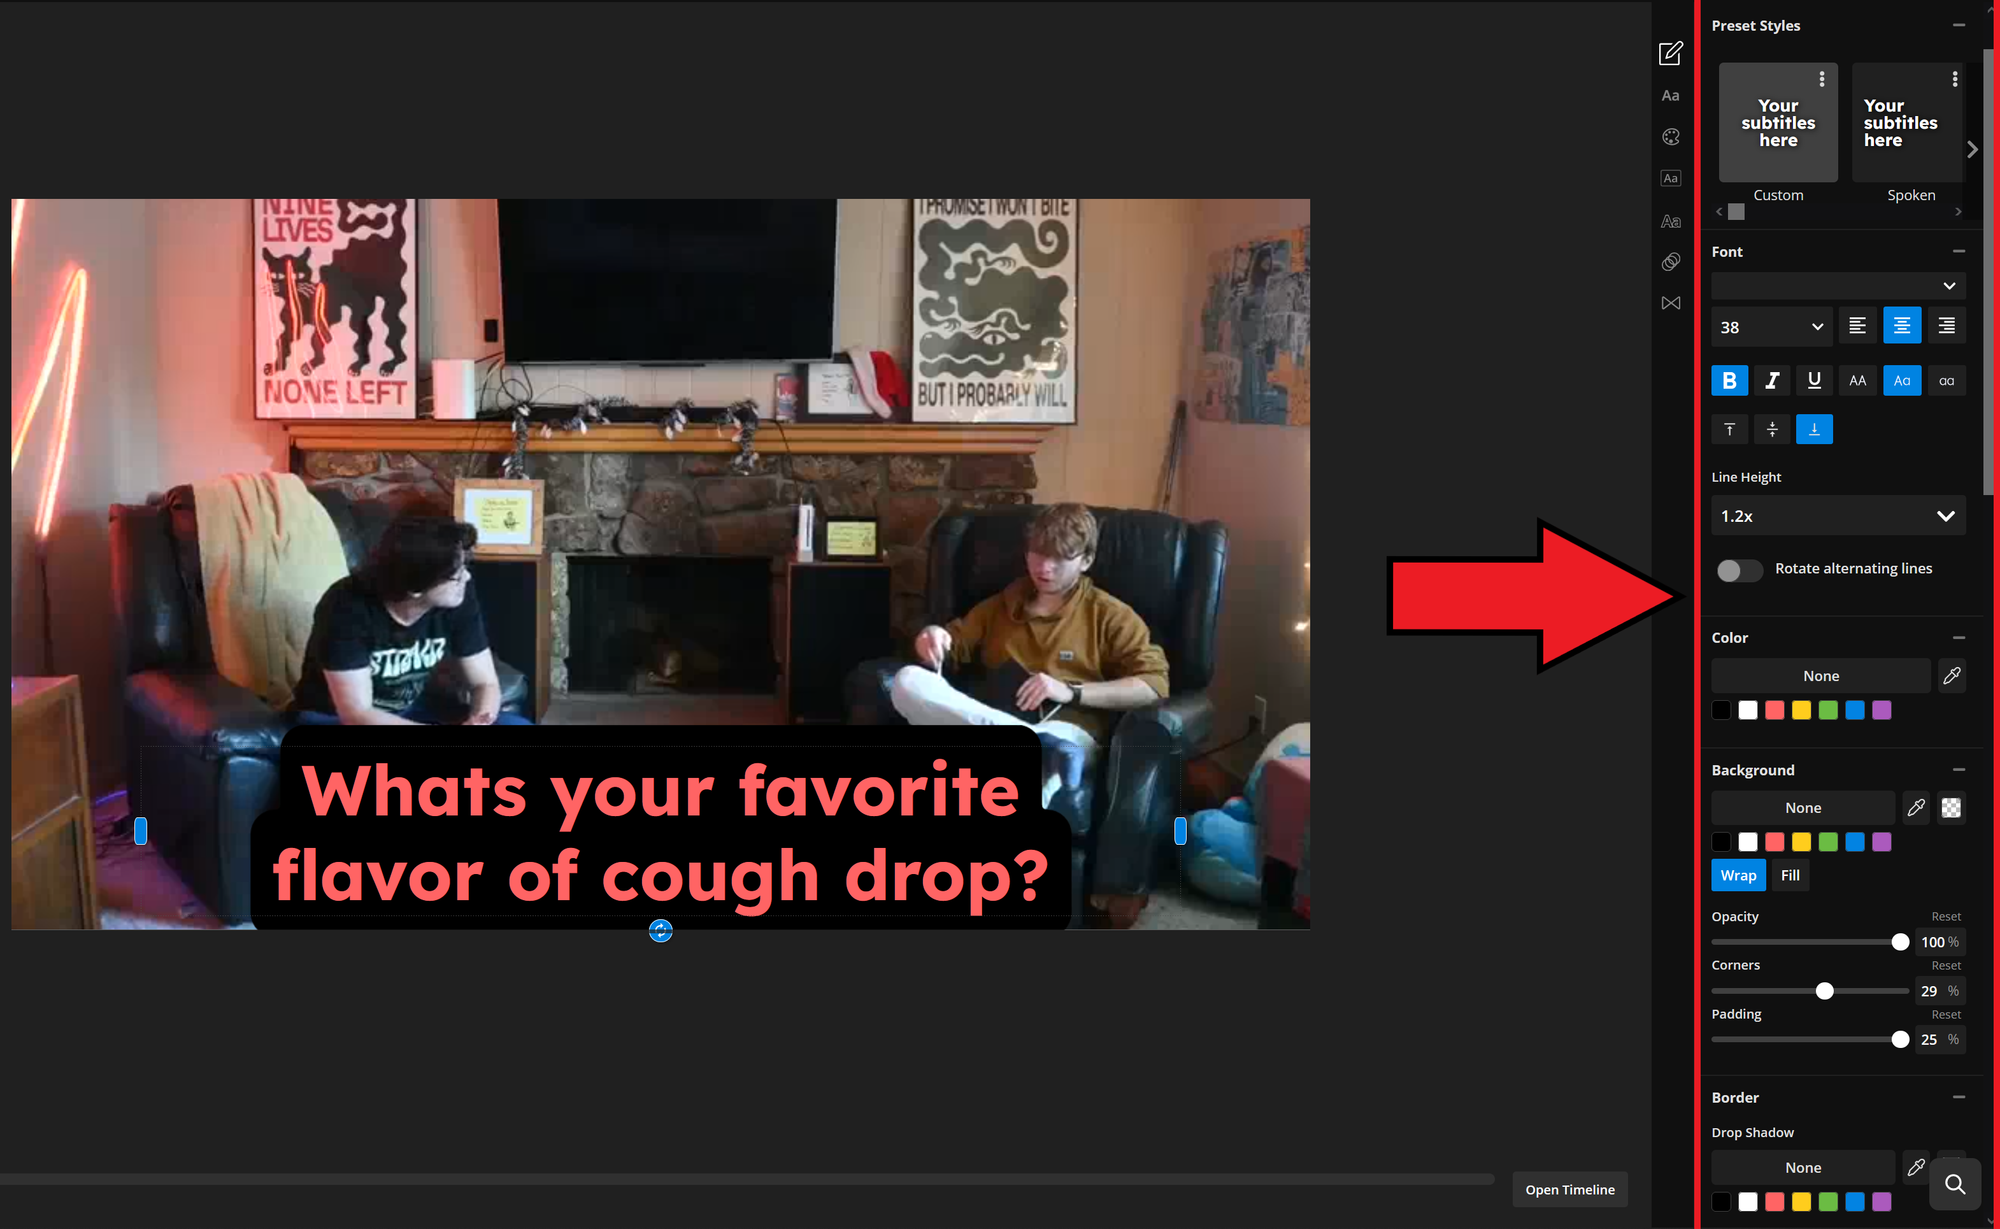
Beyond that, you can style your subtitles to improve clarity and maintain brand consistency using the editing tools on the right-hand side.
Step 2: Apply Speaker Names
After generating your automatic video captions, there are a few important adjustments you’ll need to make to ensure full compliance.
First, make sure that your speakers are named.
To do this, select the “Speaker 1” dropdown within the video transcript and click the pencil icon to edit. Any changes to the speaker's name will automatically update throughout the entire transcript. Repeat this step for each speaker featured in your video.
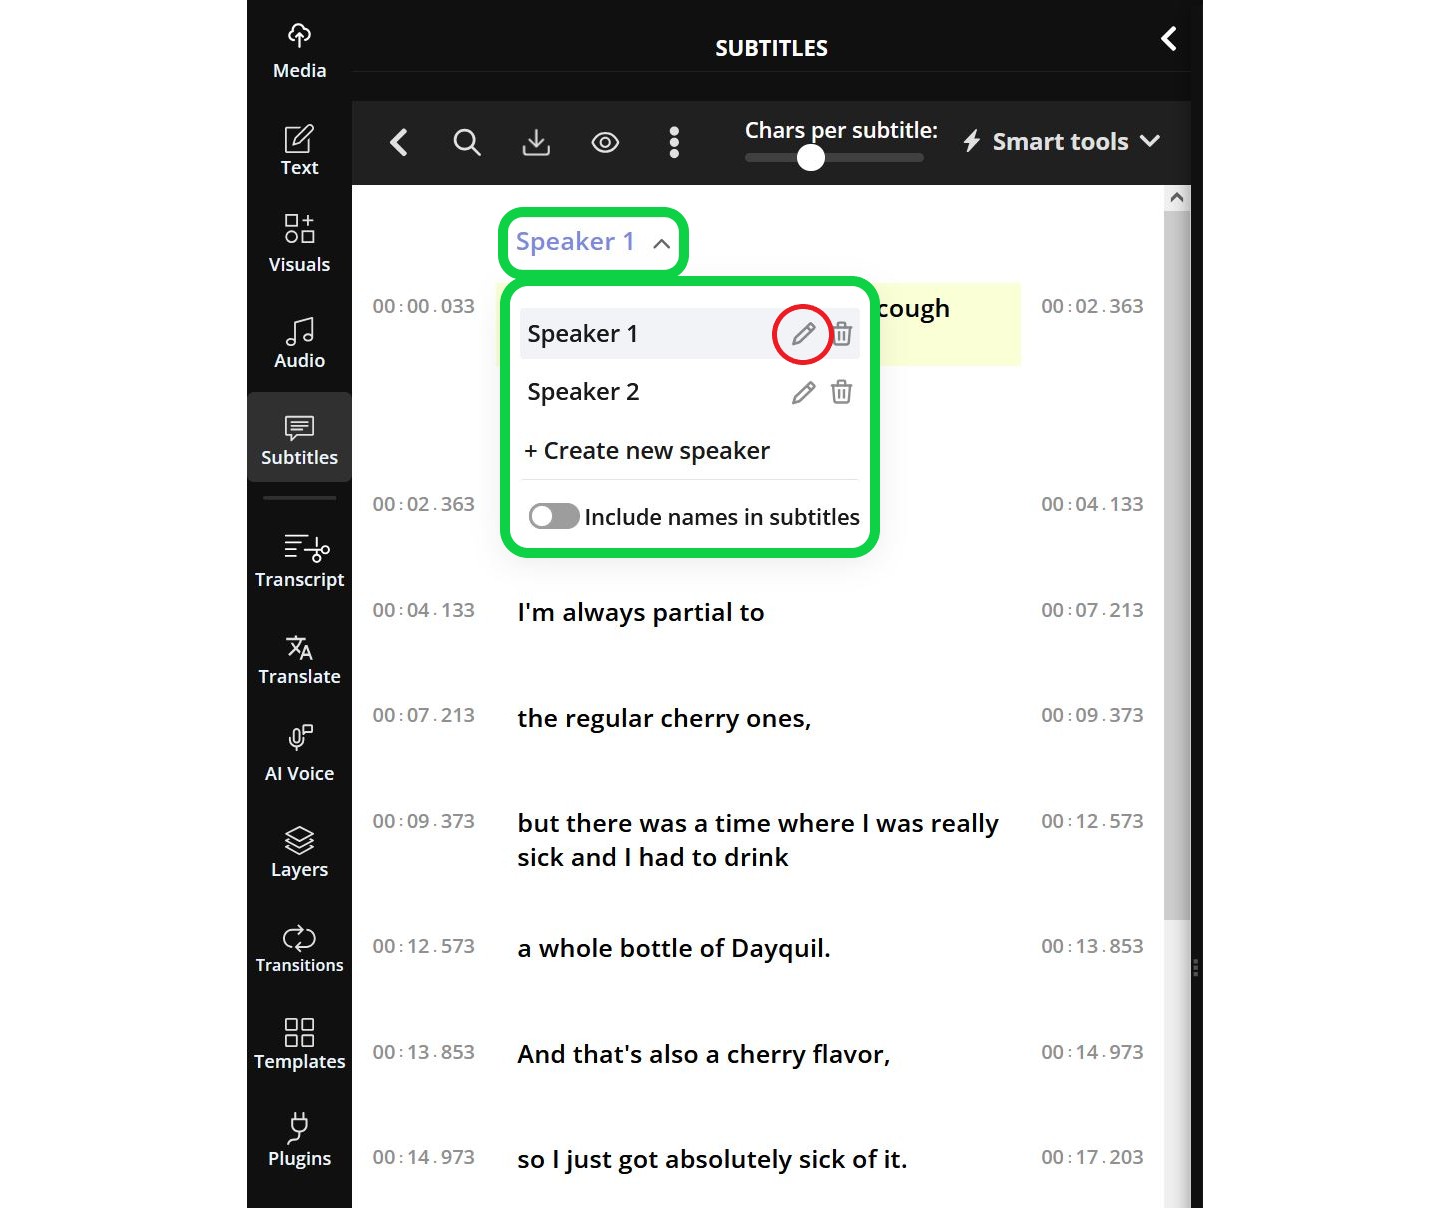
Once all speaker names are correctly labeled, be sure to toggle on Include names in subtitles. This will display each speaker’s name within the captions.
The final result should look like this.
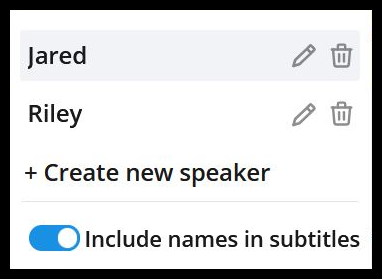
With this change, each time a new speaker begins talking, their name will appear at the beginning of their caption. This helps viewers, especially those relying solely on captions, stay aware of speaker changes, even when the speaker is not visible on screen.
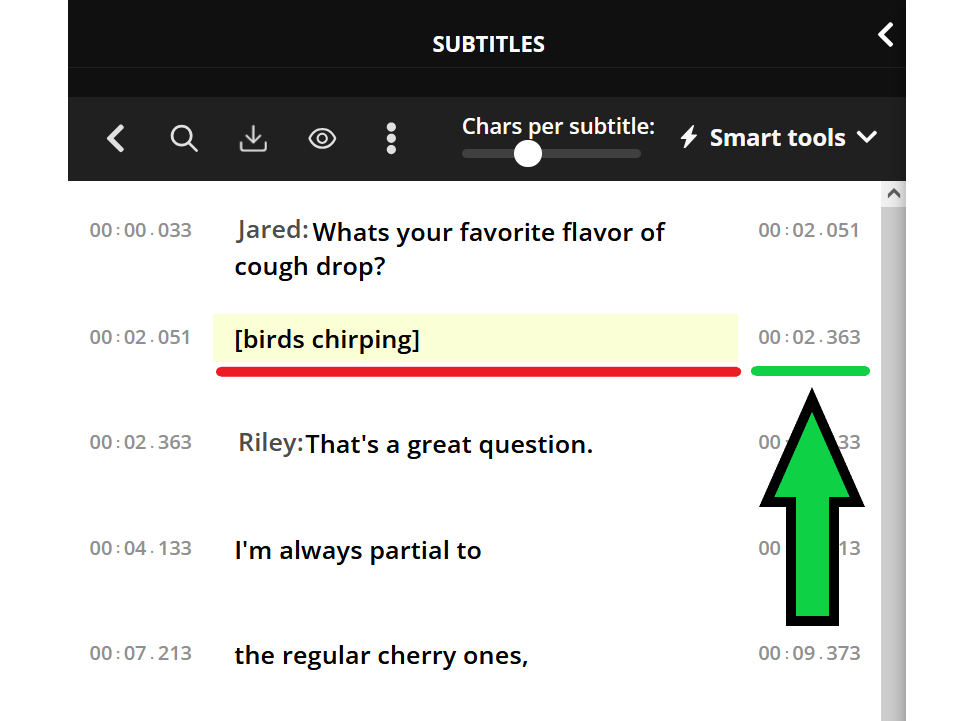
Step 3: Add Audio Cues
The second key step to creating closed captions is adding audio cues. While it’s not necessary to caption every single background noise, you should include cues for all meaningful sounds that impact context or comprehension.
When adding audio cues, follow these basic formatting rules:
- Use square brackets: Sound effects should appear in brackets like
[applause],[door slams], or[laughter]. - Be specific: Use clear and descriptive labels like
[phone ringing]or[dramatic music]instead of vague terms like[sound]or[music]. - Use lowercase (unless it’s a proper noun): For example, use
[thunder]instead of[Thunder].
To add an audio cue, hover over the part of the transcript where the sound occurs and click the Add Line button.
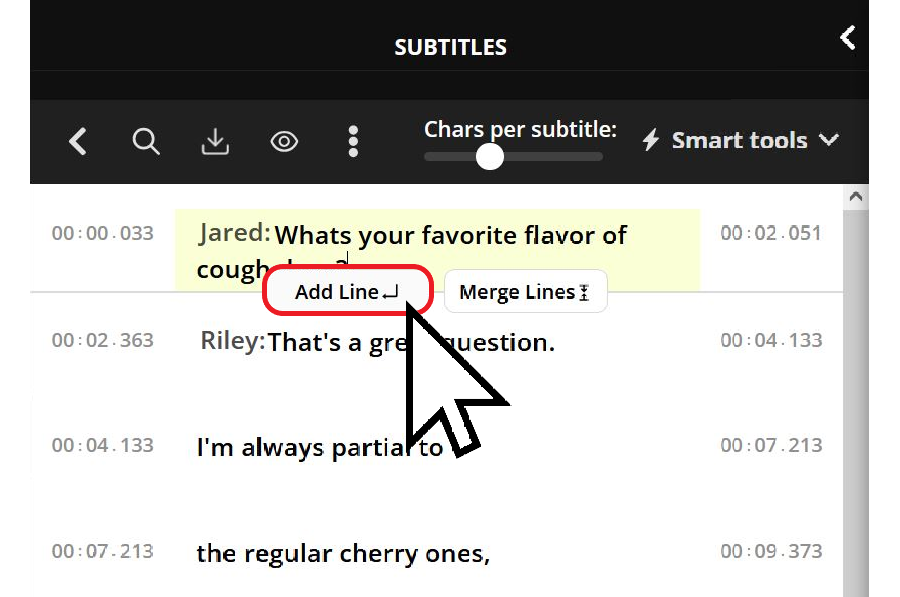
Then, enter your audio caption and use the time indicators to adjust when it appears on screen.
The left indicator controls the start time, and the right controls the end time.
Once these adjustments are complete, your captions will likely meet EAA compliance standards. At that point, you can proceed to export your captions as a transcript or caption file.
Step 4: Download Closed Captions
Any subtitles you’ve created and edited will be available for download in multiple file formats.
To access them, open the Subtitles menu and click the download icon at the top of the visual subtitles transcript. Then, choose your preferred file type to begin downloading.
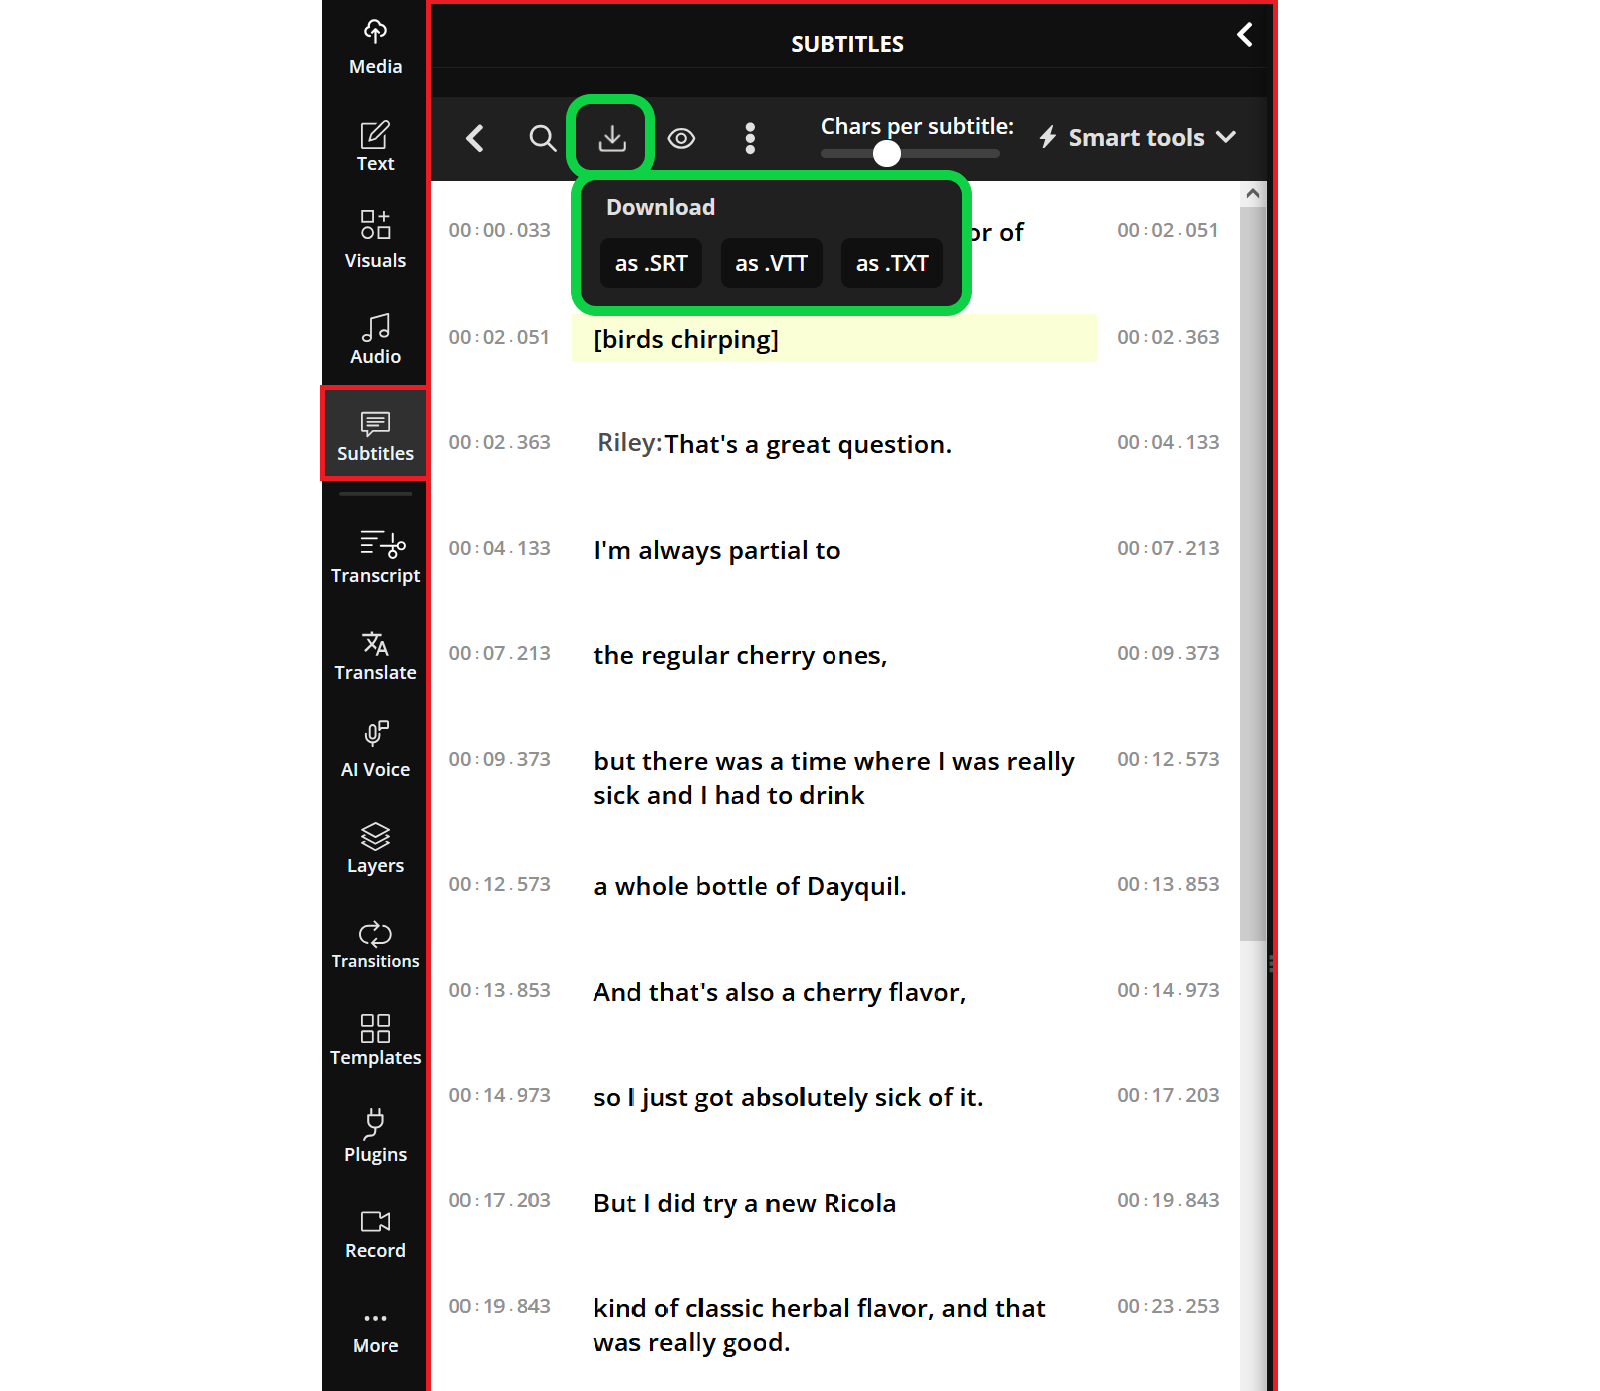
While several formats are available, it’s generally recommended to use either SRT or VTT files for most video platforms. Here’s a quick overview of each option:
- SRT: Time-stamped subtitle file used for closed captions on most major video platforms.
- VTT: Web-friendly caption format that supports styling like color and positioning.
- TXT: Plain text transcript without timestamps, best for SEO or screen readers.
Once downloaded, your caption file is ready to be uploaded to your video hosting site.
This ensures accurate closed captions are included with your video content and helps align your content with the new EAA standards.