Create AI Images That Look Like Selfies With a Celebrity (2025 Trend)
Top videos using this trend have already pulled in nearly 2 million views.

Ever wish you could say you’ve met all your favorite celebrities? Thanks to the viral AI celebrity selfie trend, now you can.
Using Sora, OpenAI’s video model, creators are generating photorealistic images that look like spontaneous encounters with A-list celebrities. These aren’t the polished red carpet shots that we’re used to. Instead, they convincingly resemble casual iPhone selfies with a harsh flash, off-center framing, and unposed expressions mid-blink.
Naturally, I had to try it. I spent six hours testing the trend by crafting image prompts, uploading photos, and asking Sora to generate my dream celebrity encounters.
While I ran into some generation issues that make the trend far more time-consuming than some of those 30-second TikTok tutorials suggest, with the right strategies and a bit of trial and error, the “caught-on-camera” selfie style is definitely achievable.
This article will walk you through how to create images that look like selfies with celebrities, with must-know tips to get as close to that photorealistic look.
Table of Contents
- Step 1: Navigating Sora
- Step 2: Enter your prompt
- Step 3: Add your reference images
- Step 4: Generating and Remixing
- Step 5: Editing Your Image
- Bonus Tips for Best Results
Step 1: Navigating Sora
Sora is OpenAI’s image and video generation model, designed to transform text prompts into photorealistic visuals. It’s at the core of the recent AI celebrity selfie trend, where users generate lifelike snapshots of themselves in imagined encounters with celebrities
You can use Sora for free, but free-tier users are limited to 12 image generations per day, which resets every 24 hours. If you subscribe to ChatGPT Plus, you get unlimited image generations and priority access.
There are two main ways to access Sora:
- Direct link: Visit sora.chatgpt.com from any browser, log into your OpenAI account, and start generating.
- Via ChatGPT: You can click “Sora” in the left-hand toolbar within ChatGPT.
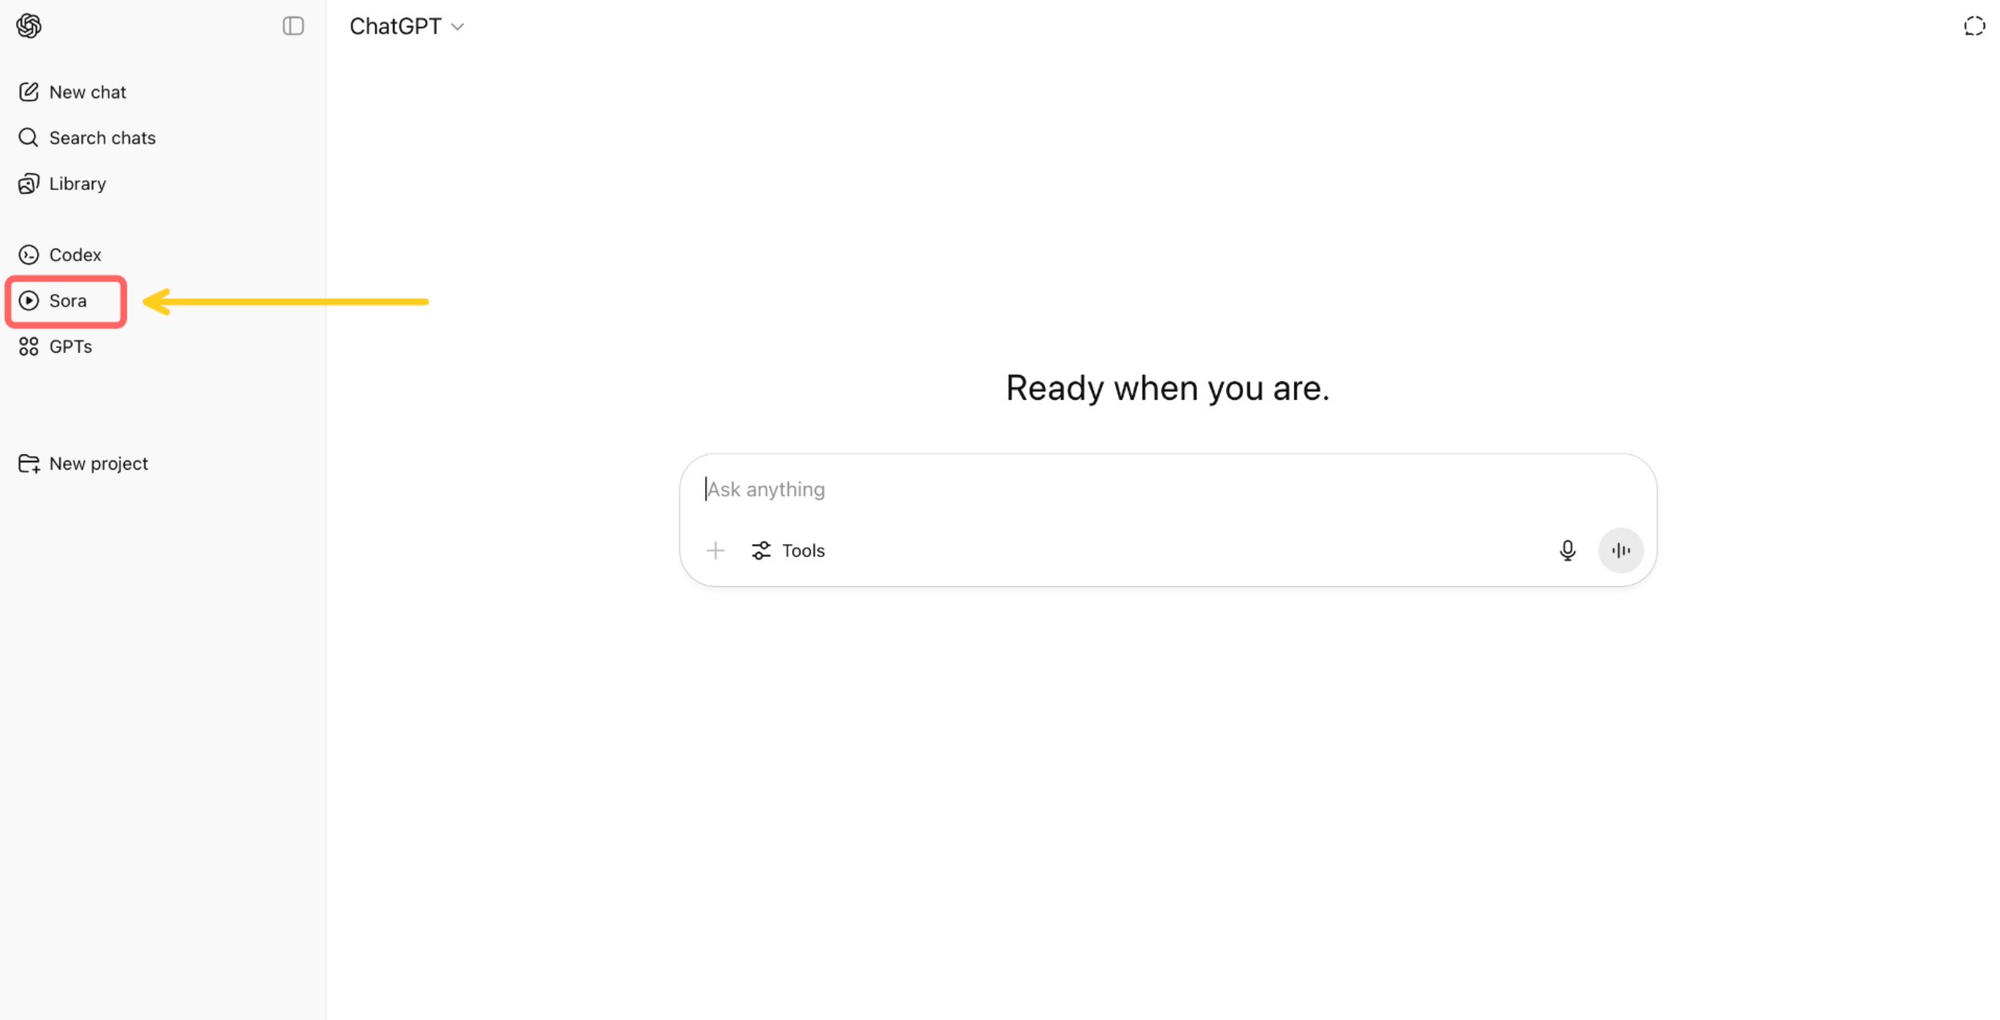
Once inside Sora, you’ll land on the Explore tab, where you can browse images created by other users.
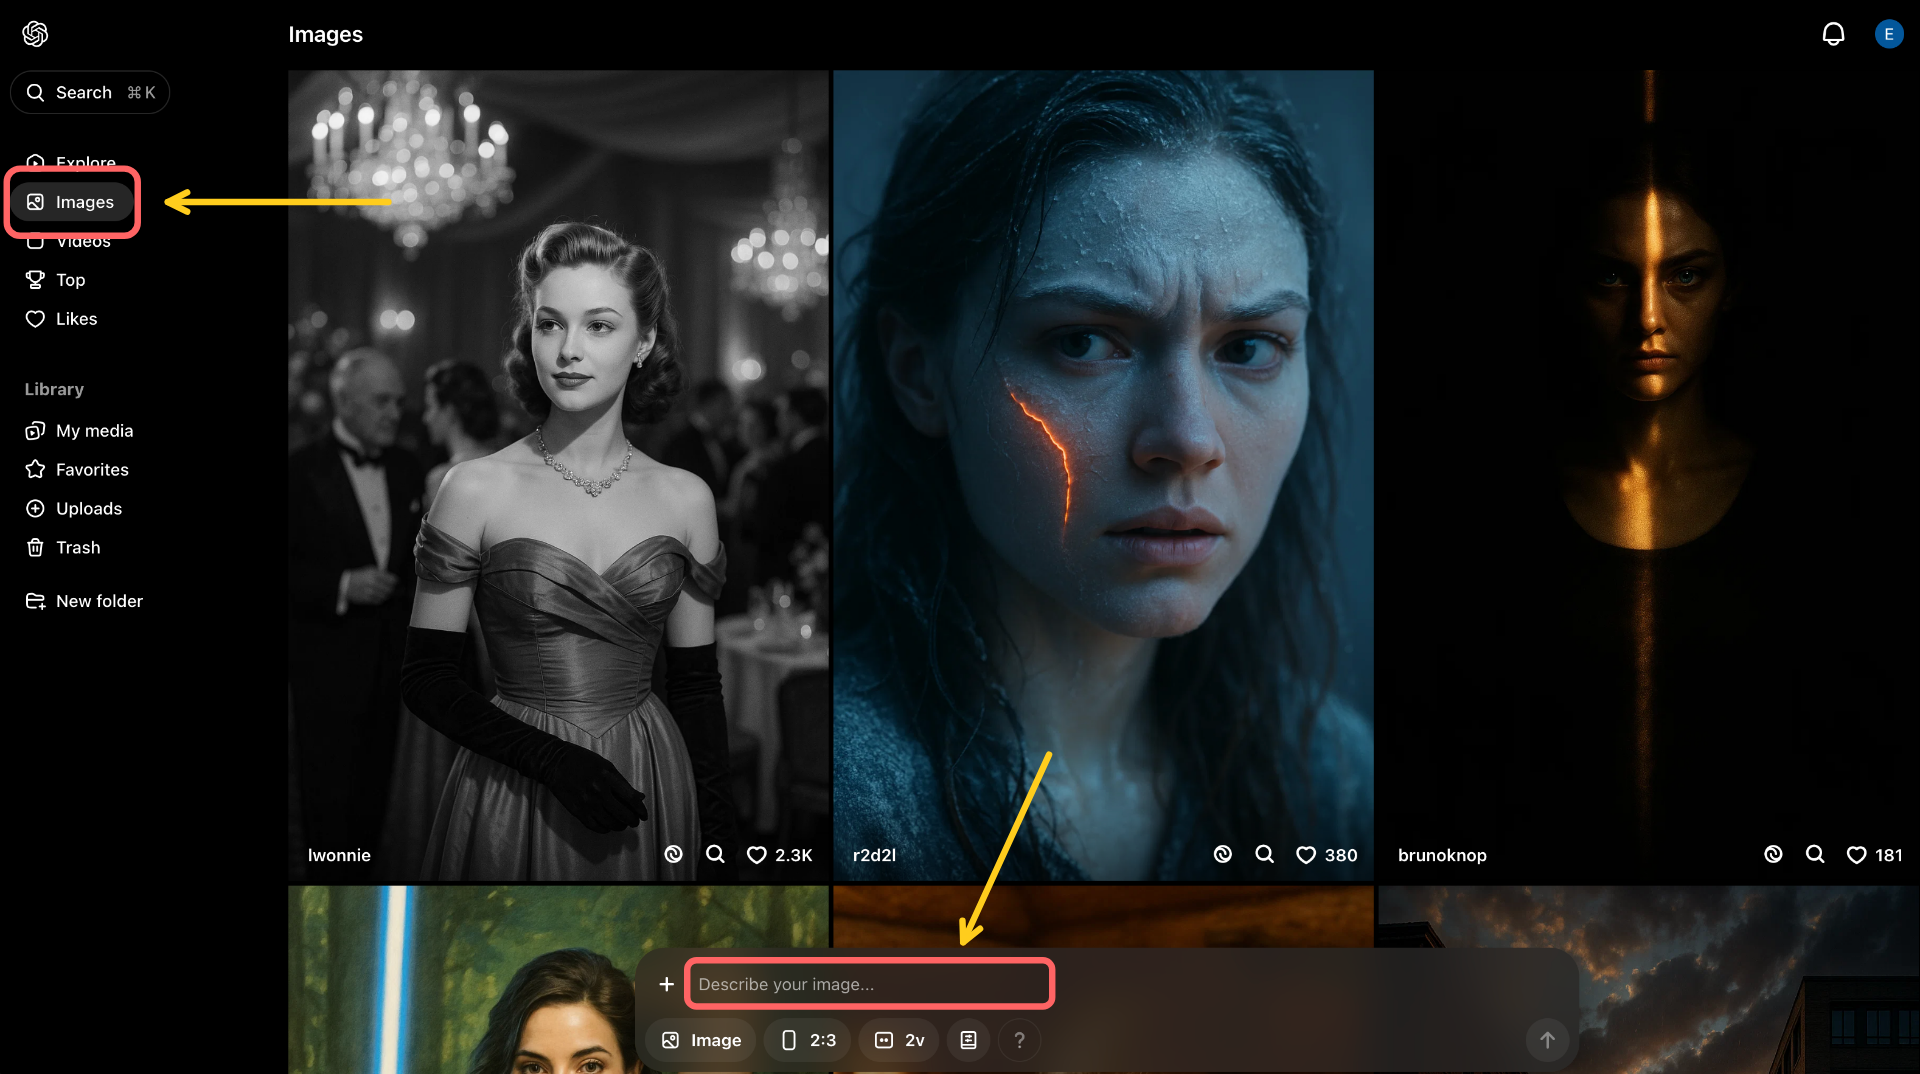
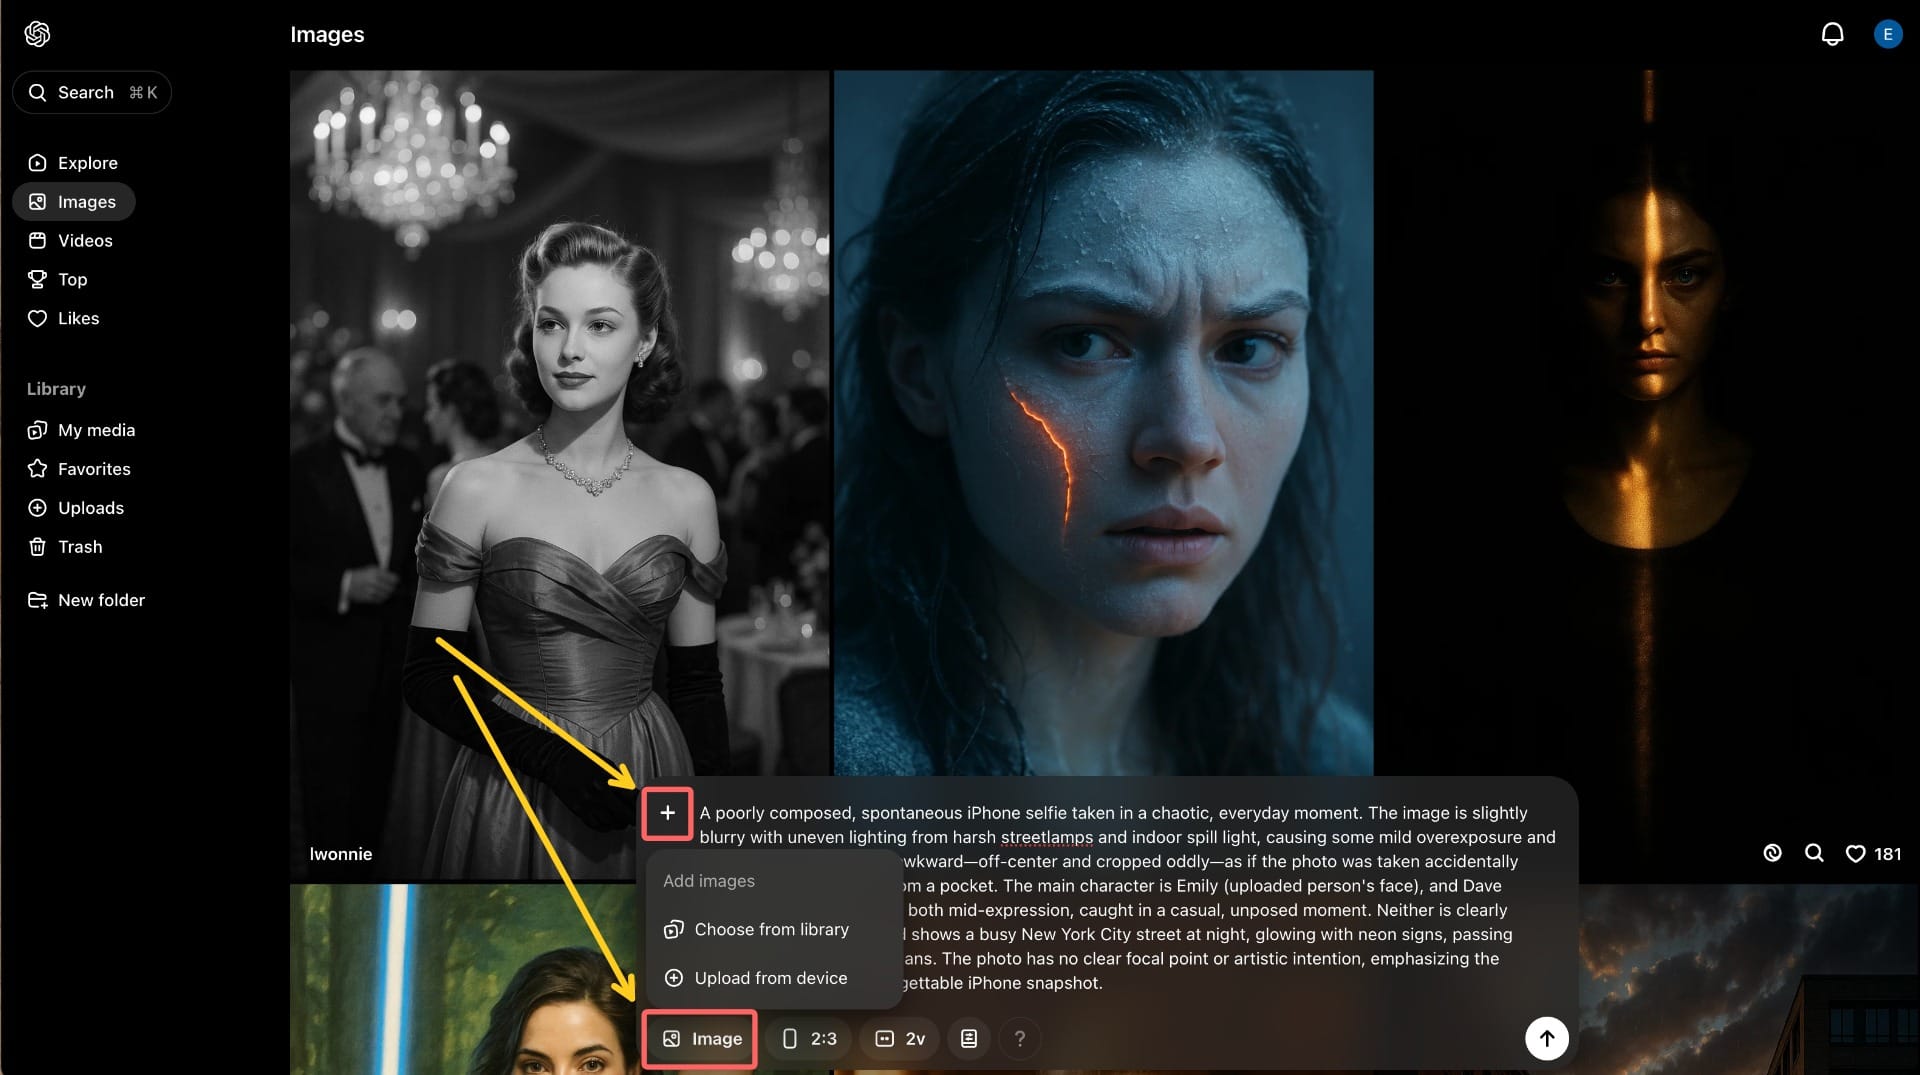
To start making your own, click the Images tab on the left. At the bottom, you’ll see a chat box.
This is where you enter prompts and upload reference images to guide the model’s output.

Step 2: Enter Your Prompt
Start by typing your prompt into the text box. In Sora, specificity is key: the more detail you include, the more control you have over the final image.
Clear, descriptive prompts help steer the model away from generic or uncanny outputs and toward something that feels realistic.
To refine my prompt, I used ChatGPT to help optimize the language and add in detail. This is a great tip if you’re unsure how to phrase certain elements or want to make a rough idea more descriptive and concrete. For example, I asked ChatGPT to improve my general idea for an image into a detailed prompt:
"I want to generate an AI selfie with a celebrity that looks casual and realistic, like a blurry iPhone photo. Can you help me write a detailed prompt for Sora that includes things like awkward angles, bad lighting, and a busy street background?"
ChatGPT then helped me expand that into a fully fleshed-out prompt that Sora could better interpret. From there, I added in some small details, like a specific location and dynamic between the two subjects.
Here is the final prompt that I used:
Take an extremely ordinary and unremarkable iPhone selfie, with no clear subject or sense of composition—just a quick accidental snapshot. The photo has slight motion blur and uneven lighting from streetlights or indoor lamps, causing mild overexposure in some areas. The angle is awkward and the framing is messy, giving the picture a deliberately mediocre feel, as if it was taken absentmindedly while pulling the phone from a pocket. The main character is [UPLOADED REFERENCE IMAGE], and [CELEBRITY] stands next to them, both caught in a casual, imperfect moment. They seem to be friendly and comfortable with each other. The background shows a lively Los Angeles street at night, with neon lights, traffic, and blurry figures passing by. The overall look is intentionally plain and random, capturing the authentic vibe of a poorly composed, spontaneous iPhone selfie.
You can directly copy and paste my sample prompt above for use.
Combine it with your own reference image (step 3 below) and add the name of your chosen celebrity where the prompt says [CELEBRITY]. Alternatively, you can edit this prompt to customize the setting, tone, or dynamic between the characters.
Step 3: Add Your Reference Images
Next, you’ll upload your reference image. A reference image is a photo that helps Sora understand who or what should appear as the subject in the generated image. It will use this to guide the facial structure, posture, and visual likeness in the output.
You can upload your image by either clicking the “+” icon or the “Image” button in the chat box. This will give you the option to select a file from your library (images you've previously generated or uploaded) or upload directly from your computer.
You don’t typically need to upload a reference image of the celebrity. Sora can usually generate a generic likeness based on the name alone. However, if you're aiming for a specific version of a celebrity (for example, Heath Ledger in his “10 Things I Hate About You” era), then it helps to both mention that explicitly in your prompt and upload a reference.
You will, however, need to upload a reference image of yourself, and how you do it can make a big difference. I experimented with several reference images, and this was the one that worked best for me:

Here’s what seemed to work best for me when choosing a reference image:
- Pick a photo with neutral lighting, where you face the camera.
Soft, even lighting helps the model read your features clearly without casting harsh shadows or highlights. Facing the camera head-on also improves alignment and makes the final image more recognizable. If your original photo is too dark or unevenly lit, you can use an image editor to quickly adjust brightness and contrast before uploading. Your reference photo doesn’t need to be perfect, just balanced enough to process your features. - Use one reference photo, not multiple.
While it might seem like uploading several selfies would give Sora more to work with, it often leads to confusion. The model tends to pull mismatched features from each photo, resulting in an unrecognizable or distorted final image. Using a single, clear reference photo generally produces more consistent results. Below is an example where I tried to upload three different reference photos:

- Pick a photo with a neutral expression.
Sora will often attempt to reinterpret your facial expression, so uploading a photo where you’re already smiling can lead to warped results. In the example below, I uploaded a reference image where I was smiling with my eyes closed, which led to significant changes in my overall features. A relaxed, neutral look gives the model more flexibility to generate natural variations.

- Pick a photo where you are wearing sunglasses.
While it might seem counterintuitive, covering your eyes can help Sora generate a more recognizable face. Because eyes are one of the most distinct features, sunglasses reduce the likelihood of distortion. In my experience, this led to more usable generations with fewer attempts. For example, I was able to generate the below example with one try. While it's not perfect, it's much more recognizable than many of the other images I generated

Step 4: Generating and Remixing
Once you've entered your prompt and uploaded your reference image(s), you can fine-tune the output using the settings located at the bottom of the chat box. Here’s what each setting does:
- Type – Choose whether you want to generate an image or a video. For this project, we’re focusing on images.
- Ratio – Select the aspect ratio of your output: Landscape (3:2), Portrait (2:3), or Square (1:1). For an authentic iPhone selfie look, portrait (2:3) is your best bet.
- Variations – Decide how many versions of the image you want Sora to generate from the same prompt. Free users can choose one or two variations, while paid users can generate up to four.
- Preset – Apply a visual style preset (for example, “Cartoonify” gives your image a stylized, illustrated look). For realistic selfies, you can leave this setting off.

Once you’ve adjusted the settings to your liking, click the “Remix” button to generate your image. Your request will be placed in a queue, and depending on server load, it may take a few minutes to process.
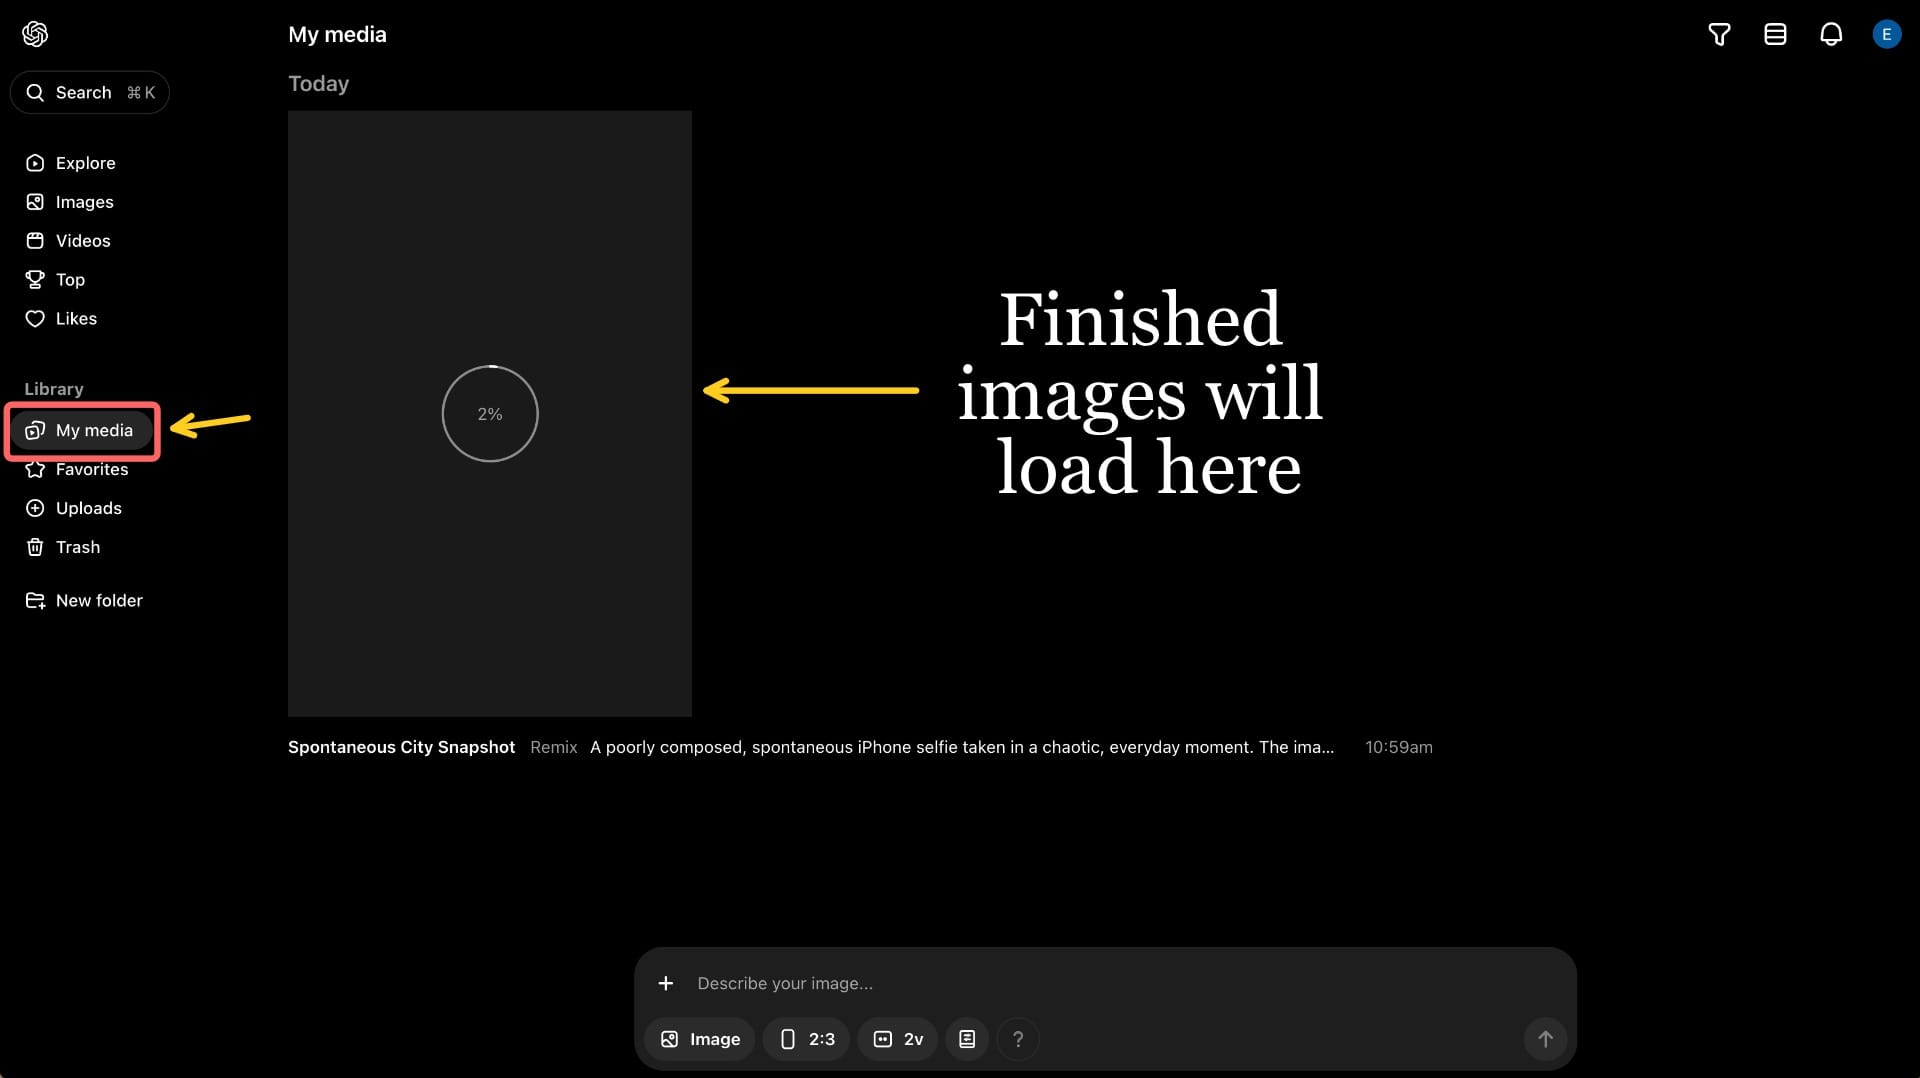
To view your generated images, go to the “My Media” tab under the Library section on the left-hand toolbar.
This is where all your past uploads and creations are stored.
Step 5: Editing Your Image
Once you’ve generated images that you’re happy with, the next step is making them social media ready. Since the appeal of this trend lies in how candid the photos look, it’s important not to over-edit.
One popular format is the viral TikTok format, where creators showcase selfies with multiple celebrities, set to trending audio, making it look like they casually met half of Hollywood.
@lauraisaruiz Si quieres intentarlo amix te paso el prompt pero a mi me cambió la cara 🤣🤣🤣 #fail #fyp #onedirection #1D #niall #liam #harry #liam #zayn #1Dfans ♬ sad SpongeBob music - michael
You can easily recreate this format using Kapwing, a browser based video editor. Here's how:
Upload Your Images
Begin by opening the Kapwing studio and uploading your AI-generated images. Because you’re uploading image files (not video clips), these images will be automatically layered into an image editor.
To turn this into a video-style slideshow, first go to the Timing section in the right-hand toolbar. There, set a project duration greater than 0 seconds. This will automatically convert your project into a video. The exact number doesn’t matter, but for my project, I chose 10 seconds.

Resize Your Project
Once your project has a set duration, the editor will switch to a timeline-based view, where all of your uploaded images appear layered on top of each other (see the image below). Before we adjust the timing of each image, let’s first resize the project.
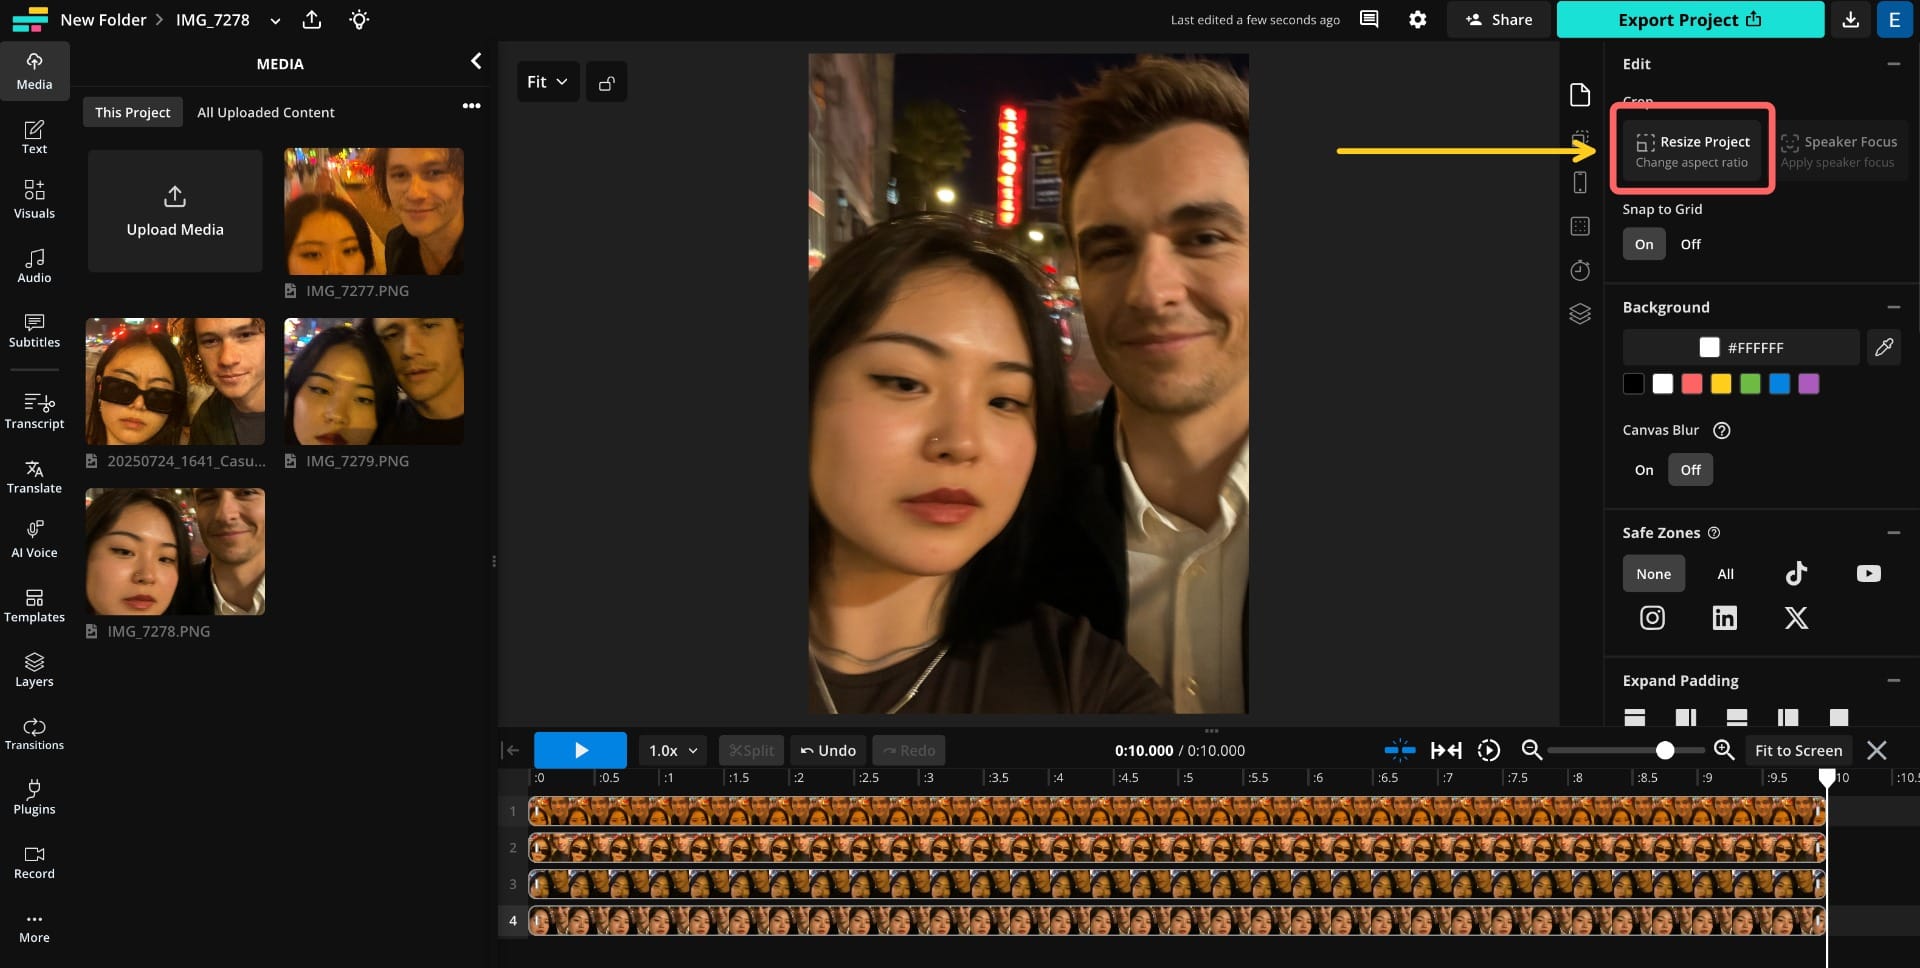
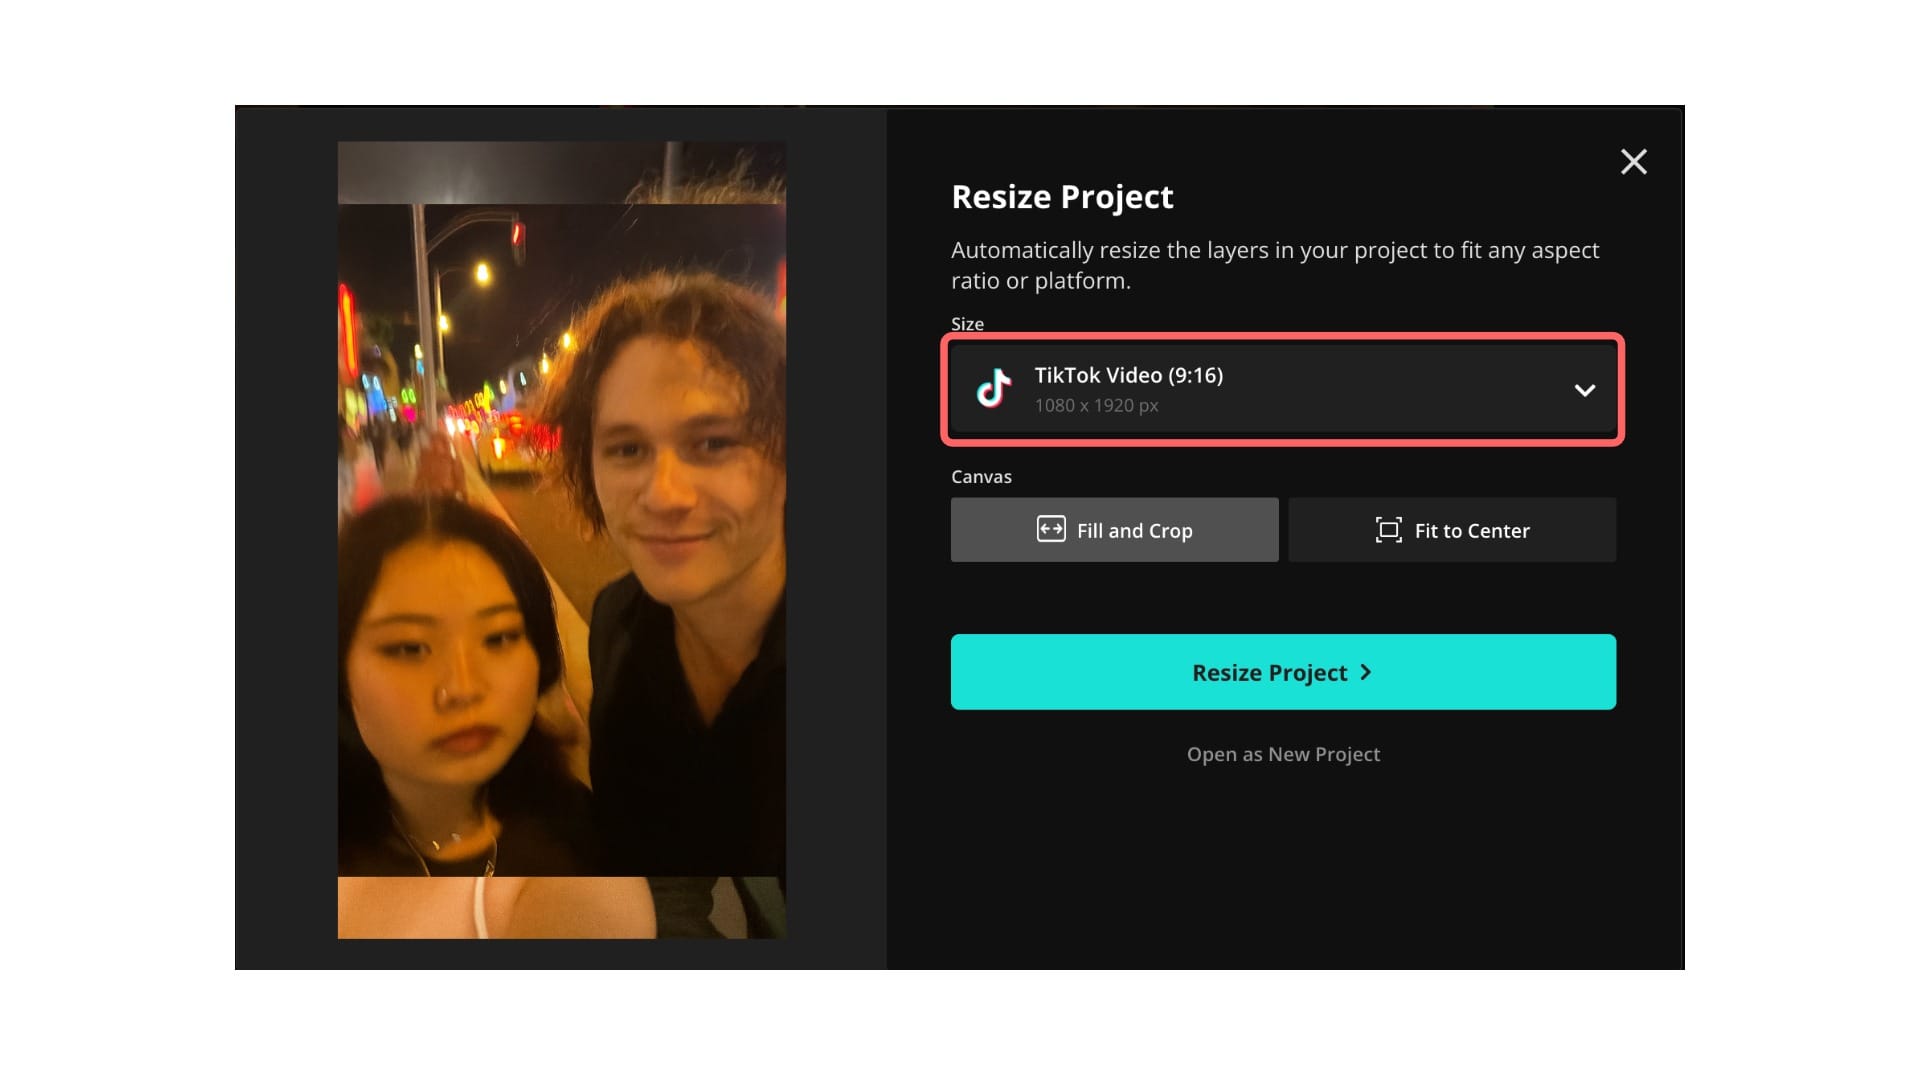
Sora exports images in a 2:3 portrait ratio, which doesn’t match TikTok’s 9:16 aspect ratio. To fix this, click the “Resize Project” button at the top of the right-hand menu. This will open a new set of size options. From the dropdown menu, select “TikTok Video (9:16)” to adjust your canvas.
Adjust Image Duration and Order
Next, you’ll want to control how long each image appears and what order they play in.
- To set the duration of each image, click on it in the timeline. Then, hover over the end edge of the clip until your cursor changes, and drag it left or right to shorten or extend how long that image stays on screen.
- To reorder the images, simply click and drag each photo so that they appear one after another on the same track in the timeline. Make sure they're not stacked on top of each other. Each image should sit in sequence to play one after the next, like a slideshow.

(Optional) Check TikTok SafeZones
Since your celebrity encounter is the highlight of this reel, you’ll want to make sure their face isn’t accidentally covered by TikTok’s interface (like the caption, buttons, or username). To preview what will be visible, you can enable TikTok Safe Zones:
- Scroll down to the “Safe Zones” section in the right-hand toolbar.
- Click the TikTok icon, and an overlay will appear showing the areas typically covered by TikTok’s UI (such as the bottom caption bar and the right-side action buttons).
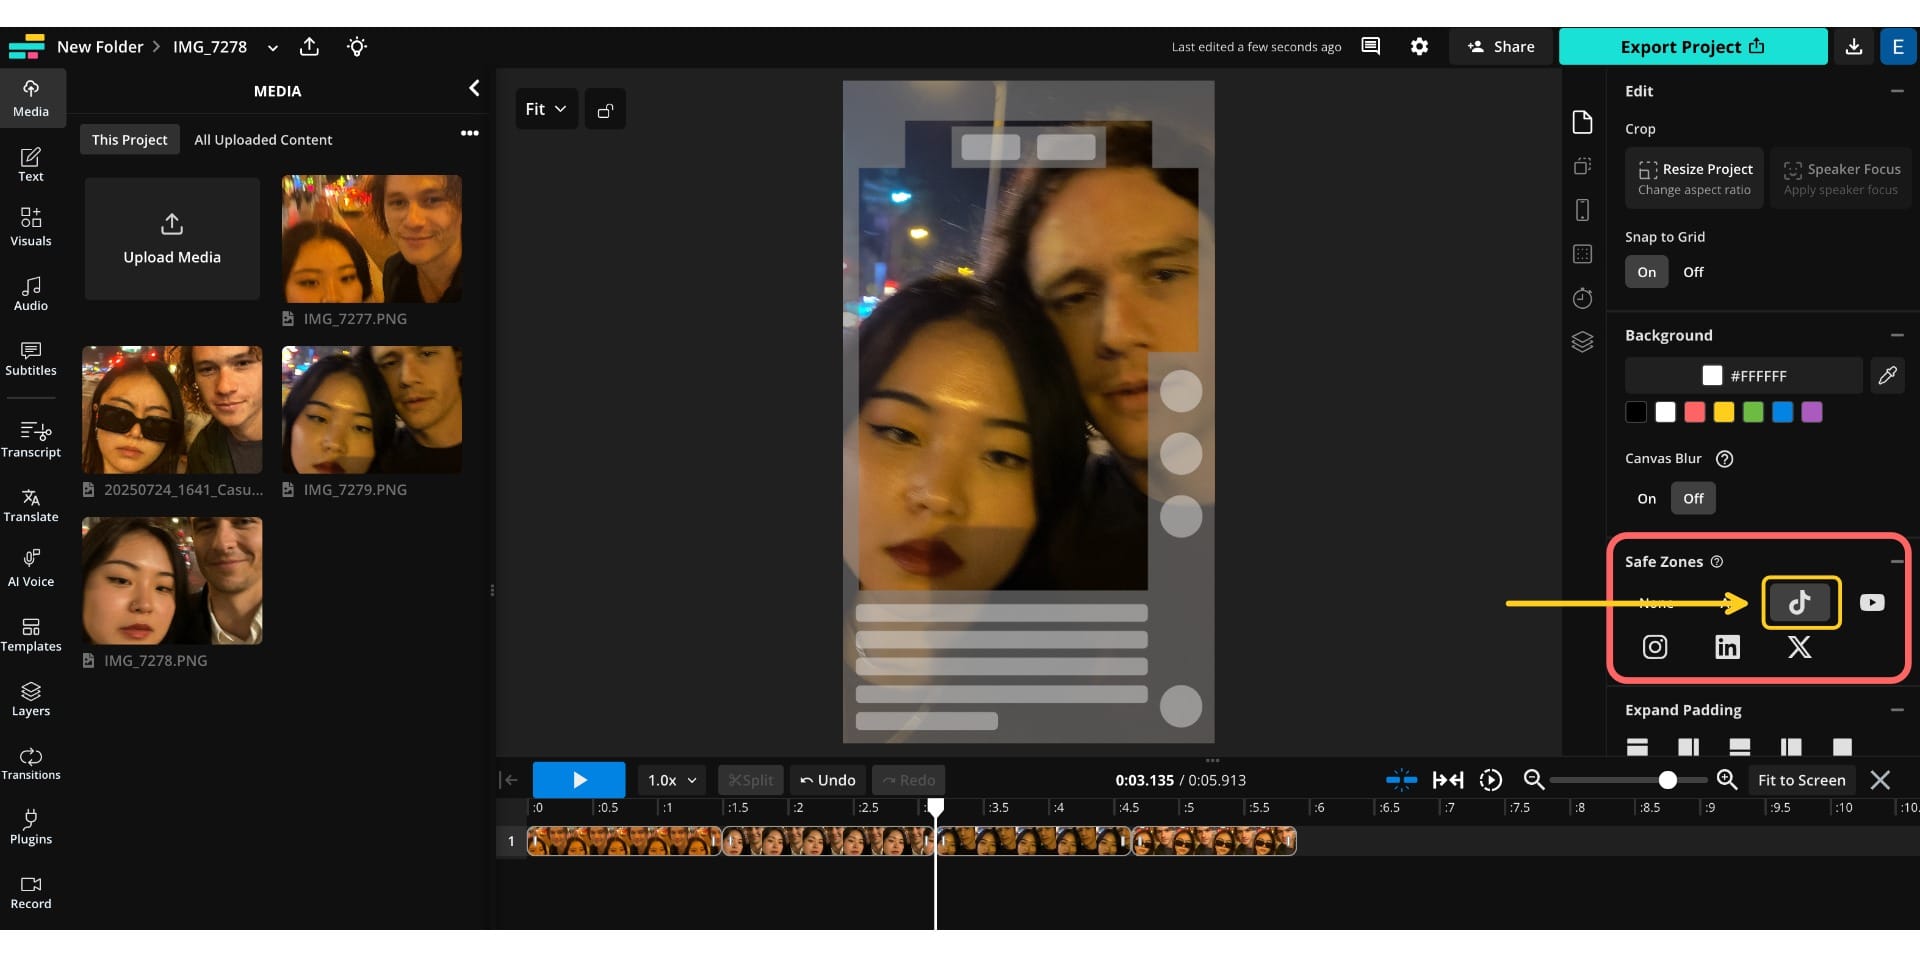
If part of your image is hidden, simply click and drag the image within the canvas to reposition it. You can also use the corner handles to resize the image so that the main focus stays within the visible area.
Add Background Music
Music plays a huge role in making your TikTok feel engaging and dynamic. To add background music:
- Go to the Audio tab in the left-hand toolbar.
- From there, you can either browse the music library and choose a track that fits your vibe, or upload your own audio by dragging in a file or pasting a link.

For my project, I simply pasted a YouTube link, and it automatically pulled the audio into my timeline. Once your audio is added, you can trim it, adjust volume, or align it with specific image transitions.
Export and Share
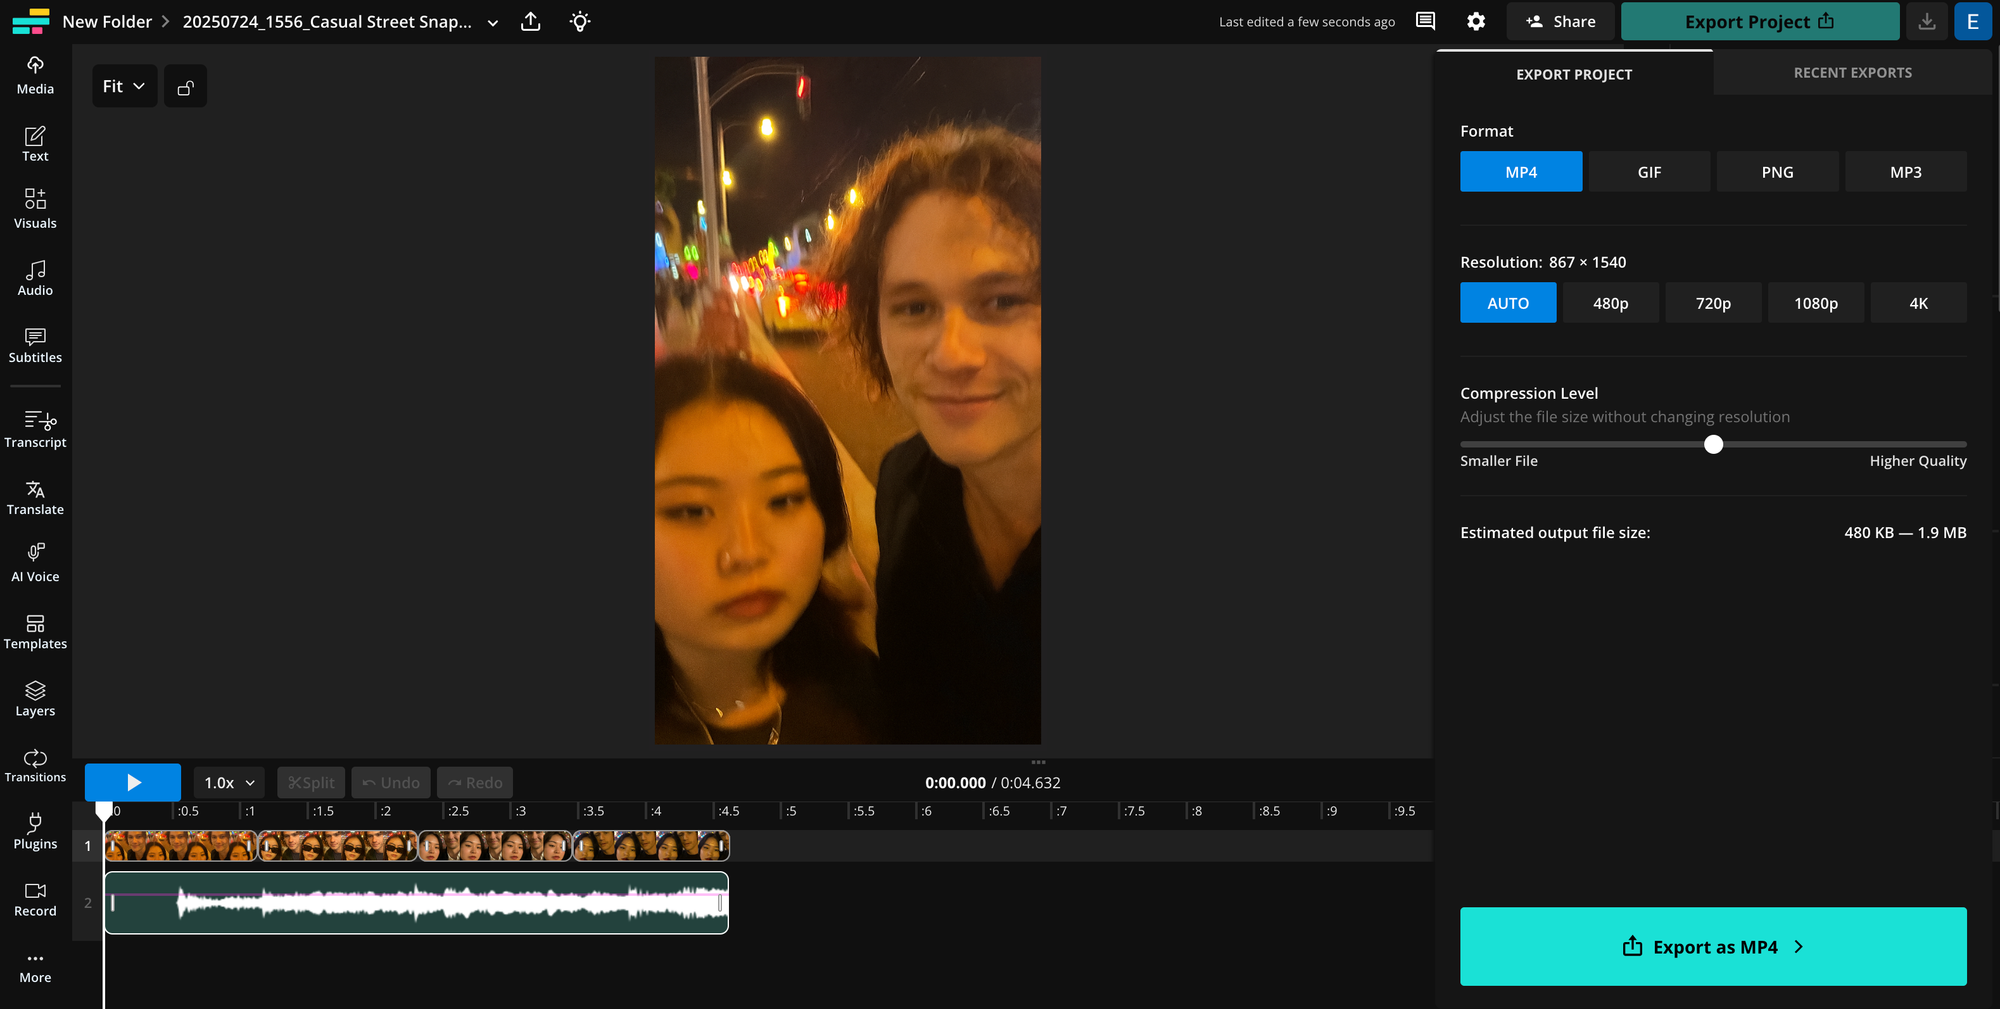
Once your project looks the way you want, it’s time to export and share it.
- Click the blue “Export Project” button in the upper-right corner.
- Choose your desired file type and size. For TikTok, select MP4 as the format.
- Confirm your settings.
After your video finishes exporting, you have two options:
- Download the video and manually upload it to TikTok (or any other platform).
- Share directly from Kapwing:
- Click the “Export Project” button again.
- Then click the “Recent Exports” tab.
- From there, click the “Share” button and select TikTok.
This will take you directly to TikTok’s upload interface, where you can finalize your post and publish straight from the browser.

Bonus Tips for Best Results
I discovered that Sora rarely recreates faces exactly as you imagine them. Instead of generating a replica of your reference images, the tool creates an approximation. That means outputs often come out distorted.
Here are a few things to keep in mind for the best results:
- Composition flaws: Mention imperfections like bad lighting, awkward angles, motion blur, or messy framing to match the aesthetic of the trend.
- Setting: Be specific about the location, time of day, or mood (e.g., “a foggy street at 2 am” vs. “sunset at Venice Beach”).
- Relationship dynamic: Phrases like “seem to know each other,” “standing awkwardly close,” or “laughing mid-conversation” can specify the interactions between the characters.
While specifying these things may seem trivial, below is an example generation where I didn't specify that the selfie between Dave Franco and I was supposed to be a friendly encounter.

Below are some of the better images I was able to generate. They’re far from perfect.
My face has been significantly distorted. In the middle image, my celebrity encounter (Dave Franco) is also noticeably off.
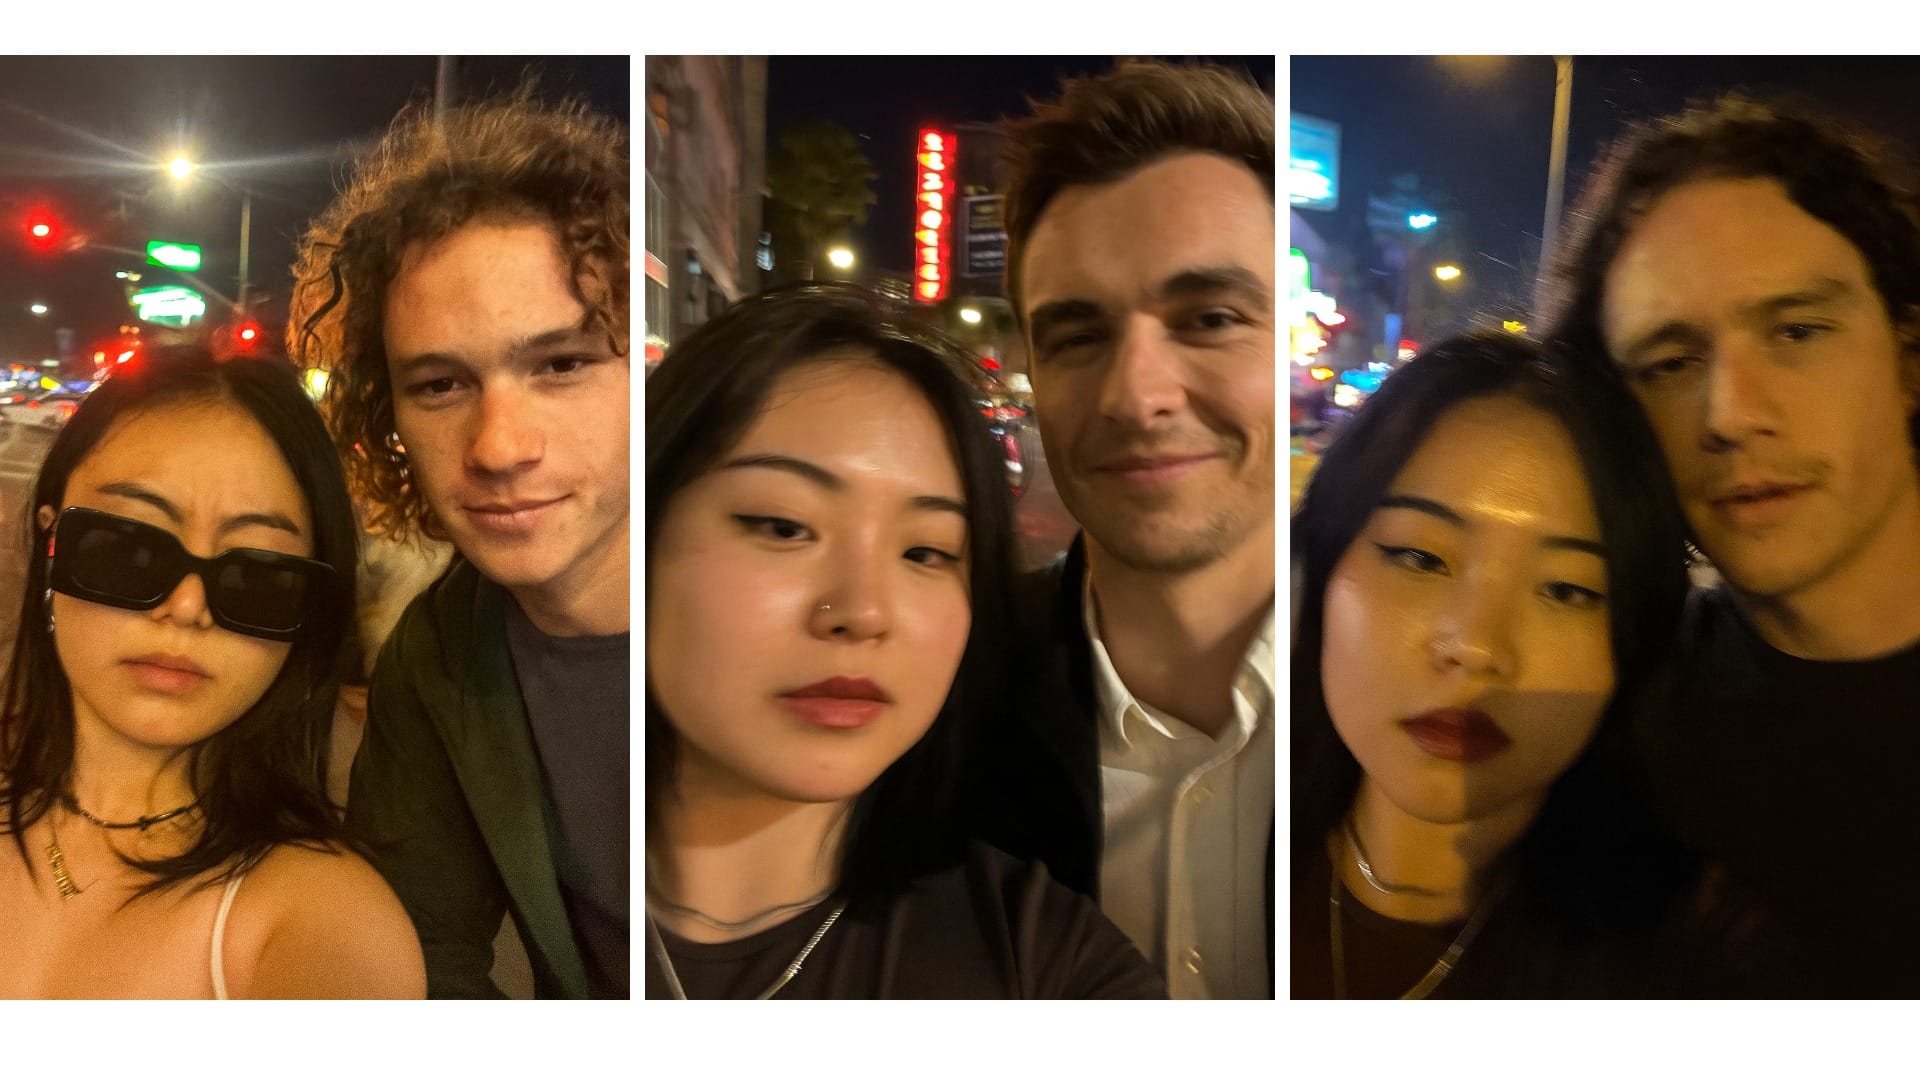
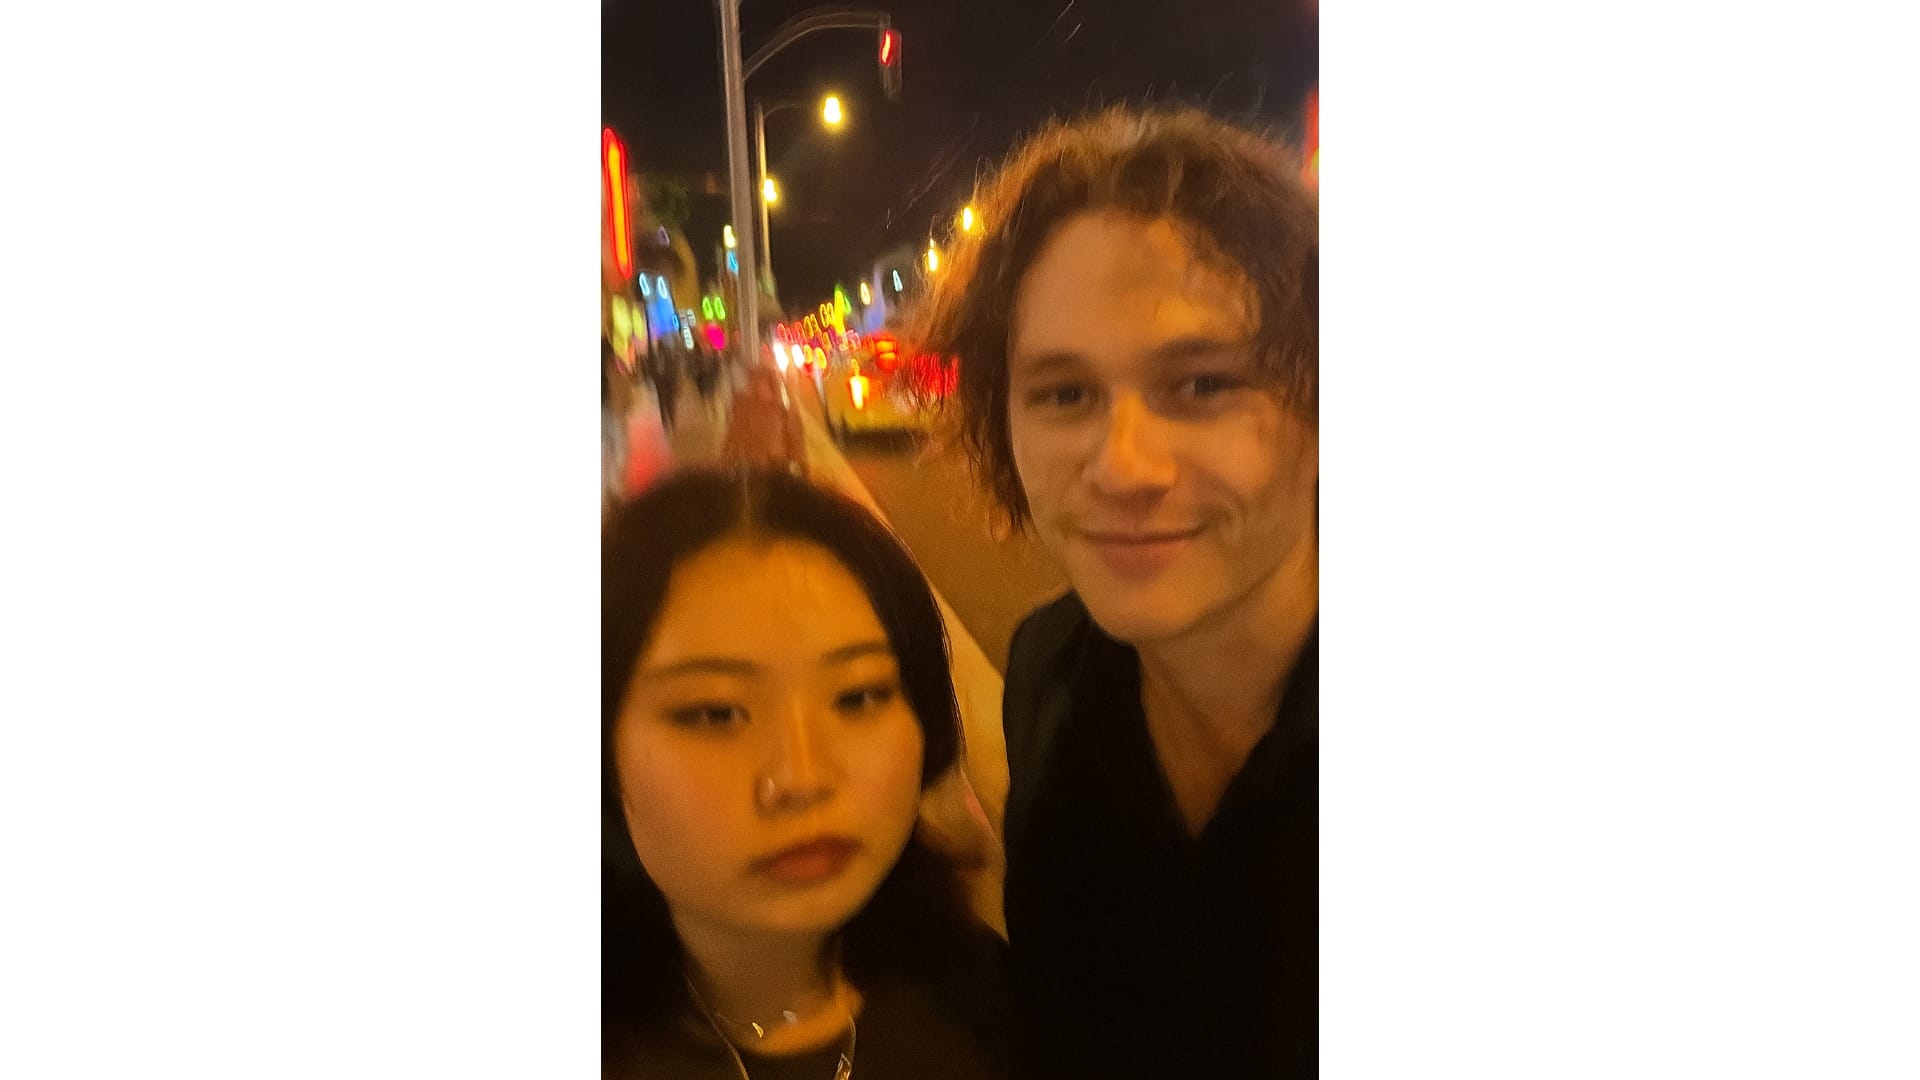
And then, here’s the only image where I fully look like myself, and my celebrity encounter (a young Heath Ledger) also genuinely resembles him.
It almost passes as a real photo:
Overall, I was impressed by how realistic and candid many of the images looked. Even though the subjects were often distorted, the textures, lighting, and casual framing often mimic real-life photography better than I expected.
That being said, generating a usable image was not easy. I was only able to get convincing results using ChatGPT Pro, which gave me unlimited generations. Even then, it took 3–4 hours of experimenting and running the same prompt and reference images over and over to finally land on one that fully resembled both me and the celebrity.
Even with a strong prompt and clean inputs, a lot of the outputs came back distorted, uncanny, or just not usable. It feels very much like a repetition game, and luck plays a big role.
For free users limited to 12 generations per day, getting a truly convincing result might be a frustrating process (if not nearly impossible) without a lot of patience or very dialed-in reference material. There are better AI trends worth exploring if you're looking for more consistent results.