
How to Use Adobe Project Indigo
Adobe’s Project Indigo reimagines iPhone photography with manual controls, raw files, and DSLR-like image quality.
If you’ve ever wished your iPhone photos had more nuance, more control, or just looked less… iPhone-y, Adobe’s new experimental camera, Project Indigo, might be for you.
Built on top of the iPhone’s camera system, Project Indigo is designed to produce photos that feel more like those from a DSLR, offering more natural image processing, higher resolution, and full manual controls. It’s an exciting step for photography enthusiasts who want a better mobile shooting experience or beginners who are curious about diving deeper into photography without investing in gear.
In this article, we’ll guide you through what Project Indigo is, how it compares to the default iPhone camera, who can access it, how to utilize its core features, and how to edit your photos for optimal results.
Table of Contents:
- What is Project Indigo?
- What Makes Project Indigo Different?
- How To Use Project Indigo
- How To Edit Project Indigo Photos
- Frequently Asked Questions
What is Project Indigo?
Project Indigo is an experimental camera app created by Adobe as part of its effort to push the boundaries of mobile photography. Unlike most smartphone cameras that prioritize convenience and instant results, Indigo is designed for users who want more control over how their images appear and feel.
It combines computational photography with professional-style manual settings, offering an experience that feels closer to using a traditional SLR camera.
Project Indigo is currently free to download on the App Store — but it’s not available to all iPhone users just yet. The app is only compatible with Pro/Pro Max iPhones from the 12 series up, and non-Pro iPhones starting from the 14 series up.
An Android version is also reportedly in development, though no release date has been announced.
What Makes Project Indigo Different?
Mobile photography has come a long way: modern smartphones can take incredibly detailed, colorful photos in almost any situation. But there are still major trade-offs compared to using professional cameras. Project Indigo is designed to address these core limitations:
- Image Quality: While iPhones perform well for their size, they still fall short in challenging scenarios like fast action or low-light scenes.
- The “Smartphone Look”: Most phone cameras apply heavy processing (brightening shadows, boosting saturation, smoothing skin, and sharpening details) to make photos look good at a glance. But these images often feel artificial or flat on larger screens.
- Limited Manual Control: Standard camera apps don’t give users access to core photography settings like ISO, shutter speed, or manual focus.
Project Indigo is Adobe’s answer: a stripped-down but powerful beta camera app that prioritizes control, realism, and image quality. It offers a consistently high image quality, with options to shoot in both JPEG and raw (DNG), a more natural, SLR-style aesthetic, and full manual controls.
How To Use Project Indigo
Basic Use:
At a glance, Indigo looks similar to the default iPhone camera app. It has two shooting modes:
- Photo: for most everyday shooting situations with good or moderate lighting
- Night: for darker settings
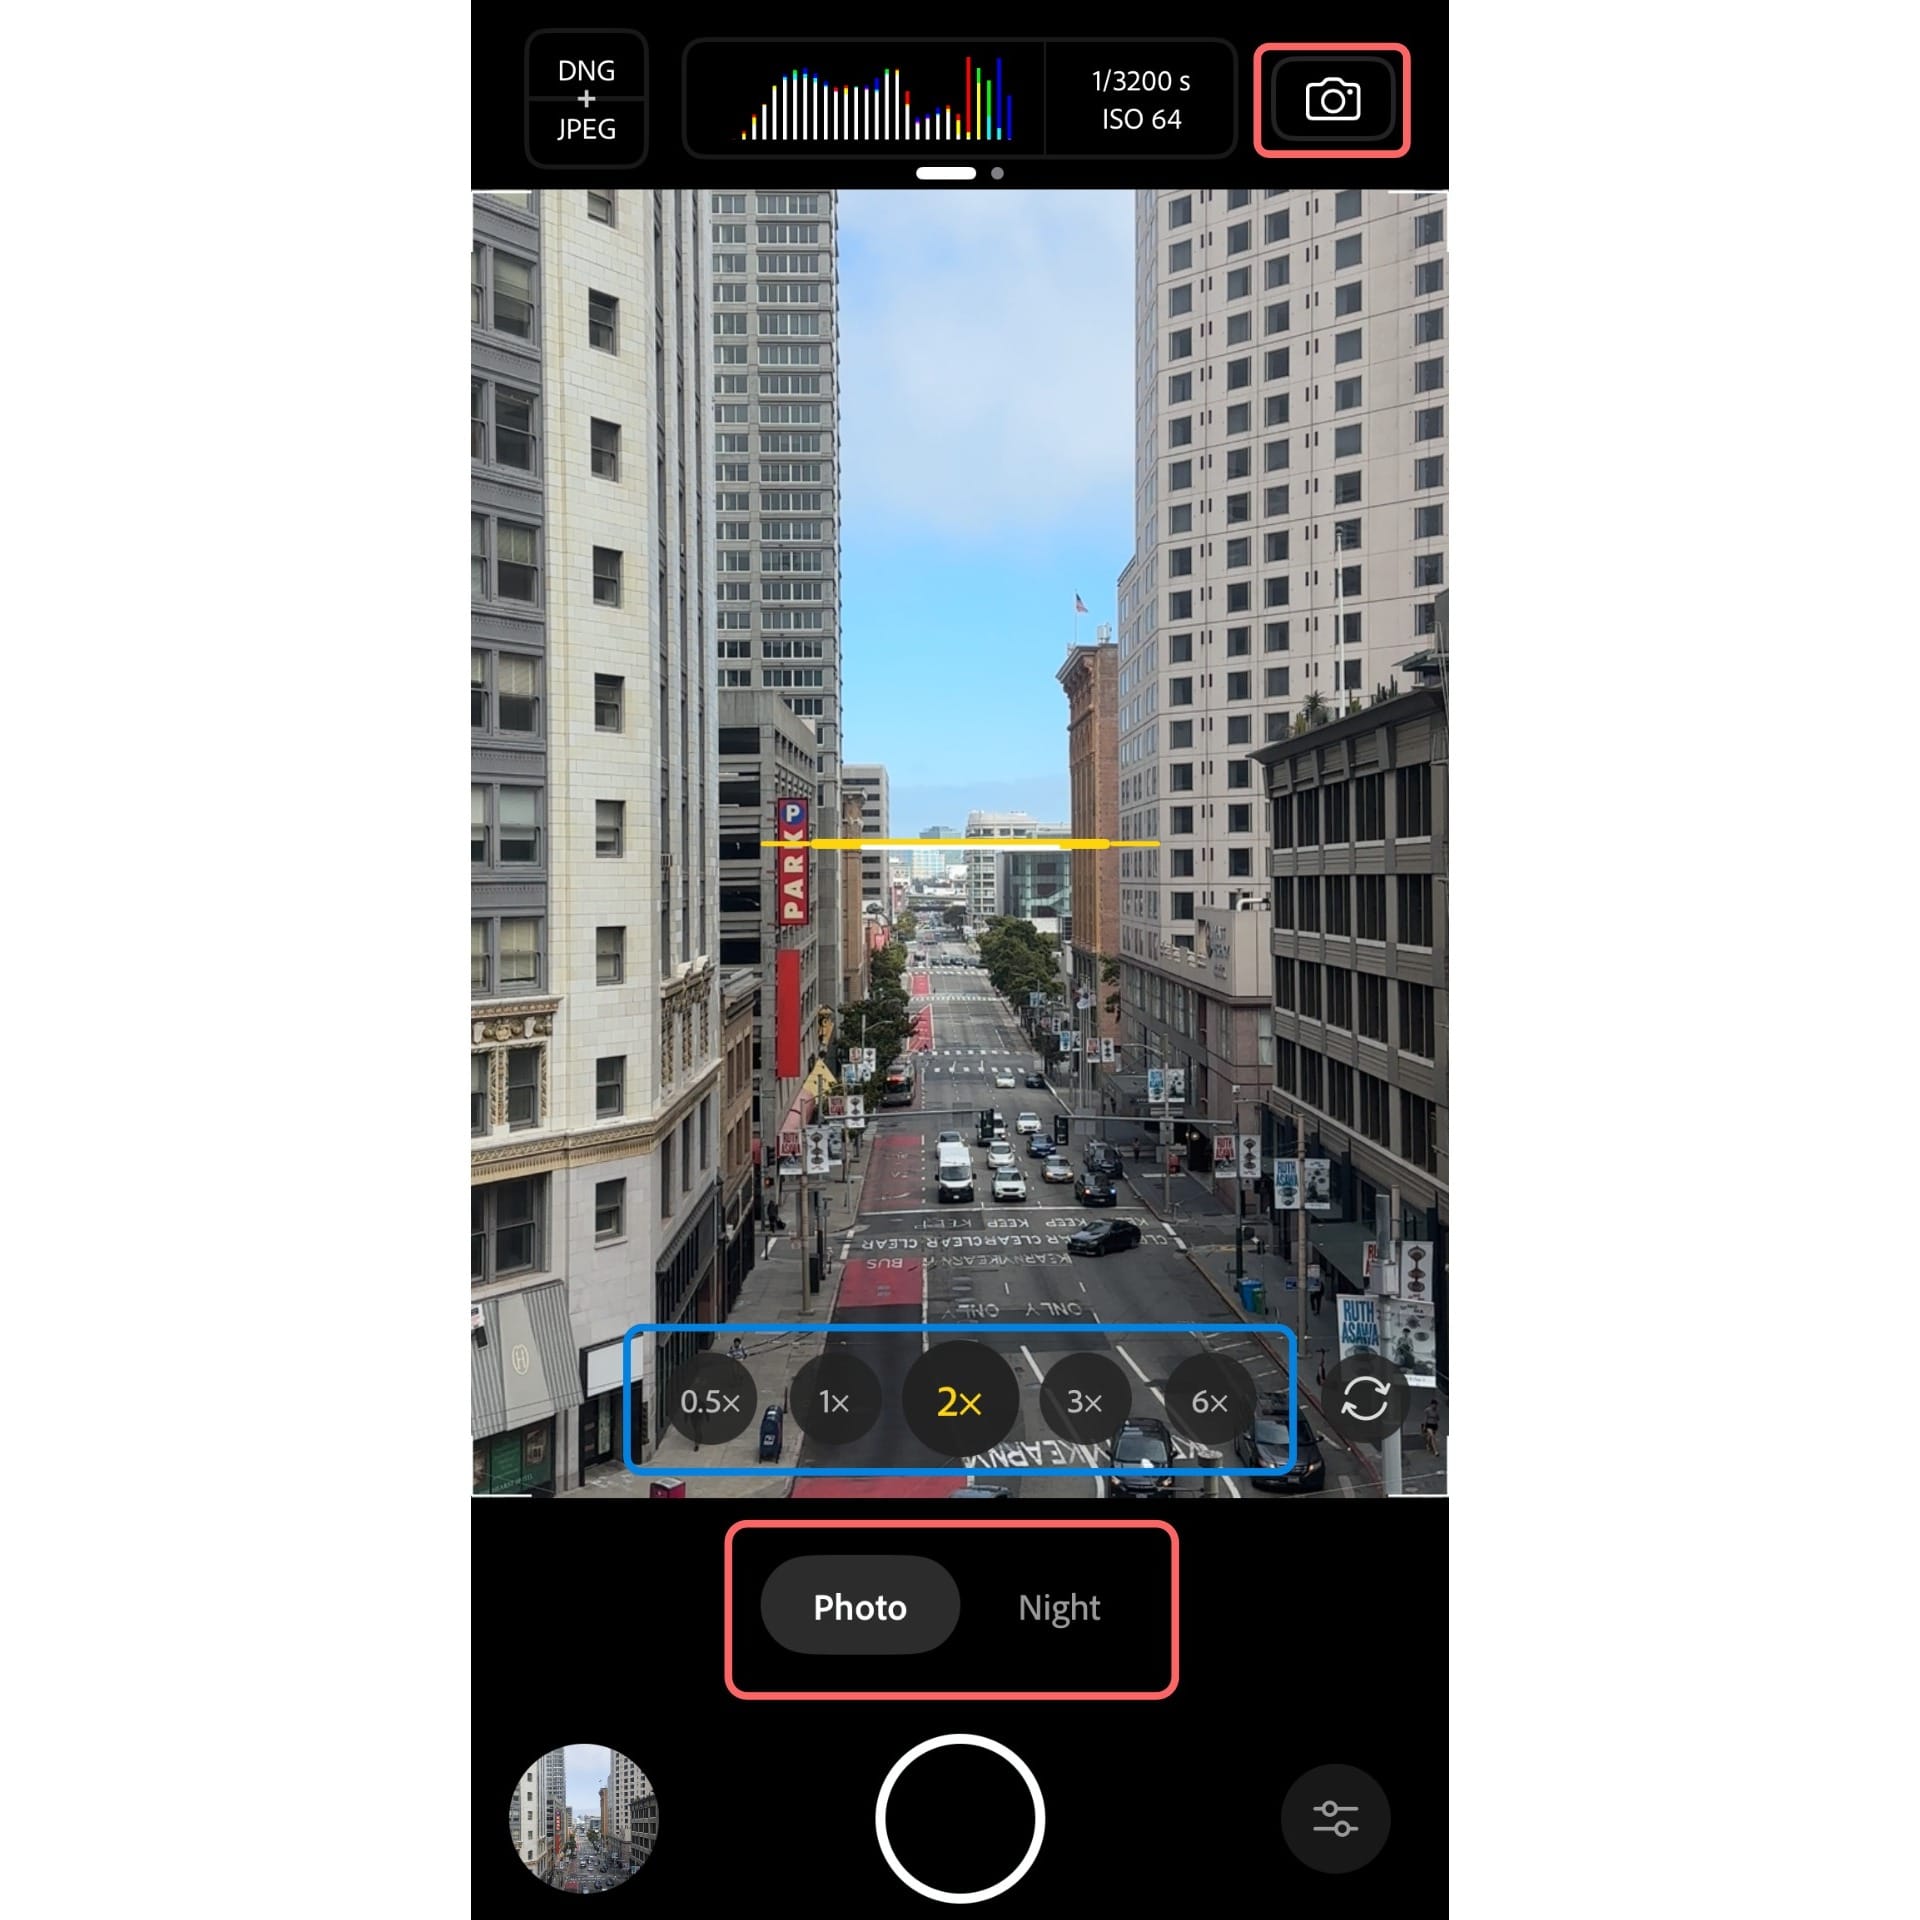
You can switch between these modes depending on the lighting conditions and the type of scene, using the control above the shutter button or the icon in the top right corner. The app will also automatically suggest Night Mode when it detects low light.
There are also several Zoom options: 0.5x, 1x, 2x, 3x, and 6x. You can tap to quickly switch between these focal lengths, or pinch in and out on the screen to zoom more precisely—up to 15x.

When you zoom past 8.0x, a small window will appear on-screen showing the full frame of the viewfinder. This helps you see where your zoomed-in section fits within the overall scene, making it easier to adjust your framing and composition.
Features & Controls:
Indigo’s power lies in its manual tools.
Here’s a quick guide to what’s on-screen:

Top Toolbar
- Format Button: The format button displays what photo format you are outputting, with the options of either DNG + JPEG or JPEG only.
- DNG files are unprocessed raw images. While they might not look as good on-screen, they are great for editing with more detail and control.
- JPEG files are processed and compressed. These images are smaller and more immediately shareable, but less flexible for post-editing
- Histogram + Camera Data: The live histogram monitors exposure across the frame. Two numbers beside it show the camera’s automatic shutter speed and ISO in real time. We’ll talk more about these numbers later.
Swiping across the histogram reveals extra tools:

- A self-timer with the options of 3s, 5s, and 10s
- Three different grid overlays (to help with live photo composition)
- A level indicator (to keep your shots straight)
- An overexposure warning option (so Project Indigo can warn you if your shot might be over-exposed)
- The settings
Manual Controls:
Like most phone cameras, Project Indigo adjusts its settings in real time to adapt to the shot.
However, unlike most phone cameras, it also gives users control over these settings.
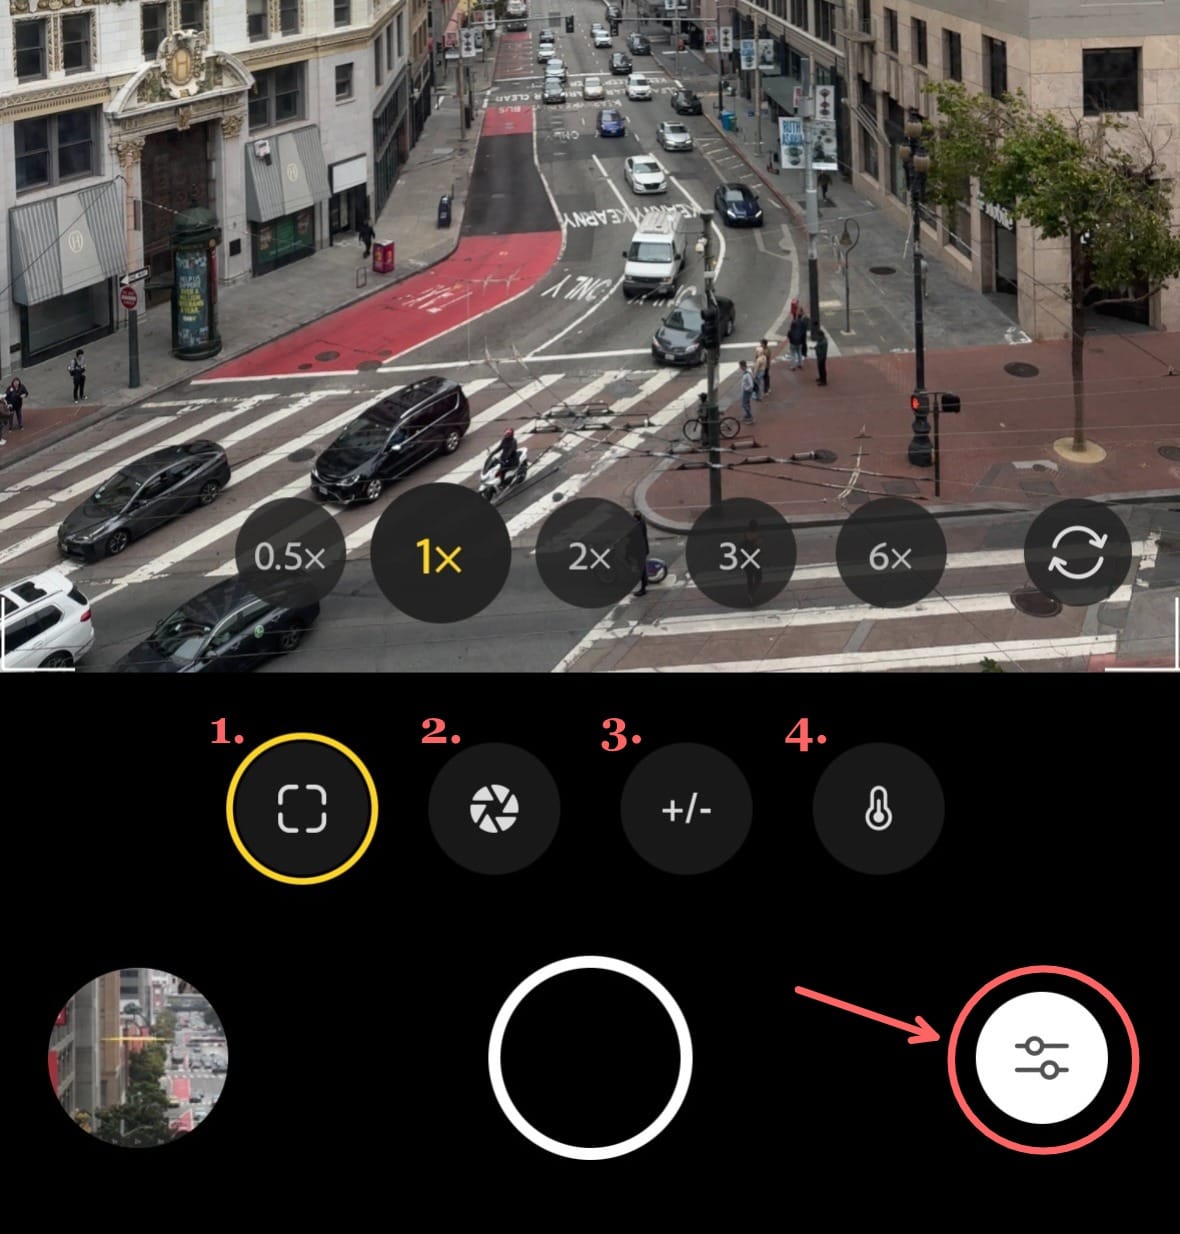
You can tap the control dial on the bottom right for manual camera adjustments. You’ll see:
- Focus: The focus is the sharpest part of the image. In Project Indigo, you can slide to control what’s in focus manually. Adjusting to a lower value brings the focus closer to the lens, while higher values bring the focus to the background.
- Shutter Speed & ISO:
- The shutter speed controls how long the lens is open. This changes the brightness, depth, and motion in an image. A faster shutter speed results in less light, and is ideal for action shots. A slower shutter speed results in more light, and is best for night shots or motion blur effects.
- The ISO measures the light sensitivity of the camera. A higher ISO results in a brighter image, but with more grain. Typically, it’s better to keep the ISO low in normally lit settings.
- Exposure: A simpler brightness slider, similar to iPhone’s, but works differently behind the scenes than ISO
- White Balance (Temp + Tint):
- Temperature adjusts the warmth or coolness of the photo (blue to orange).
- Tint adjusts the green-magenta balance. These tools help maintain natural skin tones or correct strange lighting environments
To reset these settings, you can long-press the control dial button.
The Results
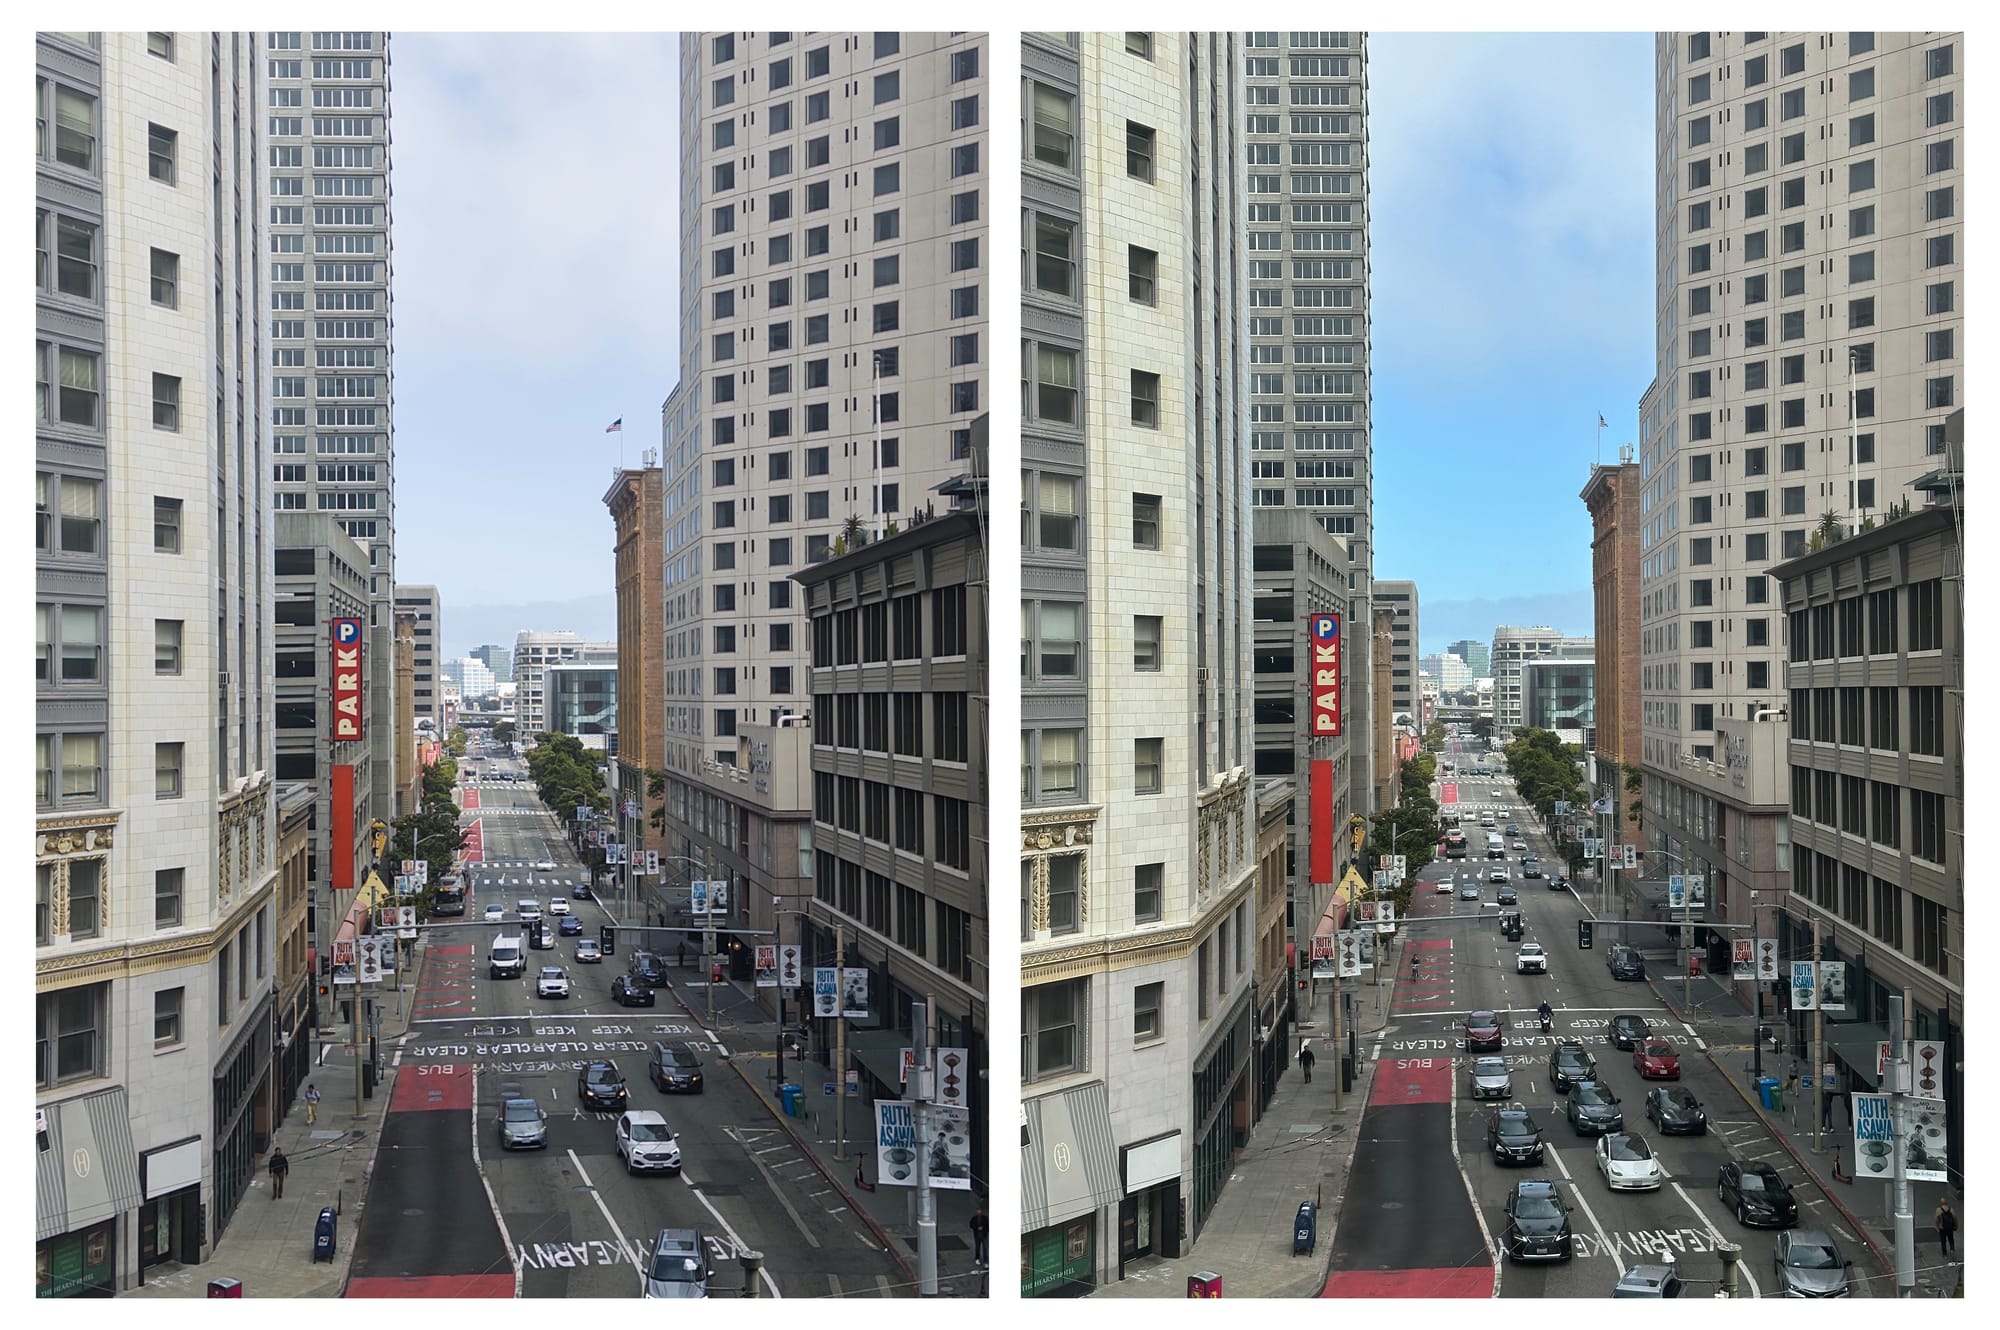
Here’s a side-by-side comparison of Project Indigo photos (on the left) versus the default iPhone camera (on the right).
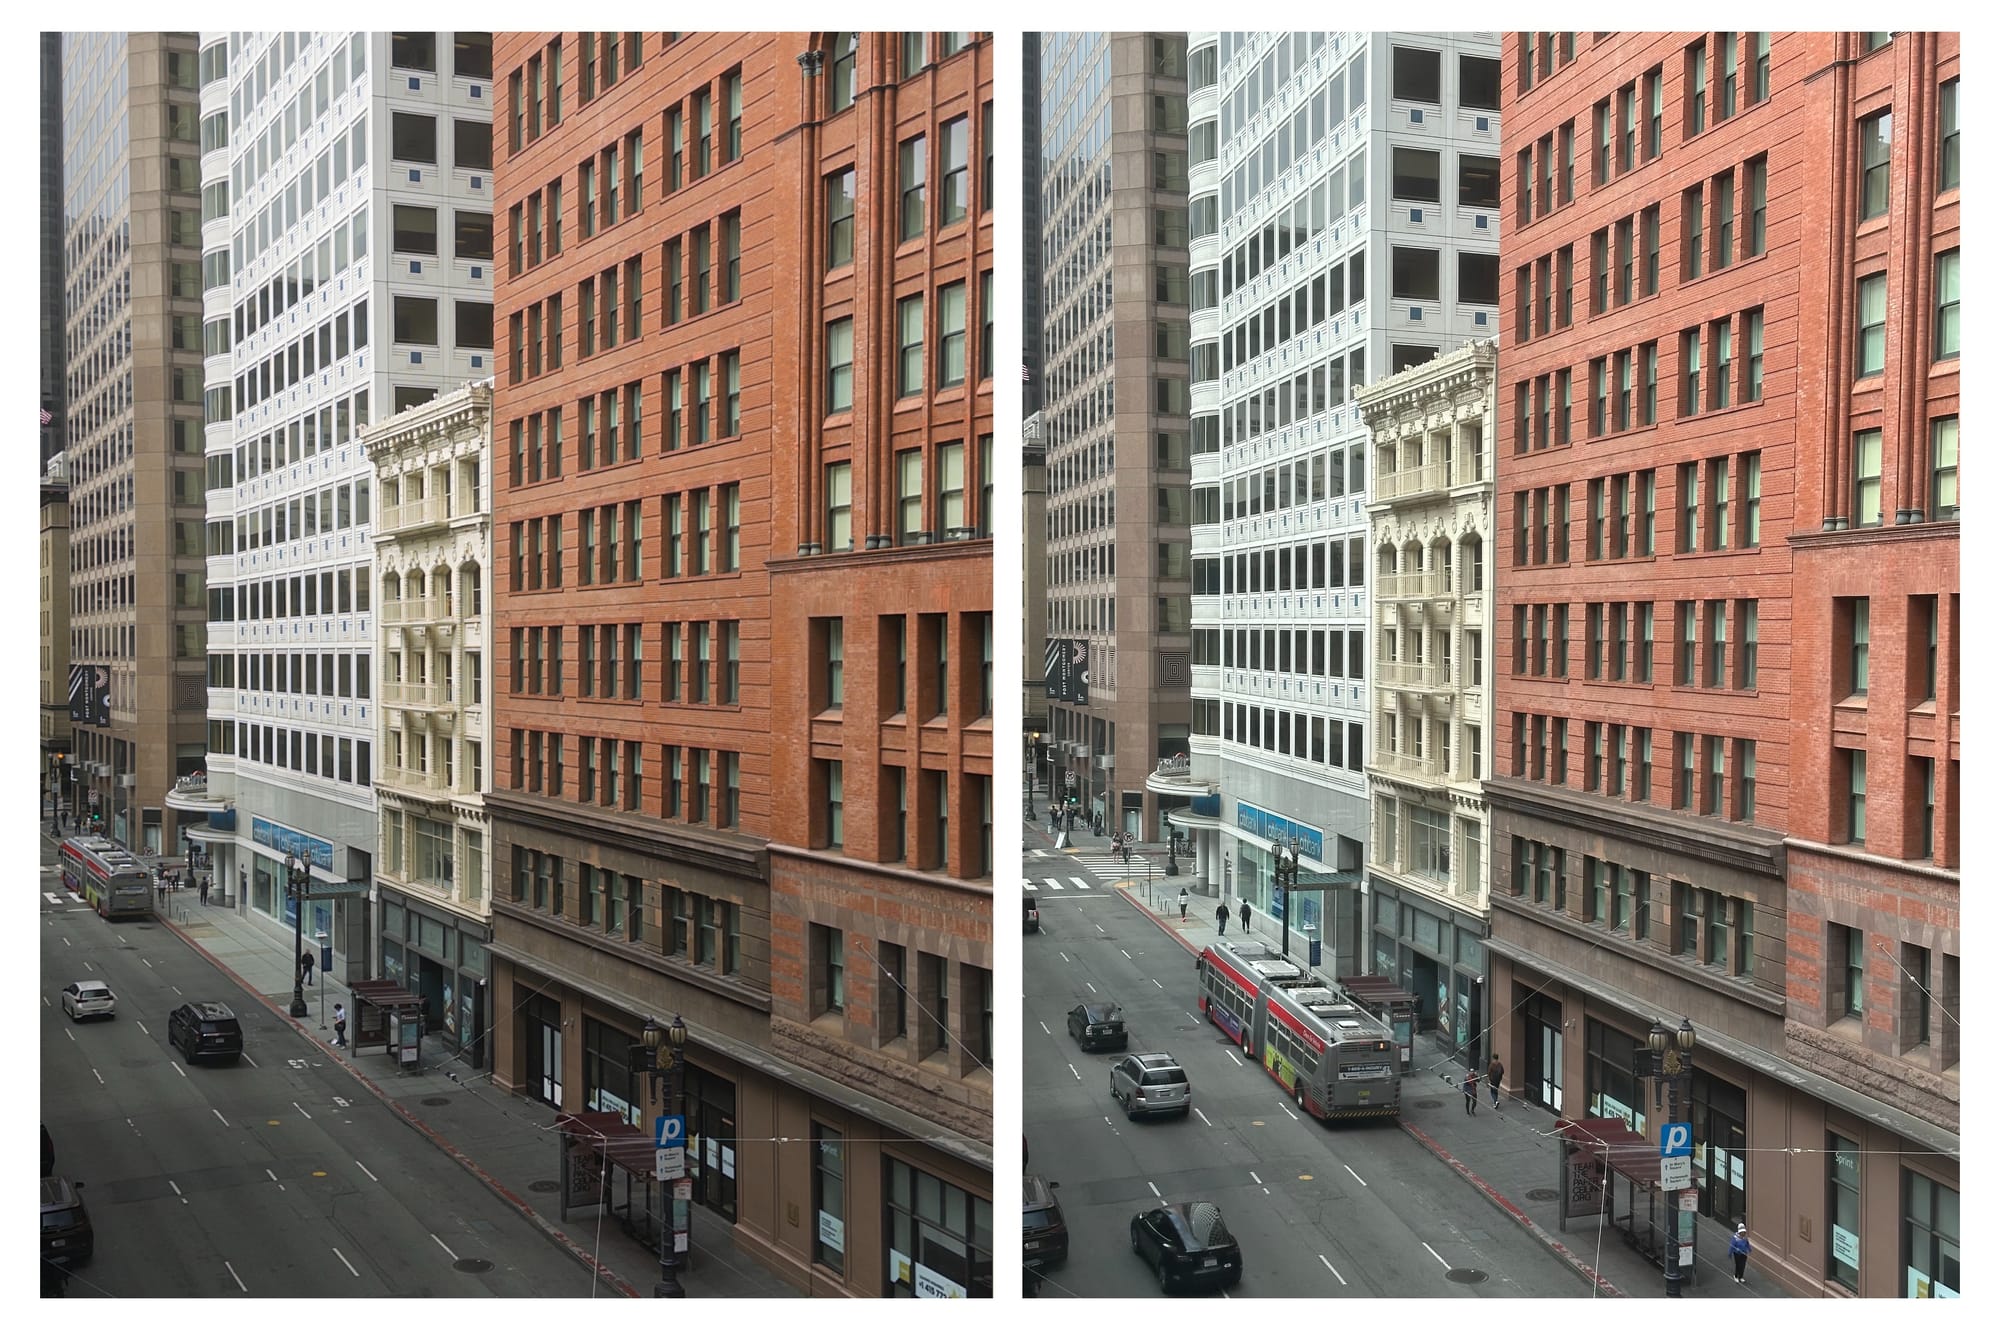
You’ll notice that Indigo’s photos tend to have less saturation, lower contrast, and more subtle processing.
While this might make them appear flatter or duller at first glance, they’re actually a more accurate reflection of how a scene looks to the naked eye.
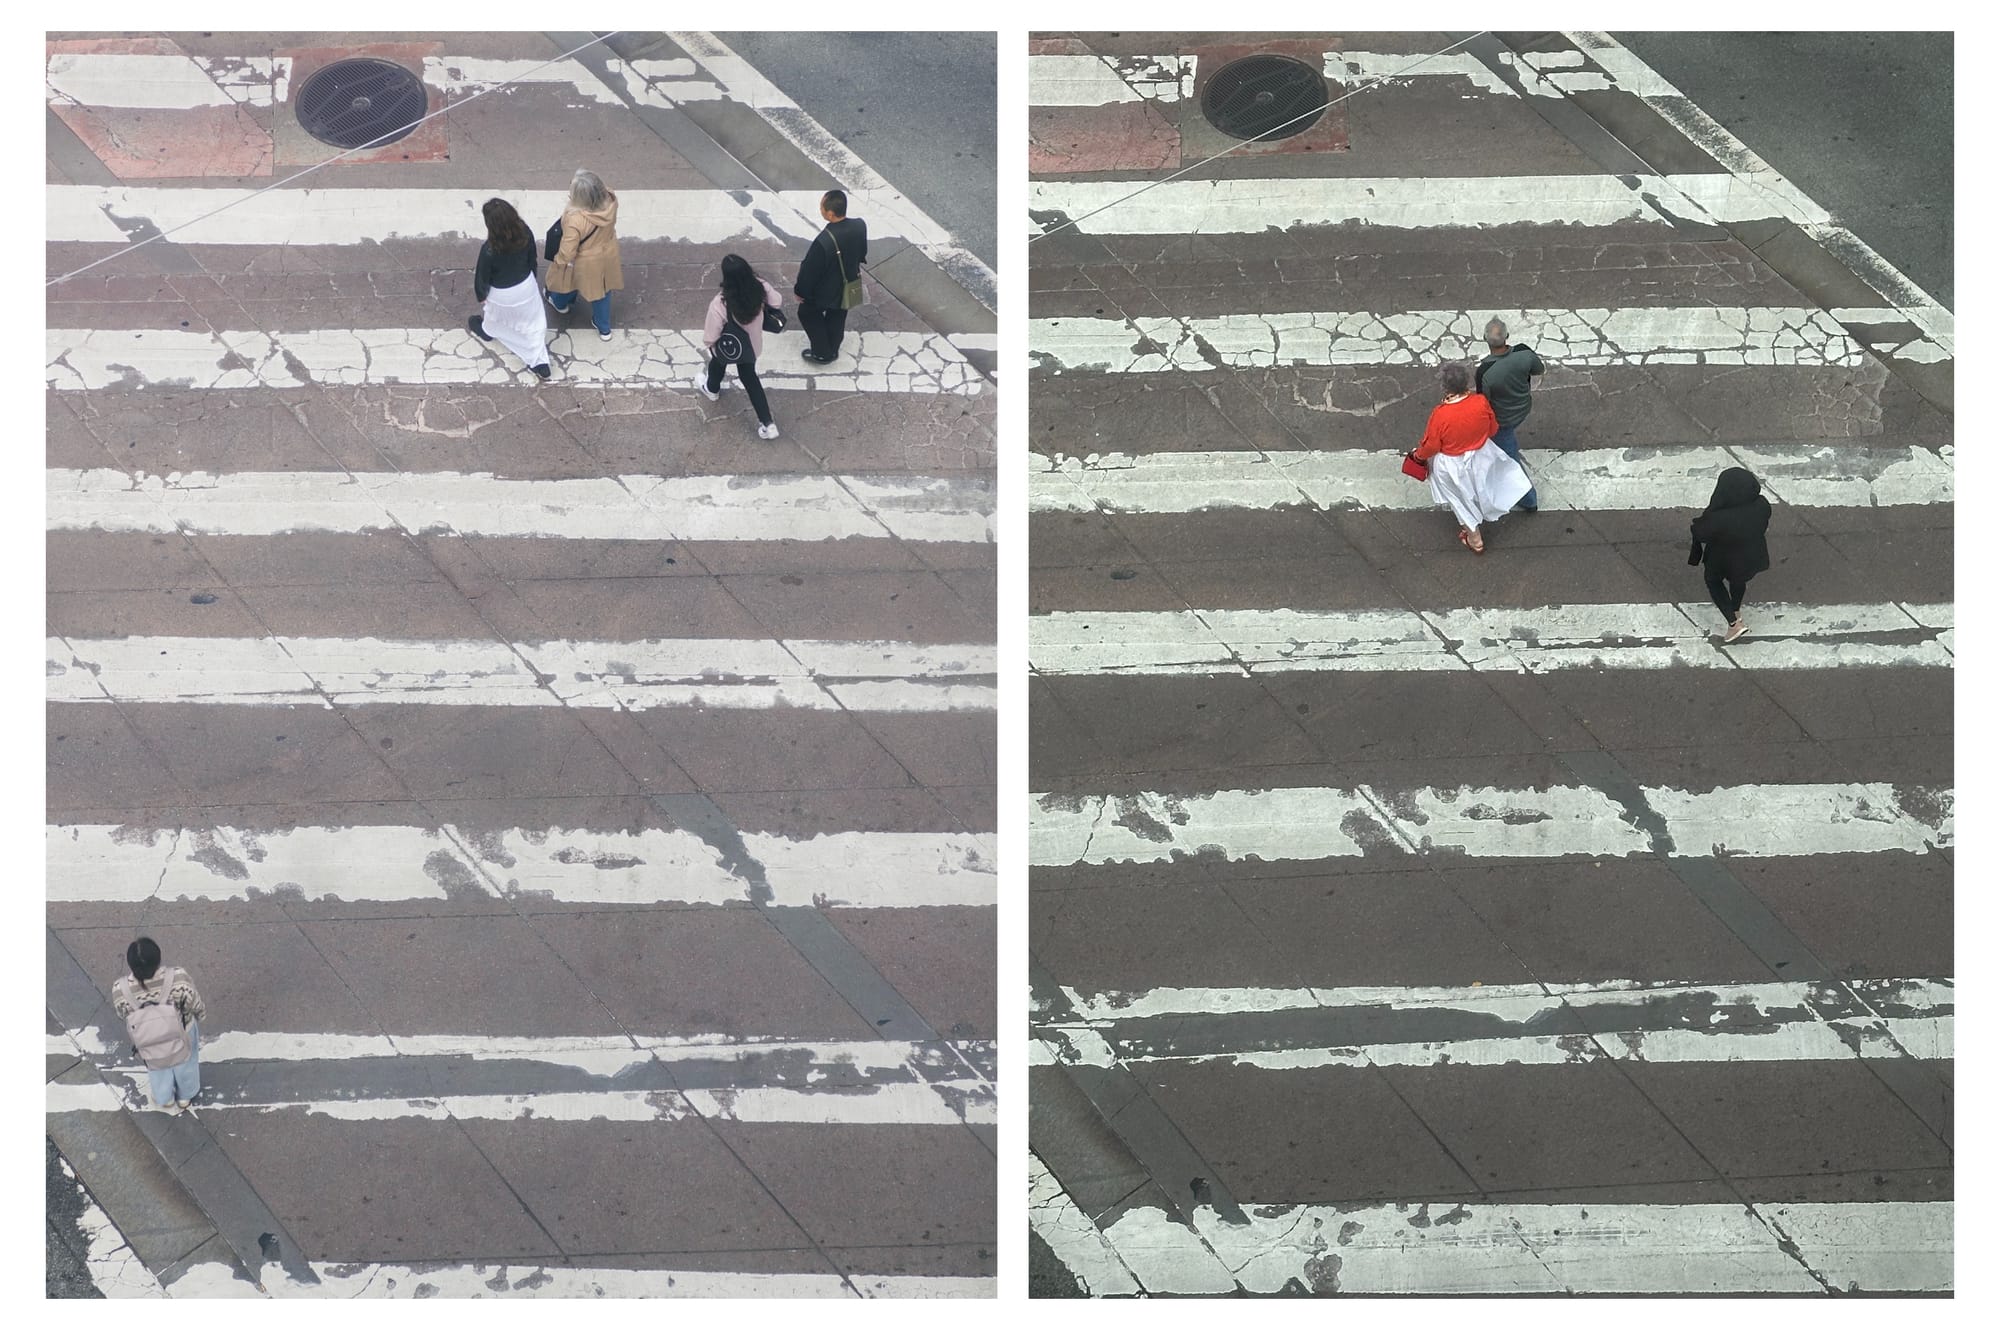
In contrast, iPhone photos are heavily processed to appear vibrant, bright, and sharp, which is optimized for quick sharing on small screens, but not always true to life.
This natural look is intentional. By minimizing in-camera processing, Indigo gives users a clean foundation – ideal for those who want full creative control during editing.
How To Edit Project Indigo Photos
Project Indigo gives you a clean, minimally processed starting point, which is great if you want control over your photo's final look. But because these images often appear flatter and less saturated than typical smartphone photos, you’ll likely want to make them pop through color grading.
Adobe recommends using Lightroom to edit photos taken with Project Indigo, especially if you’re shooting in DNG (raw) format. However, not everyone wants to commit to an Adobe Creative Cloud subscription, especially for casual or beginner use. For a more cost-effective alternative, there are many free editors available with built-in color correction and photo-editing tools.
Kapwing.com is a great, browser-based option — you can use it to color-grade, resize, and convert your photos.
How to Color Grade Your Indigo Photos
- Upload your photo to Kapwing.
- Select the image to access the color correction tools. These tools appear in the "Adjust" menu on the right side of the editor.
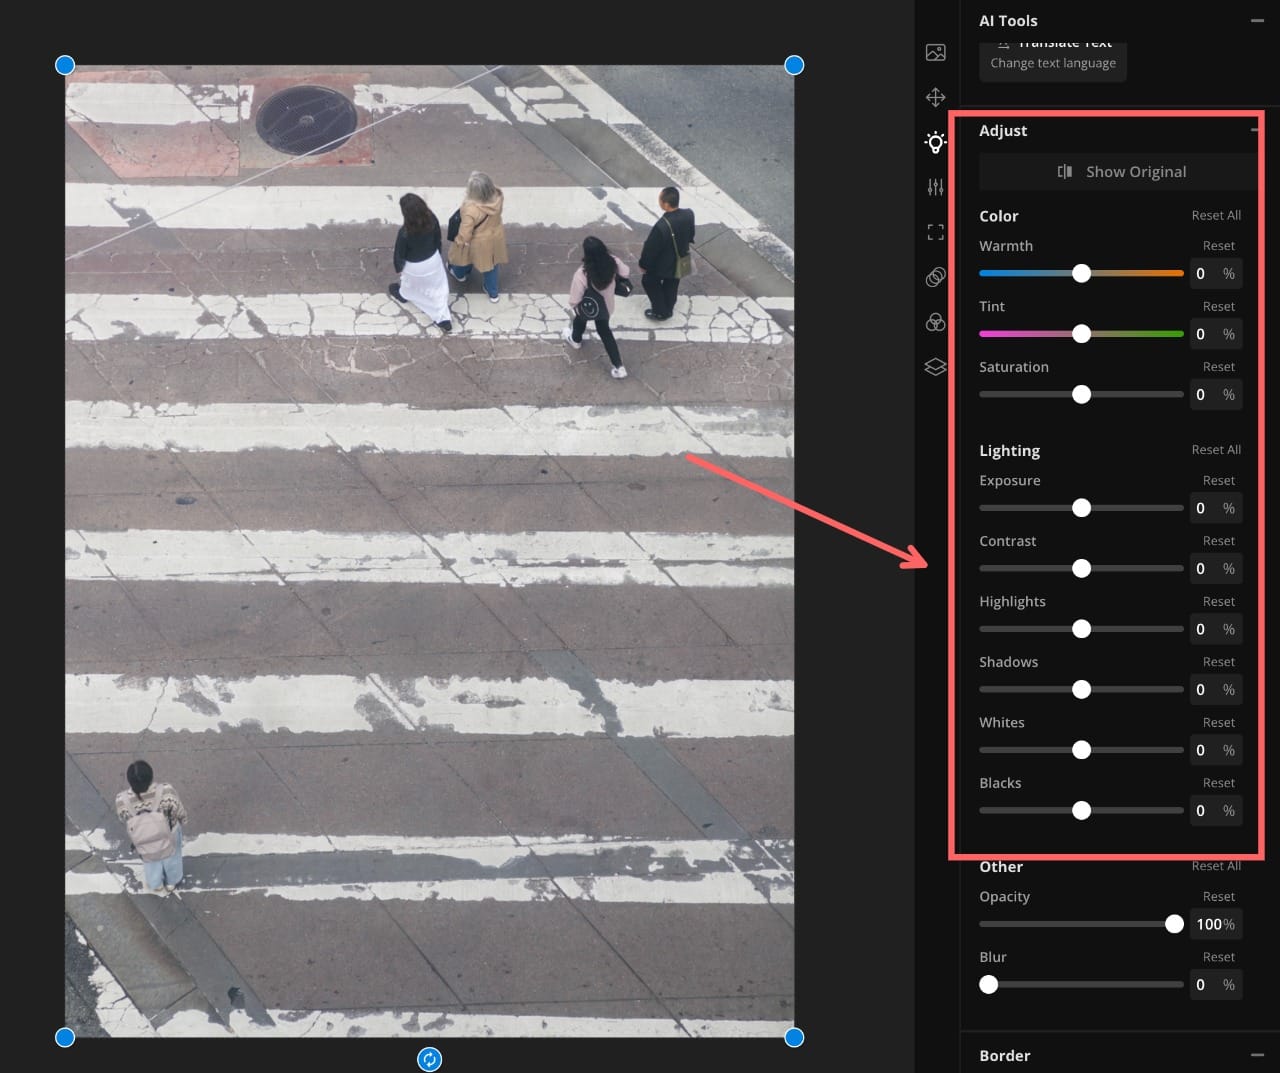
The key to color-grading is experimentation: move the sliders around and see what makes the image true to your vision.
Here are a few things you could focus on:
- Saturation & Tone: Indigo photos may look flatter or more muted than you're used to. Boosting saturation and adjusting tones can bring more vibrancy and life to the image.
- Contrast & Sharpness: If the image looks a bit soft or lacks depth, increase the contrast or tweak the sharpness. You can also fine-tune highlights and shadows to give your photo more dimensionality.
How to Resize and Convert Your Photos
Project Indigo photos can take up significantly more storage than regular iPhone photos, especially if you're shooting in DNG+JPEG mode. And if you're planning to share your images on social media, you'll often need to resize them to fit specific formats like Instagram Stories or square posts. Kapwing makes it easy to do both.
Here's how you can resize your photo:
- In the right-hand toolbar, click “Resize Project.”
- Open the size menu to select a new aspect ratio (like 9:16, 1:1, or 16:9).
- Choose how you want the image to fit the frame:
- Fill and crop scales the image to fill the new dimensions, cropping if needed.
- Fit to center places the photo inside the new frame without cropping—ideal for maintaining the full composition.
By selecting "Resize Project", you gain access to a variety of different social media formats.
Here's how you can reduce the file size of your photo:
- After editing, click “Export Project” in the top right corner.
- In the export settings, you can lower the resolution (e.g., 720p instead of 1080p) to reduce the file size.
- Click the "Export as JPG" button.
When you click "Export Project", you have the option to make your file size smaller.
Beyond basic edits, Kapwing also offers a range of creative tools to help you get more out of your photos. You can remove the image background, add custom text, and even turn your photo into a collage, making it easy to create content that stands out on any platform.
Frequently Asked Questions
What devices support Project Indigo?
The app is only compatible with Pro/Pro Max iPhones from the 12 series up, and Non-Pro iPhones starting with from 14 series up.
However Adobe notes that the app will run better on newer models
Is Project Indigo free?
Yes, Project Indigo is currently free. However, Adobe has hinted that it may eventually become a paid product, likely integrated into the Adobe Creative Cloud ecosystem.
Is there an Android version?
An Android version also is reportedly in development, though no release date has been announced.
How can I edit in Project Indigo?
Project Indigo does not support editing, but you can edit in third-party softwares like Lightroom or Kapwing
Does Project Indigo support video?
Not currently, but Adobe has announced that they are working on additional features like video, portrait mode, and panorama.


