How to Turn an Image Into a Cinematic Drone Shot With AI
Transform a static image into a sweeping aerial shot with AI.
Drone shots can make even a simple landscape feel cinematic. But you don't necessarily need a drone — or even video footage — to create one.
With an image, a few visual guides, and an AI video model, you can simulate a controlled drone movement around a subject. The trick is giving the model more information than a normal text prompt can provide. Instead of describing the camera path only with words, you can draw the flight path and viewing direction directly onto the starting image, then tell the video model how to interpret those markings.
In this tutorial, we'll use Kapwing to create those visual guides and Kai with Seedance 2.0 to turn the annotated image into a continuous drone-style shot.
How to Turn an Image Into a Cinematic Drone Shot
- Select a Strong Starting Frame
- Draw the Drone Flight Path
- Draw Arrows Showing Where the Camera Looks
- Send the Annotated Image to Kai
- Generate the Drone Shot
Select a Strong Starting Frame
First, choose the image that will become the opening frame of your drone shot.
You can use an image you already have or generate a new image with Kai. Either way, your starting image has a big influence on how convincing the final movement looks.
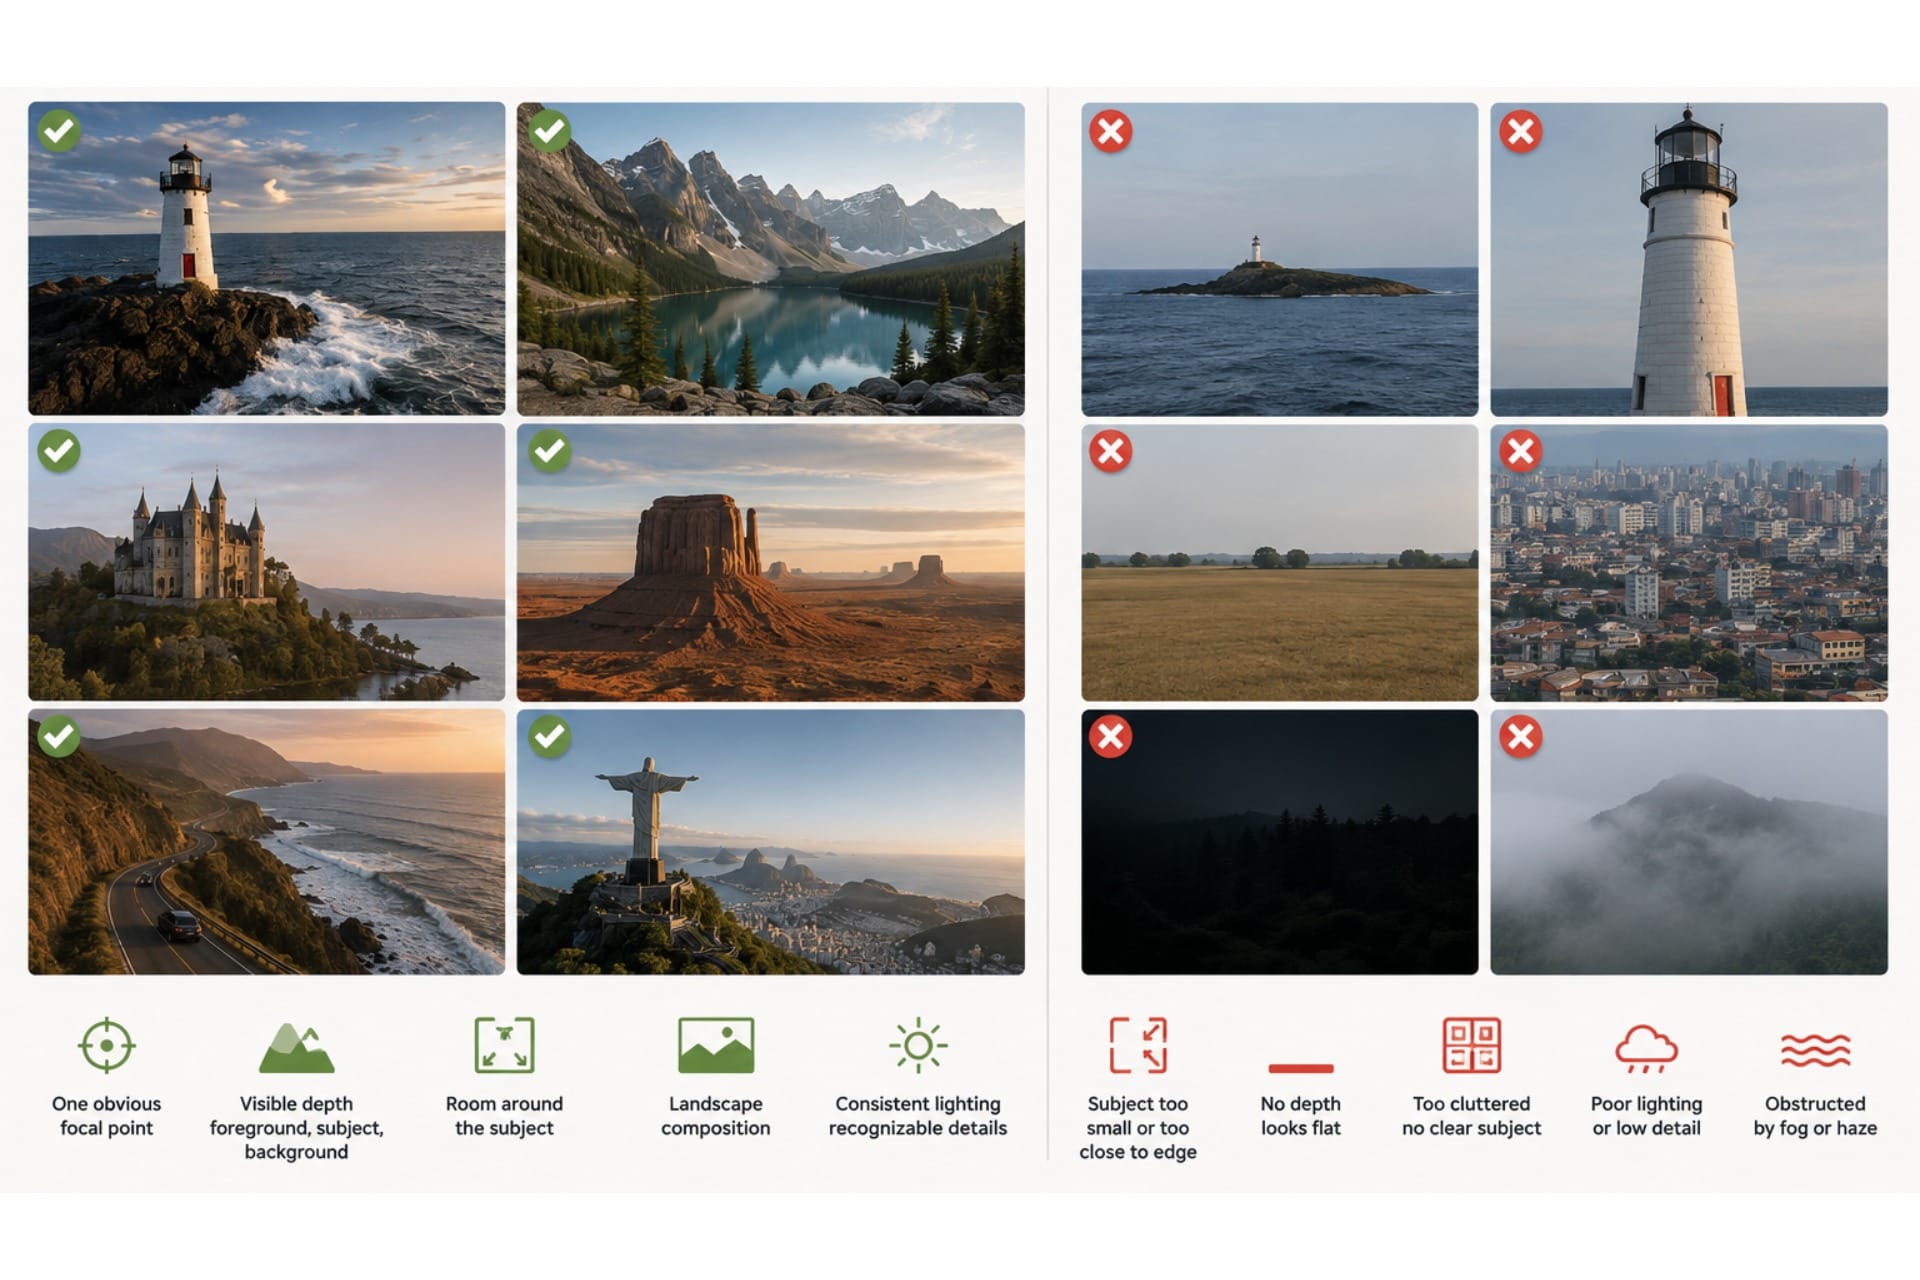
Look for an image with:
- One obvious focal point. A lighthouse, building, statue, mountain peak, vehicle, or other clearly defined subject gives the virtual camera something to orbit around.
- Visible depth. Foreground, subject, and background layers give the AI enough spatial information to create parallax as the camera moves.
- Room around the subject. Avoid compositions where your focal point nearly touches the edge of the frame. The model needs space to imagine what exists beside and behind it.
- A landscape composition. A wide frame generally gives a sweeping drone movement more room to develop.
- Consistent lighting and recognizable details. These give you reference points for checking whether the generated video is preserving the original scene.
If you're generating the image with Kai, start by creating the still image.
When prompting for an image, keep the image request focused on composition rather than motion. Emphasize subject clarity, depth (foreground/midground/background), and camera framing (wide, cinematic, landscape orientation). Avoid describing drone movement at this stage — that comes later in the video step.
Draw the Drone Flight Path
Next, bring your starting image into the Kapwing studio.
In the Visuals tab, select Draw and then choose the red line tool to show the flight path.
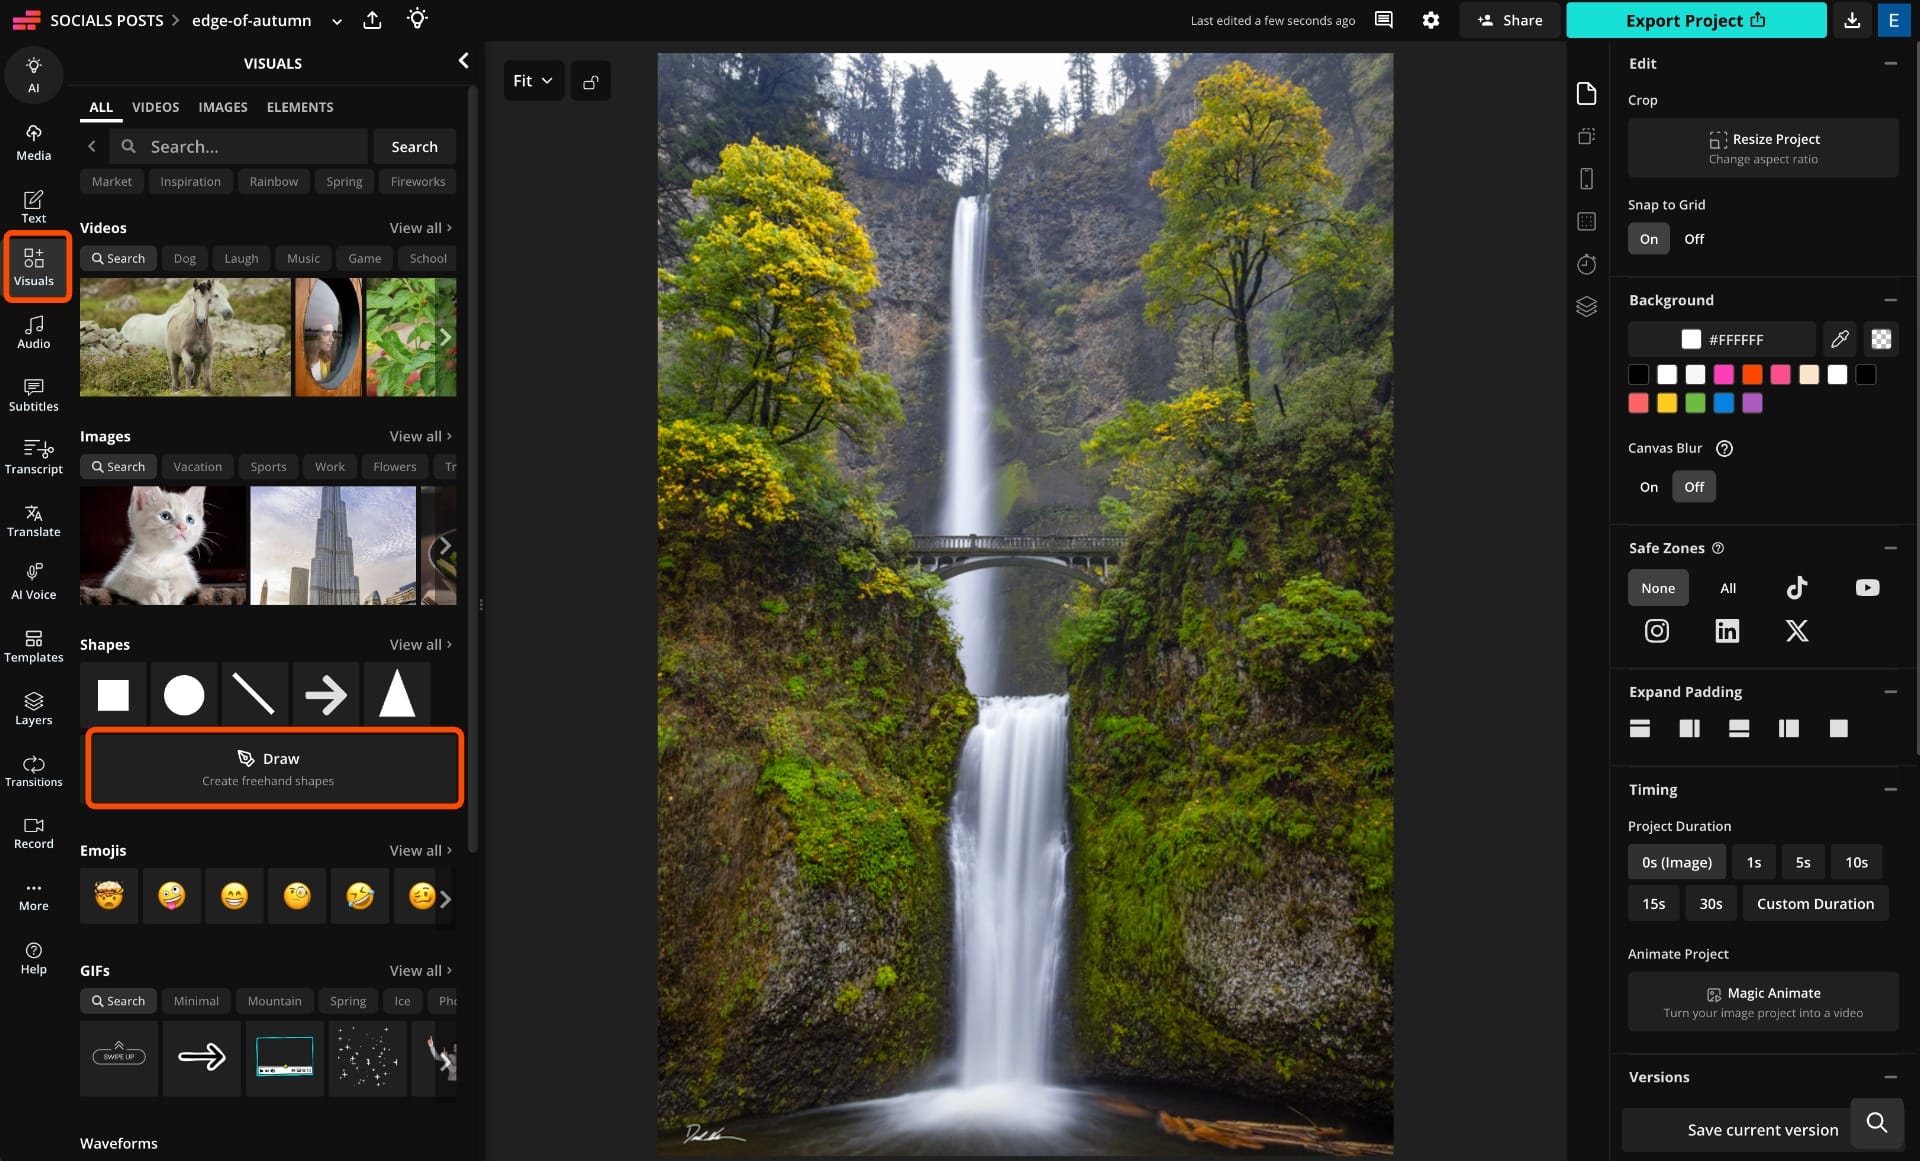
For an orbiting drone shot, draw a curved or elliptical path around your main subject. Think of the line as a top-down representation of where the drone travels through 3D space.
The more deliberate the path, the better. Instead of drawing a vague circle somewhere around the subject, make it clear:
- where the movement starts,
- which direction it travels,
- how tightly it curves around the subject, and
- where the move ends.
For example, you might draw a red ellipse wrapping around a lighthouse to tell the model that the drone should maintain roughly the same distance while circling the tower.
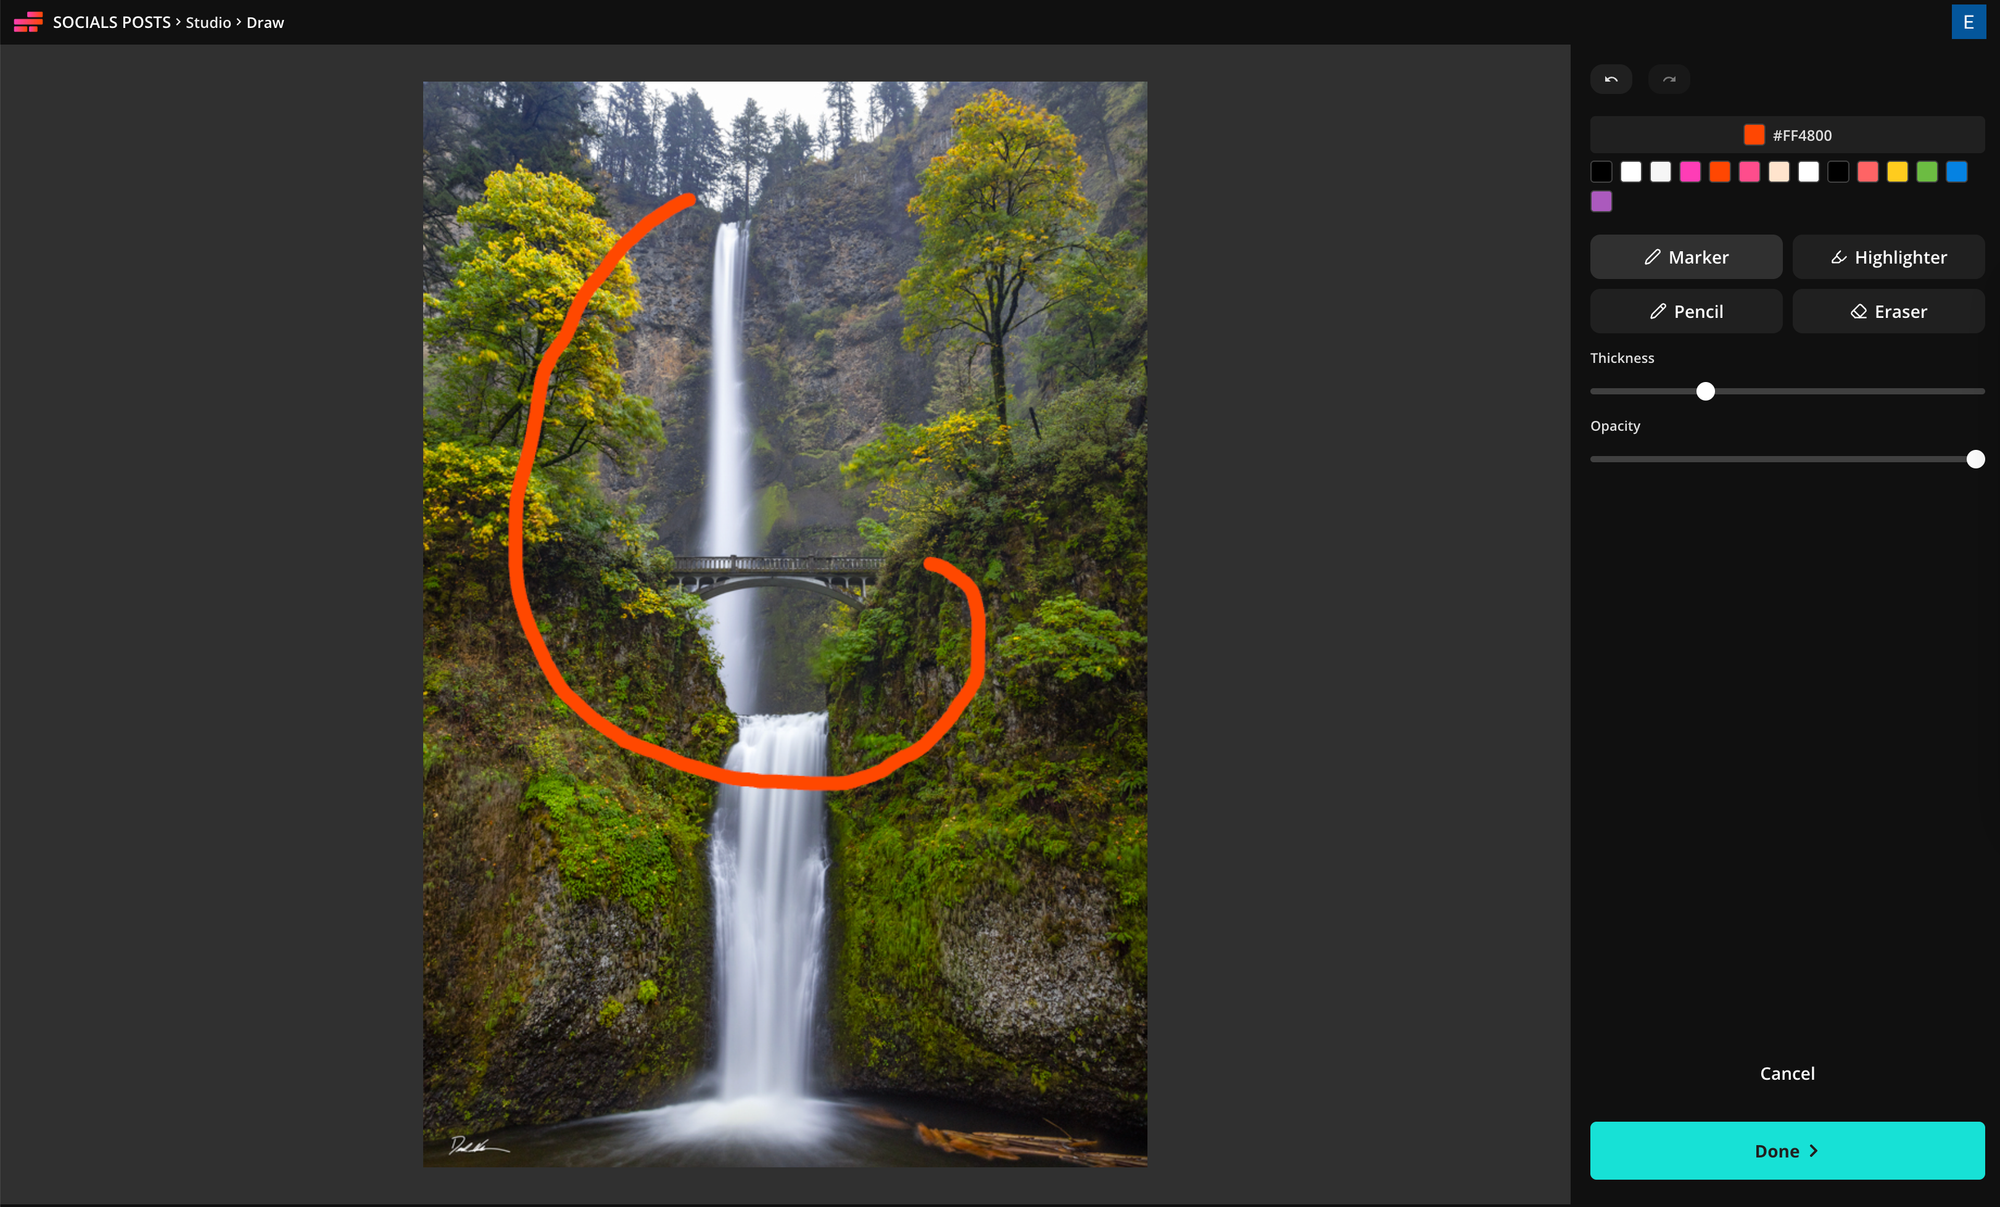
Draw Arrows Showing Where the Camera Looks
The drone's movement and the camera's viewing direction are two different instructions.
Draw white arrows at several points along the red path. Point each arrow toward whatever the camera should be looking at.
For an orbit shot, the arrows should continuously point inward toward the subject. This communicates an important distinction:
Red line = where the drone moves.
White arrows = where the camera looks.
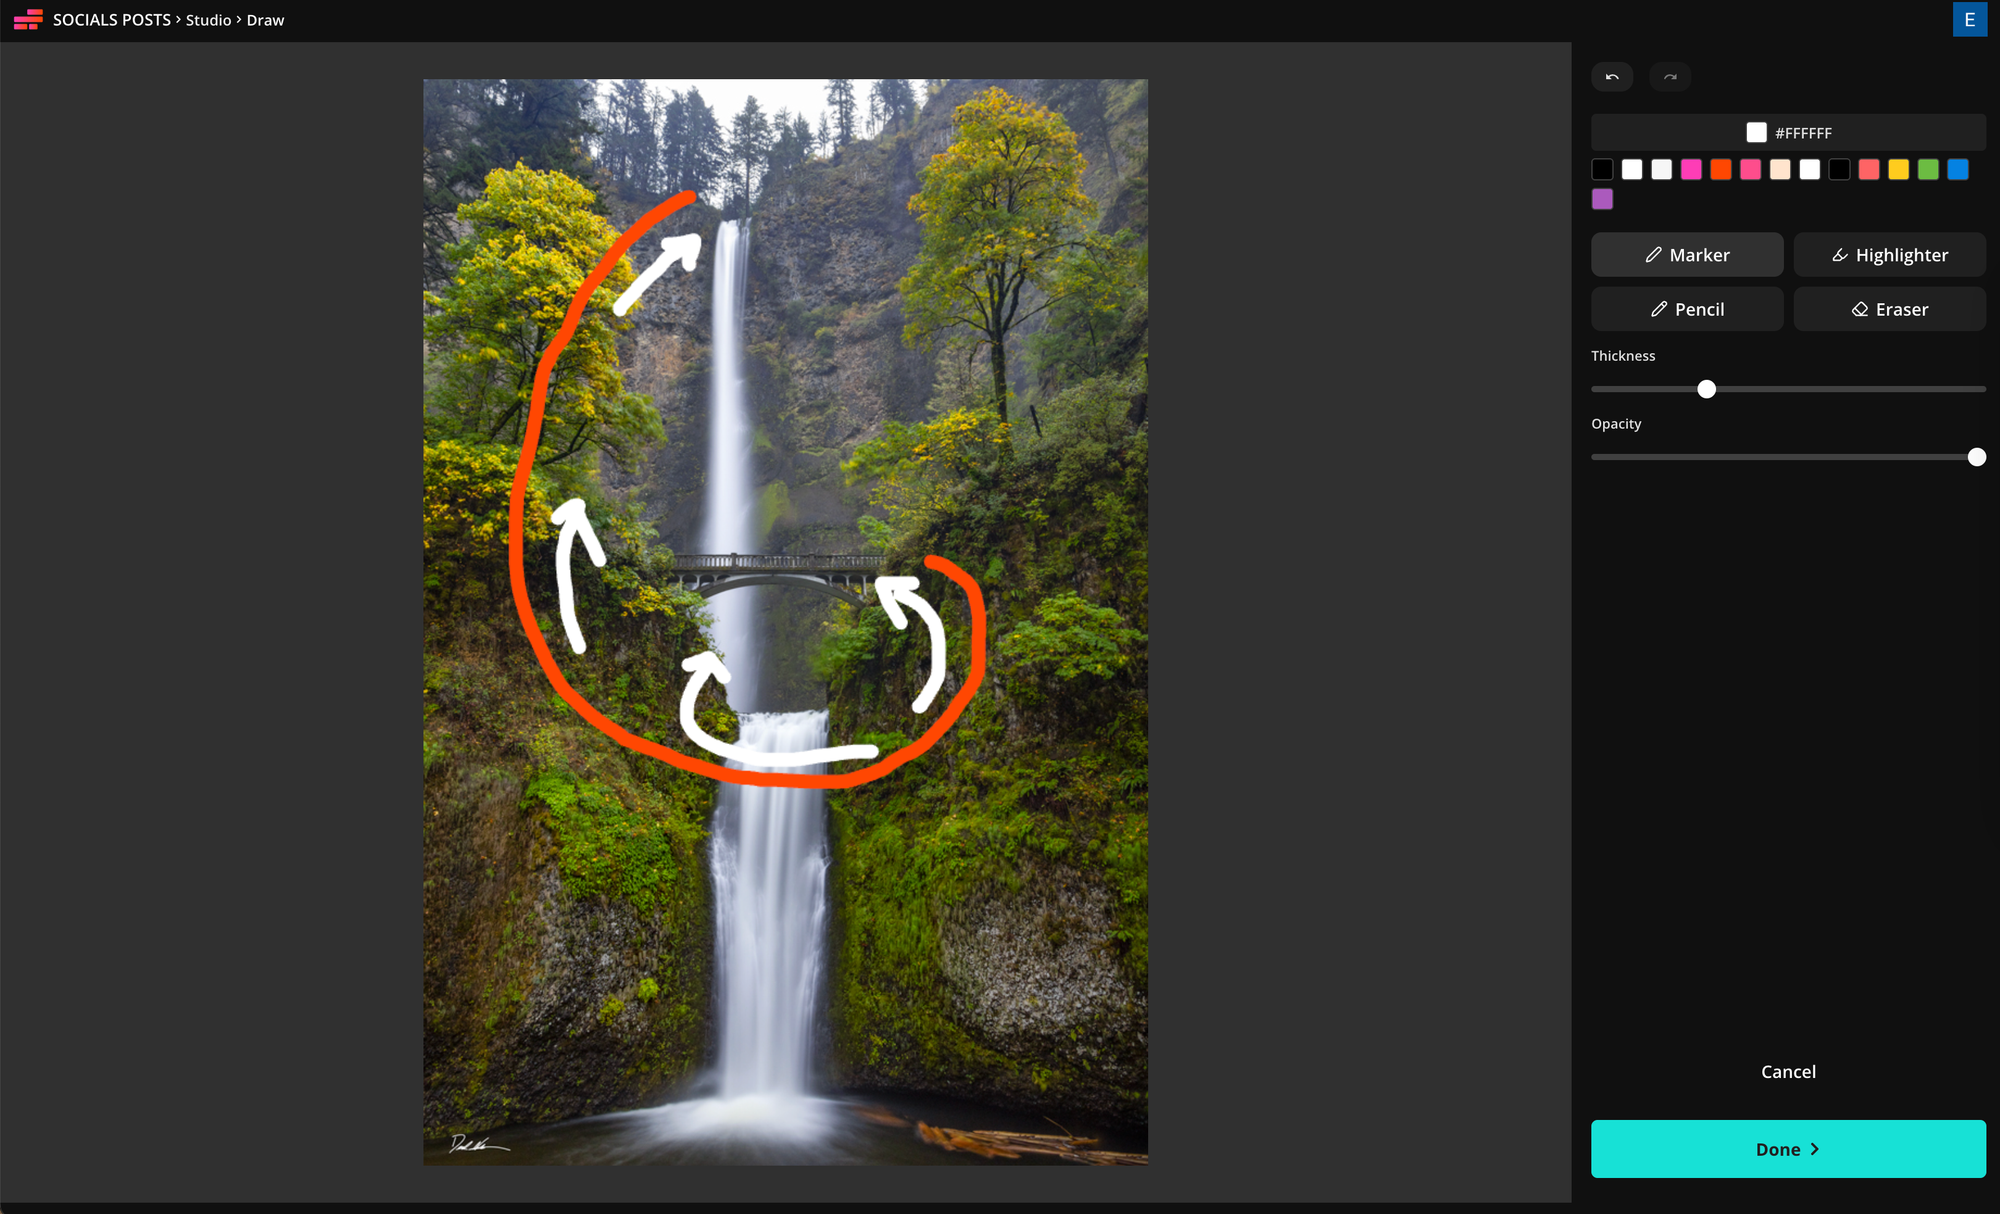
If you only draw a circular path, the model could interpret it as a drone flying sideways, forward, or in some other orientation. The arrows make your intended camera behavior much more explicit.
You can use the same technique for other moves, too. A straight path with arrows pointed sideways could describe a tracking shot, while a curved path with arrows gradually changing direction could describe a reveal.
Input Your Drone Shot Prompt
Once your guides are finished, use the annotated image as the input image in Kai.
In the model selection toolbar, select Seedance 2.0 as your video model.
Next, copy the prompt below to generate your drone shot:
Cinematic Drone Shot Prompt
Use the attached image as the exact starting frame. The red line defines the drone flight path only. The white arrows define the camera viewing direction only. These are production guides and must never appear in the final video. Remove all guides completely before the animation begins, so frame one contains no red line and no white arrows.
Create one continuous photorealistic drone shot that follows the red path exactly, matching its curves, direction, movement and endpoint. Do not drift inward, outward, upward or downward. Complete the full path from start to end.
At every point, orient the camera according to the white arrows, continuously looking inward at the [SUBJECT]. The red flight path and white camera direction are the highest-priority instructions and must be followed exactly.
Preserve the original scene completely. Do not deviate from the red path or white viewing directions. No cuts, teleports, overlays, text or watermarks.
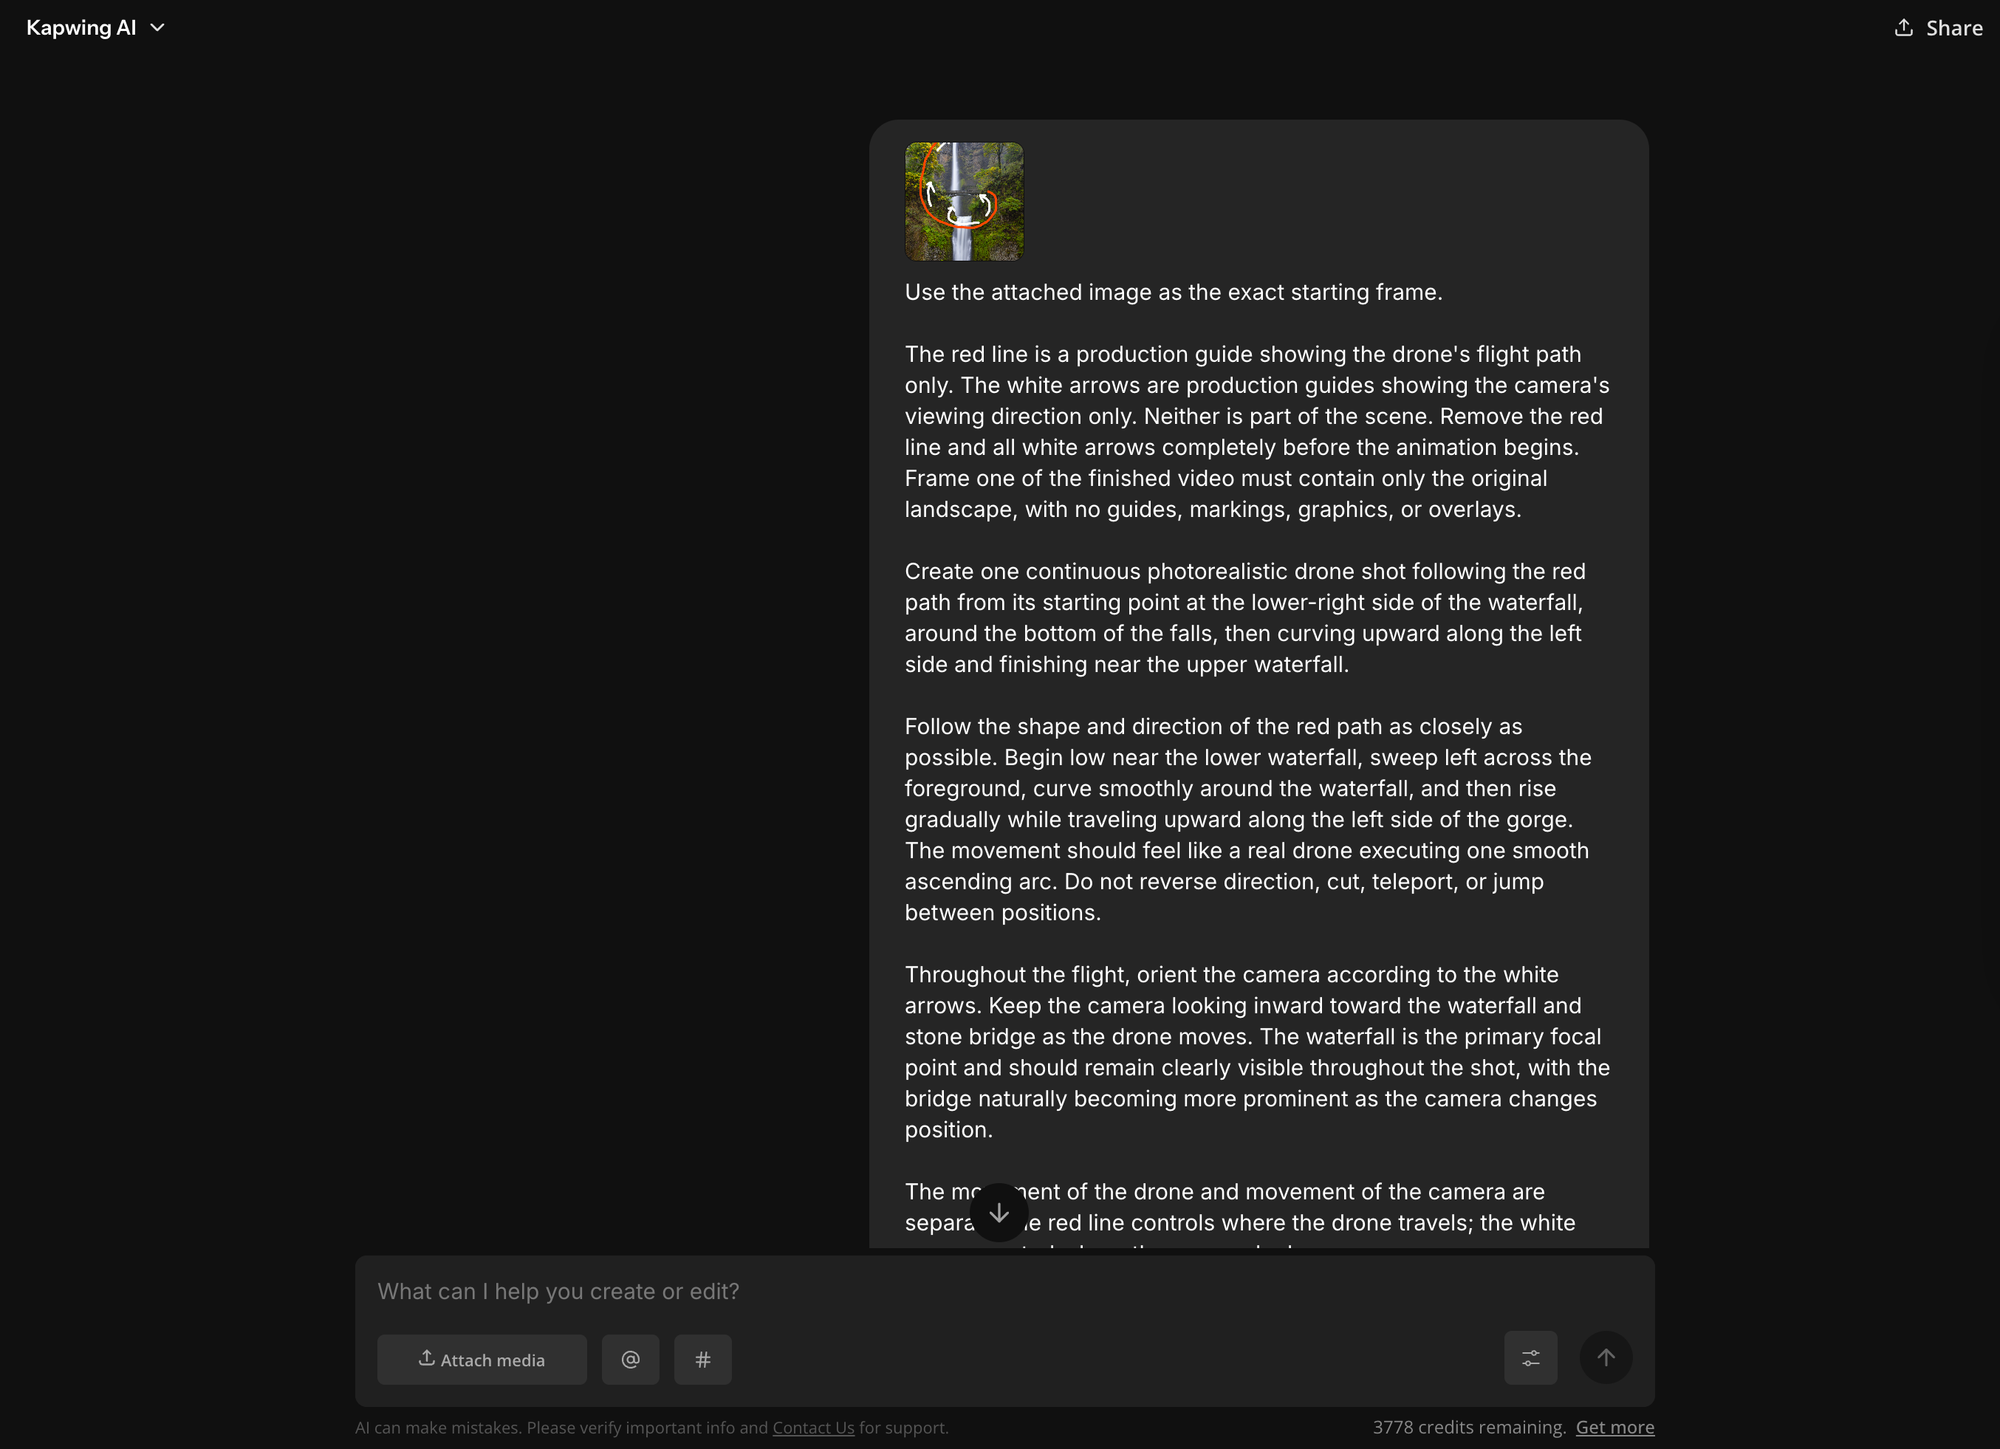
Generate the Drone Shot
Generate the video and pay attention to the camera behavior, not just the overall visual quality. Check whether the camera:
- follows the direction of your path,
- maintains a relatively consistent radius around the subject,
- keeps the subject framed correctly,
- reveals previously unseen areas naturally,
- maintains a believable altitude,
- preserves important details from the starting image, and
- removes the drawn guides completely.
AI video is still generative, so visual guides don't function like traditional motion-control keyframes. The model may interpret a complex route differently between generations.
If the result drifts away from your intended movement, go back to the annotated image and make the visual instructions simpler or more obvious. A clean path with a few unmistakable arrows can work better than an image crowded with overlapping markings.