How to Stitch Videos Together (Using AI)
Businesses using AI‑generated video tools report reducing average production costs by 58%.

Combining multiple video clips into one seamless final video is one of the most important tasks for creators. Whether you're editing a vlog, stitching together event footage, or producing a music video. But doing it manually can be time-consuming and prone to choppy cuts, mismatched audio, or inconsistent color.
That’s where AI-enhanced video editing comes in. AI-powered tools now make the process faster and more seamless than ever. Traditional editing often means manually aligning clips, syncing audio, and building transitions frame by frame. But with automatic video stitching, AI can handle tasks like trimming silences, syncing footage, and creating polished cuts.
In this guide, you’ll learn how to merge videos using AI, with detailed instructions and expert tips for common use cases.
When Should You Use AI Video Stitching?
AI video stitching is a faster, smarter way to combine video clips. Instead of manually lining everything up using traditional drag and drop methods, you can use an AI video editor to extract clips and merge them.
AI stitching is especially helpful when:
- You're working with multiple clips that need to play as one continuous video
- You’re editing podcast or interview footage and want to cut silences or filler words
- You’re editing a music video and want to sync visuals to an audio track
These tasks can be surprisingly time-consuming in traditional editing software, which can be overwhelming for newer creators or anyone on a tight deadline. That’s where AI-powered video stitching tools come in: they can optimize manual tasks, letting you focus more on creative choices.
How to Stitch Videos Together Using AI
Tools like let you generate a rough cut by analyzing the transcripts from your clips and deciding what to cut, keep, or rearrange. That makes it especially powerful for editing talking head videos, interviews, podcasts, or any content where the transcript mirrors the story flow.
Here’s how to stitch videos together using AI, step by step:
Select the Video Clips You Want to Stitch Together
The first step in stitching videos together is selecting the right clips to upload. With Kai, this step is especially important because the AI actually analyzes the transcript of your footage to determine how to trim, reorder, or combine clips.
Kai only works with spoken dialogue, like talking head videos, interviews, or tutorials. The more structured and clear your speech is, the better the AI can understand the content and generate a clean, well-paced edit.
Here are some expert tips to help you prep your footage for transcript-based stitching:
- Choose clips with strong spoken content: Kai makes editing decisions based on what’s said in your video, not just what it looks like.
- Include a variety of clips: A broader range of dialogue gives Kai more to work with for pacing and content flow.
- Trim low-quality or irrelevant clips: Cleaning up your input reduces noise and leads to more accurate edits.
Write a Prompt to Guide the AI Editor
The next step is to write a prompt to guide the AI editor. Writing an advanced prompt can significantly improve the quality of the output and reduce the time you spend editing.
Here's how to write an effective one:
- Be clear about the video’s goal: For example, “Create a 60-second highlight reel for TikTok”.
- Include the tone you’re going for: Keywords like “energetic,” “professional,” or “funny” help guide pacing, transitions, and visual choices.
- Mention specific actions: Ask the AI to “trim silences,” “add captions,” “cut on the beat,” or “remove pauses,” depending on your content type.
- Include target platforms: Saying “format for Instagram Reels” or “export in 16:9 for YouTube” helps the AI frame the video correctly.
Example Prompt for Video Stitching
Open Your Project in Kai
Once you’ve chosen your photo, head to Kai to start your project. On the homepage, you’ll see a chat interface that asks, “What can I help you create?” — this is where you’ll paste or type your prompt.
Click Attach media to upload the video clips you want to stitch together.
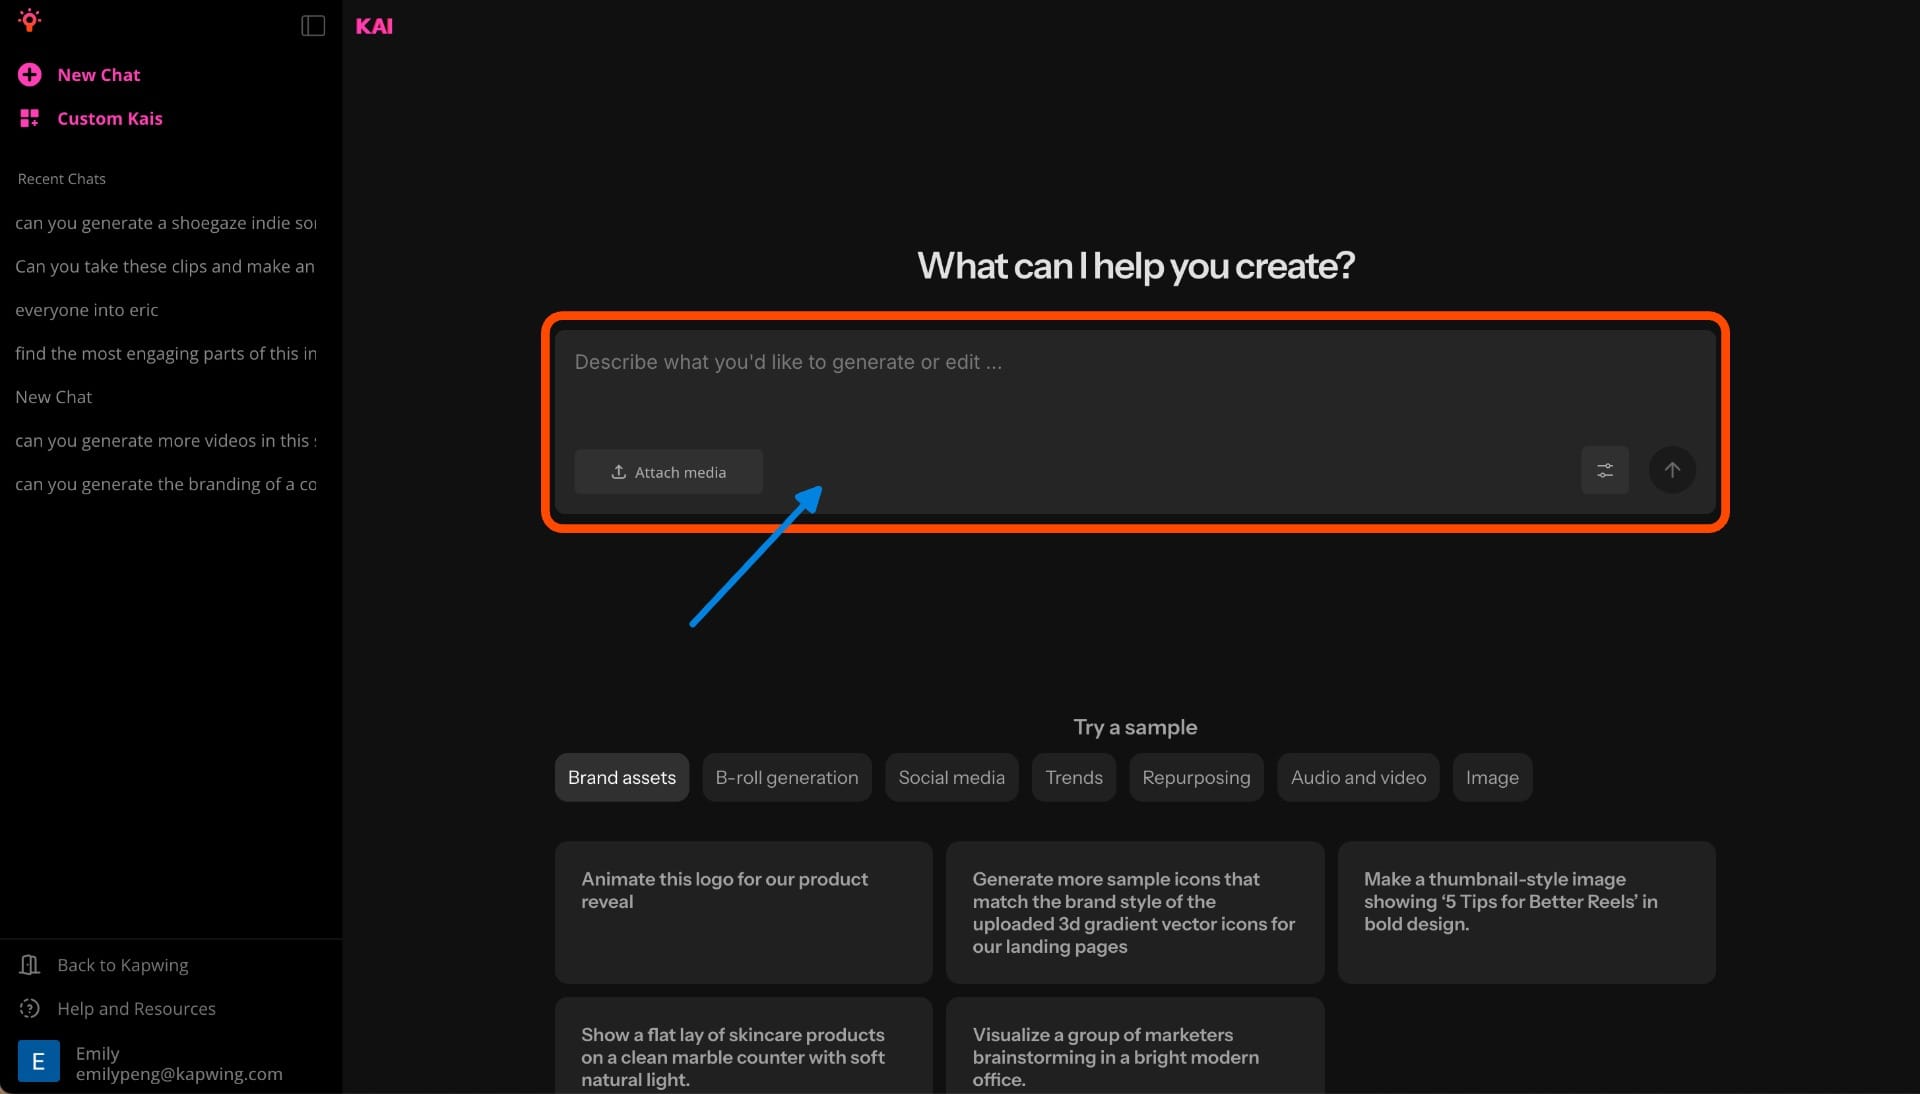
Once uploaded, the AI will automatically analyze your clips and generate a video based on your prompt.
This rough cut will include trimmed footage, basic transitions, and any formatting or captions you requested.

Refine the AI-Generated Video in the Chat Interface
Once the AI has stitched your clips together, you’ll get a rough cut of your video, shaped by your prompt and the spoken content in your footage. From here, you can give follow-up instructions in the chat interface to adjust the output.
For example, you can:
- Rearrange clips (“Move the second clip to the end”)
- Adjust timing (“Make the video under 60 seconds”)
- Add or remove captions
- Modify pacing, tone, or transitions

Open in the Studio to Make Final Edits
If you're happy with your project, you can simply click the Download button to save your content.
But if you need to make changes, clicking the “Edit in Kapwing” button will launch your project directly inside the studio, with all your content preloaded and ready to customize.
From there, you can make precise, frame-by-frame edits to every element of your project, including trimming video clips, swapping out images, adjusting fonts, and fine-tuning transitions. Each video segment is fully editable, so you have full creative control over your final output.
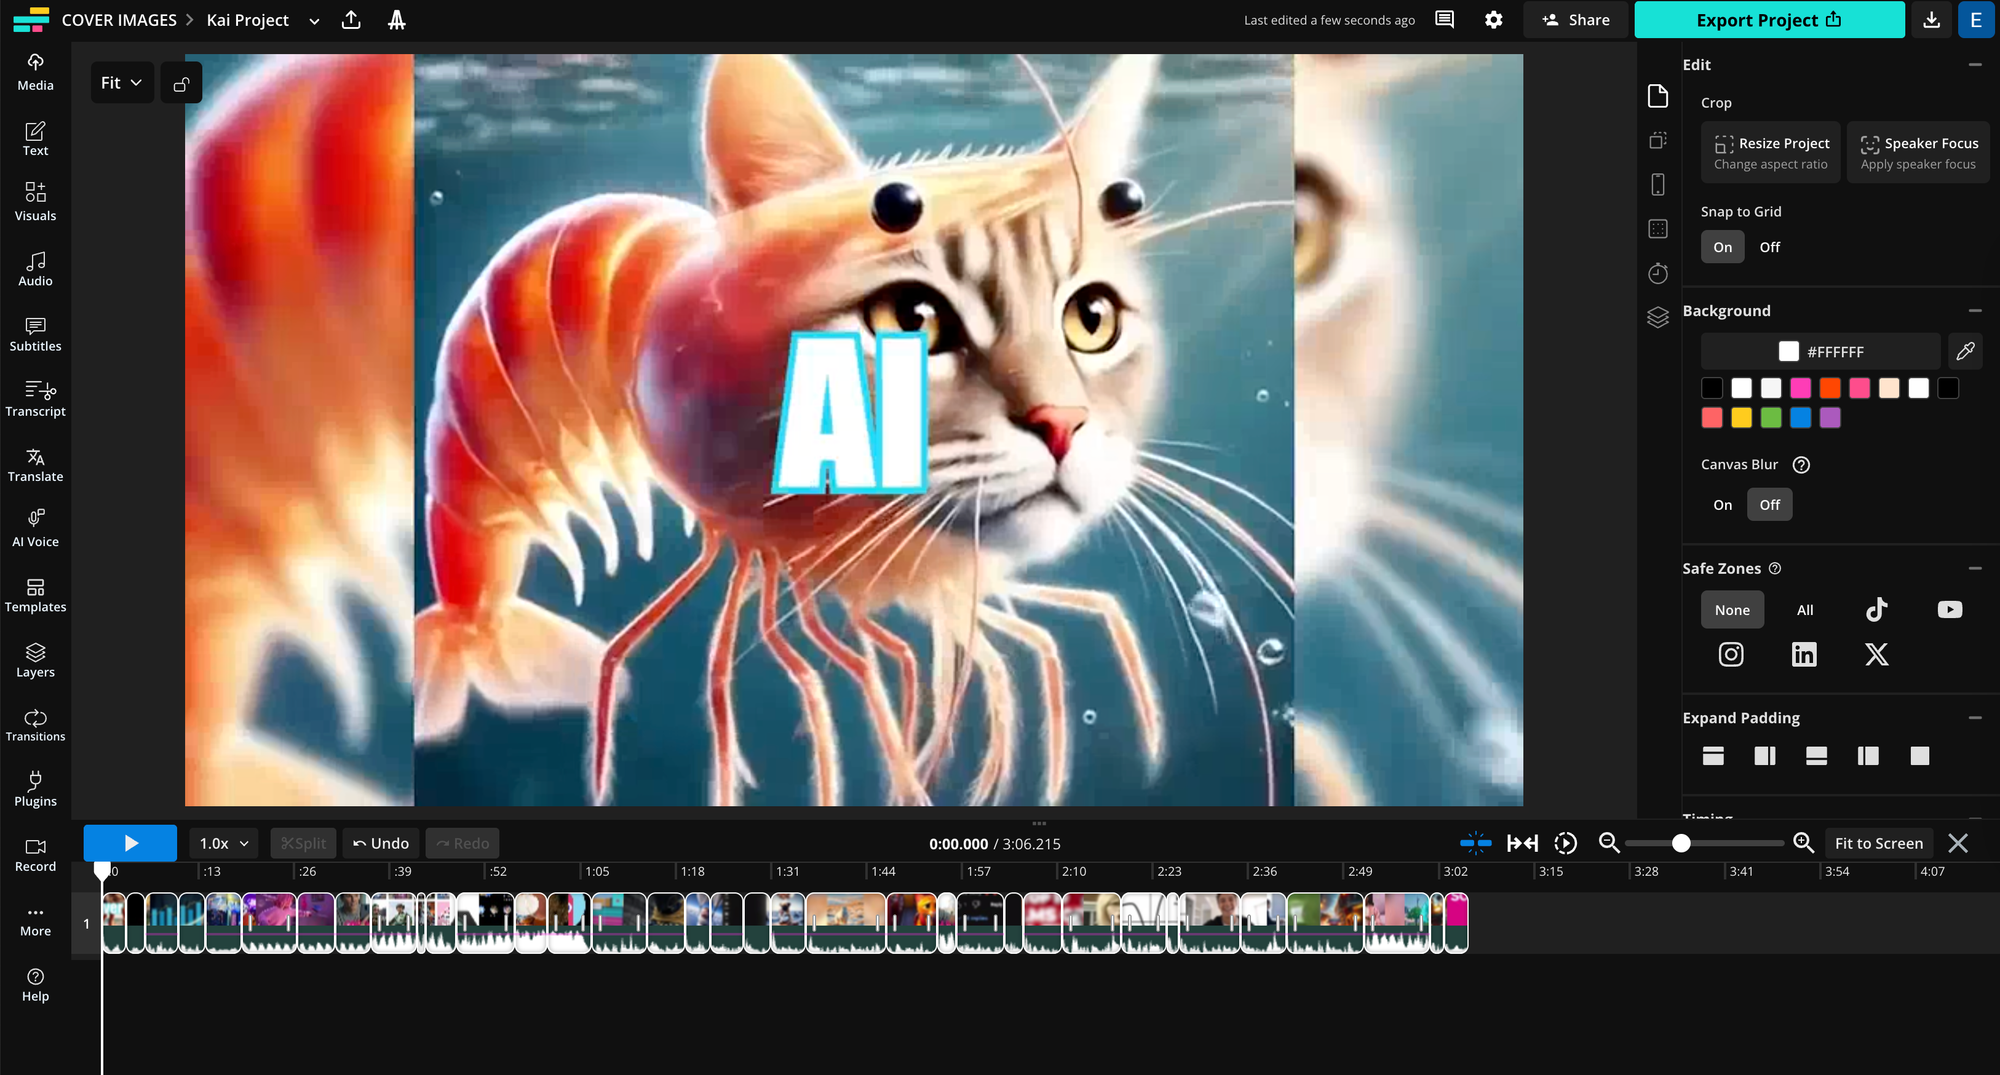
For example, for my video project, I might trim the intro for a tighter hook, swap in an updated thumbnail frame, or adjust the text overlay to match my current brand colors.
If the captions need tweaking for tone or timing, I can do that too
Use Cases: How AI Video Stitching Can Edit Different Types of Content
Whether you're creating content for YouTube, TikTok, or your next podcast drop, AI stitching tools can help you trim, organize, and export polished videos faster.
Here’s how you can use AI video stitching for specific content types:
How to Use AI Video Stitching for Podcasts or Interviews
Podcast episodes and interview recordings are often long, uncut, and filled with pauses or filler words, which makes them ideal for transcript-based AI editing.
Here’s how AI stitching helps:
- Trim filler words and long pauses:
Use AI to clean up the transcript automatically by removing words like “um,” “ah,” or awkward silences for a smoother listening/viewing experience. - Stitch together key moments into short clips:
Pull highlight quotes or memorable answers from long-form recordings and stitch them into short, social-ready clips. - Auto-generate subtitles:
Use AI to transcribe the audio and , which is a must for accessibility and better engagement, especially on muted autoplay platforms. - Resize and reframe for different platforms:
Adjust aspect ratios (like 9:16 for TikTok/Reels or 16:9 for YouTube) and center the speaker’s face.
How to Use AI Video Stitching for Vlogs and Long-Form Content
By using transcripts to interpret what’s being said, AI can help align dialogue with the visuals, segment your content, and pull shareable moments from narratives.
Here’s how AI stitching helps with long-form editing:
- Reorder clips to match your storyline
If your vlog is filmed out of sequence, AI can rearrange transcript-based clips to match a clear timeline. For example, you can prompt the editor to follow the order of events: “arrival,” “exploring,” “sunset recap,” etc. - Highlight visual + spoken milestones
AI can extract short snippets that match key visual moments with powerful lines of dialogue — like pairing a mountain-top voiceover with sweeping drone footage for Instagram or TikTok. - Add custom title screens to break up chapters
You can use AI tools to create title screens for each segment of your vlog, like “Day 3: Coastal Hike,” and pair them with B-roll. These 1–10 second slides help structure longer videos and make them easier to follow.
Frequently Asked Questions
How do I fix jump cuts or awkward transitions after AI stitching?
If your stitched video feels choppy, try adding crossfade transitions, inserting B-roll, or reordering clips. Tools like Kapwing allow manual tweaks after the AI has made its initial cut, so you can smooth things out as needed.
Can I use AI to merge videos with different formats or resolutions?
Yes, most AI video editors can automatically resize or crop videos to match the canvas of your project. You can stitch together footage from phones, webcams, or cameras, and the tool will handle the formatting.
Is the output quality (resolution or frame rate) affected by AI merging?
AI editors usually maintain your clips’ original quality unless you export at a lower setting. Make sure to export in 1080p or 4K for the best results, especially if your footage includes high-motion scenes or text overlays.
Can I manually tweak the video after the AI stitches it together?
Yes, most platforms let you edit the AI-generated video in a timeline editor. You can trim, move clips, change transitions, adjust timing, and add custom overlays or text before exporting your final version.
What are best practices for getting good results with AI stitching?
To get cleaner results:
- Use consistent lighting and framing across clips
- Leave a bit of overlap or buffer time at the start/end of each clip
- Keep background noise minimal for easier audio syncing
- Label or organize clips before uploading to speed up the process