How to Make a Reel on Facebook
Facebook Reels generate an estimated 140 billion plays per day

As of 2025, over 616 million people watch Facebook Reels. While these short, vertical videos may look similar to what you’d see on Instagram Reels or TikTok, they reach a uniquely broad and diverse audience.
Unlike TikTok and Instagram, which have user bases that heavily concentrate on users under 35, Facebook’s audience is more evenly distributed across adult age groups, with strong representation not only from younger adults but also from those aged 35–44, 45–54, and older.
For creators seeking to connect with a multigenerational and global audience, mastering the art of Facebook Reels has quickly become an essential marketing skill.
This article will walk you through how to make a Reel using the Facebook app, from basic in-app edits to unlocking more creative control with an online Video Editor.
Table of Contents
How To Make A Reel On Facebook
Facebook’s built-in Reels editor offers a simple and accessible way to produce videos directly from the app. While it doesn’t offer the full creative flexibility of professional editing tools, it’s great for content creators who want to post quickly, test ideas, or only make simpler edits.
Step 1: Open the Reels Editor
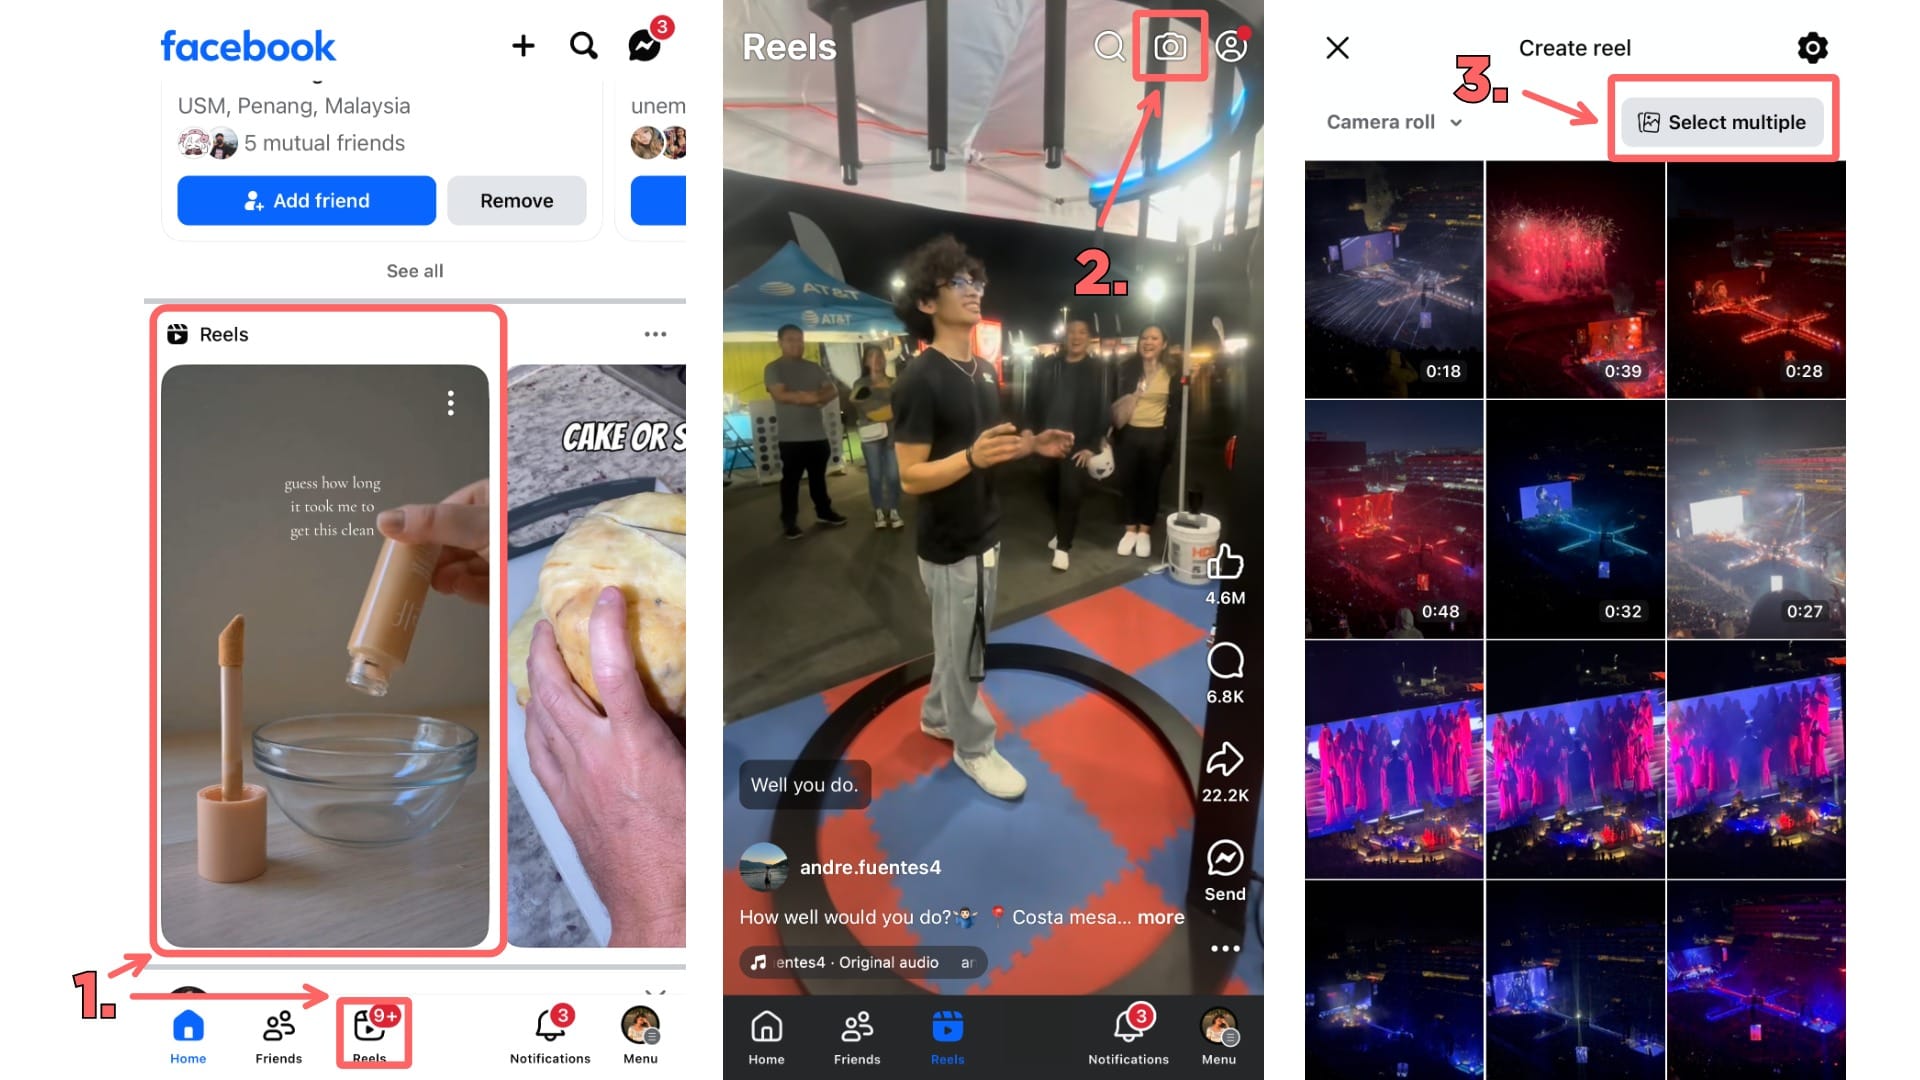
- Open the Facebook app and tap the Reels tab at the bottom of the screen.
(Or scroll down your timeline until you find the Reels section, then tap on any Reel to open it) - Tap the camera icon in the top-right corner to start creating a Reel.
- Choose videos or photos from your camera roll. To select more than one, tap “Select Multiple.” You can add up to 50 clips, but make sure to keep the total video under 90 seconds.
Step 2: Edit With Facebook’s In-App Tools
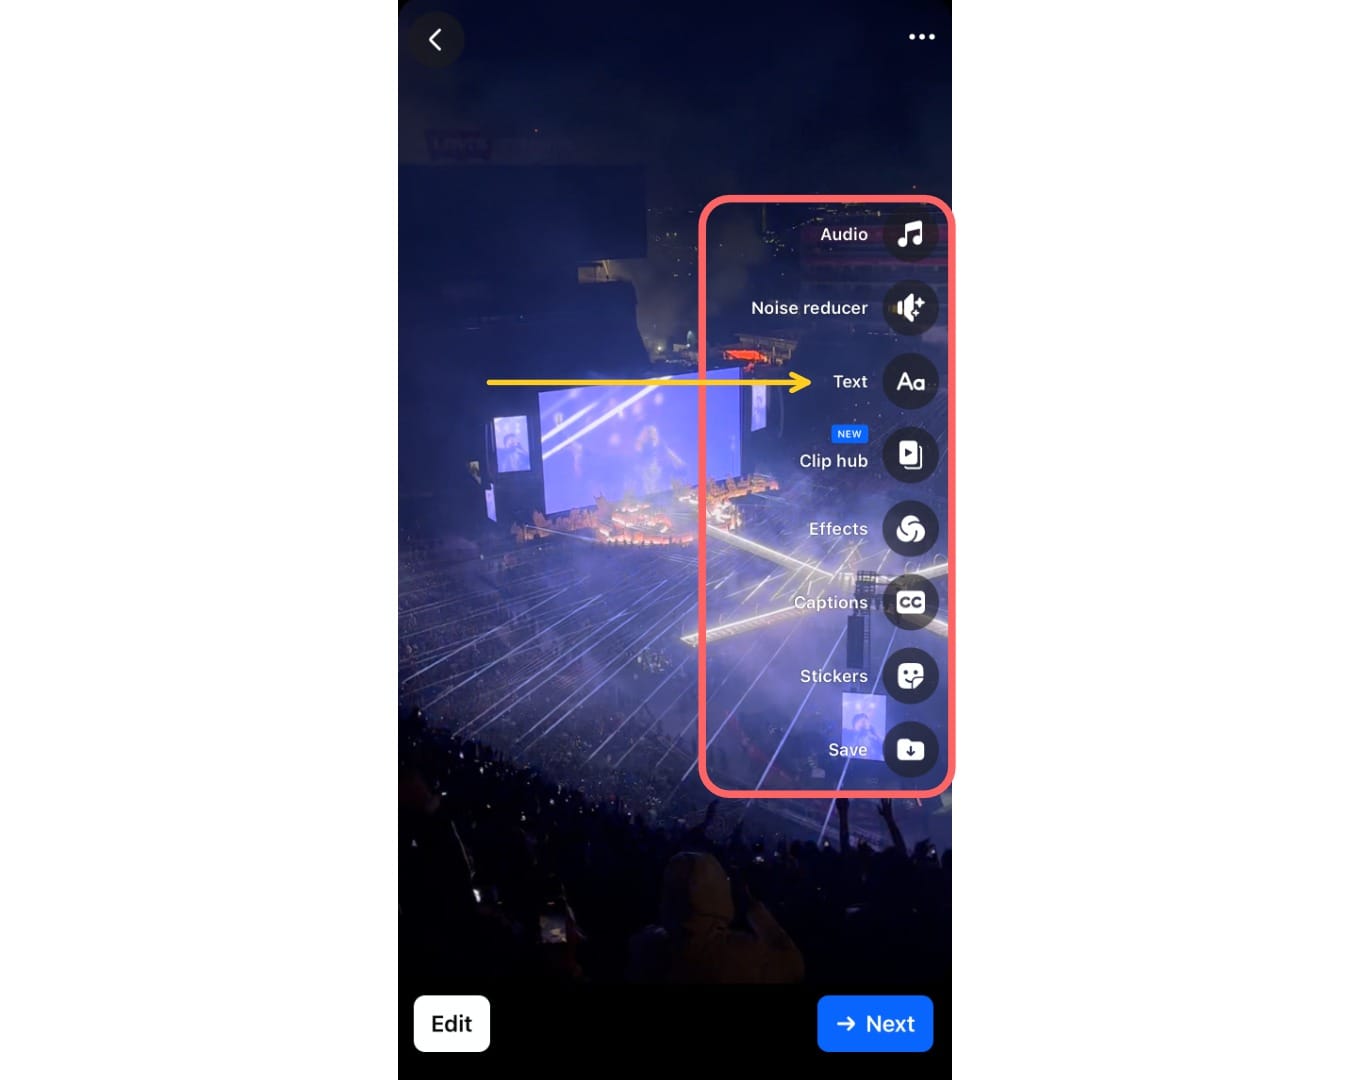
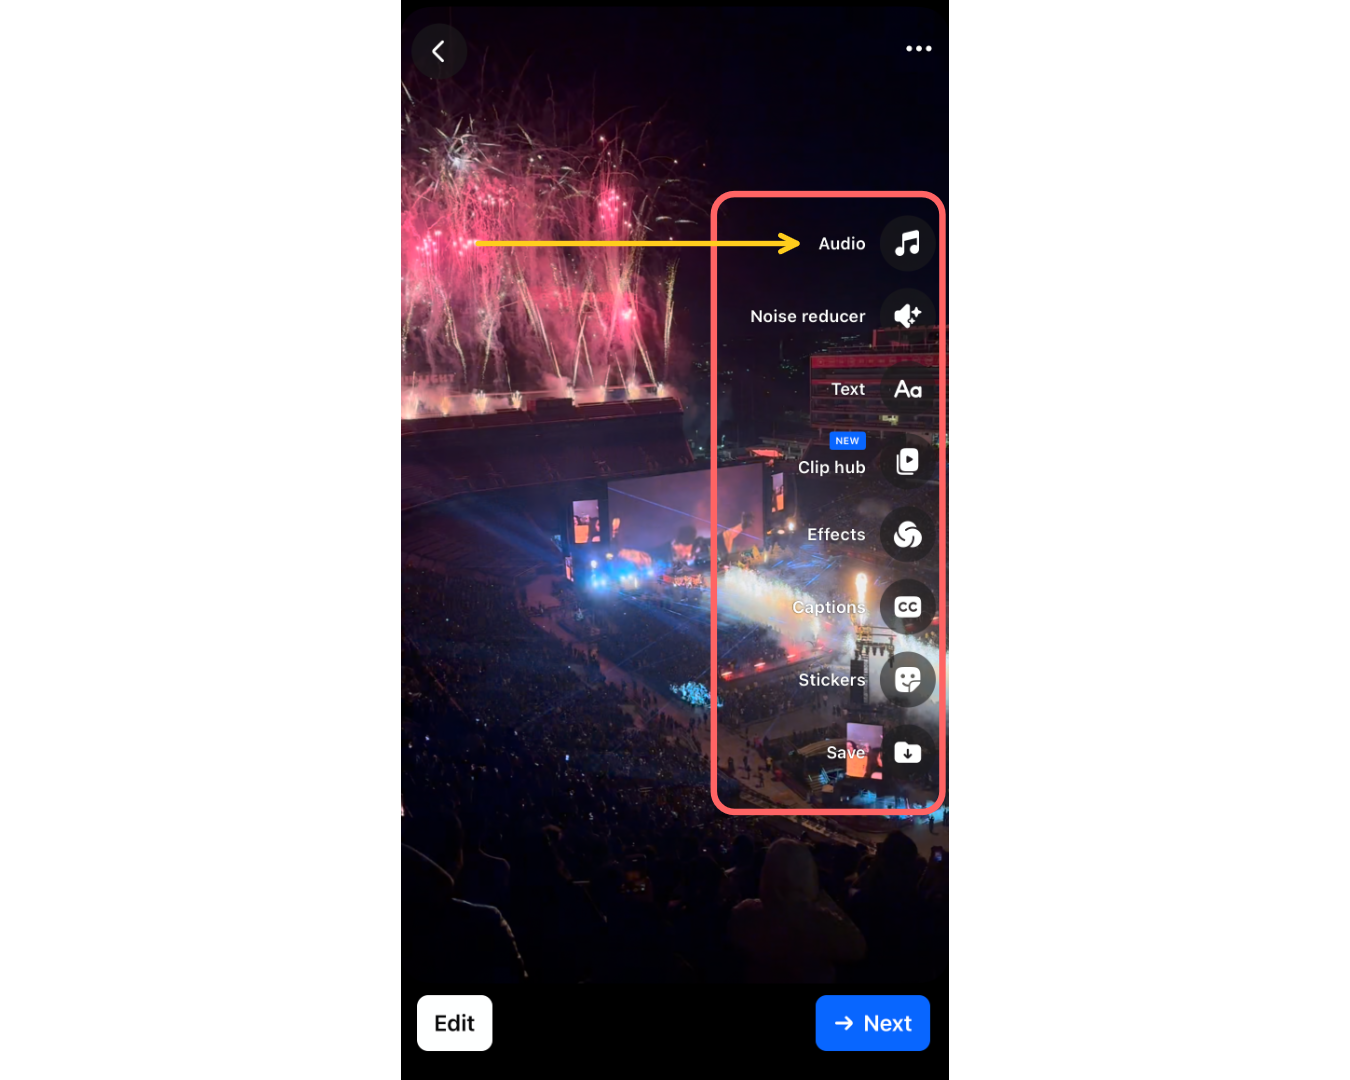
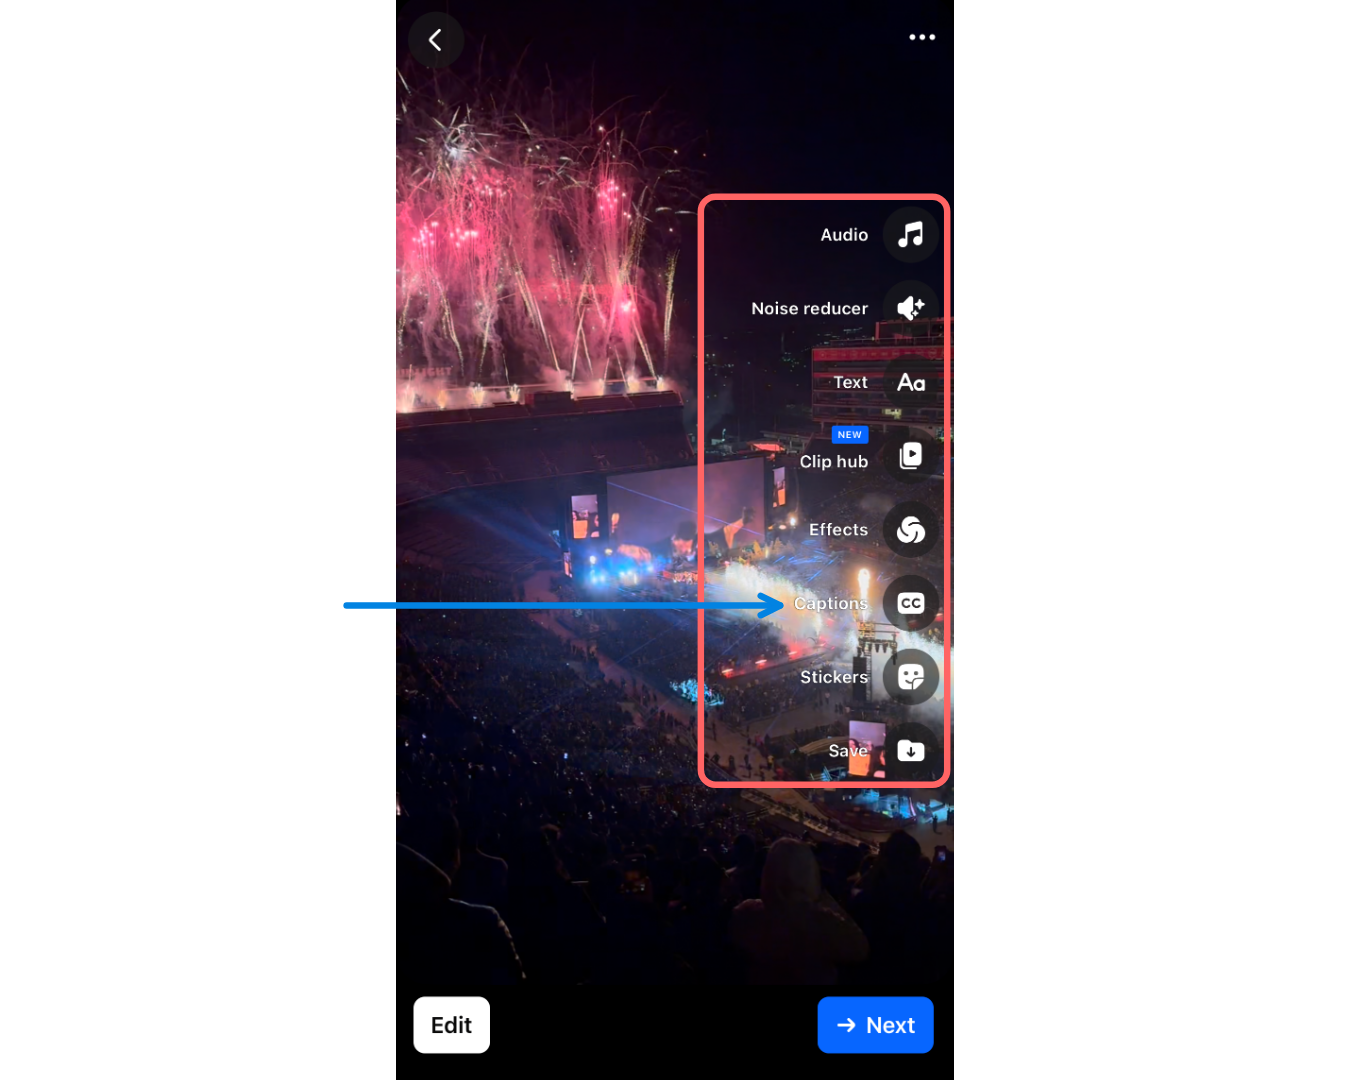
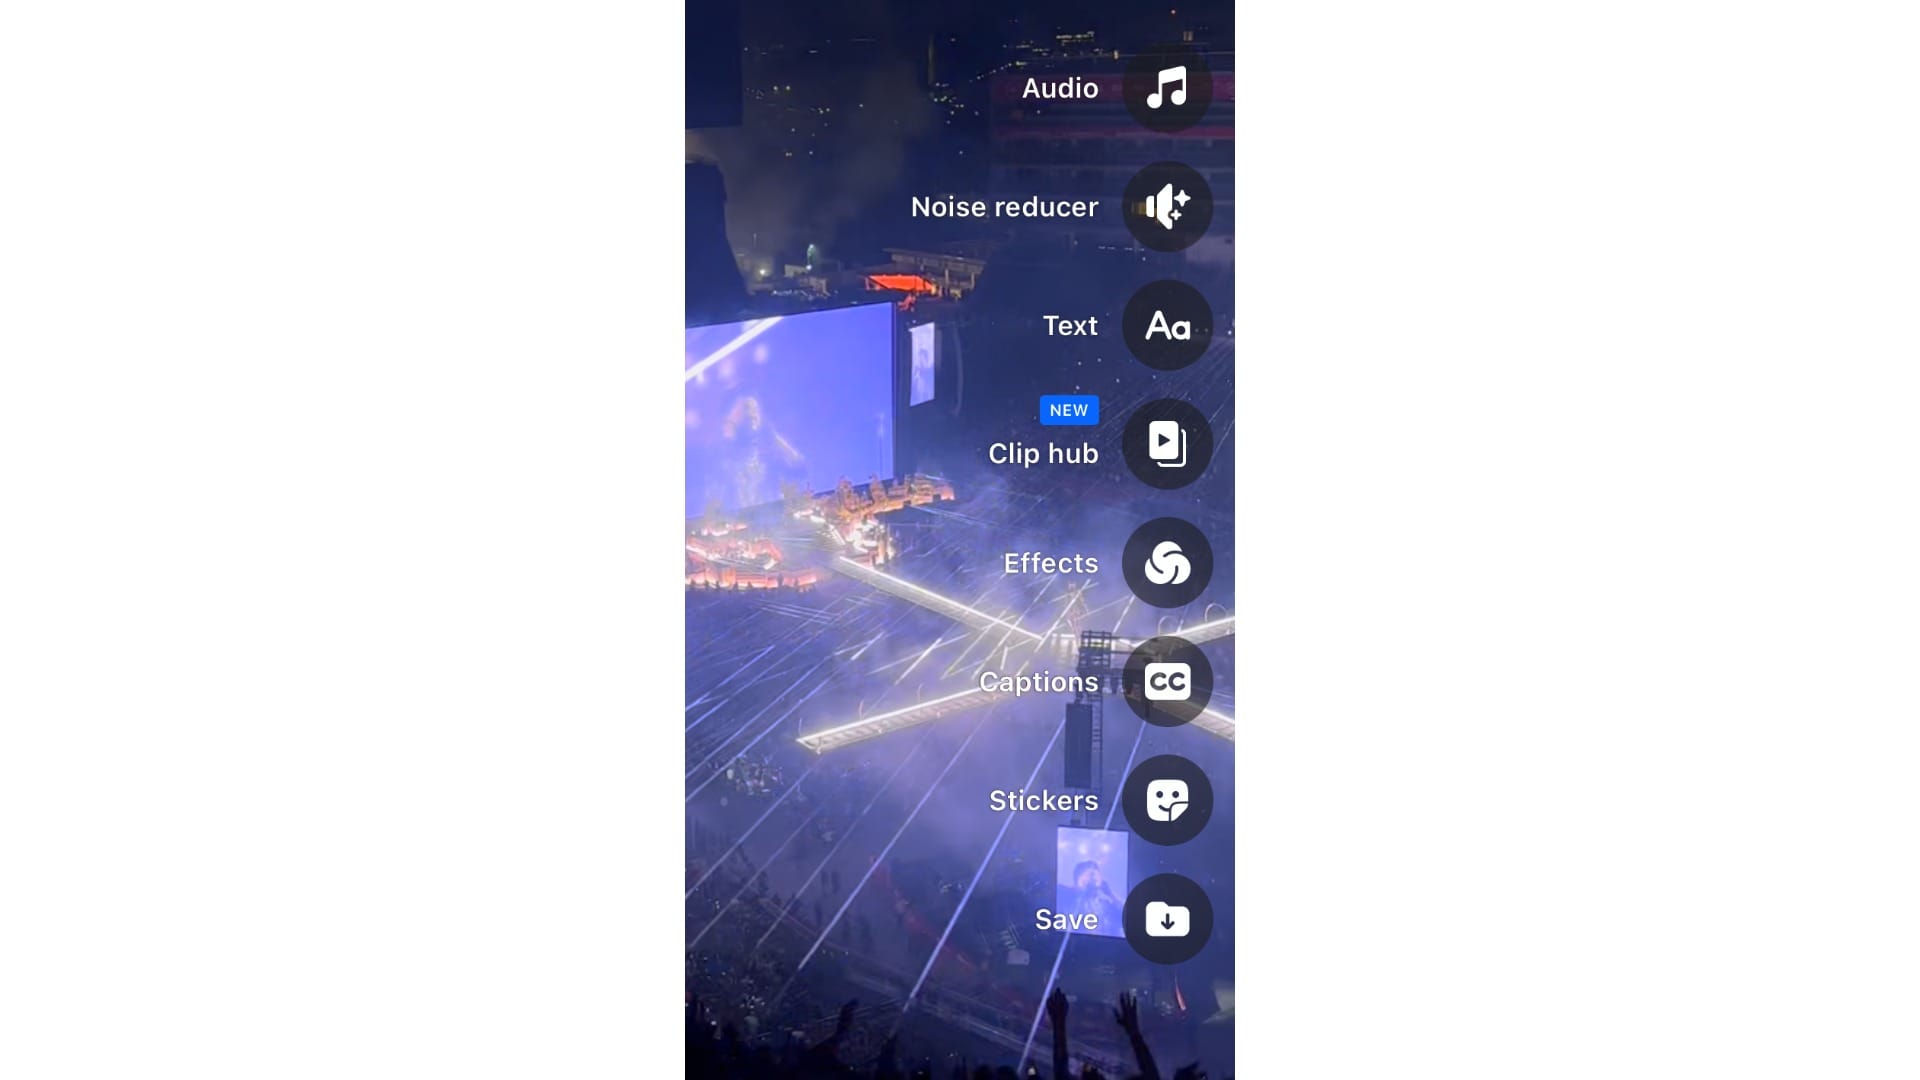
Once your clip is selected, you’ll see a vertical toolbar on the right side of the screen.
I'll walk you through how to use some of the most important features. For an overview of all the tools, scroll to the end of this section.
Text
One of the most important tools in the Facebook Reels editor is the Text tool (the “Aa” icon). You’ll need to add text to your Reel in most cases, whether it’s to give context, highlight points, or grab attention.
For example, in the “POV:” trend, creators use on-screen text to set up a scenario before the video even begins.
@swerve_app yeah im staying at home next time #fyp #gym #gymtok #viralvideo ♬ 1901 - Instrumental - Phoenix
Start by clicking on the Text icon (third from the top).
This will open up a text editor menu, where you can type directly to add text to your video.
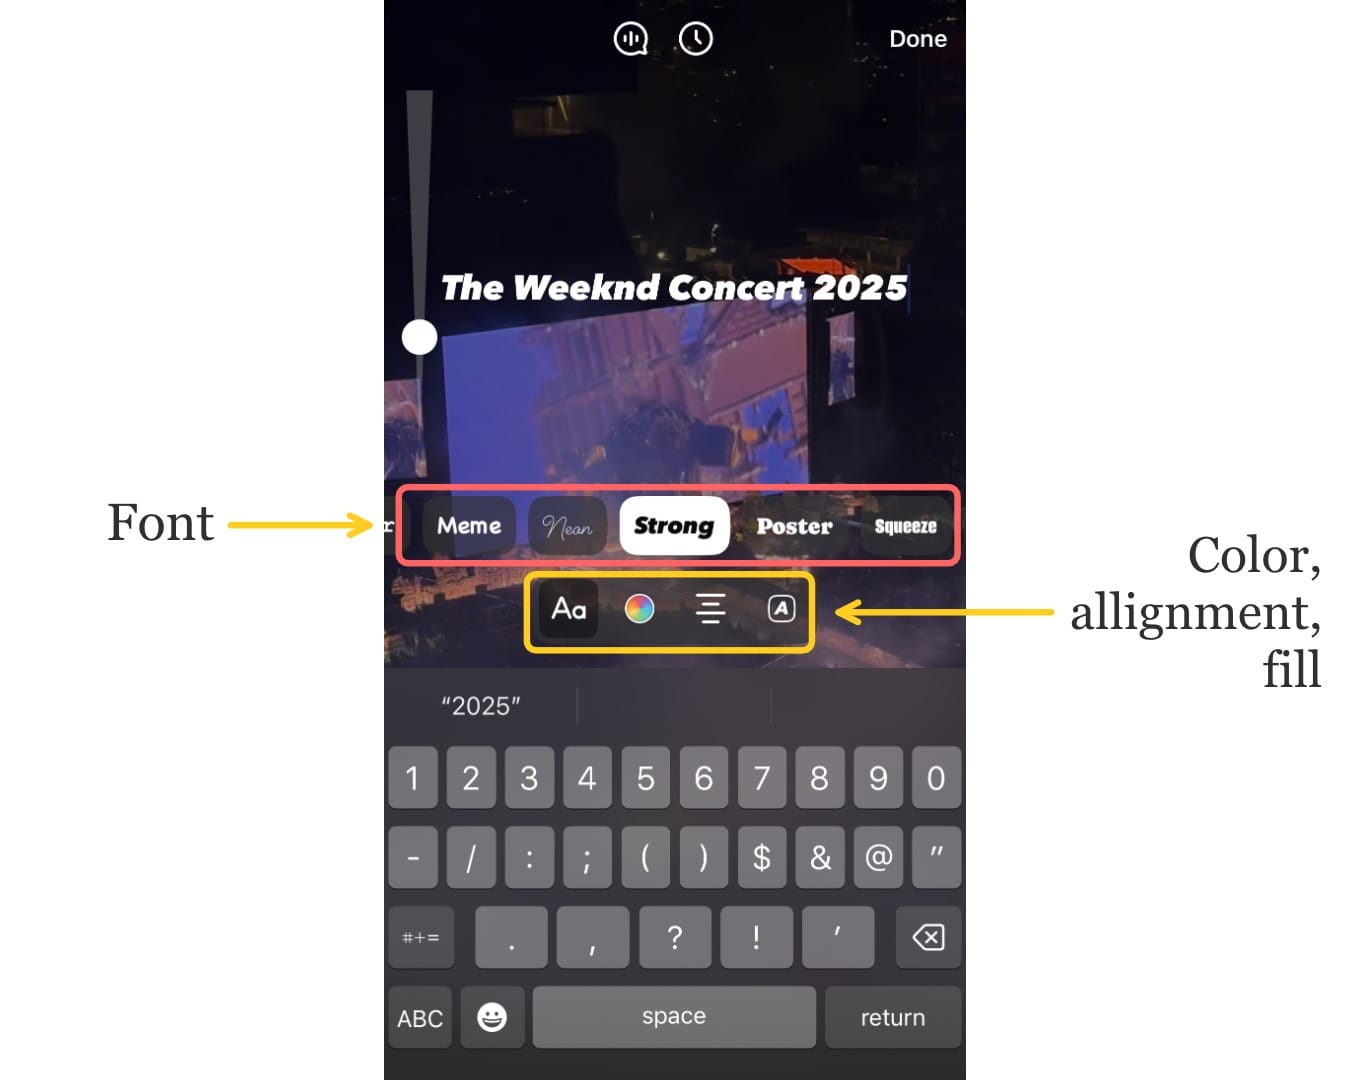
Just above the keyboard, you’ll see a toolbar. These tools customize how your text looks on screen.
- The most important is the Font tool (Aa), where you can scroll through a variety of fonts.
- Next to that is the Color tool, where you can change the text color.
- The Alignment tool allows you to align your text to the left, center, or right of the screen.
- Lastly, the Fill tool adds a colored background behind your text. This can improve visibility, especially when your video has a busy background.
You can click "Done" to finalize your text. Once you're back on the editing screen, you can pinch/drag the text-box to change its size and position.
Animate Text for More Engaging Visuals
While Facebook lets you add static text to videos, it doesn’t let you animate it. Animated text can take your content to the next level, making it more polished, dynamic, and attention-grabbing, especially in fast-scrolling environments like Facebook Reels.
For example, successful creators like Jay Shetty use animated text to reinforce key messages. The Dodo uses pop-up text to guide viewers through stories, making their content easier to follow.
Here’s how you can animate your text using a free video editor:
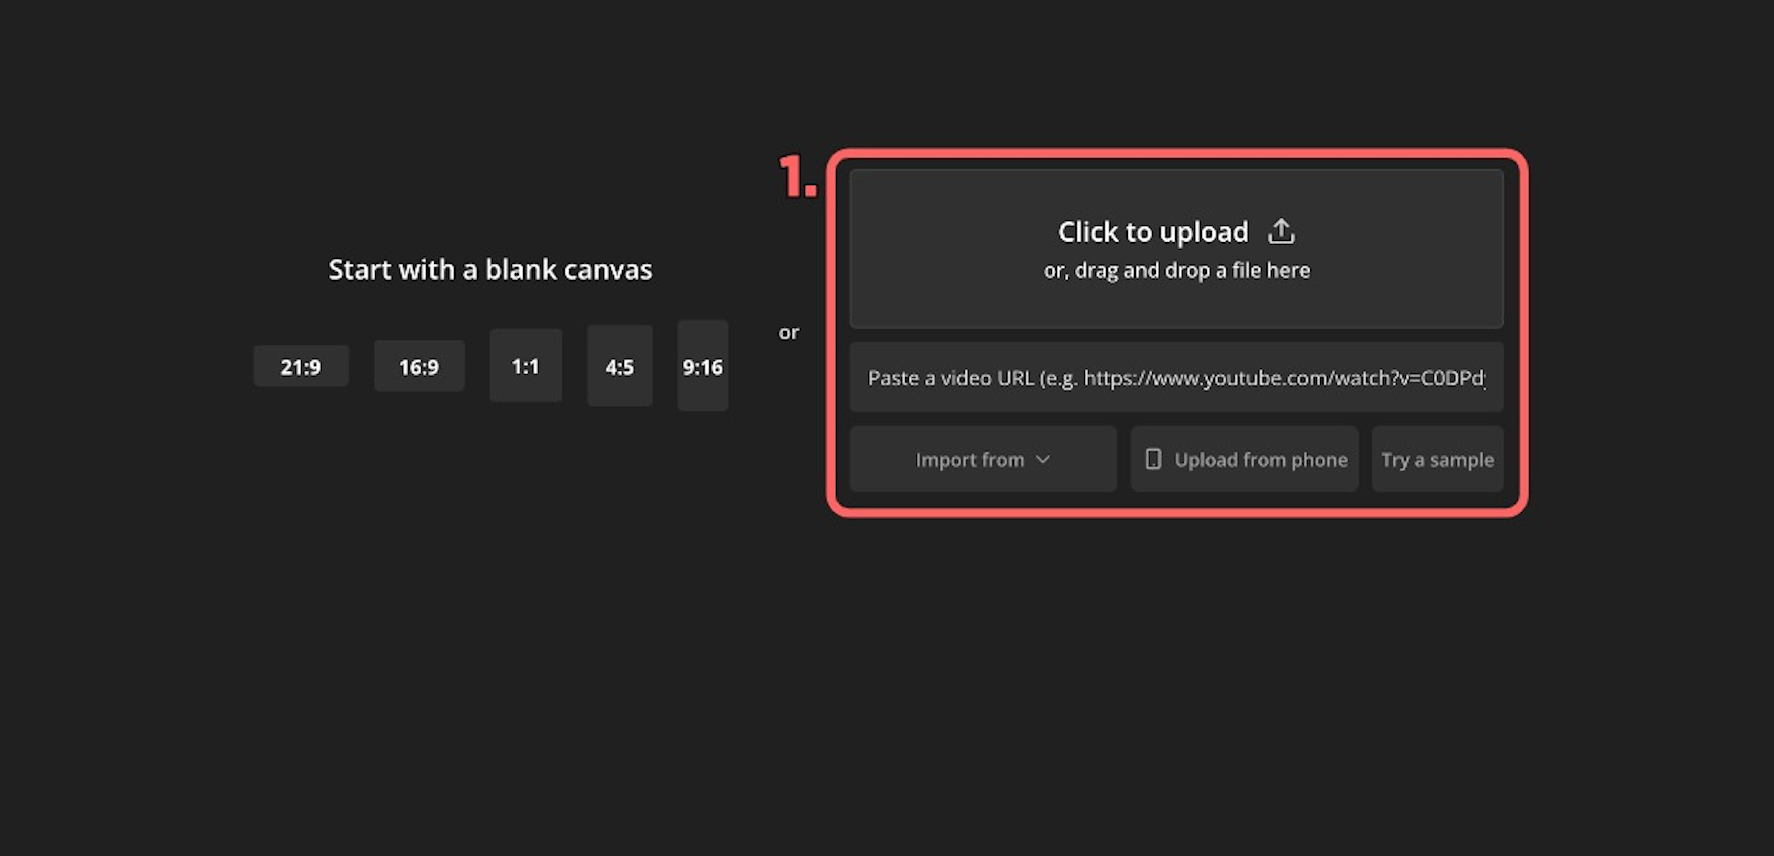
- Upload your video to Kapwing's studio. You can either upload a video file or paste a link to an existing video.
- In the left-hand toolbar, click the Text button. You can choose from a variety of preset styles or click “Add Text” to create your own. Customize the color, outline, font, capitalization, spacing, and alignment.
- Type your message into the text box. You can adjust the text’s duration and position in the timeline to sync it with your video.
- Click the text layer in the timeline. In the right-hand toolbar, scroll down to find the Animations and Transitions section.
- Animations control what the text does while it's on screen (e.g. bounce, fade, typewriter).
- Transitions control how the text enters and exits (e.g. slide in, fade out).
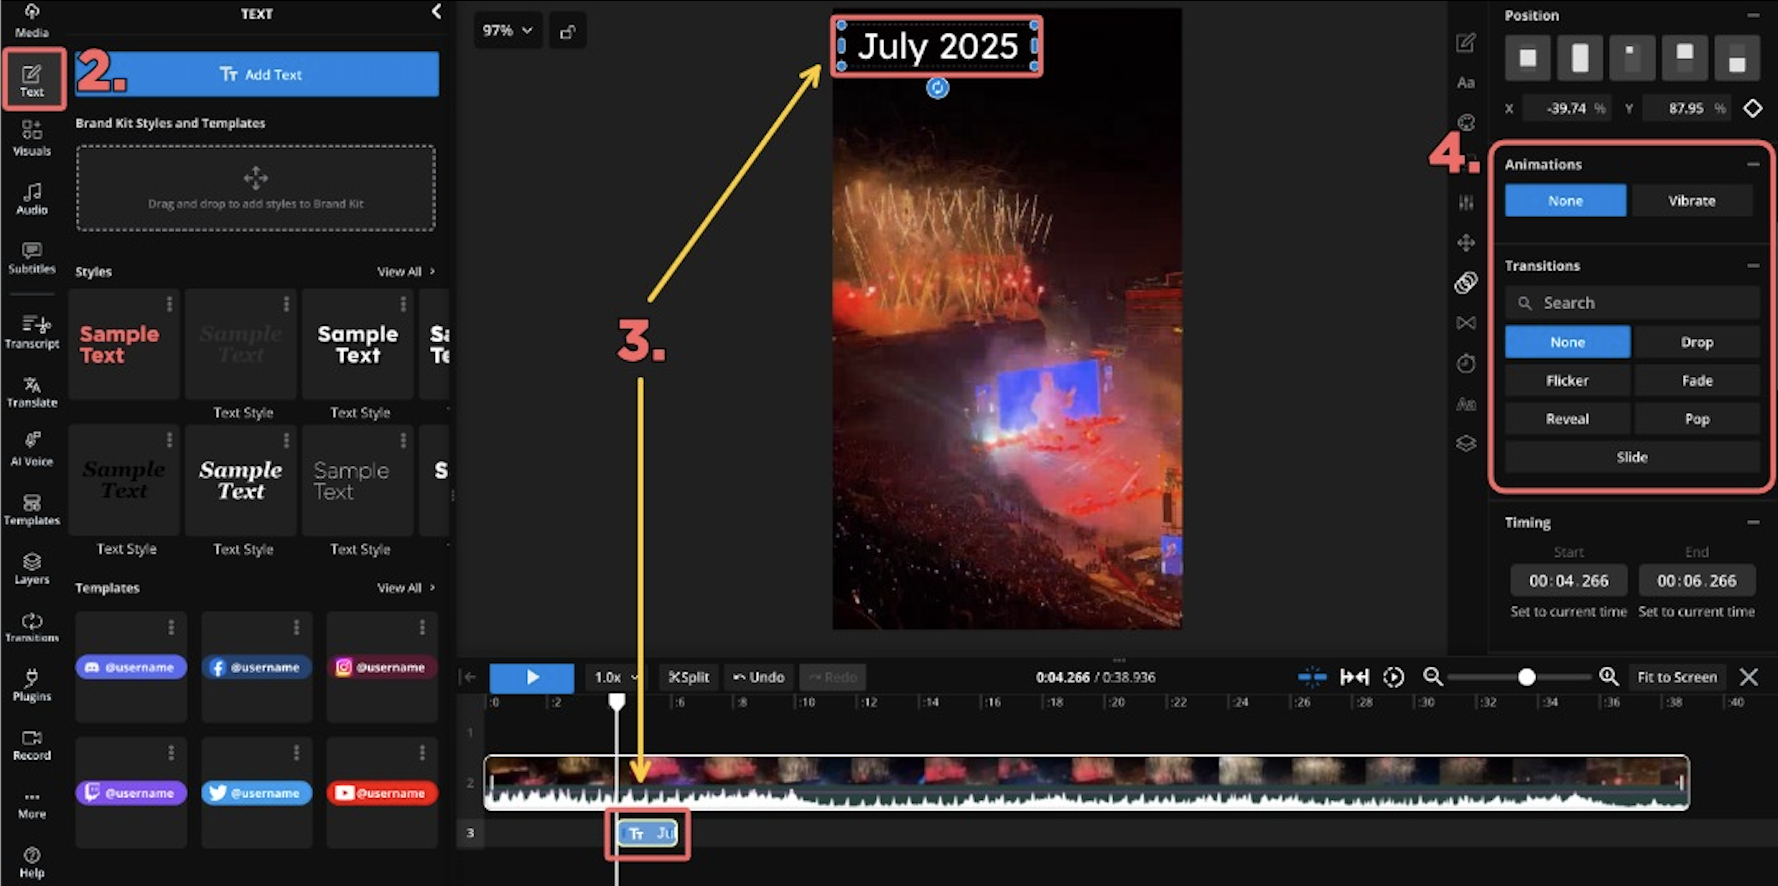
In this example, the Flicker effect is used to enhance the energy of the concert clip, adding a transition that matches the concert's atmosphere.
An example video that I edited with animated text.
Effects
Next, you can enhance your video by adding an Effect. Effects are visual overlays and filters, ranging from color adjustments to face filters and augmented reality elements. You might use an effect to match a specific trend, make your content feel more polished, or help your video grab attention in the feed.
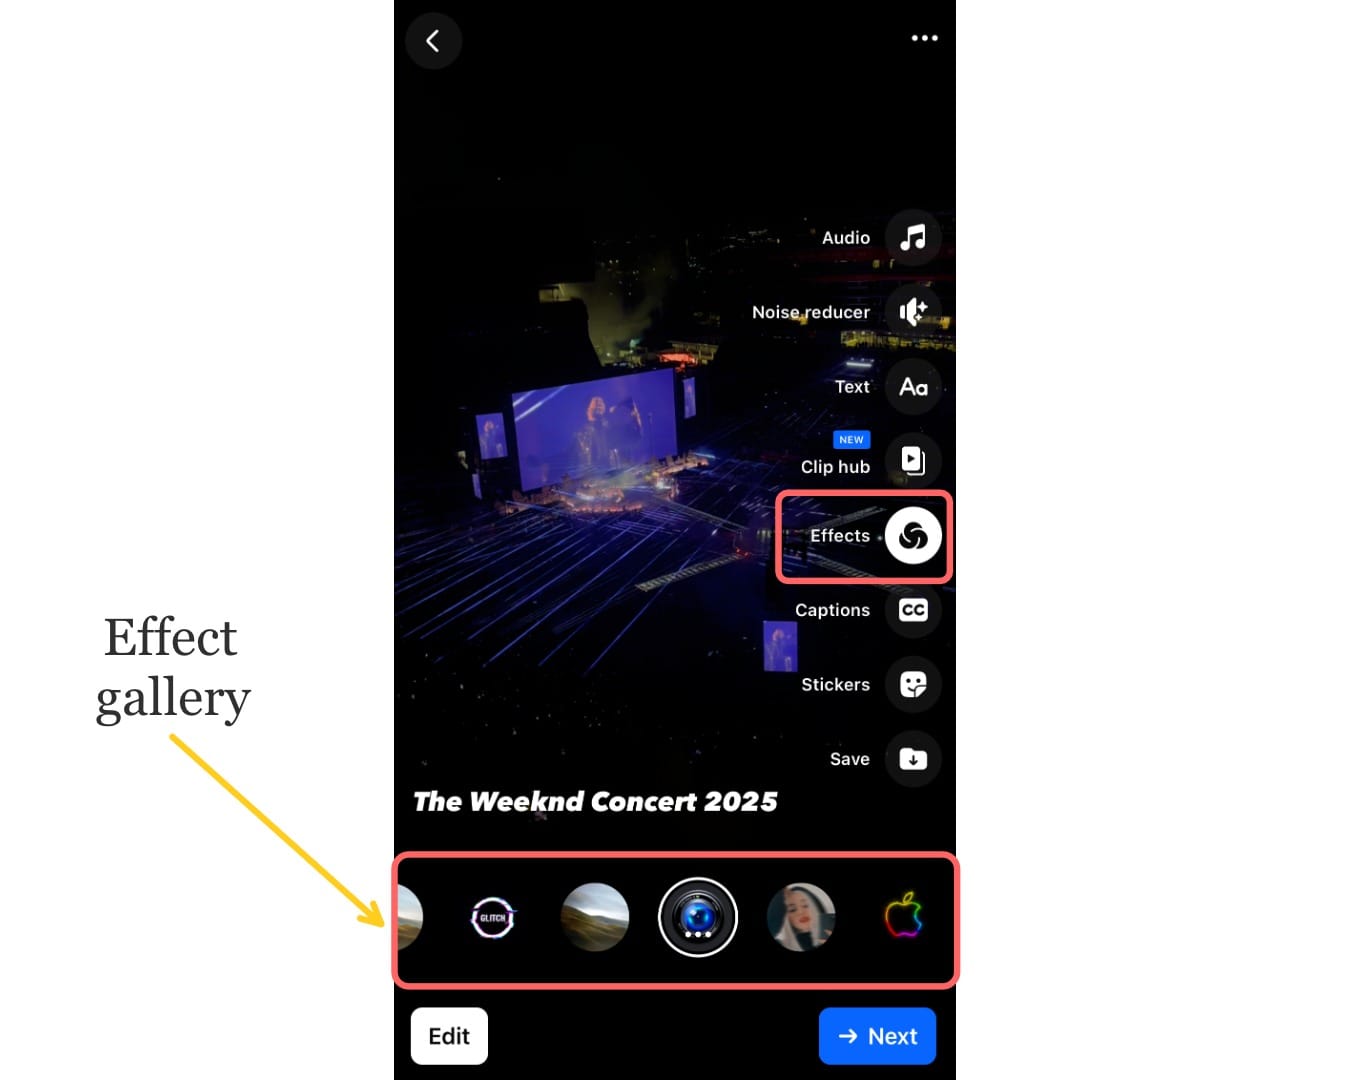
To begin, tap the Effects button (fifth from the top). This will open the effects library, where you can scroll horizontally through options. Tap on an effect thumbnail to preview it live on your video.
Tap the same effect again to toggle it off, or scroll to select a different one. Once you're happy, tap the Effects icon again to lock in your choice.
It's important to note that you can only apply one effect at a time on Facebook. This makes it more important to be intentional with your choice.
When choosing an effect, you should consider the tone and purpose of your Reel. You could ask yourself whether the effect enhances your message or distracts from it.
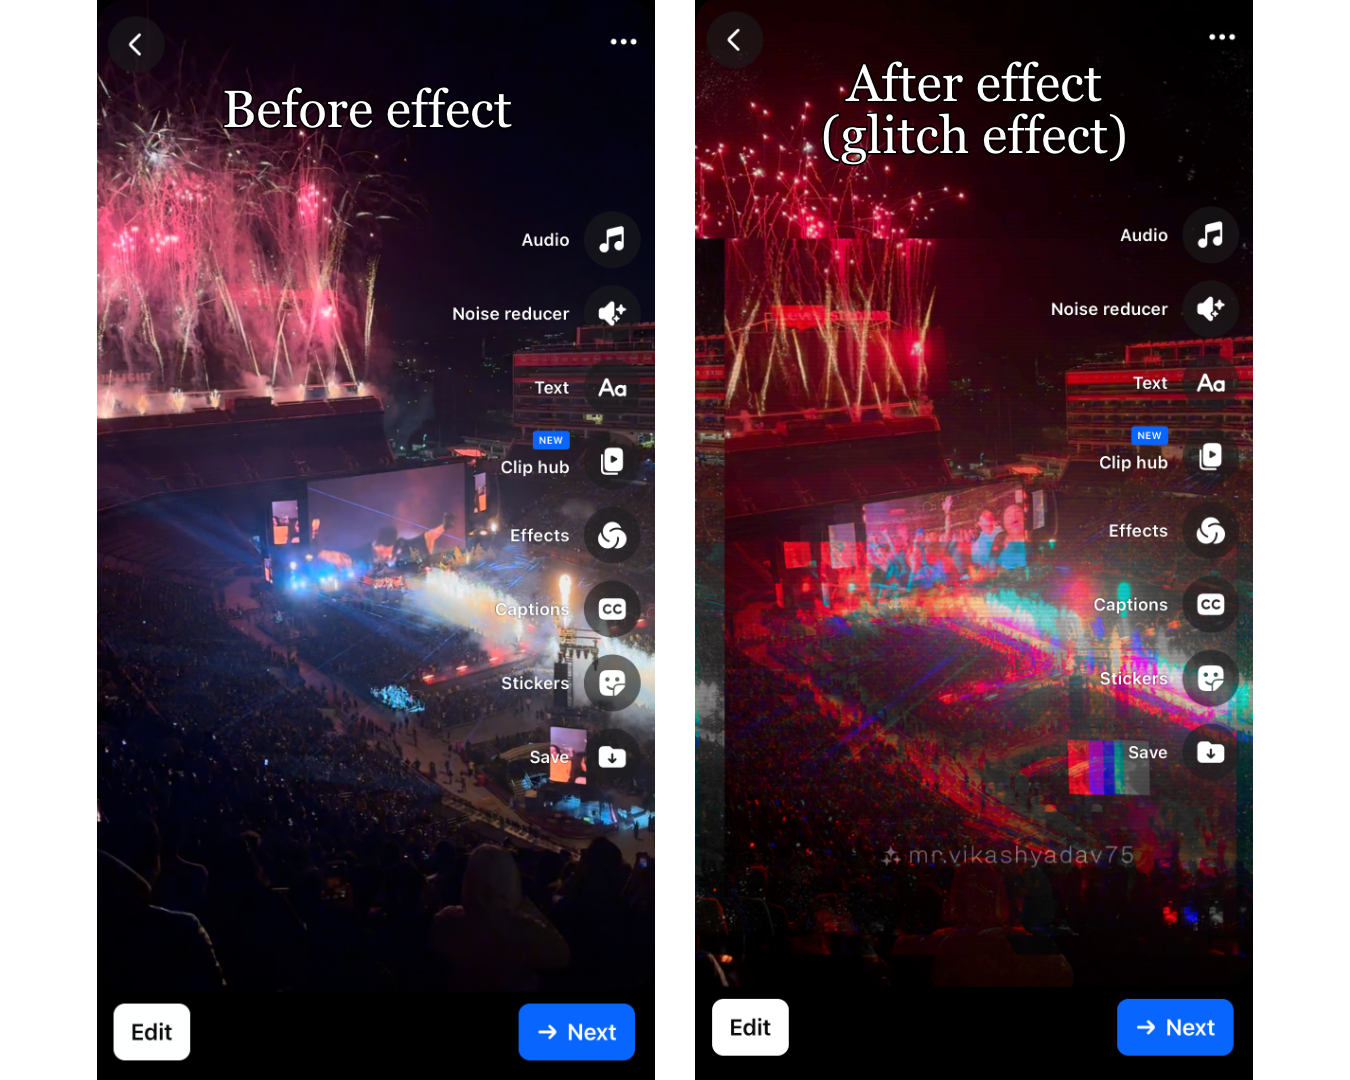
For example, in the Reel we created, we applied a glitch-distortion effect to a concert clip. The effect emphasized the motion, amplifying the energy of the scene.
There are dozens of effects available in the Facebook Reels library. However, certain styles tend to be more popular. Here are a few standout categories:
- Retro / Vintage Filters:
Mimic the look of VHS tapes, film grain, or nostalgic color grading - Lighting Enhancers
Simulate “golden hour” lighting by warming up tones, softening shadows, and brightening skin - AR Face Filters
Add virtual accessories like glasses, makeup, animal ears, or masks that track facial movement - Motion or VFX-Style Effects
Add dynamic visual elements like blur trails, pulsing zooms, kaleidoscope reflections, or glitch distortions
Audio
You can also enhance your Reel by adding background music or a voice over. Background music helps set the mood, match trending audio, and make your video feel more polished and engaging. Similarly, voice overs are ideal for adding context or personality. They're commonly used in “day in the life” edits, tutorials, or commentary-style Reels.
To add music or a voice over, tap the Audio button (the first icon on the right-hand toolbar). This will take you to Facebook’s Audio Library.
Adding Background Music
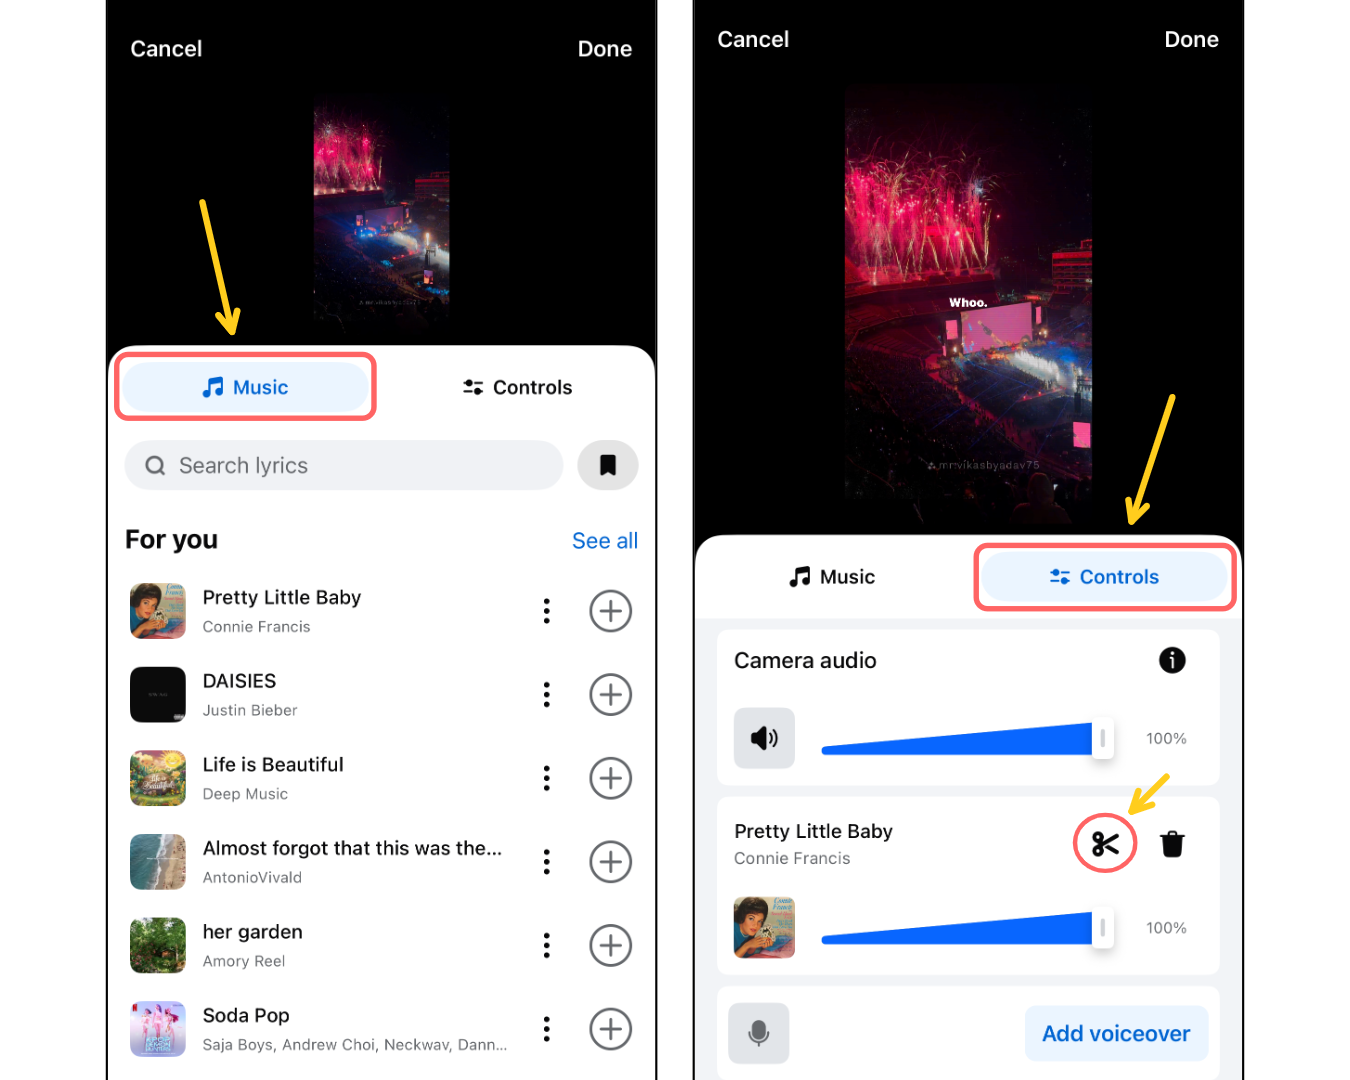
By default, you'll land on the Music tab, where you can browse a selection of songs. Tap on any track to preview it with your video.
You can fine-tune your audio by tapping the Controls tab. Here, you’ll be able to adjust the volume of both the music and your original footage.
To adjust the section of the song you want to use, tap the Scissors icon. This lets you scrub through the track and select the exact portion that fits your video.
Recording a Voice Over
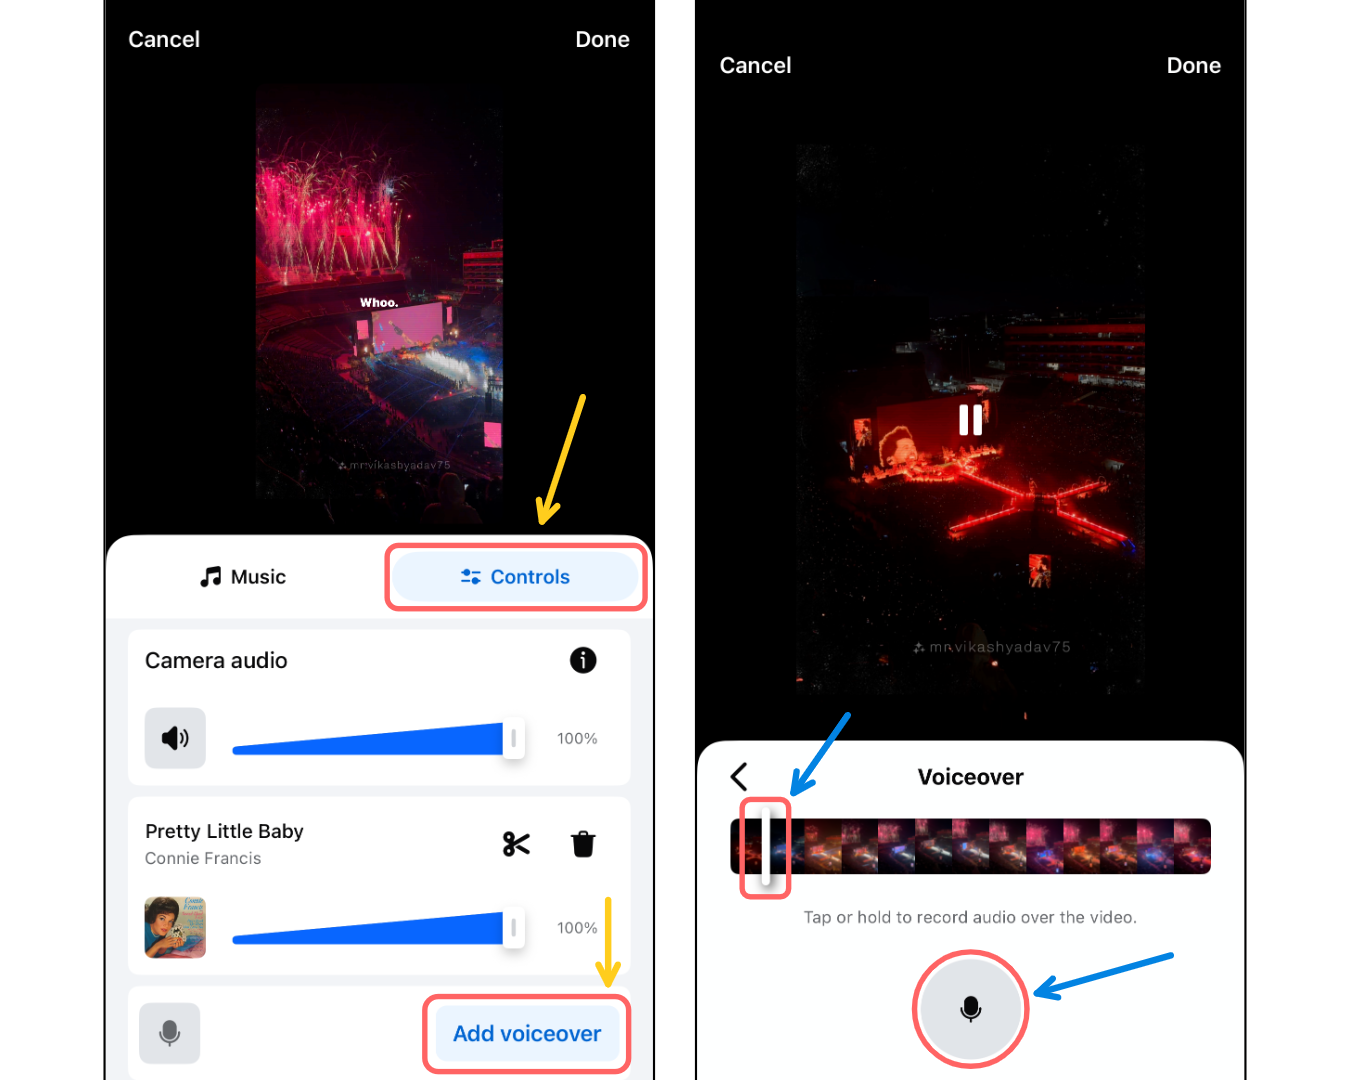
To record a voice over, go to the Controls tab. Scroll down to the bottom section and tap the “Record Voiceover” icon. This will take you to the recording studio.
Once you’re in the Recording Studio, first drag the playhead to the point in your video where you want the voiceover to begin. Then choose how you want to record:
- Tap once to start recording, then tap again to stop.
- Or, press and hold the button to record only while holding it down—useful for short voice inserts or quick reactions.
Note: You can add both music and voiceo ver to your Reel — just make sure the volumes are balanced so both are audible. You can adjust this in the Controls tab.
Captions
Facebook can automatically generate captions for your Reel. Captions make your videos more inclusive to people who are deaf or hard of hearing, and they also help viewers who are watching with the sound off (which is common on mobile).
Captions can only be autogenerated for videos up to 1 minute long. If your Reel is longer than 60 seconds, the captions feature won’t be available.
To add captions, first tap the Captions icon (third from the bottom on the right-hand toolbar).
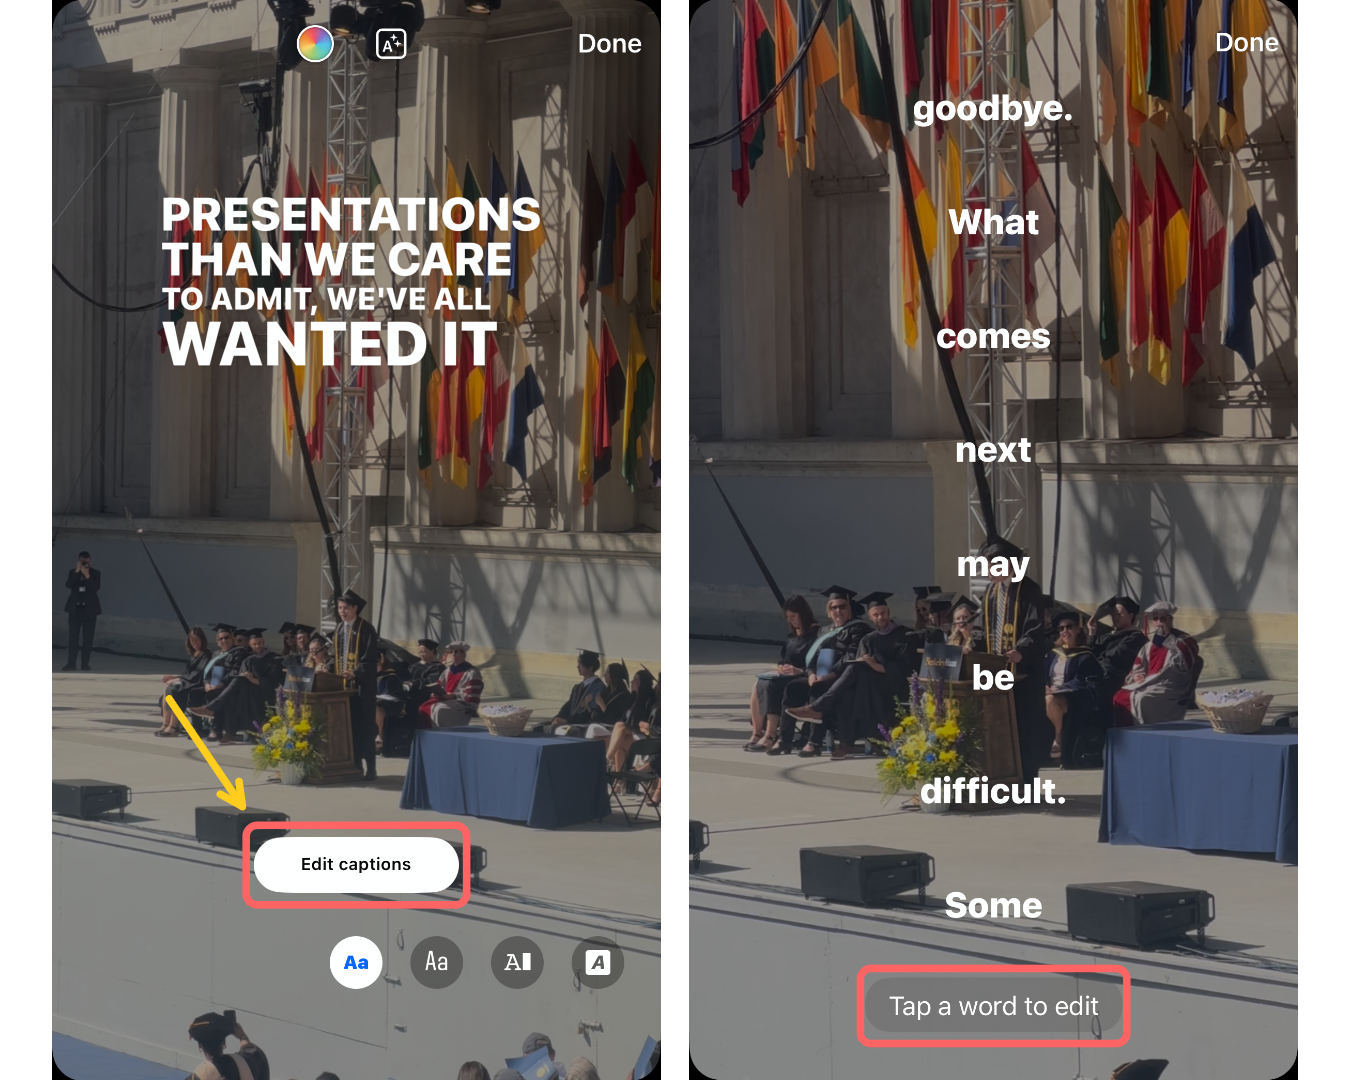
Once you click on the button, Facebook will autogenerate the captions based on the audio in your video.
You can refine this by tapping on the "Edit Captions" button. This will break the transcript down word by word, allowing you to scroll through and adjust individual words for better accuracy. To edit a word, simply tap on it. This will allow you to type in your correction.
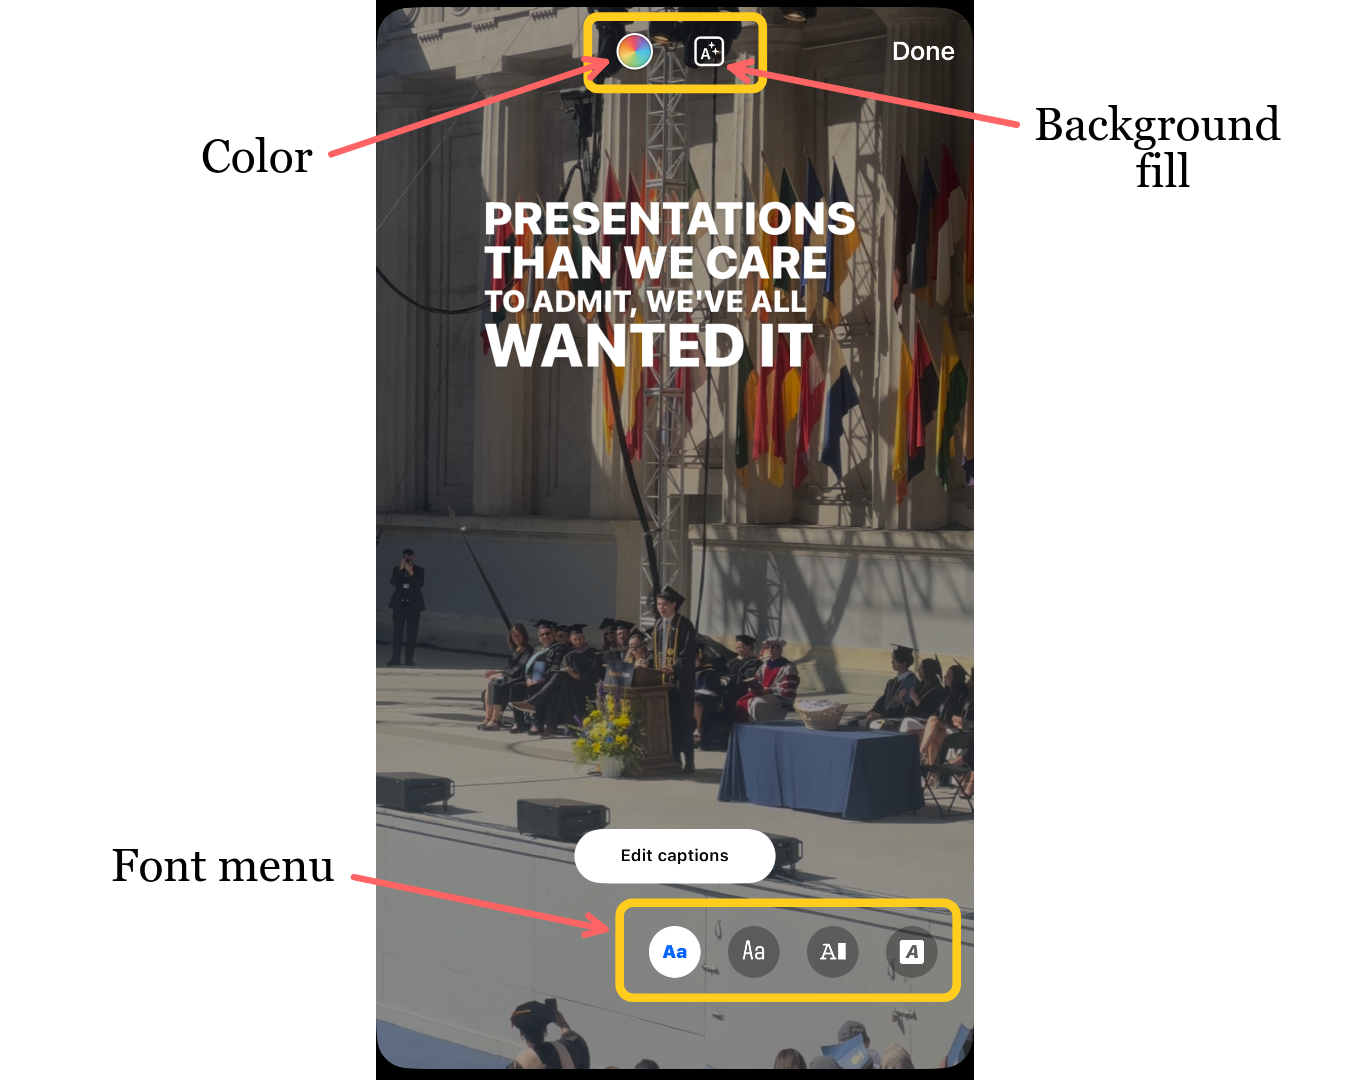
You can also change how your captions look. Swipe through the style menu at the bottom of the screen to browse different font options.
To adjust the text color or add a background fill, tap the icons at the top of the editor.
Additional Tools
For your reference, here are the tools that we didn't cover:
- Noise Reducer: Lowers background noise and improves audio clarity
- Clip Hub: A library of stock footage to use in your reels as fun effects or B-Roll
- Stickers: A library of stickers you can overlay onto your reel to give it a fun touch
- Save: Downloads your Reel to your camera roll
Step 3: Open the Timeline Editor for Additional Edits
In the main editor, any text or audio you add is applied to the entire video by default. This is fine for simple posts, but many viral trends require certain text to appear at specific moments, or music to match scene changes.
That’s where the timeline editor comes in. A timeline-based editor lets you see a visual breakdown of your video across time, allowing you to adjust when elements appear and disappear.
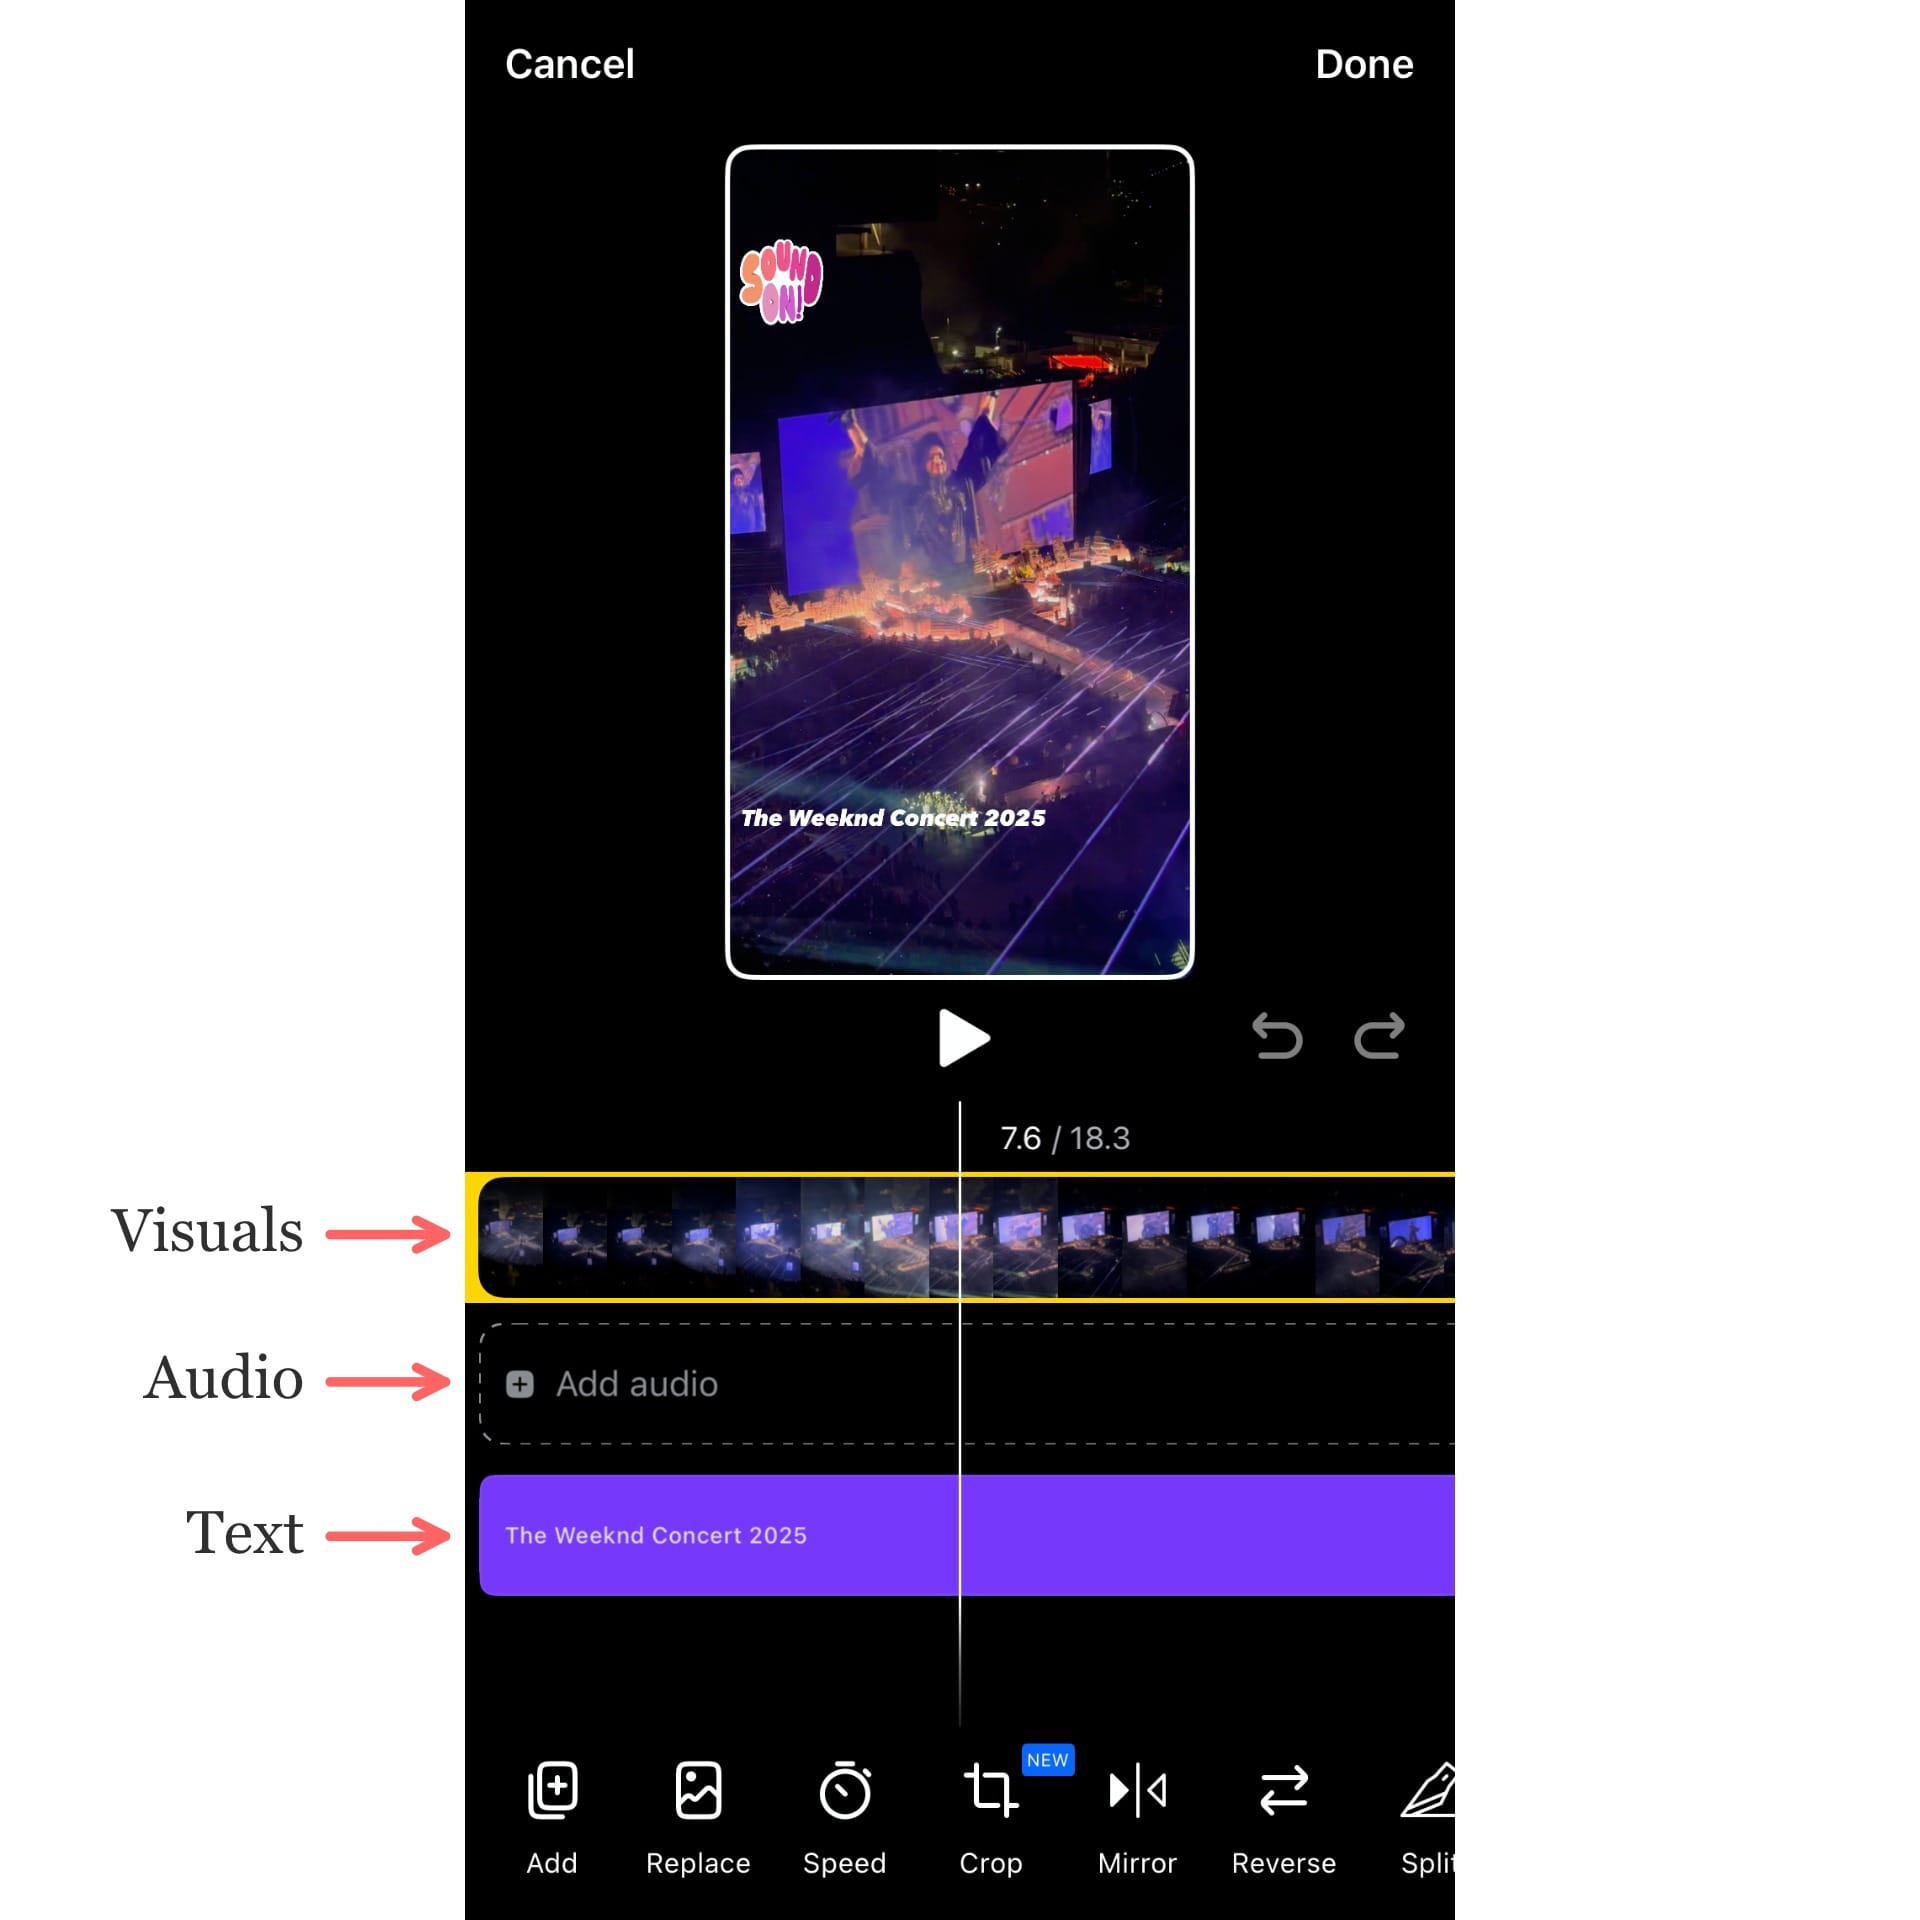
To access Facebook’s timeline-based editor, tap “Edit” in the bottom-left corner of the screen. This will open a separate editing screen, where you'll see the timeline of your Reel. The timeline is divided into three main layers, each representing a different type of media:
- Video Layer (Top) – This shows your videos/images in the order they play.
- Audio Layer (Middle) – This shows the music or audio added to your Reel.
- Text Layer (Bottom) – This displays all the text you've added to your video.
To rearrange elements in the timeline, drag them left or right along their respective layers. This lets you control exactly when each clip, text box, or audio track starts and ends in your Reel.
To resize an element (such as shortening a text overlay or trimming a video clip), tap on the block in the timeline and drag the edges inward or outward. This adjusts the duration that the element appears on the screen.
You can resize an element by dragging the edges inward and outward.
Adding Additional Text and Audio
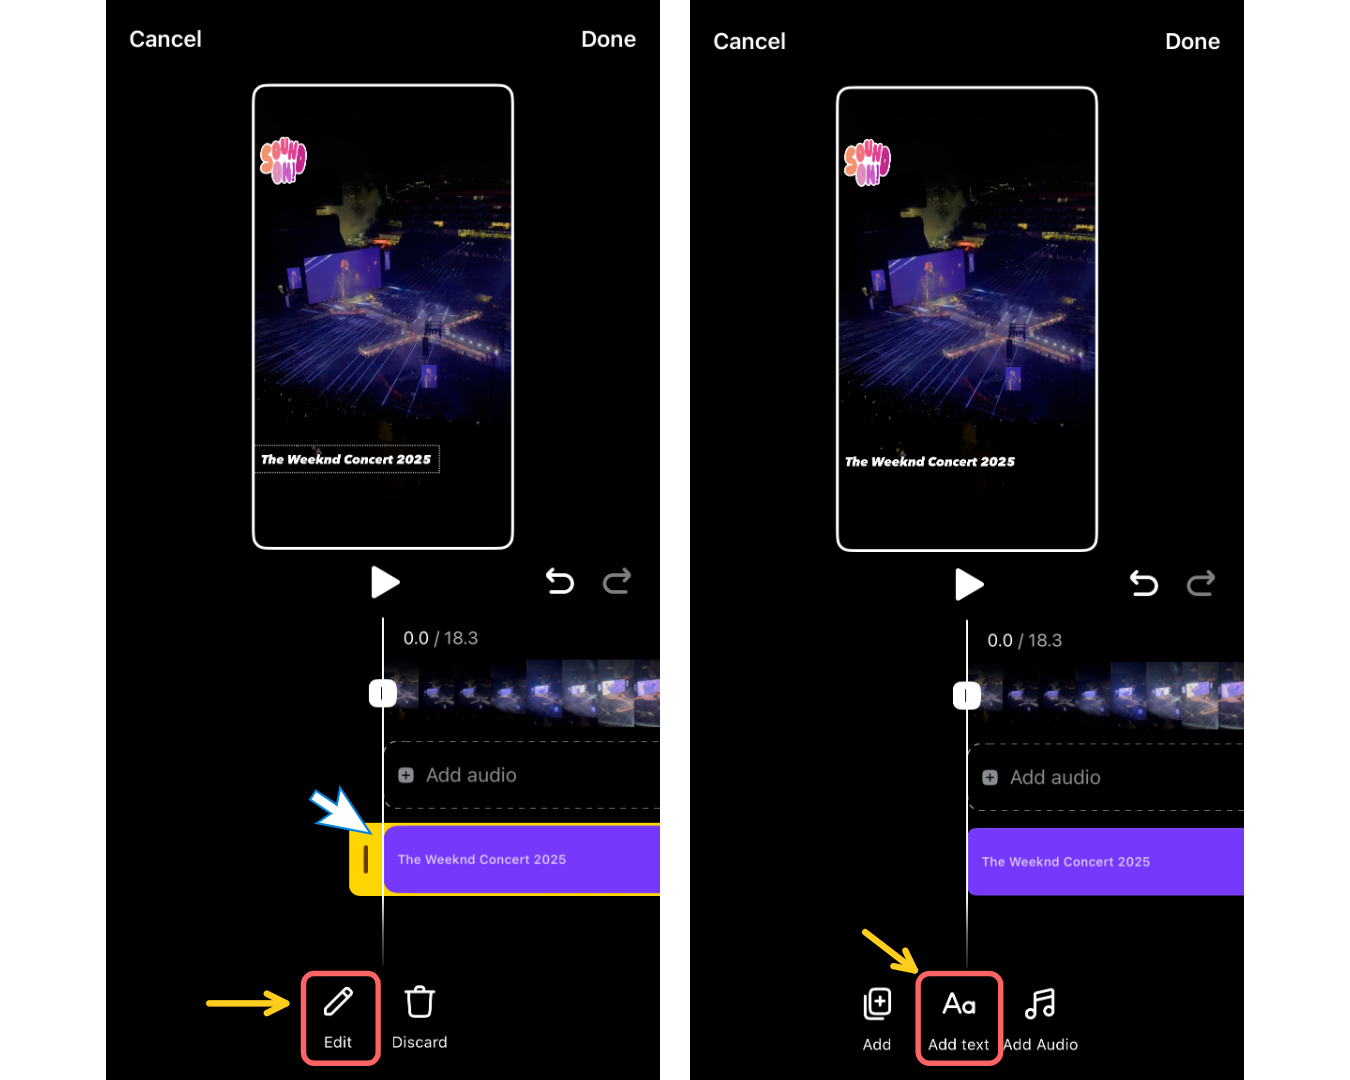
In the timeline editor, you can also add additional video, audio, or text. If the layer is currently empty, you can simply tap on the empty section of the timeline to insert a new element.
If there are already elements in that layer, you have a couple of options:
- You can scroll to the end of the existing content and tap on the next empty section to add your new element there.
- If you want to overlap elements, tap on the existing block and select Edit. From there, you can add additional elements that appear on screen at the same time as the current one.
Additional Tools
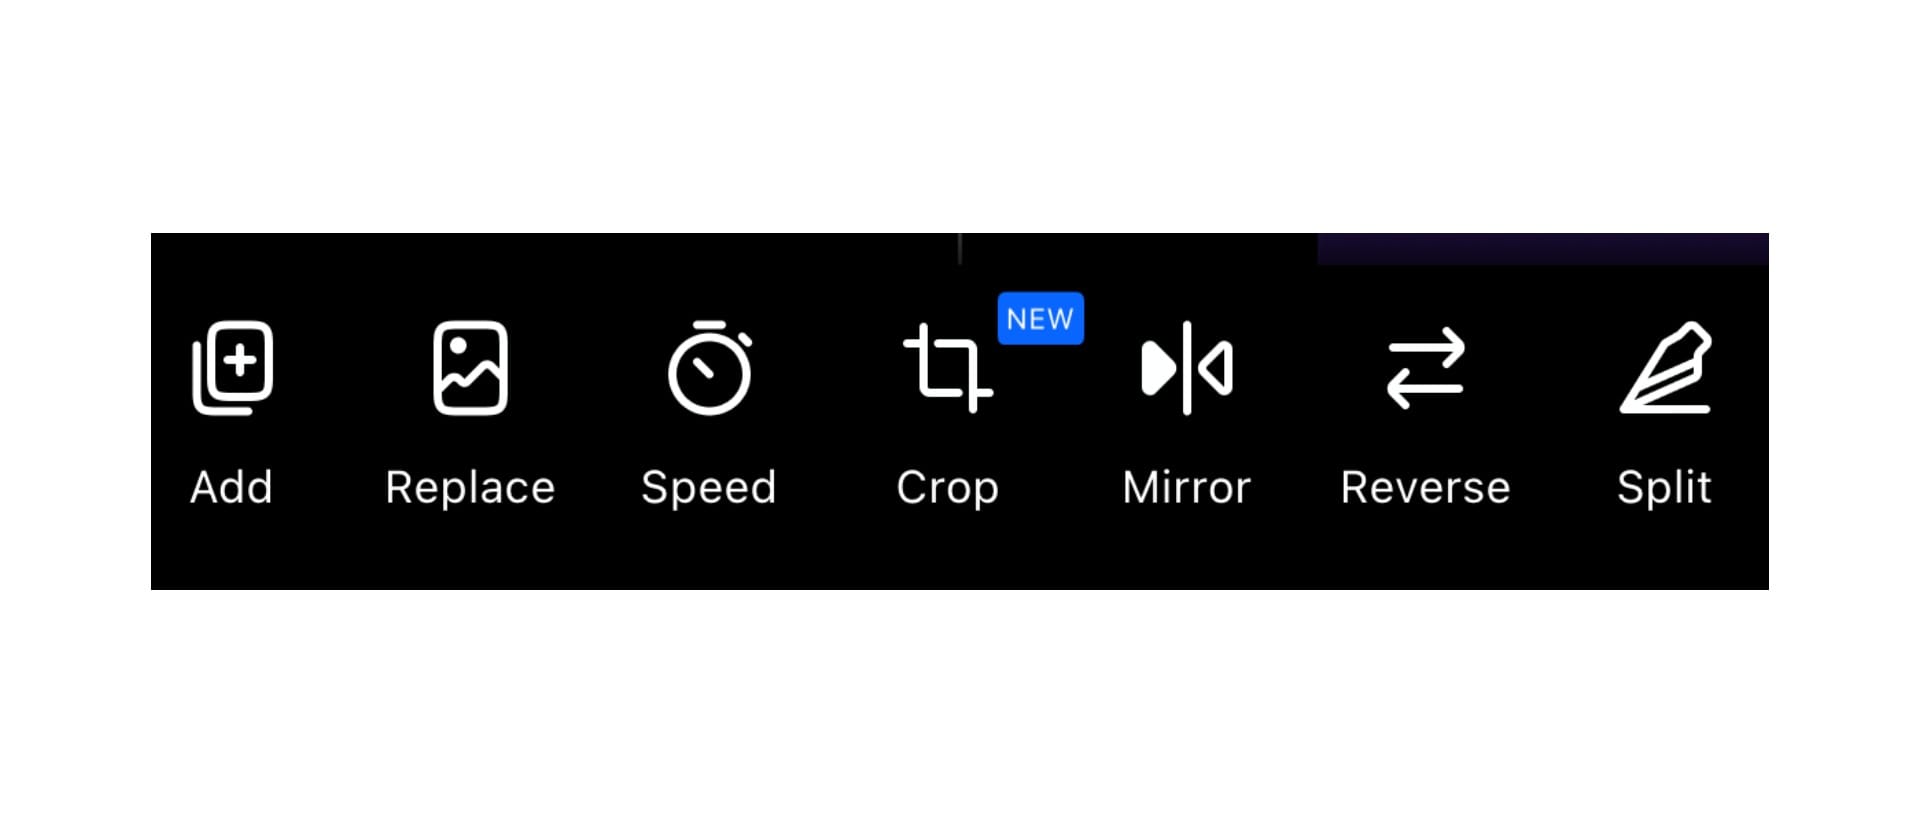
Beyond the standard timeline editing features, Facebook also offers a set of extra tools. Here's a quick breakdown of what each tool does and how you might use it:
- Add: Inserts new clips to the end of your timeline.
- Replace: Swaps a clip with another of the same length, making it easy to update footage without disrupting your timing.
- Speed: Changes the playback speed of your clip. You can slow it down to 0.3x for dramatic moments or speed it up to 3x for fast-paced edits.
- Crop: Resizes or repositions the framing of your video. Use this to center your subject or adjust how it appears within the vertical frame.
- Mirror: Resizes or repositions the framing of your video. Use this to center your subject or adjust how it appears within the vertical frame.
- Reverse: Plays your clip backward for a creative or comedic effect.
- Split: Cuts a clip into two parts at the position of the playhead. This lets you rearrange or insert elements between the segments for smoother transitions.
How To Automatically Edit Facebook Reels
While Facebook’s built-in Reels editor is great for quick trimming, adding music, and basic effects, it has its limits. External video editors often offer more advanced features and control for content creators.
I recommend Kapwing, especially if you're editing content originally made for long-form platforms or you need to apply more creative edits, like animating text and generating B-roll.
Here is the quickest way to edit a long-form video, automatically cutting it into smaller clips without any manual editing.
Kapwing's Repurpose Studio
If you already have long-form content, like a podcast, YouTube series, or recorded interviews, you can use the Repurpose Studio to turn those videos into short, vertical Reels optimized for Facebook without any manual editing.
Many successful creators use this strategy.
For example, Steven Bartlett repurposes highlights from his podcast, The Diary of a CEO, into short, quotable Facebook Reels. Similarly, Comedy Central’s The Daily Show pulls one-liners or viral moments from full episodes and turns them into fast-paced, captioned Reels.
Here’s how to repurpose long-form video into Facebook Reels:
- Open the Repurpose Studio and upload your content, either by selecting a video file from your device or pasting a link to an already published video.

- Select the language of your video.
- Set the maximum duration for your clips. For Facebook Reels, the limit is 90 seconds.
- Keep in mind that this also defines the general range of your clip lengths. For example, if you choose 60–90 seconds, you likely won’t get clips in the 15–20 second range.
- Add keywords to help the AI identify the best moments to clip. For example, using terms like “money” or “monetization” will guide the AI to select segments related to those topics from within an interview.

Once you’ve generated clips, the Repurpose Studio will present a variety of options ranked by a growth score, which is based on coherence, hook, and subject relevance.
You can further edit the generated clips using the toolbar at the top of the screen. Applying any of the edits below will apply the tool to all of your clips, meaning you save hours of editing time by adjusting multiple clips at once.
Here’s an overview of the available tools:

- Templates: Pre-built styles that adjust fonts and design based on use cases like webinars or podcasts.
- Aspect Ratio: Resizes your video to fit different social media formats.
- Subtitles: Turns subtitles on or off, or customizes the font.
- Intro Hook: Edits or adds a compelling hook at the beginning, either as a title or an AI-generated voiceover.
- Speaker Focus: Automatically keeps the video centered on the speaker.
- Waveform: Adds a visual waveform that reflects the audio.
- Auto Emoji: Automatically inserts relevant emojis into your subtitles.
You can export these clips and upload to Facebook as they are or edit them further from within Kapwing's Editing Studio, adding elements such as voice overs, AI images, and translations.
If you’re not satisfied, you can regenerate clips by clicking the icon next to “Your Selected Clips.”