
How to use text-to-speech in Kapwing
You've seen viral videos on TikTok and Instagram with an automated voice that reads text, and you want to know how it's done. On Kapwing, you can automatically add a synthetic voiceover to a project with the AI Voice feature. This tutorial will explain what this feature is and how to use it to allow for more stories to be created and shared.
What is text-to-speech?
How do I generate text-to-speech on Kapwing?
How do I make text-to-speech sound more natural?
How much text-to-speech can I generate on Kapwing?
Voice Cloning
What languages does Kapwing support for text-to-speech?
What is text-to-speech?
Text-to-speech (TTS) is a technology that converts written text into spoken words using AI-generated voices. It allows users to create audio from text input, often with customizable options for voice style, pitch, speed, and tone.
On Kapwing, TTS tools allow users to generate voice overs for their projects. Users can choose from a large variety of voices with different attributes including language, gender and age (eg. American, young, male or female).
What are the uses for text-to-speech?
TTS is a versatile tool with a wide range of applications. Here are some popular ways creators and businesses leverage this technology:
- Video Content Creation: Add voiceovers to YouTube videos, social media clips, and tutorials without recording your own voice.
- Accessibility: Make content more inclusive by providing audio for people with visual impairments or reading difficulties.
- E-Learning and Training: Create engaging audio for online courses, corporate training, and educational materials.
- Marketing and Advertising: Use voiceovers in ads, promotional videos, and product demos to engage audiences.
- Podcasts and Audiobooks: Generate spoken versions of written content to reach a wider audience.
Whether you're a content creator, educator, or marketer, TTS can save time and enhance the reach of your projects.
How do I generate text-to-speech on Kapwing?
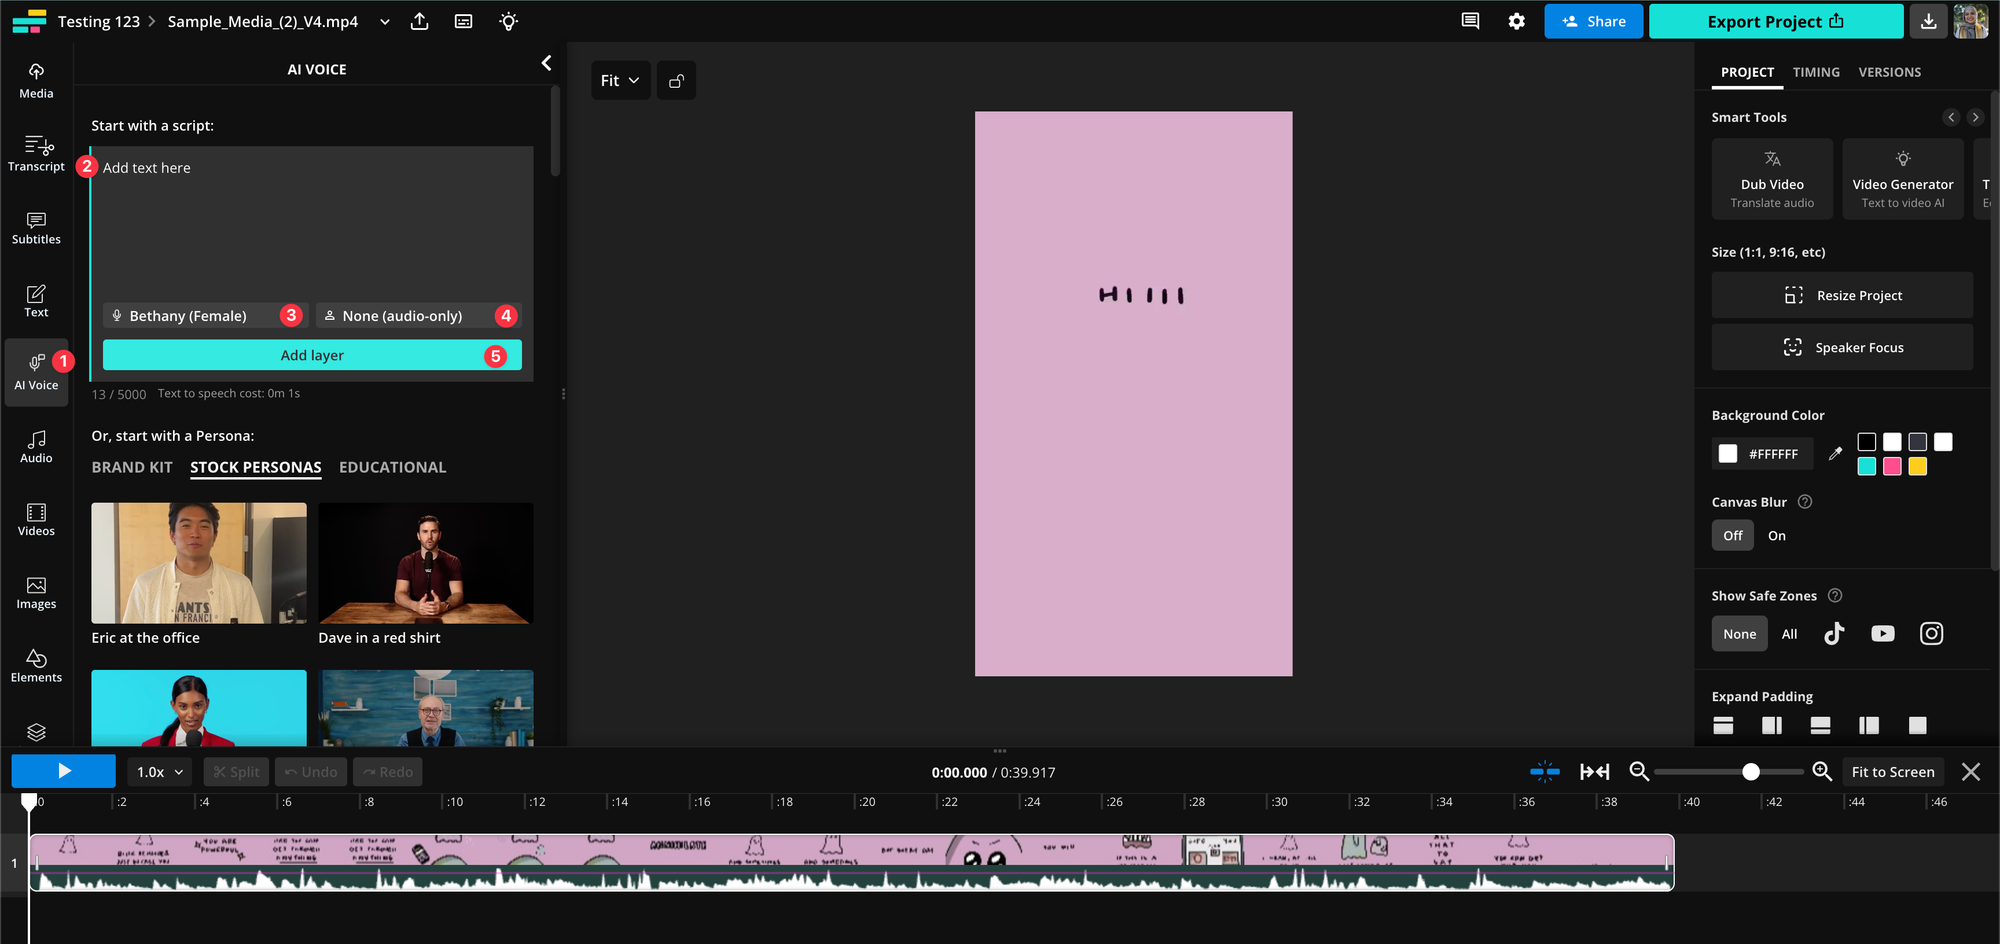
- Navigate to the "AI Voice" tab in the left sidebar
- Enter your text you want to convert into audio
- Choose your preferred voice based on the language of your text input
Note: Business and Enterprise users can use their own voice clones. Learn more below - Optionally, add a persona for an AI avatar to narrate your text-to-speech, or, select "None" if you only need audio
- Click "Add layer" to generate your text-to-speech layer, which will appear on the timeline once the generation is finished
How do I make text-to-speech sound more natural?
1. Add Emphasis with Quotation Marks
Emphasizing key words can change the meaning and impact of your sentences. Wrap words or phrases in quotation marks (" ") to draw attention.
Example:
- Without emphasis: What do you think?

- With emphasis: What do “you” think?

This technique is great for highlighting important points or making your message more engaging.
2. Show Emotion with Punctuation
Kapwing’s AI voice responds to punctuation cues to adjust tone and intensity. Use exclamation points (!) or question marks (?) to add emotion, and double them (!!, ??) for extra emphasis.
Examples:
- Neutral: What are you doing here?
- Angry: What are you doing here??

- Neutral: It’s great to see you.

- Excited: It’s great to see you!

- Overjoyed: It’s great to see you!!

Experiment with punctuation to match the emotion you want to convey, whether it’s excitement, surprise, or urgency.
3. Create Natural Pauses
Pauses can make your AI voice sound more thoughtful and less robotic. Use dashes (-), em-dashes (—), or ellipses (. . .) to control the timing. Longer dashes and multiple dots create longer pauses.
Examples:
- No pause: Let’s take a moment to reflect.

- Short pause: Let’s take a moment - to reflect.

- Short pause: Let’s take a moment . . . to reflect.

- Longer pause: Let's take a moment — to reflect

How much text-to-speech can I generate on Kapwing?
There is a limit on how much text-to-speech a user can generate depending on their plan type. The following tools deduct from the text-to-speech limit:
- AI Voice
- AI Dubbing
- AI Video Generator
The text-to-speech limits are listed on the Pricing Page, and are as follows:
- Free users - 3 minutes
- Pro users - 80 minutes/month
- Business users - 200 minutes/month
- Enterprise users - Custom
Your text to speech limits will renew on the first of the month, regardless of your billing date. For example, if you have run out of limits by June 15th and your billing is June 20th, your limits will renew July 1st.
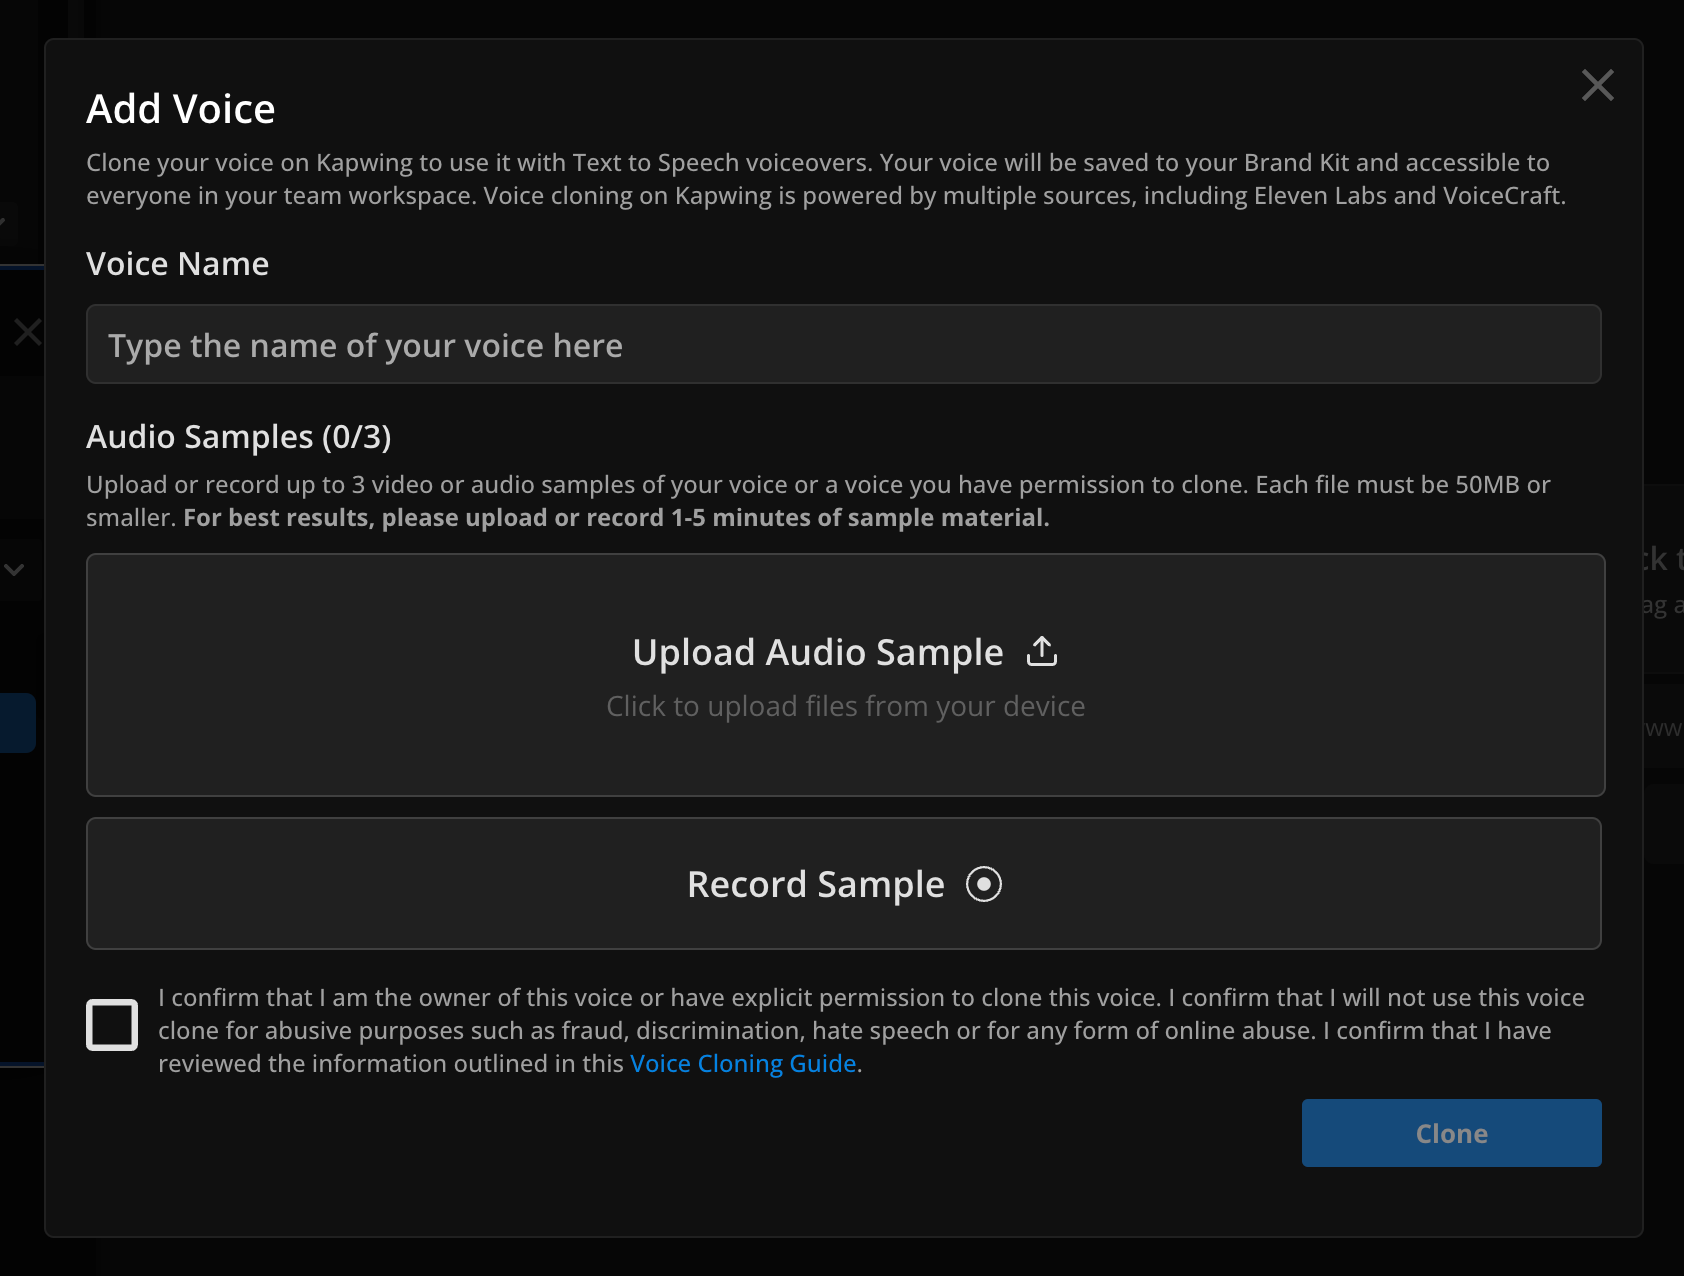
Voice Cloning
Kapwing offers the ability to save a clone of your voice so that you can create a text to speech layer using your own voice model. We've enabled Voice Cloning in partnership with Eleven Labs.
To add a voice clone, you must be a Business customer. Business plan customers can save up to 2 voice clones in their Brand Kit. Once you've upgraded to the Business Plan, click the "Add new Voice" button in the Text to Speech dropdown menu (#3 on the image above). You'll be prompted to upload an example of the speaker whose voice you want to clone. Note that customers MUST have the rights to clone a speaker's voice, as noted in Kapwing's terms of service.
To delete a voice clone, go to your Brand Kit and scroll down to the saved voice clones. Hover over a voice model icon and click the delete icon that appears in the upper corner.
What languages does Kapwing text-to-speech support?
Kapwing supports 180 different voices in over 40 different languages. See the full list of supported languages below.
Supported Language List
English (United States)
English (United Kingdom)
English (Australia)
English (India)
Arabic (Multi-Region)
Bengali*
Bulgarian
Chinese (Mandarin)
Czech
Danish
Dutch
Finnish
Filipino (Tagolog)
French (Canada)
French (France)
German
Greek
Gujarati*
Hebrew*
Hindi
Hindi (Romanized)*
Hinglish*
Kannada*
Hungarian
Indonesian
Italian
Japanese
Korean
Latvian*
Lithuanian*
Malay
Marathi*
Mandarin (Taiwan)
Norwegian
Polish
Portuguese (Brazil)
Portuguese (Portugal)
Punjabi*
Romanian*
Russian
Slovak
Spanish (Spain)
Spanish (Mexico)
Swedish
Tamil
Thai
Turkish
Ukrainian
Vietnamese
* we do not support voice cloning in this language
Looking for more help?
Check our Release Notes for tutorials on how to use the latest Kapwing features or contact us.


