What Is B-Roll Footage?
Videos with B-roll experience up to a 50% increase in watch time.

B-roll is one of the most powerful tools in video editing: it enhances your story, smooths over cuts, and keeps viewers visually engaged. Traditionally, finding the right B-roll meant scrolling through endless media libraries — or heading out to film it yourself.
Now, with modern tools, you can create or source cinematic B-roll without ever leaving your browser.
In this guide, we’ll walk you through two simple methods for adding B-roll to your videos using Kapwing and its AI Assistant, Kai:
- Using stock footage libraries, perfect for finding ready-to-use clips
- Generating custom B-roll with AI, ideal for specific, stylized, or narrative-driven visuals
Whether you’re a content creator, marketer, editor, or just getting started, this tutorial will show you exactly how to level up your videos using accessible tools.
Table of Contents
- What is B-Roll Footage?
- Why is Adding B-Roll Footage Important?
- How to Add B-Roll Using Stock Footage Libraries
- How to Generate B-Roll Using AI Tools
What is B-Roll Footage?
B-roll footage is the secondary visual content used to support, enhance, and contextualize your primary footage, known as A-roll. While A-roll typically features your main subject or plot line, B-roll includes the supplemental visuals that bring that narrative to life. These can range from close-ups to wide establishing scenes, insert footage, and atmospheric visuals.
For example, in the opening credits of Twin Peaks (1990), director David Lynch uses extended shots of the town's sawmill, surrounding forest, and waterfall. These shots, while disconnected from the characters or plot, establish the remote setting, foreshadow the series’ tone, and ease viewers into the aesthetic of the town.
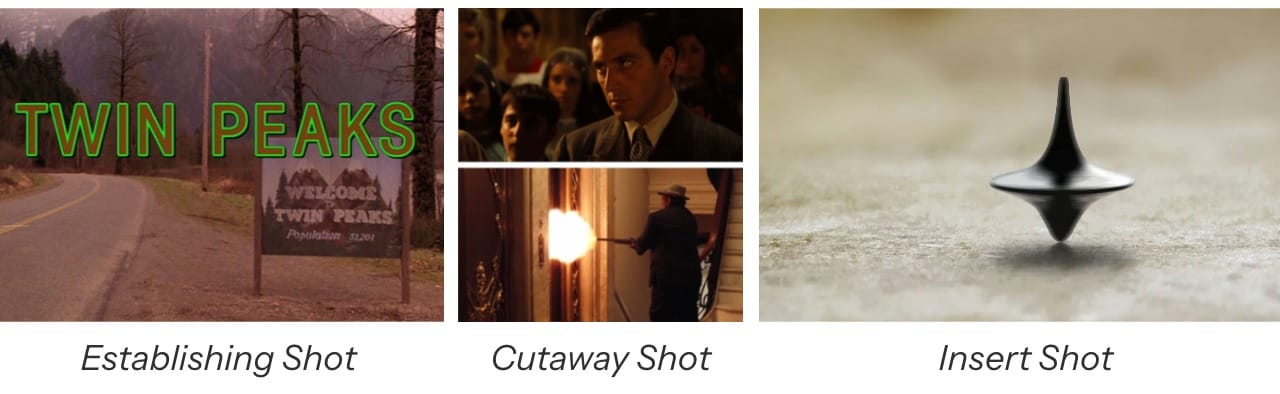
What Counts as B-Roll Footage?
- Establishing Shots: Wide or exterior shots that show the location where a scene is taking place.
- Example: The opening of Twin Peaks (1990) shows establishing shots of the town to establish the tone and setting.
- Cutaway Shots:
Shots that "cut away" from the main action to show a relevant detail or reaction.- Example: In The Godfather (1972), the baptism scene cuts away from the ceremony to parallel the violence being carried out by Corleone’s men
- Insert Shots:
Tight, focused shots of specific objects or actions, often used to highlight important details.- Example: In Inception (2010), the insert shots of the spinning top (totem) are used to signal whether the main character is dreaming or awake.
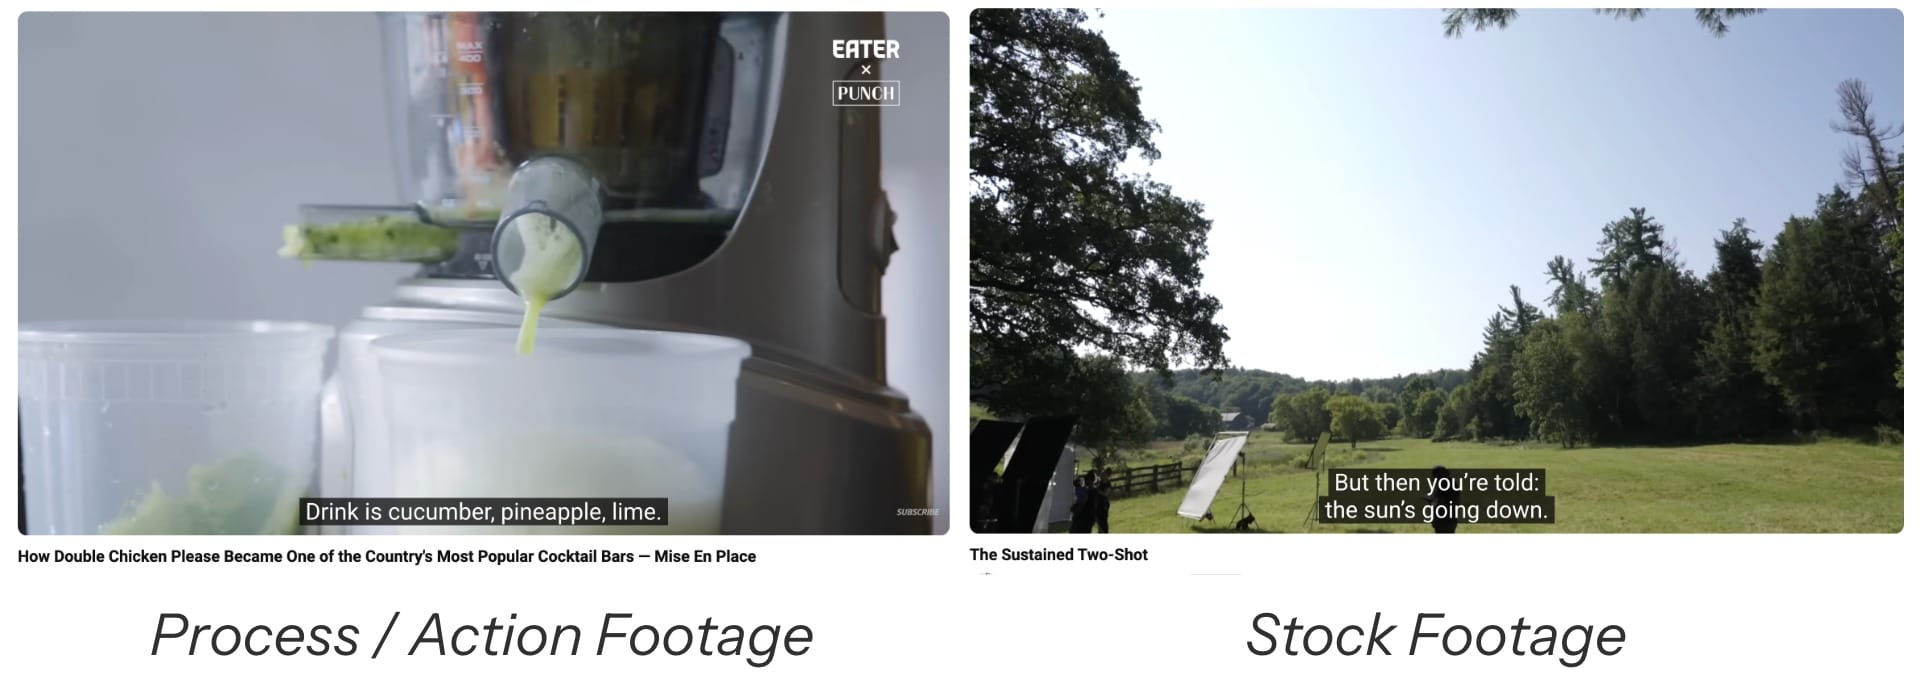
- Process / Action Footage:
Shows a task being done step by step. It often complements voice over by showing what’s being described.- Example: YouTube channels like Bon Appétit rely on process B-roll to reveal the behind-the-scenes of restaurants. As the chef narrates their technique, the B-roll shows their process.
- Stock Footage:
These are pre-filmed clips from online libraries that creators can license and use in their own projects.- Example: In Every Frame a Painting, the film analysis series uses stock footage to illustrate ideas and fill narrative gaps.
Why is Adding B-Roll Footage Important?
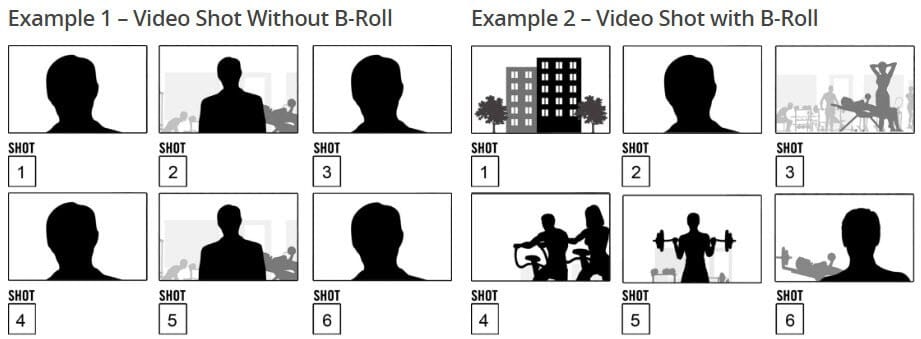
Adding B-roll to your video projects isn’t just a stylistic choice. It also helps guide the viewer’s attention and reinforce what’s being said. For example, the image below shows two versions of the same scene: one without B-roll (Example 1) and one with (Example 2).
Example 1 relies on repeated shots of the main subject, offering no sense of place or activity. In contrast, Example 2 opens with establishing shots of the gym, followed by cutaways of people working out. These visuals provide vital clues that allow the audience to make inferences (in this case, that the subject has just arrived at a crowded gym).
Furthermore, B-roll can improve viewer retention.
One study found that videos with B-roll experience up to a 50% increase in watch time, with 80% of viewers reporting preferring content that integrates it.
On platforms like YouTube or TikTok, where algorithmic success is tied to engagement and watch duration, this can directly impact how far your video reaches.
How to Add B-Roll Using Stock Footage Libraries
Stock footage libraries are one of the fastest and most accessible ways to add B-roll to your videos. With Kapwing’s stock video library, you can quickly find high-quality clips to enhance your story.
Step 1: Start a New Project in Kapwing
Start by opening or creating a project in the Kapwing Studio. Click on the Visuals tab in the left-hand toolbar.

Step 2: Browse or Search the Stock Video Library
For B-roll, you'll most likely want to use video clips, so click on the Videos tab. If you're open to mixing in images, you can stay on the All tab.
From there, you can either browse by category or use the search bar to find something specific. For example, you could search for “aerial city at night”, or “close-up of hands typing”.

Step 3: Choose and Insert Your B-Roll Clip
If you use the search bar, you’ll see a range of relevant options based on your keywords. Scroll through the results and choose the clip that best matches your scene. To narrow down your options, you can enable the “Royalty Free Only” toggle — this ensures that the clips you use are safe for commercial or public use.
Once you’ve found the right B-roll clip, click on it to add it to your project timeline. From there, you can trim, reposition, or layer the footage however you need. You may want to add a filter so it fits better with your existing content, or generate a sound effect to go with it.

Optional: Use Smart B-Roll for Photo-Based Content
If you're working with photo-based B-roll instead of video clips, you can also use the Smart B-Roll tool.
Navigate to the Images tab in the left-hand toolbar, then click on the Smart B-Roll option. The tool will analyze your script or voiceover and auto-populate your timeline with relevant stock images that align with your content.

How to Generate B-Roll Using AI Tools
While stock B-roll may work for broader visuals like establishing shots or process footage, it’s less effective for more specific shots, like cutaways or inserts. This is because these shots often require narrative precision and a specific visual style.
Traditionally, these would require a full crew and filming. But today, AI video generators make it possible to create those clips on demand. With tools like Kai, you can generate high-quality, stylized B-roll footage. Here's how to do it:
Step 1: Write Your Prompt
Writing a detailed, effective prompt is one of the most crucial elements of AI video generation, defining what appears in the frame, how it looks, what happens, and how long the shot lasts.
Here are some important things to keep in mind:
What to Include in Your Prompt:
- Subject: What’s the focus of the shot?
e.g. “A man walking into a gym,” “hands placing a letter on a desk” - Setting: Where is it taking place?
e.g. “inside an urban boxing gym,” “modern home office with desk lamp” - Action: What happens in the scene?
e.g. “walks in and sets down gym bag,” “hands gently open the envelope” - Camera Angle / Movement: Controls cinematic style
e.g.“top-down static frame,” “over-the-shoulder handheld shot” - Duration: How long should the shot last?
e.g. “4–6 seconds of continuous action” - Visual Style: Match your video’s tone
e.g. “cinematic lighting with shallow depth of field,” “dark, moody, soft focus”
Example High-Quality B-Roll Prompt
“5-second close-up shot of a spinning metal top on a polished wooden table. Soft afternoon light filters in from a nearby window, casting subtle reflections and shadows. The camera remains static, with shallow depth of field focused on the top as it spins steadily in place. Minimal background detail, warm cinematic tones.”
Step 2: Attach a Reference Image
(Optional, but recommended)
When generating B-roll with Kai, your reference image plays a different role depending on whether you're creating a video or an image.
- For AI video, the reference image is treated as the first frame of the clip. This means the reference image should be exactly like how the video begins.
- For AI images, the reference image is used loosely as stylistic or structural guidance. The AI will borrow elements, but the output won't match the image.
Below are best practices for choosing strong reference images, based on what you’re trying to generate:
Setting / Environment:
Use a shot that shows the full environment without being too far away or too cropped in.
For video, make sure it looks like a realistic first shot; pay attention to camera angle, lighting, and scale.

Object or Product:
Include a focused, well-lit photo of the object you want the AI to replicate. Clear textures, shape, and color are key for accurate generation.
For video, ensure the object is centered and framed cleanly

Character / Human Element:
If you're generating B-roll that includes people, use a clear portrait or full-body image that shows wardrobe, posture, and facial detail.
For video, the AI will treat this as the opening shot, so lighting and pose should match the tone of your scene.

Step 3: Generate Your Footage
Once your prompt and optional reference image are ready, open Kai and start a new chat. In the chat window, you’ll see an input field at the bottom. Click the “Attach Media” button in the bottom-left corner to upload your reference image.
Then, paste your prompt into the input box. Once everything is in place, click the arrow button (or press Enter) to generate your B-roll clip.

Step 4: Refine or Edit the Output
After you submit your prompt, Kai will generate an output directly in the chat. If you’re not satisfied with the first result, don't worry. It often takes a few tries to get the look you’re going for.
Start by prompting Kai with specific revision requests. For example:
- “Make the subject more centered.”
- “Increase contrast and brightness.”
- “Use a blurred background.”
If that doesn’t work, try tweaking your original prompt to be more descriptive. Small changes can lead to very different results.

Step 5: Add to Your Project Timeline
Once you're happy with your generated asset, you have a couple of options for using it. You can either download it directly or open it in a new project using the buttons below the asset preview.
If you're already working inside a Kapwing project, the generated B-roll will automatically be saved to your Media Library. Simply navigate back to your project, open the Media tab, and look under All Uploaded Content to find and drag the new clip into your timeline.

This is the final B-roll clip that we generated based on our prompt and reference image.
It combines the key visual elements we described and is ready to be used in a cinematic project.
Frequently Asked Questions
What is the difference between A-roll and B-roll?
A-roll is your primary footage: the main content that tells your story, such as interviews, talking heads, or action scenes. B-roll, on the other hand, is supplemental footage that supports and enhances the A-roll. It might include cutaway shots, establishing scenes, or background visuals that add context, smooth out edits, or visually reinforce what’s being said.
When should you use B-roll in a video project?
You should use B-roll any time you want to add variety, cover jump cuts, illustrate what your subject is talking about, or set the scene. B-roll helps keep the viewer engaged, emphasizes key points, and makes the final product feel more polished and professional.
What types of shots count as B-roll footage?
Common types of B-roll include:
- Establishing shots (like a wide shot of a city or location)
- Cutaway shots (like hands typing during an interview)
- Close-ups or detail shots (such as a close shot of food being plated)
- Action or process footage (someone painting, cooking, working, etc.)
- Atmospheric or mood shots (like nature, scenery, or crowds)
- Stock or archival footage (used when you don’t have original footage)
Any visual that complements and enhances the main content can function as B-roll.