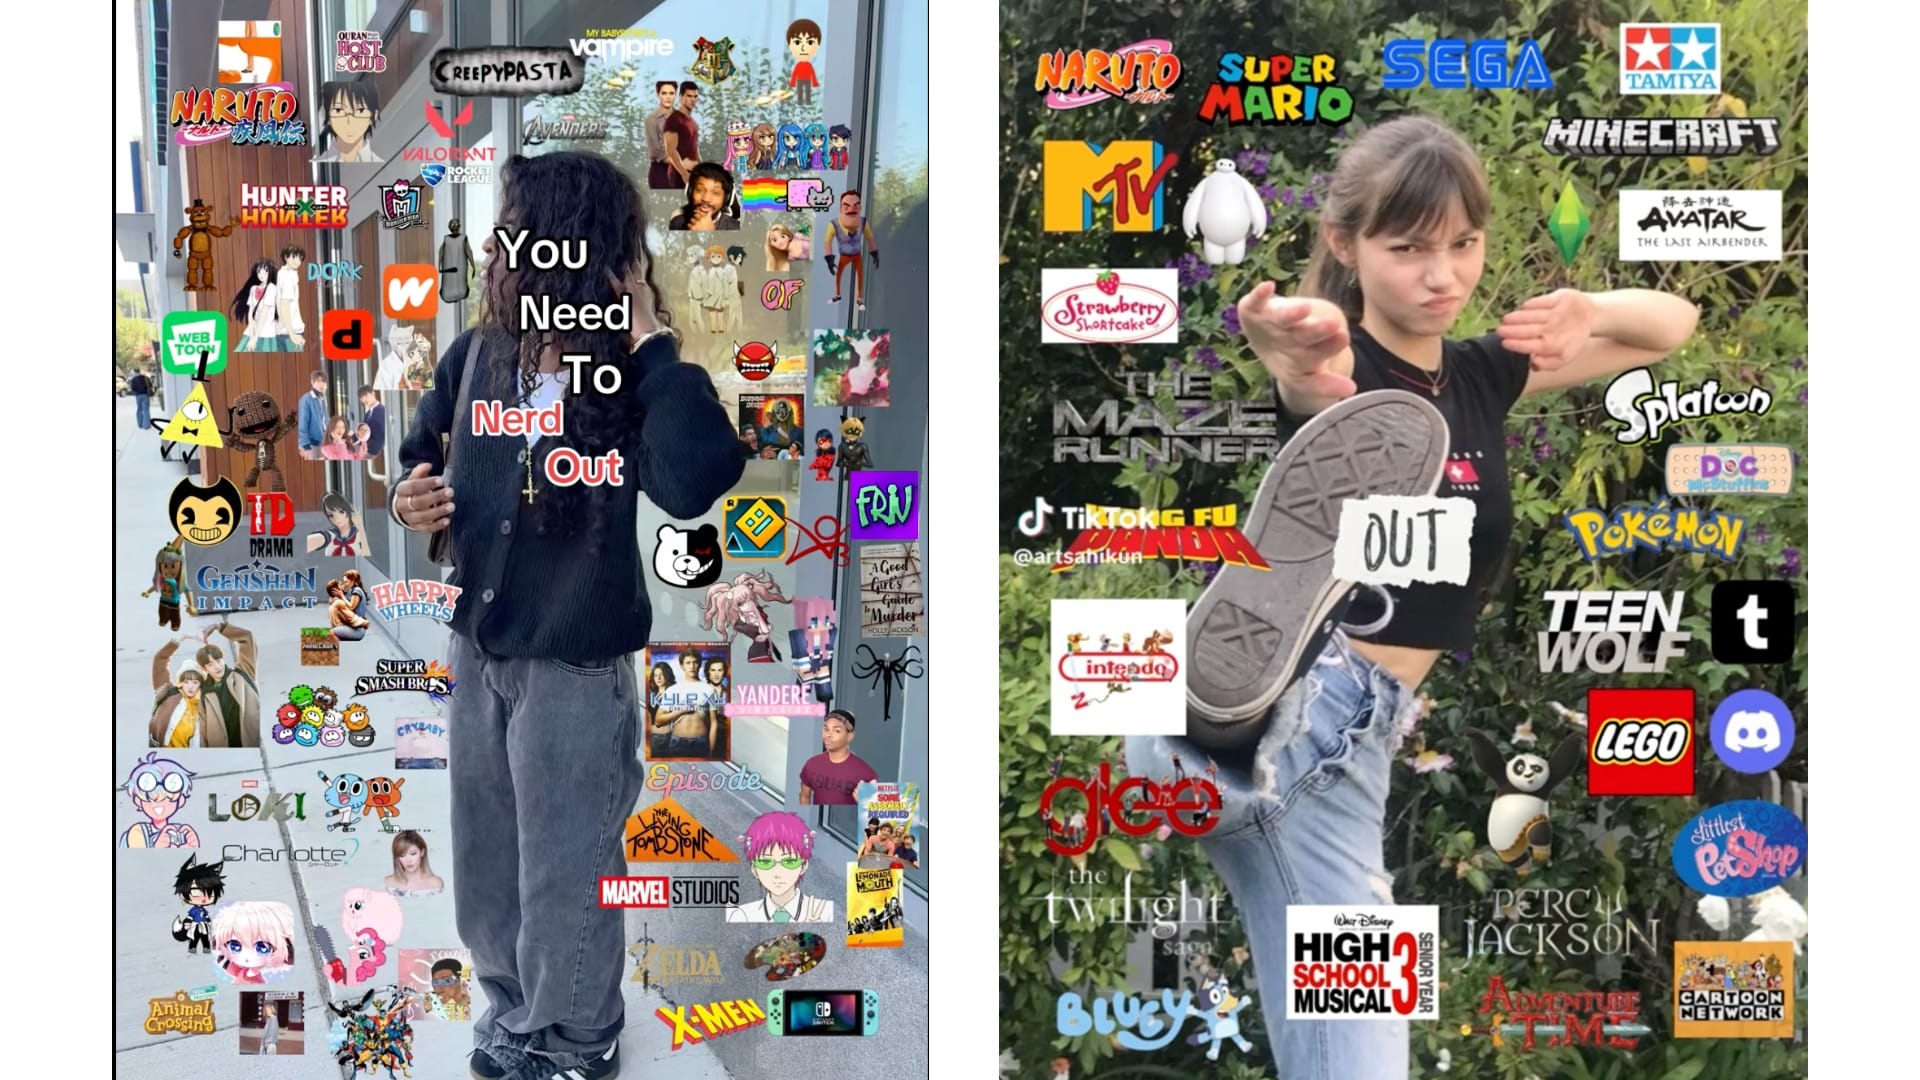
How To Do “You Need to Nerd Out” Trend On TikTok
Over 198K creators have posted their TikTok nerd-outs
If you’ve been on TikTok lately, you’ve probably seen the “You Need to Nerd Out” trend. The premise is simple: creators are showing off the hobbies, collections, or passions they "nerd out" over, whether that’s anime, vintage vinyl, board games, coding setups, or anything else that makes their inner nerd shine. It’s a fun, relatable way to celebrate the things you love most.
Originally sparked by YouTuber The Zurkie Show, who encouraged people to proudly “nerd out” about what they love, the trend quickly went viral on TikTok. Most videos use the phrase “You need to nerd out” paired with the track Punkrocker, while creators share collages or clips of the things that bring them joy.
@artsahikun you need to nerd out 😎✨️ #youneedtonerdout #nerd #viraltiktok #viral #trending #templatecapcut #CapCut ♬ original sound - madi
If you want to join in, it’s simple to do and doesn’t require advanced editing skills. In this step-by-step TikTok tutorial, we’ll show you exactly how to make a “You Need to Nerd Out” video, from choosing what to feature to filming, editing, and posting your own version.
Step 1: Pick Your Background Photo
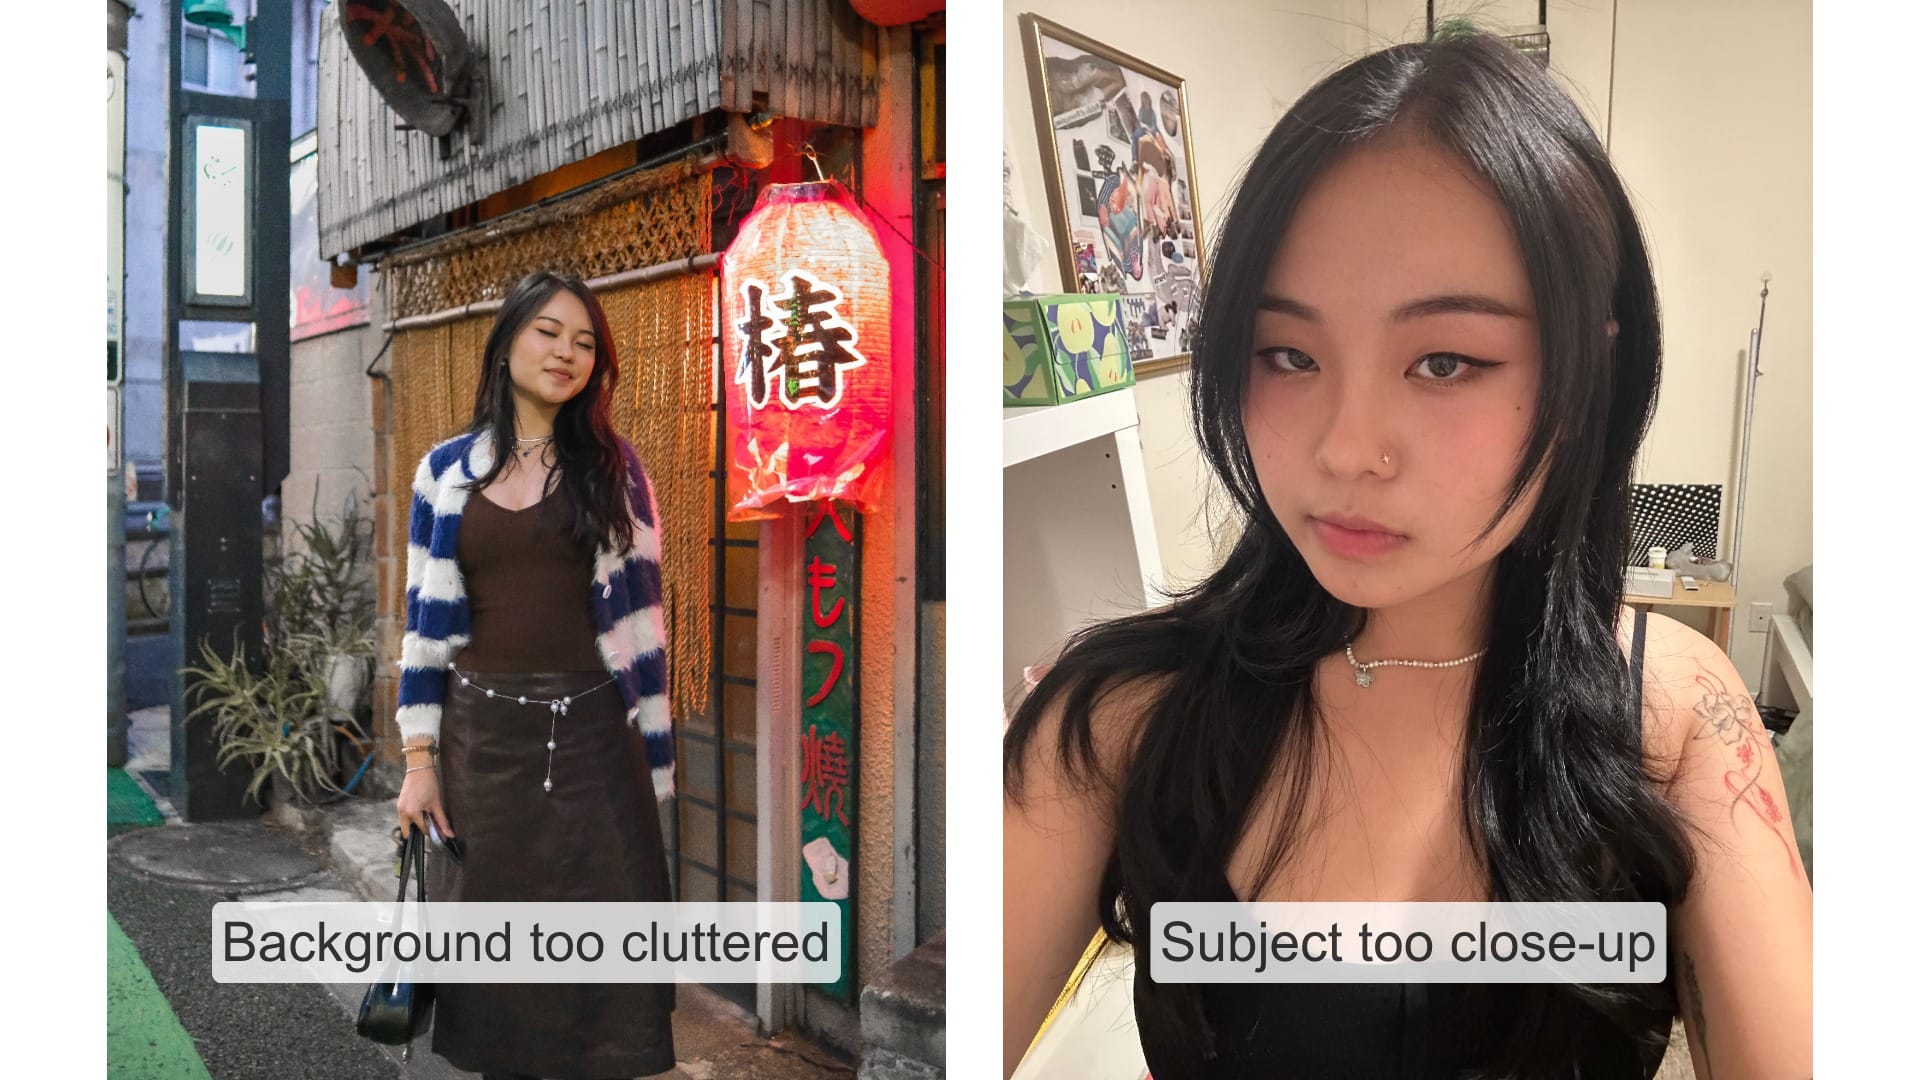
To start creating your “You Need to Nerd Out” TikTok video, you’ll need a strong background photo of yourself. Selecting a good picture is important because it sets the stage for the rest of your video, ensuring that your passions stand out.
The most popular choices are full-body pictures or portraits, since they give you plenty of room to arrange your “nerd out” items around you; many creators use mirror selfies, standing poses, or casual portraits.
However, to make your video look even better, it’s worth being intentional with your photo choice. Keep the following pro tips in mind:
- Leave plenty of foreground space: don’t fill the entire frame with yourself; the goal is to balance your figure with the items you’ll add later.
- Use a neutral wall or uncluttered background: this makes your added images stand out more clearly.
- Avoid clutter in the foreground: too many objects or distractions will compete with your “nerd out” items.
For example, the two images below would be poor choices for this trend: the first is a close-up selfie where the face fills nearly the entire frame, leaving no space to add items around the subject. The second is a full-body shot, but the background is cluttered with furniture and objects that distract from the “nerd out” items you want to highlight.
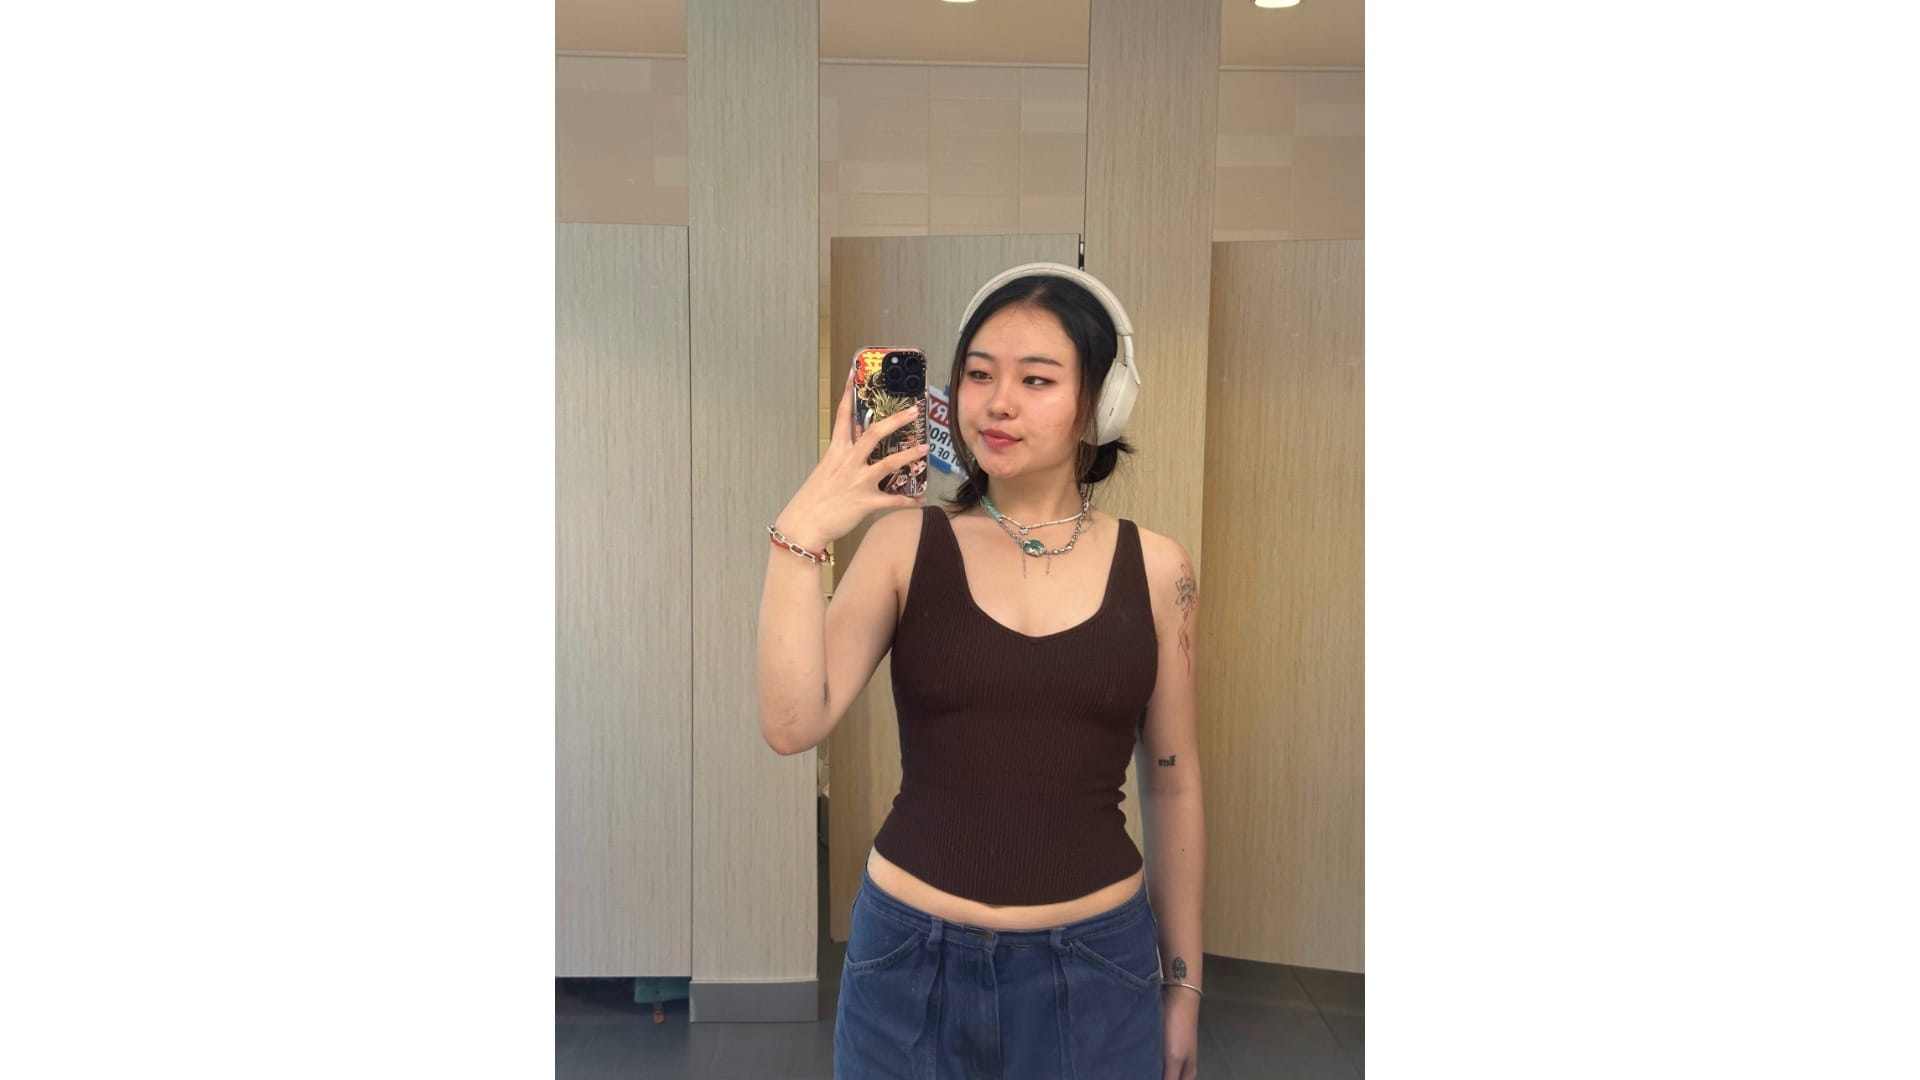
Below is the photo that we chose for the "You Need To Nerd Out" trend: a mirror selfie with a neutral background.
Even though it isn’t full-body, the photo works because it leaves plenty of foreground space. The uncluttered backdrop makes it easy to add “nerd out” items that stand out against the frame.
Step 2: Collect Your “Nerd Out” Items
Once you’ve chosen your background photo, the next step is to gather the photos of the items you’ll showcase in your “You Need to Nerd Out” TikTok video. These should represent the hobbies, fandoms, or passions that you’re most excited about.
Some popular examples we’ve seen include anime (Hunter x Hunter, Naruto), TV shows and movies (Vampire Diaries, Gravity Falls), apps (Webtoons, Spotify), and characters (Pixel Cat and other fan-favorites).
No matter what you choose, here are some pro tips when selecting your images:
- Pick pictures with transparent or solid backgrounds: transparent backgrounds save you an extra step, while solid backgrounds make it easy to remove.
- Use logos whenever possible: instantly recognizable logos (like Spotify, Pokémon, or Marvel) connect quickly with viewers and give your video more impact.
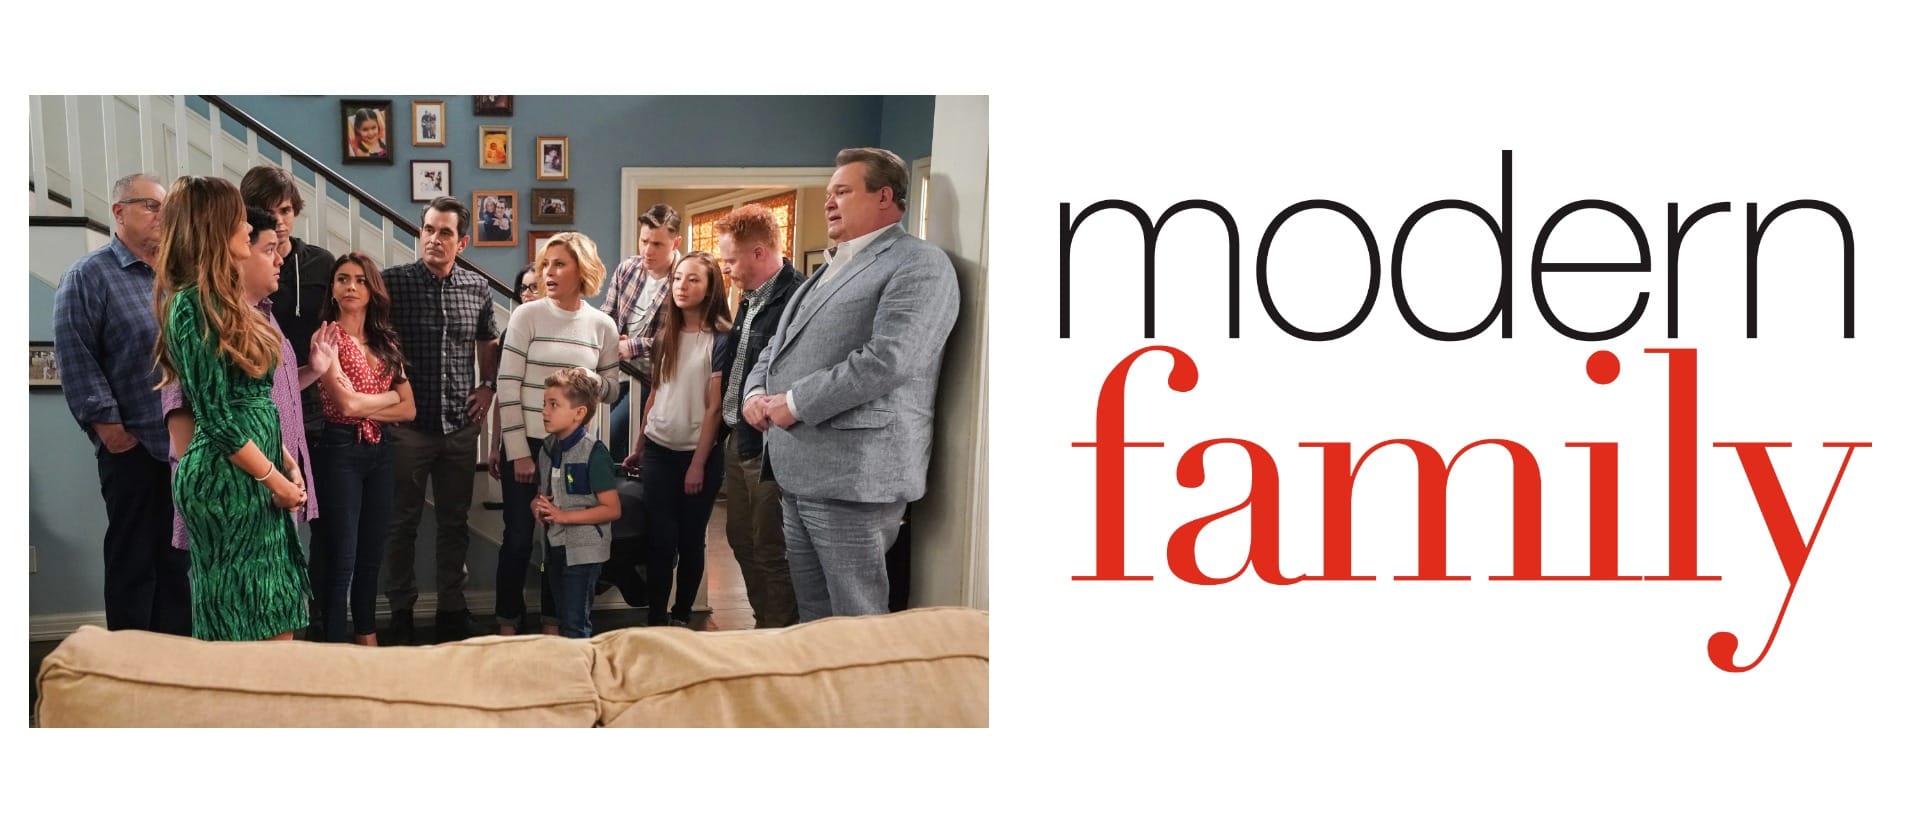
In the example below, the photo on the left is a bad choice to represent Modern Family because the background is difficult to remove, and it’s not immediately clear what the photo is showing. The photo on the right is a good choice because you can easily remove the background, and viewers will instantly understand what it represents.
Finally, think about how many items you want to include. The number of “nerd out” photos depends on how saturated you want your frame to look.
I used 11 images in mine, but you can adjust based on your style. Save all of your chosen images into a single folder or album so they’re easy to upload later.
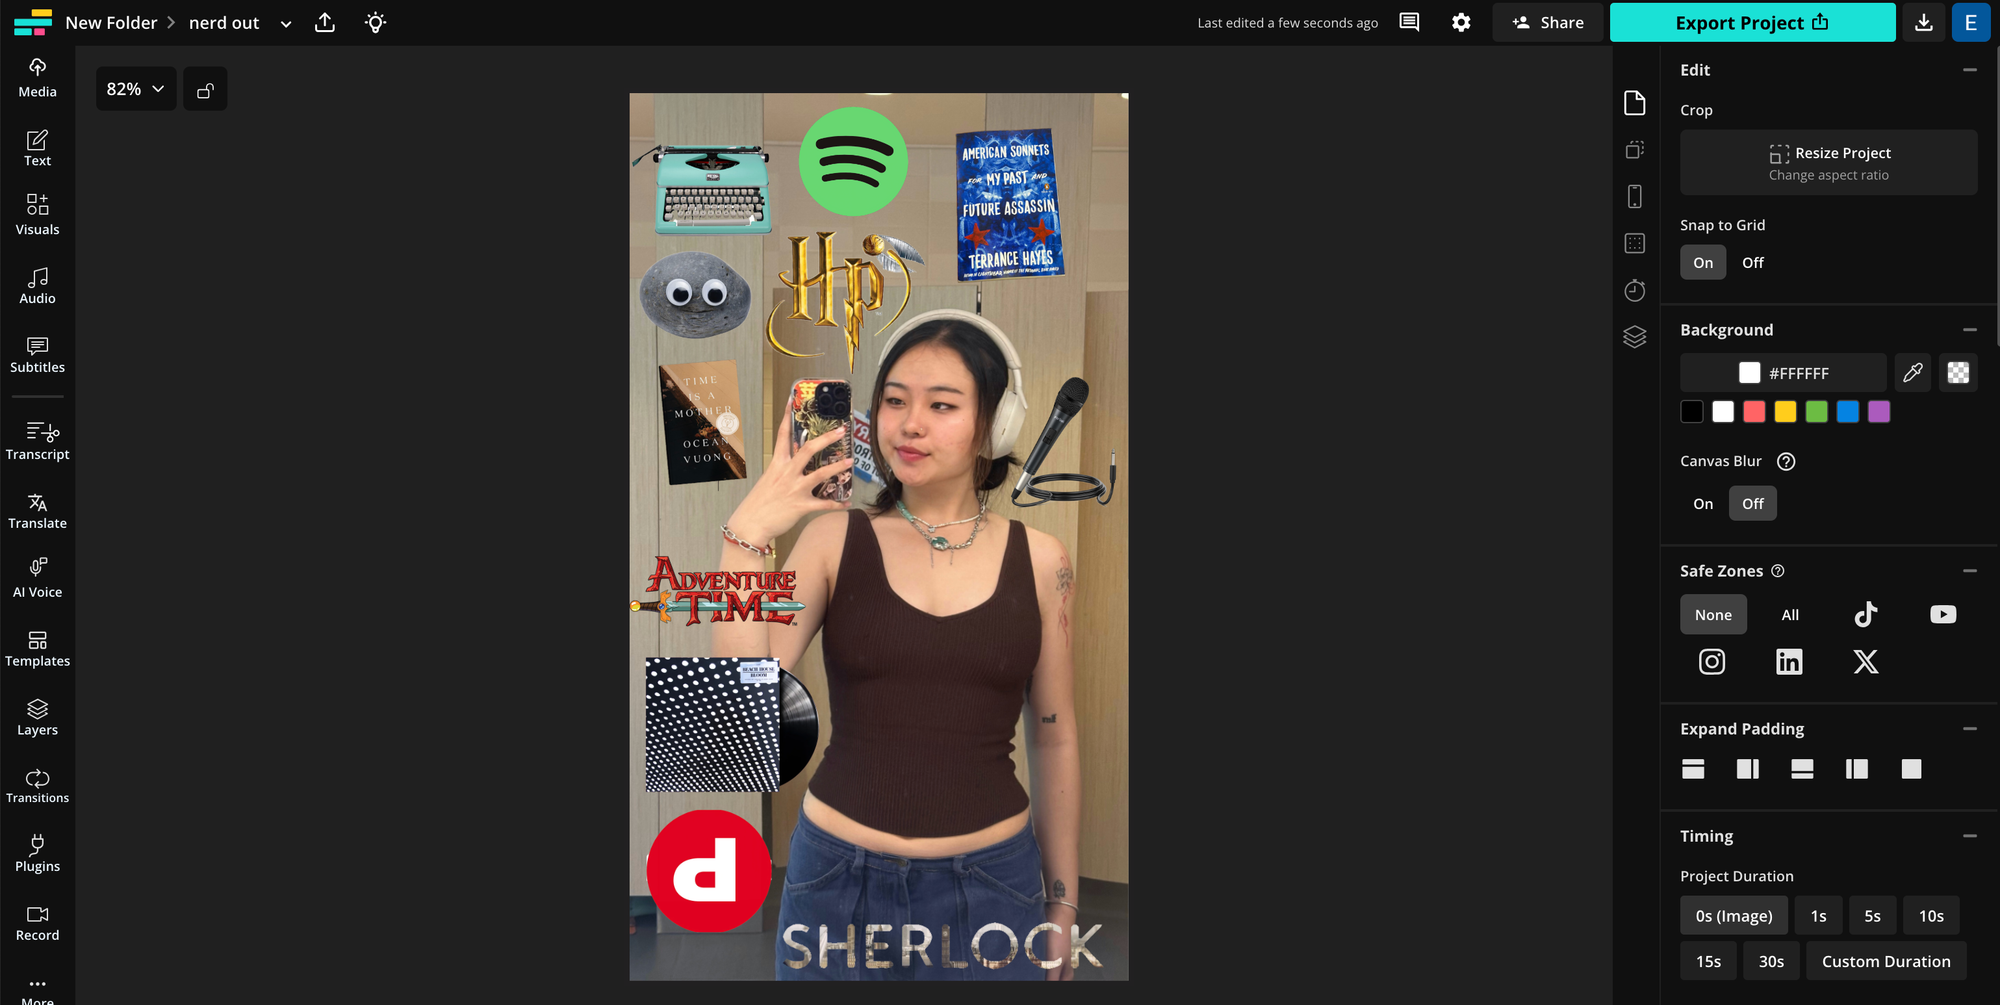
Step 3: Upload and Arrange in Kapwing
Start by uploading your background image into the Kapwing Studio. This will be the base layer for your “You Need to Nerd Out” TikTok video.
Resizing Your Photo
After uploading, you’ll first want to resize your photo to match TikTok’s vertical format. On the left-hand toolbar, click the “Resize Project” button.

This will open a pop-up menu with different size options. From the drop-down menu, select TikTok Video (9:16).
Then, click the blue "Resize Project" button. This will perfectly crop your project to fit TikTok's aspect ratio.

Uploading Your “Nerd Out” Images
Next, upload the images you collected earlier of the things you love to “nerd out” over.
On the left-hand toolbar, click the “Media” tab. This will open your media library, where you can see all the content you’ve previously uploaded. Then, click the “Upload Media” button.

Select the saved files from your device. Once uploaded, all your fandoms, logos, and passions will appear in your media library, ready to be added to your project.
Removing Backgrounds and Arranging
As part of the trend, you’ll need to remove the backgrounds of your “nerd out” photos.
To do this quickly, select an image, then click “Erase” in the right-hand editing menu.

This will open an editing menu. Click on the “Auto Remove Background” button to automatically cut out the background.
Once the preview looks good, click “Done” to save your changes.

After that, you can resize the image by dragging its corners or move it by clicking and dragging across the canvas. Arrange each photo around your body until the layout feels balanced.
Make sure to leave space for the text overlay that’s part of the trend: the phrase “You need to nerd out.” It helps to plan ahead where you want each word to go so your images don’t block the text.
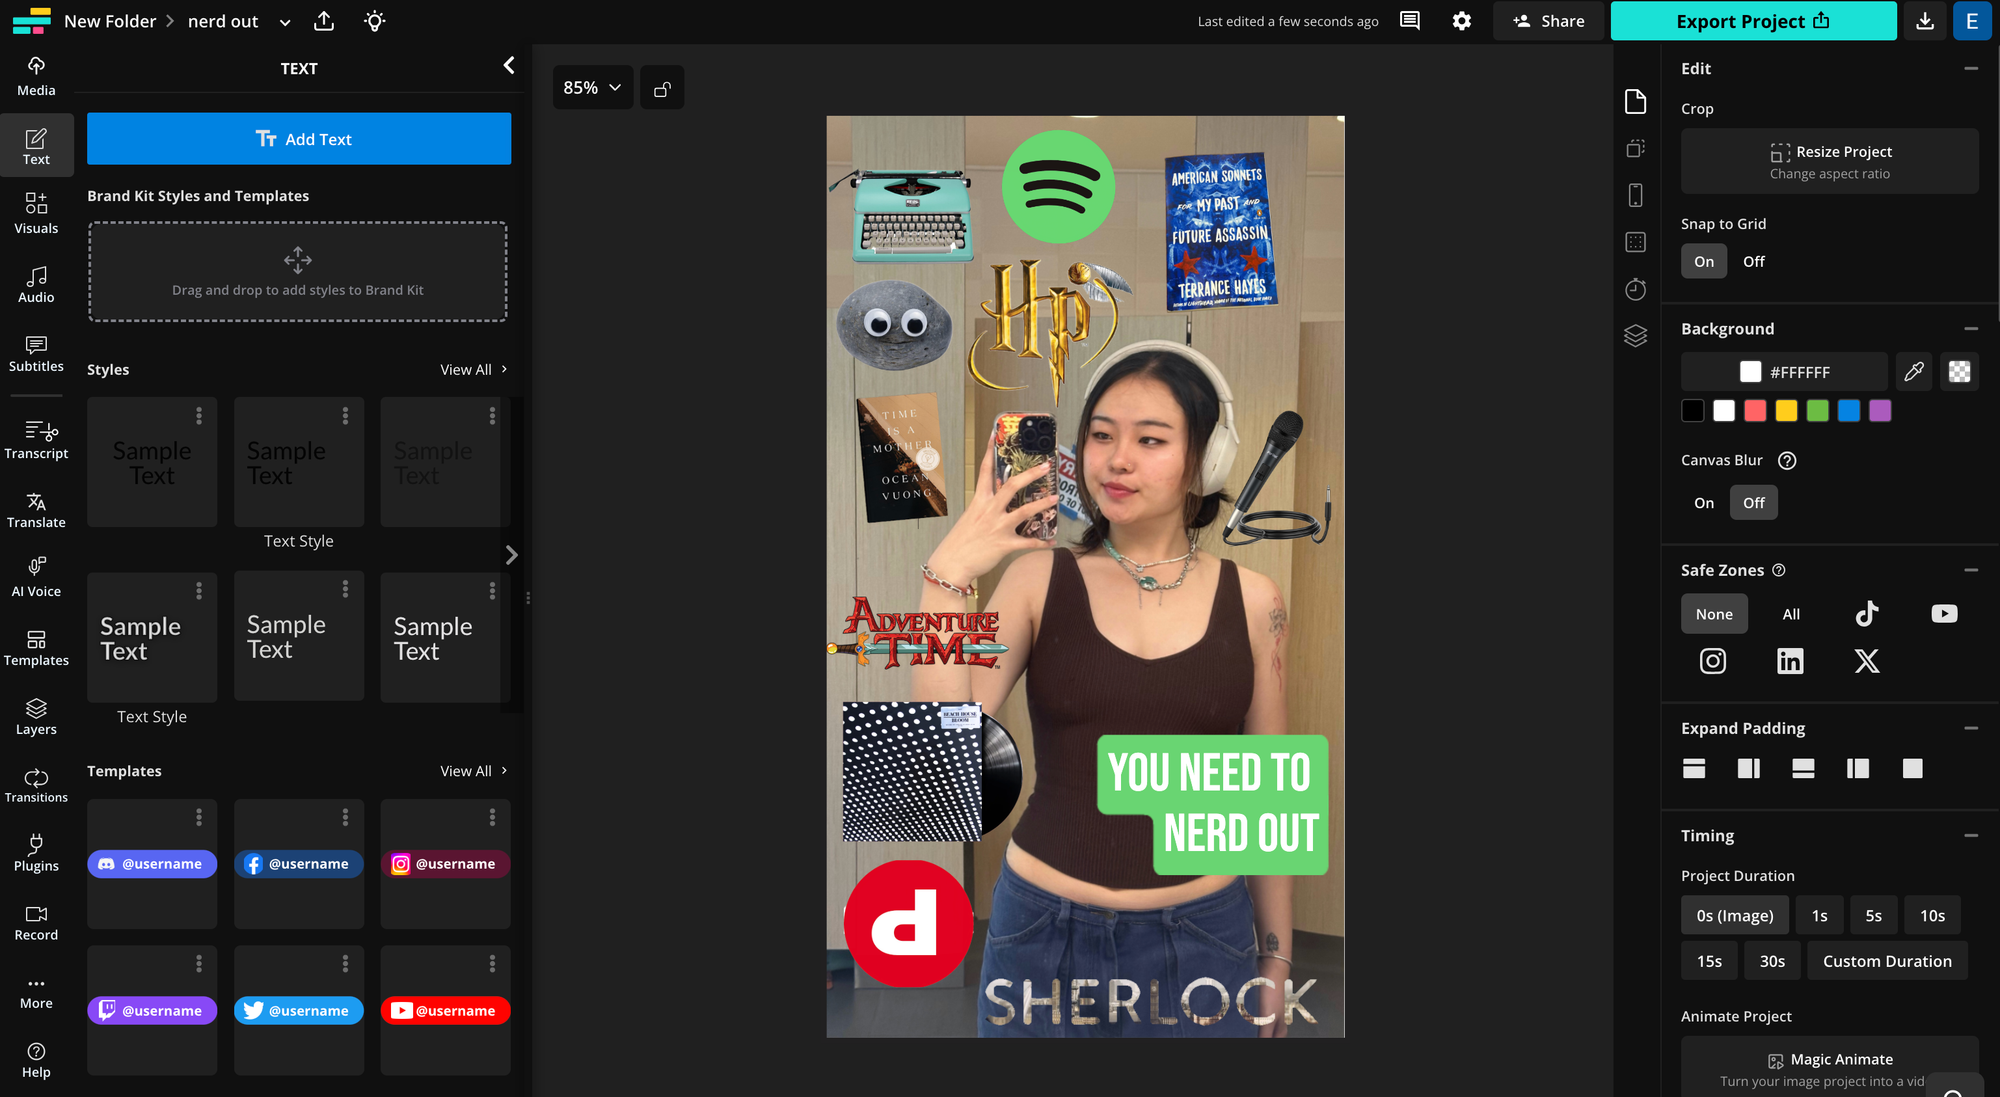
Step 4: Insert the Text Overlay
Next, add the text overlay that makes this trend recognizable: “You need to nerd out.”
To do so, on the left-hand toolbar, click the “Text” button. This will open a menu with different sample text styles you can scroll through. If you want to customize your own, click the blue “Add Text” button.

A new text box will appear on your canvas. Use the tools on the right-hand toolbar to adjust the font style, size, and color until it matches the look you want.
Once you’re happy with the style, simply drag and drop the text box to position it.
Make sure to place the words strategically so they don’t overlap with your “nerd out” items.
Step 5: Export Your Project
Now that you’ve finished creating your Nerd Out video, it’s time to export your project to upload it on TikTok. Click the blue “Export Project” button in the top-right corner of Kapwing. This will open the export menu, where you can choose your file type and resolution. Once you’ve finalized your settings, click the blue “Export” button again.

After exporting, go to the “Recent Exports” tab in Kapwing. Select your image and click “Download” to save it to your device.

Step 6: Upload on TikTok and Add Audio
Now that you’ve exported your collage, it’s time to upload it to TikTok and pair it with the trending audio that makes this trend recognizable.
The easiest way to find it is by searching for the “You Need to Nerd Out” trend on TikTok, and finding a post that uses the audio. You’ll notice a few variations of the sound. The most popular version uses the track “Punkrocker,” but you can choose whichever version fits your style.
Once you’ve found a post, tap the sound bar at the bottom of the video.

This will take you to the audio page, where you can tap the “Use Sound” button in the bottom-right corner to start your post. TikTok will open the editor screen; tap on your camera roll in the bottom-right corner and select your exported image to add it to your post. Once it’s loaded, click “Next” to add captions and post.