How To Do The AI 3D Figurine Trend
With 66K+ Google searches last month, the 3D Figurine Trend is quickly becoming one of TikTok’s trendiest AI effects.

Advanced AI-generated effects are reshaping the way creators approach content in 2025. While “AI slop” trends like Italian brainrot or cat videos still gets views, attention is shifting toward AI effects that are high quality and more cinematic.
One of the best examples is the AI 3D Figurine Trend, which takes a photo and transforms its subject into a realistic miniature collectible. The result looks like an actual retail product, often complete with an acrylic base and packaging mockup.

While the AI 3D Figurine Trend looks polished and professional, it’s actually easy to do yourself with the right tools. While the trend originally took off with Google's Nano Banana, you can achieve the exact same effect in Kapwing, which is quicker, easier, and offers a full editing studio.
In this guide, we’ll break down how to create your own AI figurine with Kapwing, from choosing the best photo to writing a strong prompt, generating your figurine, and exporting a share-ready result.
What is the AI Figurine Trend?
The AI 3D Figurine Trend is a viral TikTok format where people turn themselves, friends, or even pets into collectibles. These figures are photo-realistically rendered, and complete with transparent acrylic bases and packaging mockups.
Furthermore, the final result closely resembles the person in the reference photo, from their outfit to their hairstyle and facial features.
@ann4133 yayyy berhasil 🥳 yg mau ikutan ni caranya: STEP 1 1. buka gemini 2. upload fotonya 3. masukan promptnya: Create a 1/7 scale intelligent figurine in the picture, in a realistic style, in arial environment. the figurine is plattered on a computer desk. the figurine has around transparent acrylic base, with no text on the base. the content on MAYA the screen is the Zbrush modelling process of this figurine. next on the computer screen is an BANDAI-style toy packaging box with printing. the packaging features two-dimentional flat illution. STEP 2 (biar bisa gerak) 1. buka openart.ai (https://openart.ai/video/i2v) 2. upload foto yg dr gemini di start frame dan end frame (foto yg sama) 3. masukan promtnya: Nure two hand gently pick up the figurine with the transparent acrylic base on the frame and rotate it slighty for impaction. The model in the packaging box remain stationary, while all others background elements stay unchanged. selamat mencoba 😁 #viral #prompterchallenge #miniature #fyp #videoviral ♬ Mau Tak Mau - Remix Dance Porto - Tsaqib
The realism of this trend is what truly sets it apart. Unlike more fantastical or animated AI effects (like TikTok’s Bikini Bottom Trend) the AI 3D Figurine Trend relies on how accurately your generator can capture details from your photo. As such, the AI tool you choose will determine whether your figurine looks convincingly like you or comes out distorted and uncanny.
While the trend first went viral on Google's Nano Banana, the Kapwing Image Generator is a better choice because it includes many advanced models, including Seedream 4 and Hailuo MiniMax.
These models are designed to work directly with reference photos, resulting in very consistent, high-quality results.
In the next section, we’ll walk you through exactly how to create your own AI figurine from start to finish.
How To Do The AI 3D Figurine Trend
Step 1: Choose the Right Photo
In the AI 3D Figurine Trend, the quality of your figurine starts with the quality of your source image. While most viral TikToks only showcase the finished miniature, the photo you choose behind the scenes can make or break the final result.
This is because a poor-quality reference image often leads to figurines that look disproportionate, distorted, or even unrecognizable.
For example, below you can see the difference: one figurine was generated from a high-resolution, full-body photo, resulting in accurate proportions and clean details. The other was made from a selfie, and the result is uncanny and doesn't align with the trend.
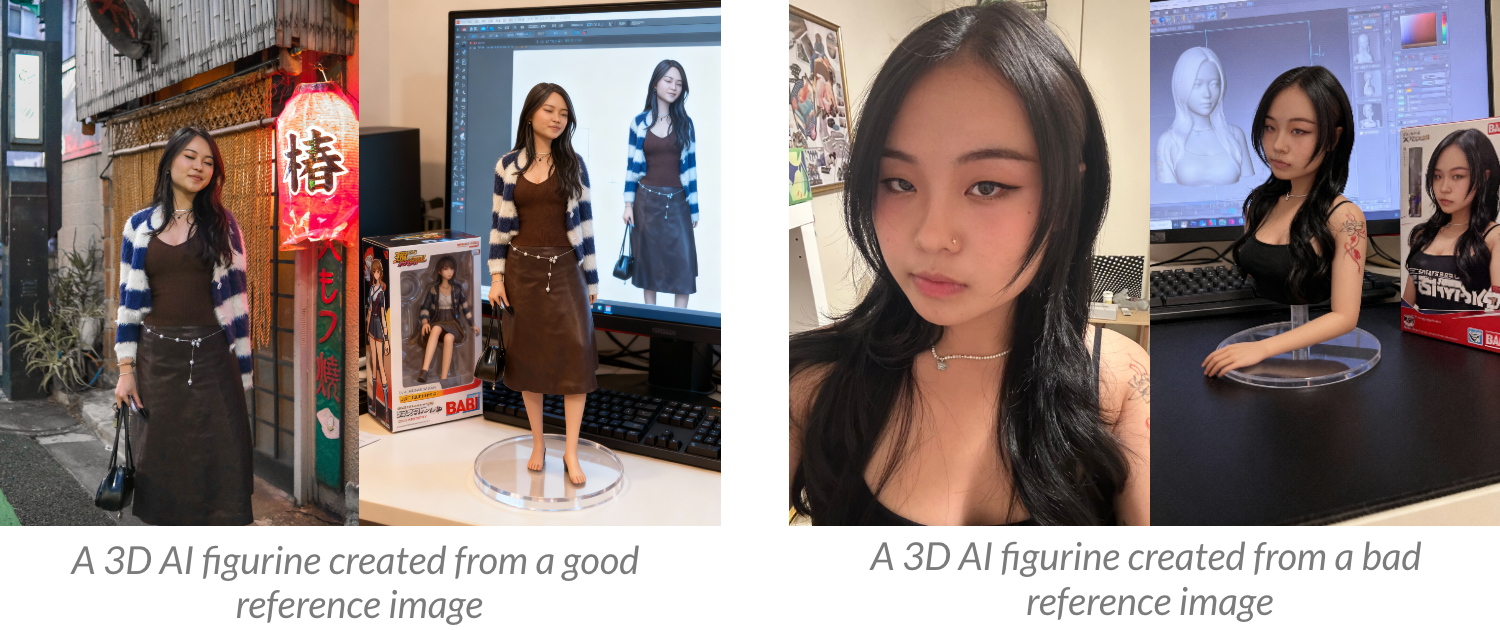
To avoid these issues, we’ll break down exactly what makes a reference image “good” or “bad” and how to choose the right one for your figurine:
- Full-body images work best
Since the finished figurine is a full-body collectible, using a full-body photo ensures the AI has the needed details. If you use a selfie or a waist-up shot, the model would have to invent details, resulting in results that may look uncanny. - Prioritize high resolution and good lighting
The sharper the image, the more details (like outfit textures or accessories) can be preserved. Blurry or dark photos may result in figurines that lack definition. If your photo quality isn’t perfect, try running a photo enhancer first. - The pose matters
Avoid photos where you’re seated, slouched, or partially hidden behind objects, since these positions can cause awkward proportions or incomplete body parts.
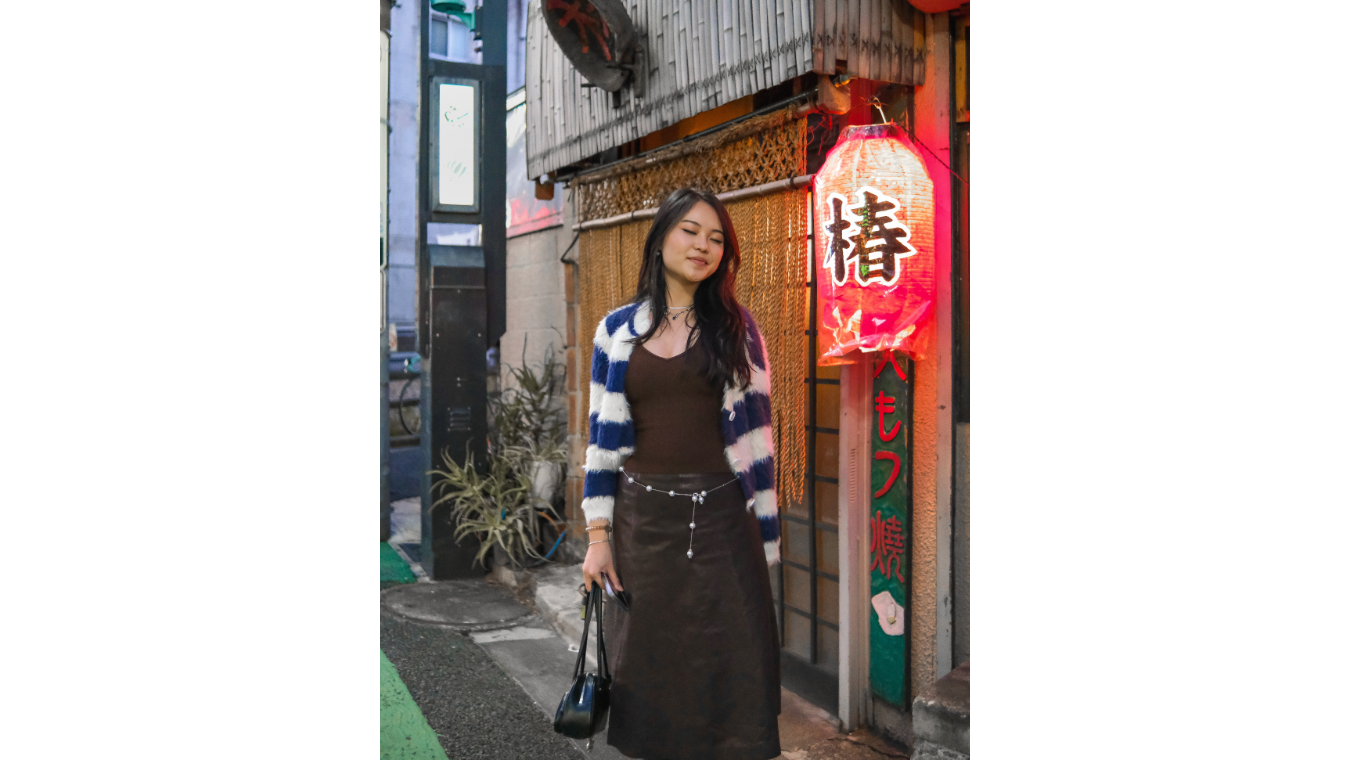
We used the following photo to generate one of our figurines. It works because the subject is clearly visible, the photo is bright and evenly lit, and the outfit is shown in full detail.
Step 2: Craft Your AI Prompt
Once you’ve chosen the right reference photo, the next step is to write a clear and detailed AI prompt. A strong prompt tells the AI exactly what to generate, while also setting boundaries to avoid things like cropped bodies or distorted features.
Here are some important things to keep in mind when writing your prompt:
- Scale and Style: Always specify the figurine’s size (e.g., 1/7 scale) and style (realistic, collectible, cartoon)
- Reference Linkage: Emphasize that the figurine should resemble the subject in your photo — outfit, hairstyle, accessories, and facial features
- Environment: Add context so the figurine looks intentional, like placing it on a desk, in front of packaging, or in a display case.
- Negative Prompts: Clearly state what you don’t want (e.g., no cropped body, no anime style, no distorted proportions).
Here’s the exact prompt we used. Feel free to copy and paste it directly into Kapwing.com, or tweak it to match your own figurine.
Create a 1/7 scale intelligent figurine in a realistic style of the figure in the attached reference image, placed on a computer desk in a real environment. The figurine has a round transparent acrylic base with no text. The computer screen displays the Zbrush modeling process of this figurine. Next to the screen is a BANDAI-style toy packaging box with two-dimensional flat illusion printing. No cropped body, no partial figure, no missing limbs, no sitting or cut-off poses. Avoid anime, manga, cartoon, or stylized rendering. No distorted facial features, incorrect clothing, or mismatched hairstyle.
Step 3: Generate with Kapwing AI
Now that you have your prompt ready, it’s time to bring your figurine to life
Go to Kapwing.com and select the Generate tab. This will open Kapwing’s AI generation hub, where you can create images, videos, and even songs.
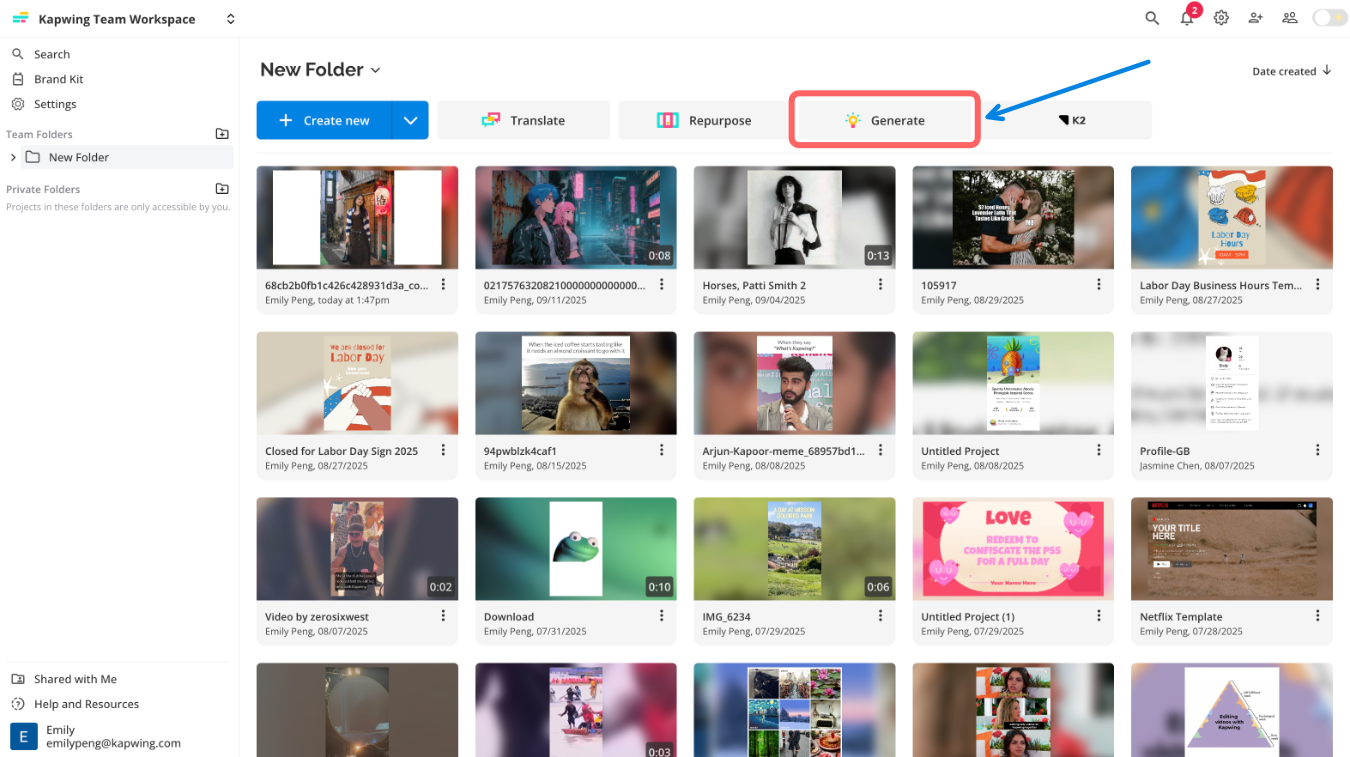
Once you’re in the Generate page, use the left-hand toolbar to switch into the Images tab. This will open a workspace with a prompt box and a history of any images you’ve previously generated with Kapwing.
In the toggle at the bottom left of the chat box, make sure the Seedream 4 or Kapwing I1 model is selected for best results.
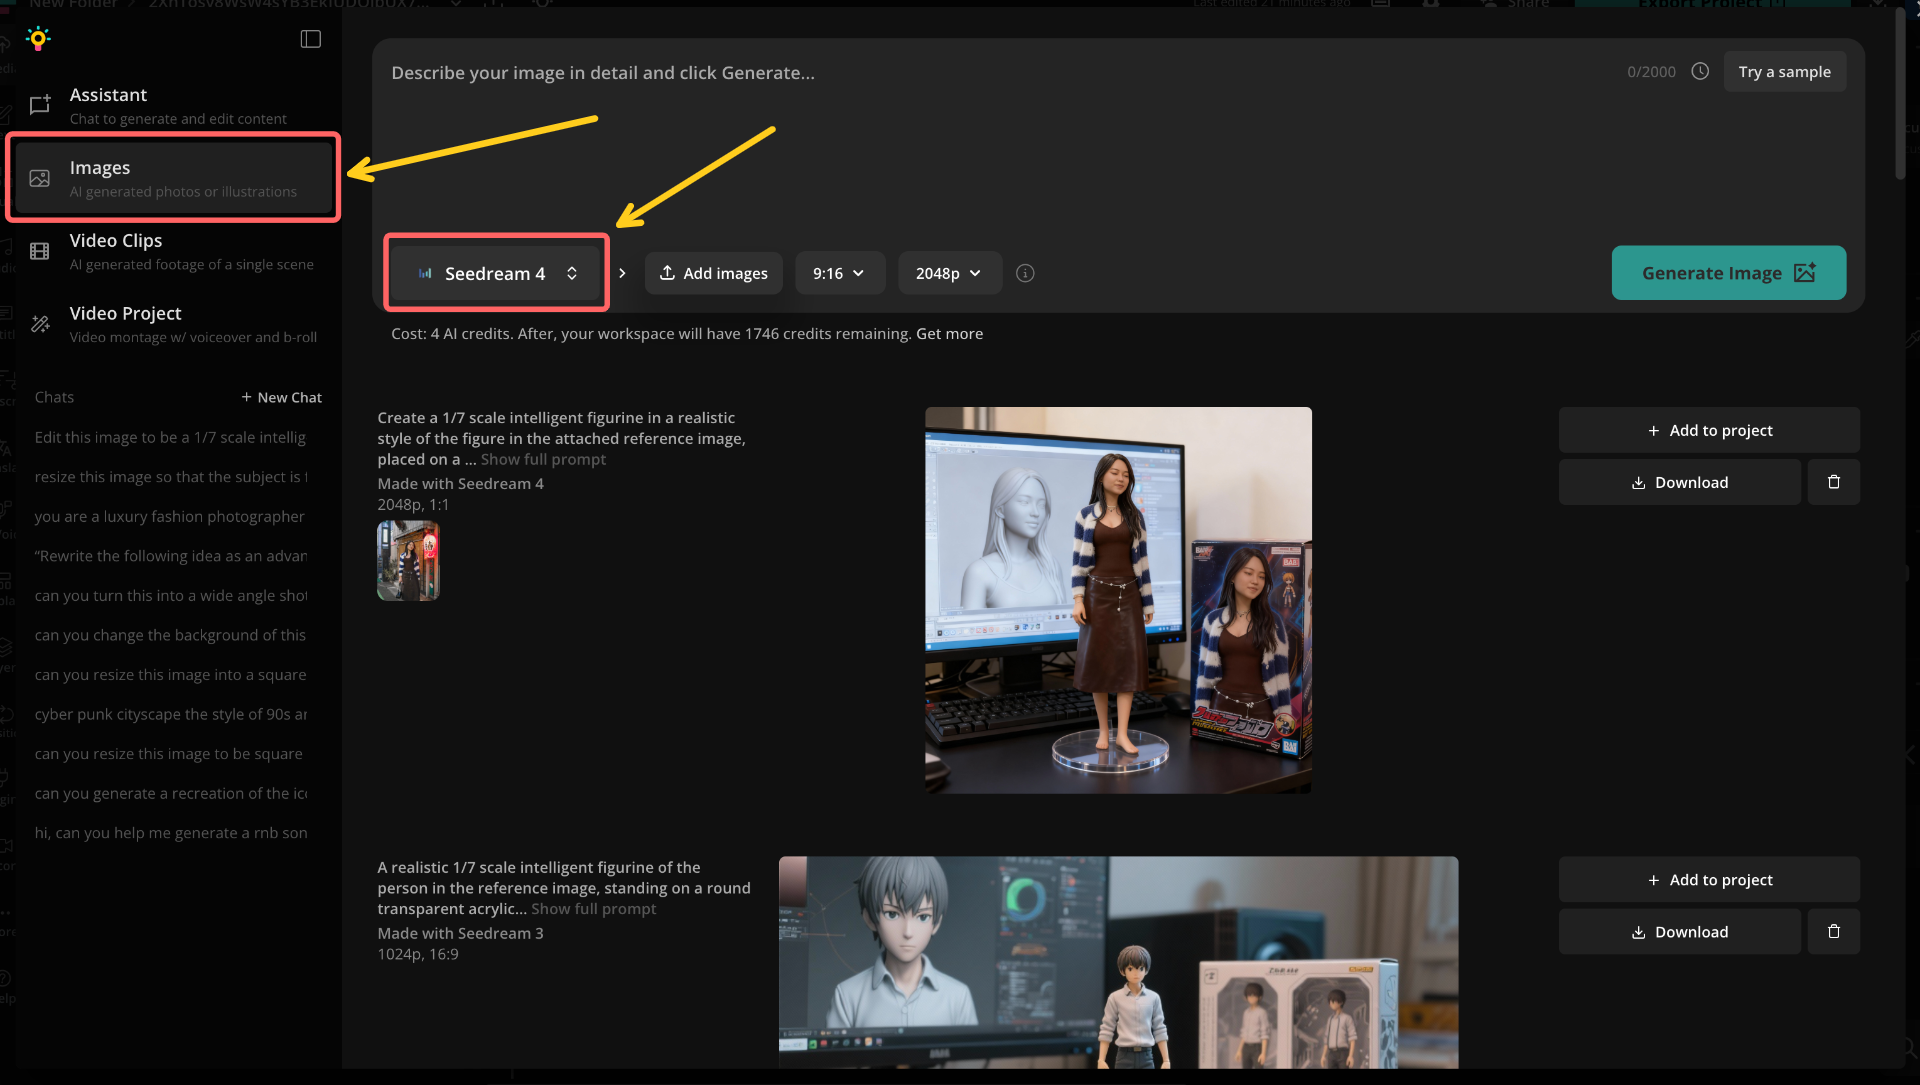
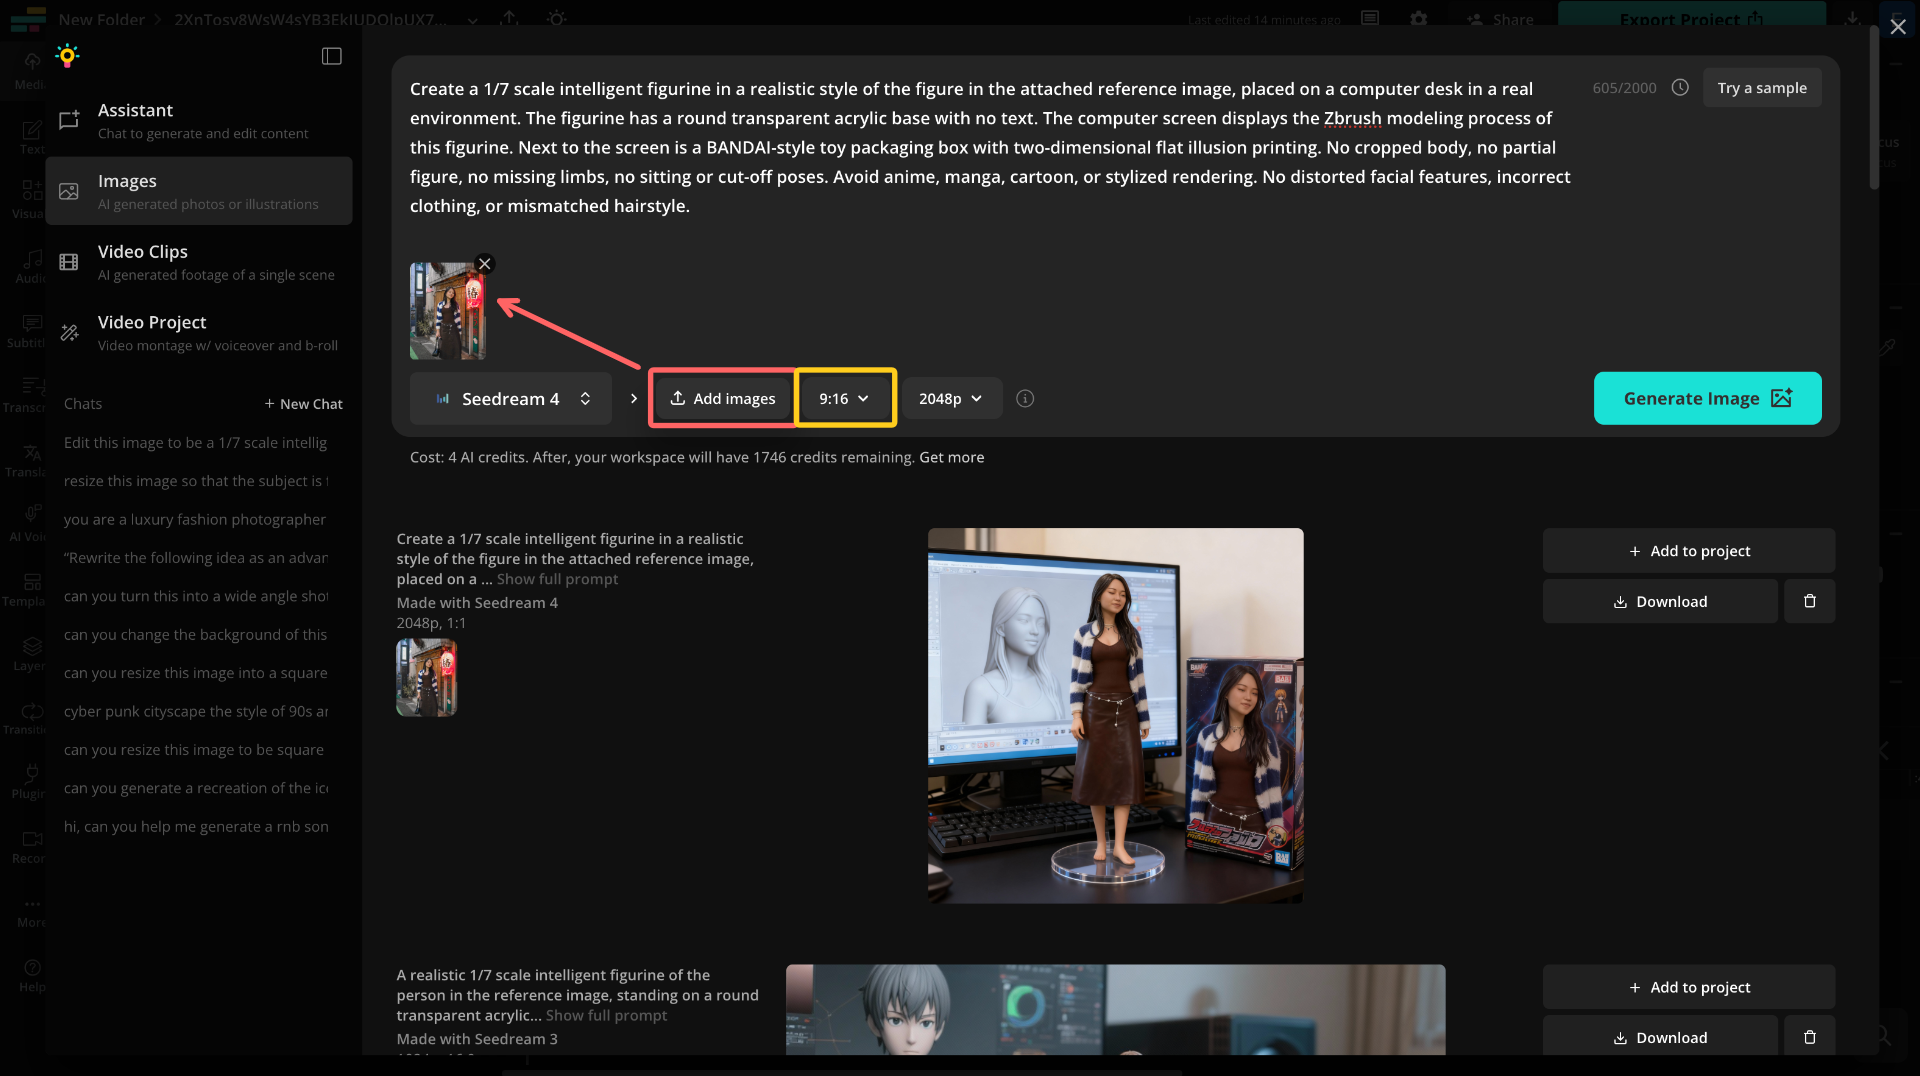
Then, click the Add Image button to upload your reference photo.
You can also set the aspect ratio and output resolution before generating. For this trend, which is especially popular on TikTok, the 9:16 option best fits TikTok's size guide.
Finally, paste your prompt into the prompt box and click Generate Image. The AI will process your photo and instructions, then return your figurine render in just a few seconds.
Step 4: Download and Post
If you’re not satisfied with your first result, don’t worry. It often takes a few tries. Start by simply regenerating with the same prompt, since AI tools can return slightly different variations each time. If the issue persists, try tweaking your prompt for clarity or switching to a different reference photo to get a better match.
This was the image that we were the most satisfied with:
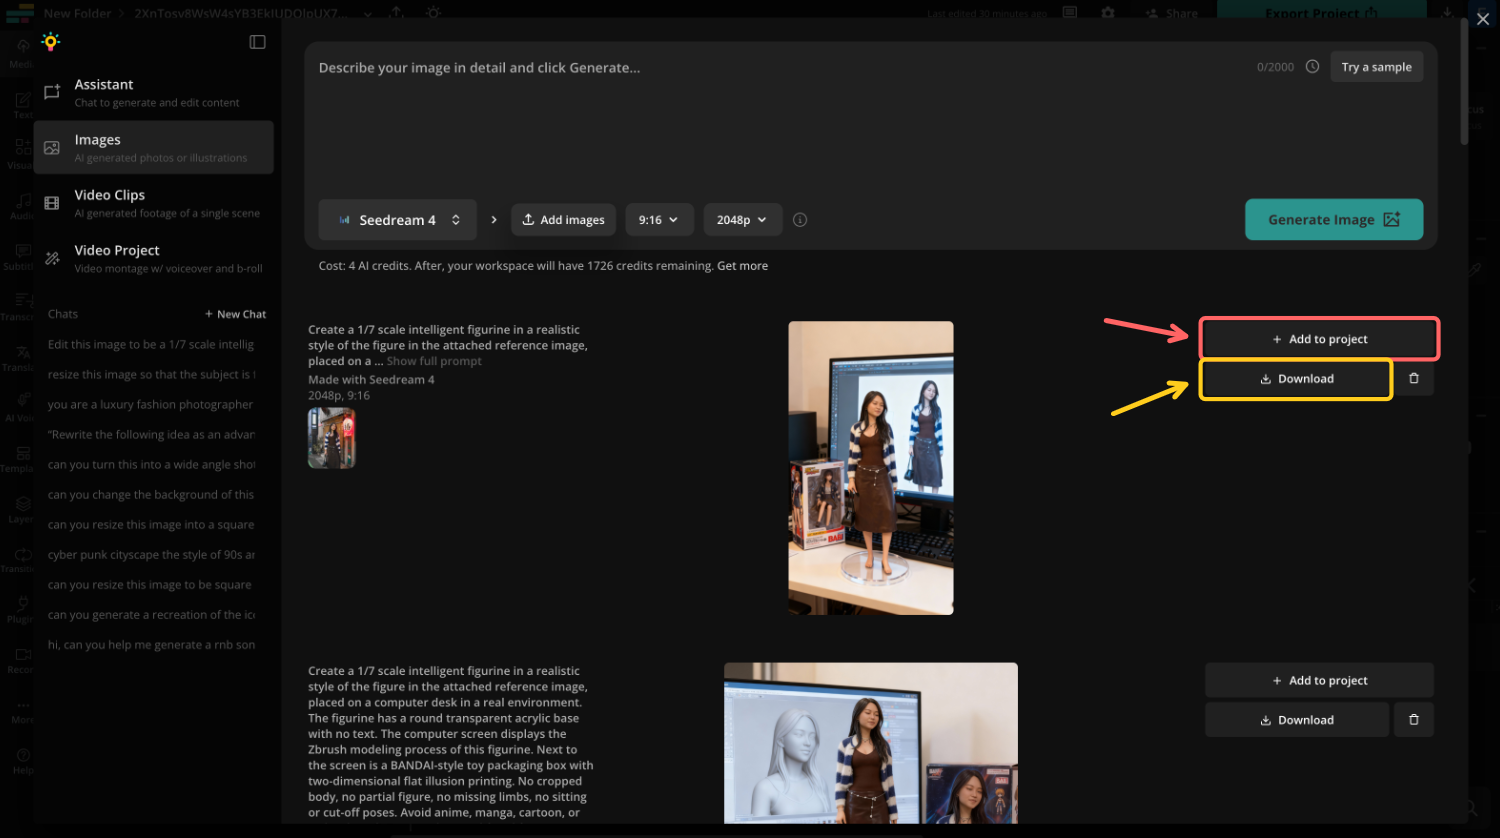
Once you’re happy with your AI figurine, you can either download it directly or save it to a Kapwing project.
Downloading is the best option if you want to post your figurine as-is. Saving it to a project, on the other hand, lets you make additional edits in Kapwing. For example, you could add text overlays or even combine multiple figurines into a video.
When your figurine is downloaded and ready, it’s time to post it. Share your creation on TikTok with trending audio and hashtags, like #aitrend, #3dfigure, #aieffects, and #figurinetrend.
You could also experiment with reveal edits, unboxing-style videos, or side-by-side comparisons of your photo and figurine to make your post more engaging.
Frequently Asked Questions
Can I do the AI 3D Figurine Trend for free?
Yes. Tools like Kapwing and Seedream offer free tiers, though there may be limits on resolution, exports, or watermarks. Paid plans unlock higher quality outputs and faster processing.
Why is the AI 3D Figurine Trend so popular on TikTok?
Because the figurines look like real collectibles — almost like Funko Pops or action figures — but they still resemble the user. That mix of realism and novelty makes them perfect for TikTok reveals and transformations.
What’s the best app for the AI Figurine Trend?
Kapwing and Seedream 4 are popular options, but other image generators have also been used to create figurines.
Can I make an AI figurine of my pet?
Yes — pet figurines have gone viral too. Just make sure your reference photo is clear and specify in your prompt that it’s an animal figurine.
Can I animate my AI figurine?
Yes. Some creators take their figurine image and animate it using AI video tools like OpenArt’s image-to-video feature, creating “unboxing” or “rotation” effects.