
How to Create an iOS 16 Wallpaper with Photos from Your Camera Roll
Ready to create a new iOS 16 wallpaper with photos from your camera roll? In this article, we'll teach you how to add depth effect to the wallpaper for that signature iOS 16 look.
Having just become available to the public as of September 16th, iOS 16 now provides Apple users with a wide array of features, including new edit and undo send features, improved focus filters, and much more.
Despite coming with a multitude of new features, one of the most eagerly anticipated iOS 16 features has been its new lock screen wallpaper customization options.
To help you better understand this new feature, I’ll answer the most frequently asked questions about iOS 16 wallpapers and how you can start incorporating your own photos into them.
Let’s get started!
How Can I Create a New iOS 16 Wallpaper For My Phone?
First, make sure that your iPhone's software is up to date and has enough storage space to run iOS 16.
Once you've successfully downloaded and installed iOS 16, you should now be able to access your iPhone's new Wallpaper customization settings in two ways:
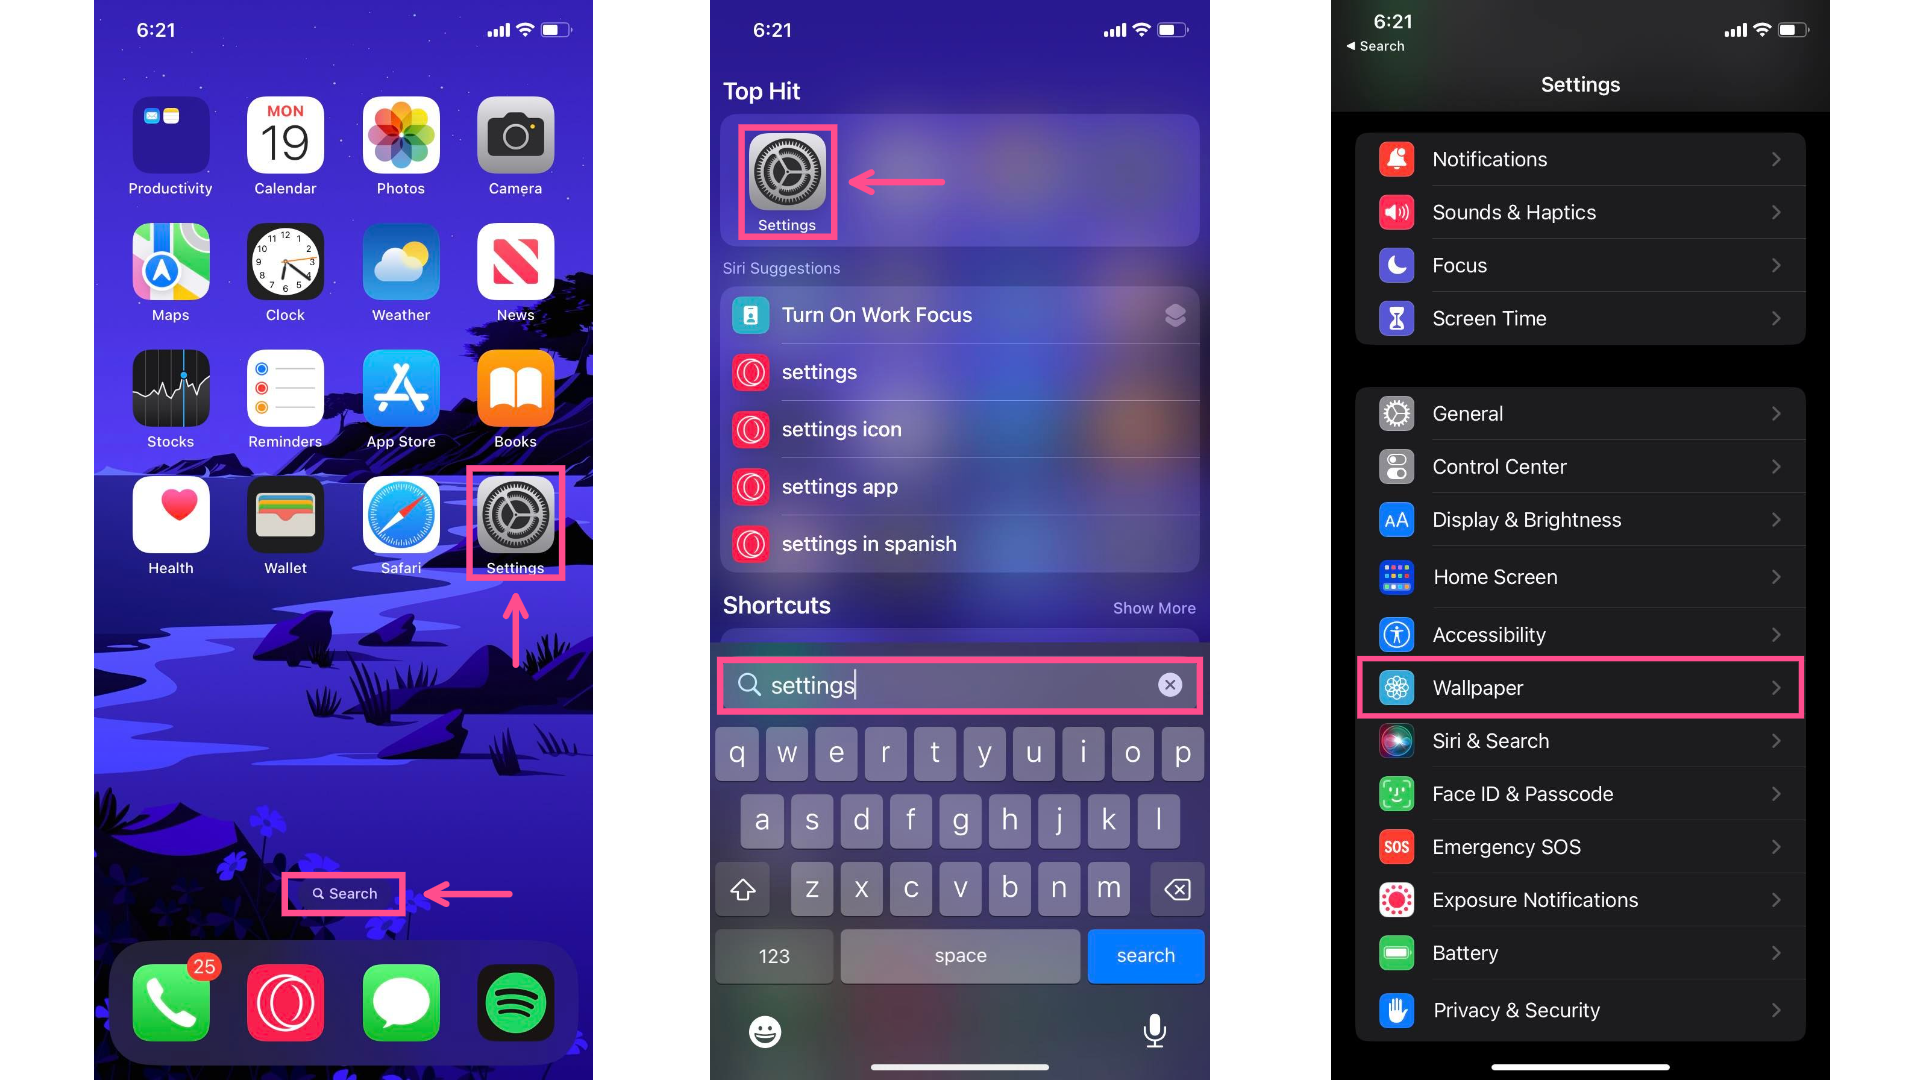
- The traditional way is to open the Settings app (by locating it on your home screen or using the search function), scroll down until you find the Wallpaper setting, and press it.
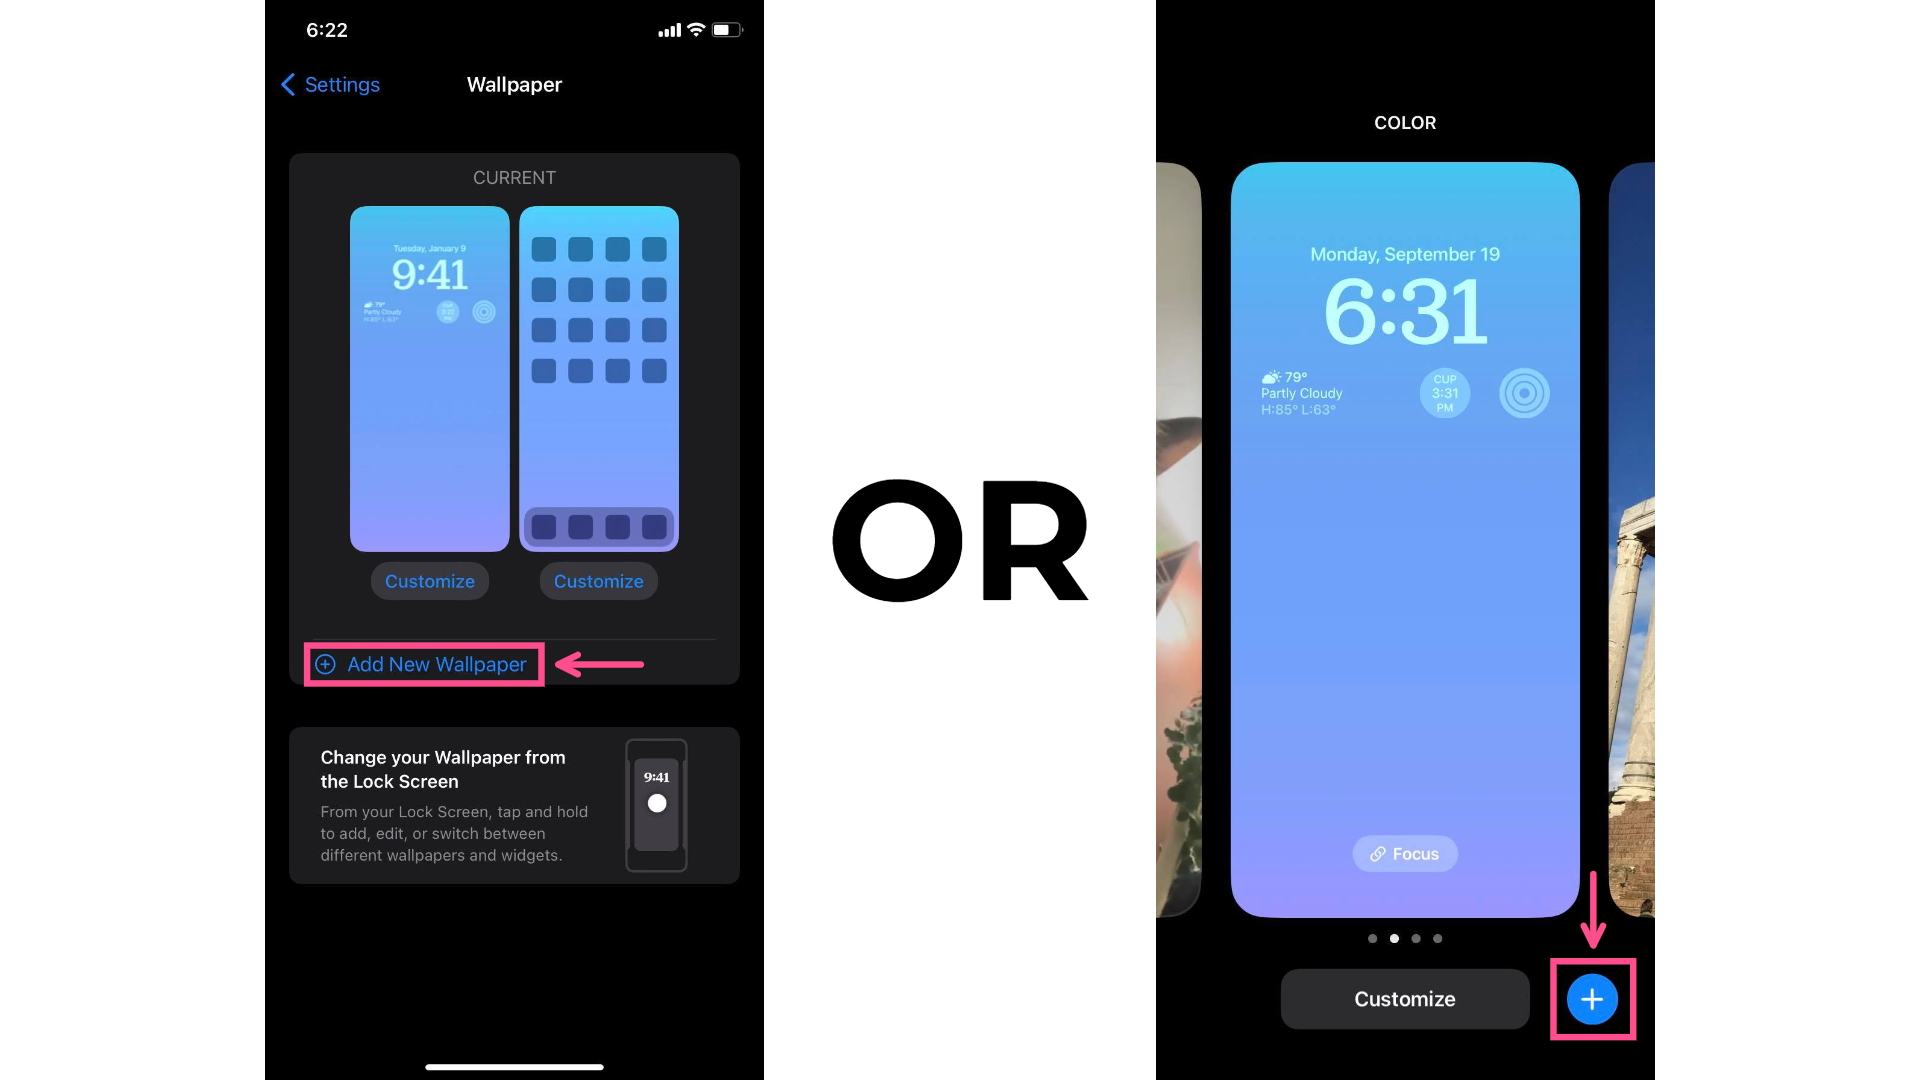
- A new method to access and customize your wallpaper is to simply long-press/hold on the the lock screen until you are presented with the option to customize your current wallpaper or add a completely new one.
Regardless of which method you decide to choose, you should now be all set to start customizing and creating a new wallpaper using Apple's preset designs or using photos from your camera roll.
In order to create a wallpaper using photos from your camera roll, select Add New Wallpaper in the settings menu, or if you're on the lock screen, simply press the blue plus button.
From here, you should be presented with various layouts (located at the top of the screen) as well as Apple's wallpaper designs.
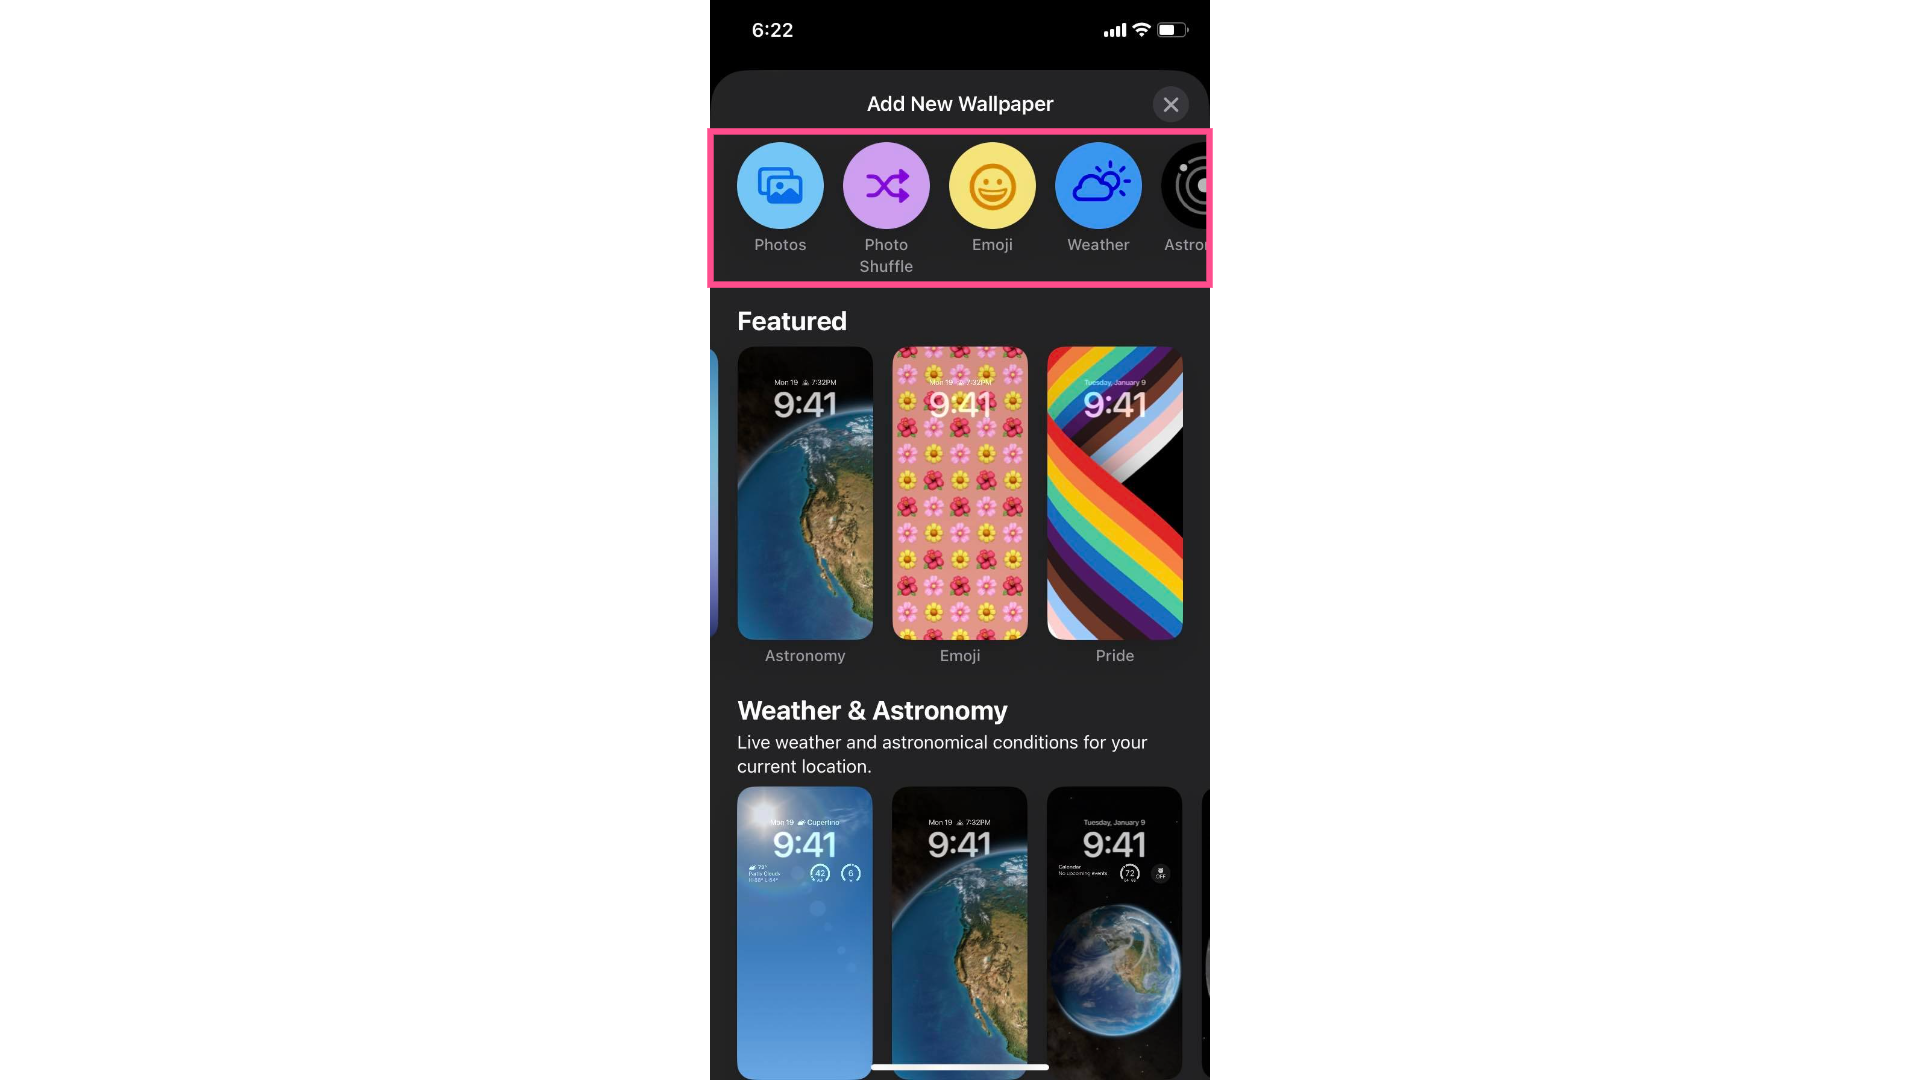
Since we're planning on creating a wallpaper from photos on our camera roll, press either the Photos (for a single picture) or Photo Shuffle (for multiple pictures) button.
Create an iOS 16 Wallpaper with a Single Photo:
First, choose the photo you would like to have as your wallpaper. As a feature, your phone will also automatically select suggested pictures to use.
Side Note: If none of the photos you currently have on your phone exactly match the vibe/aesthetic you're going for, you can also create your own wallpaper/collage from scratch using Kapwing.
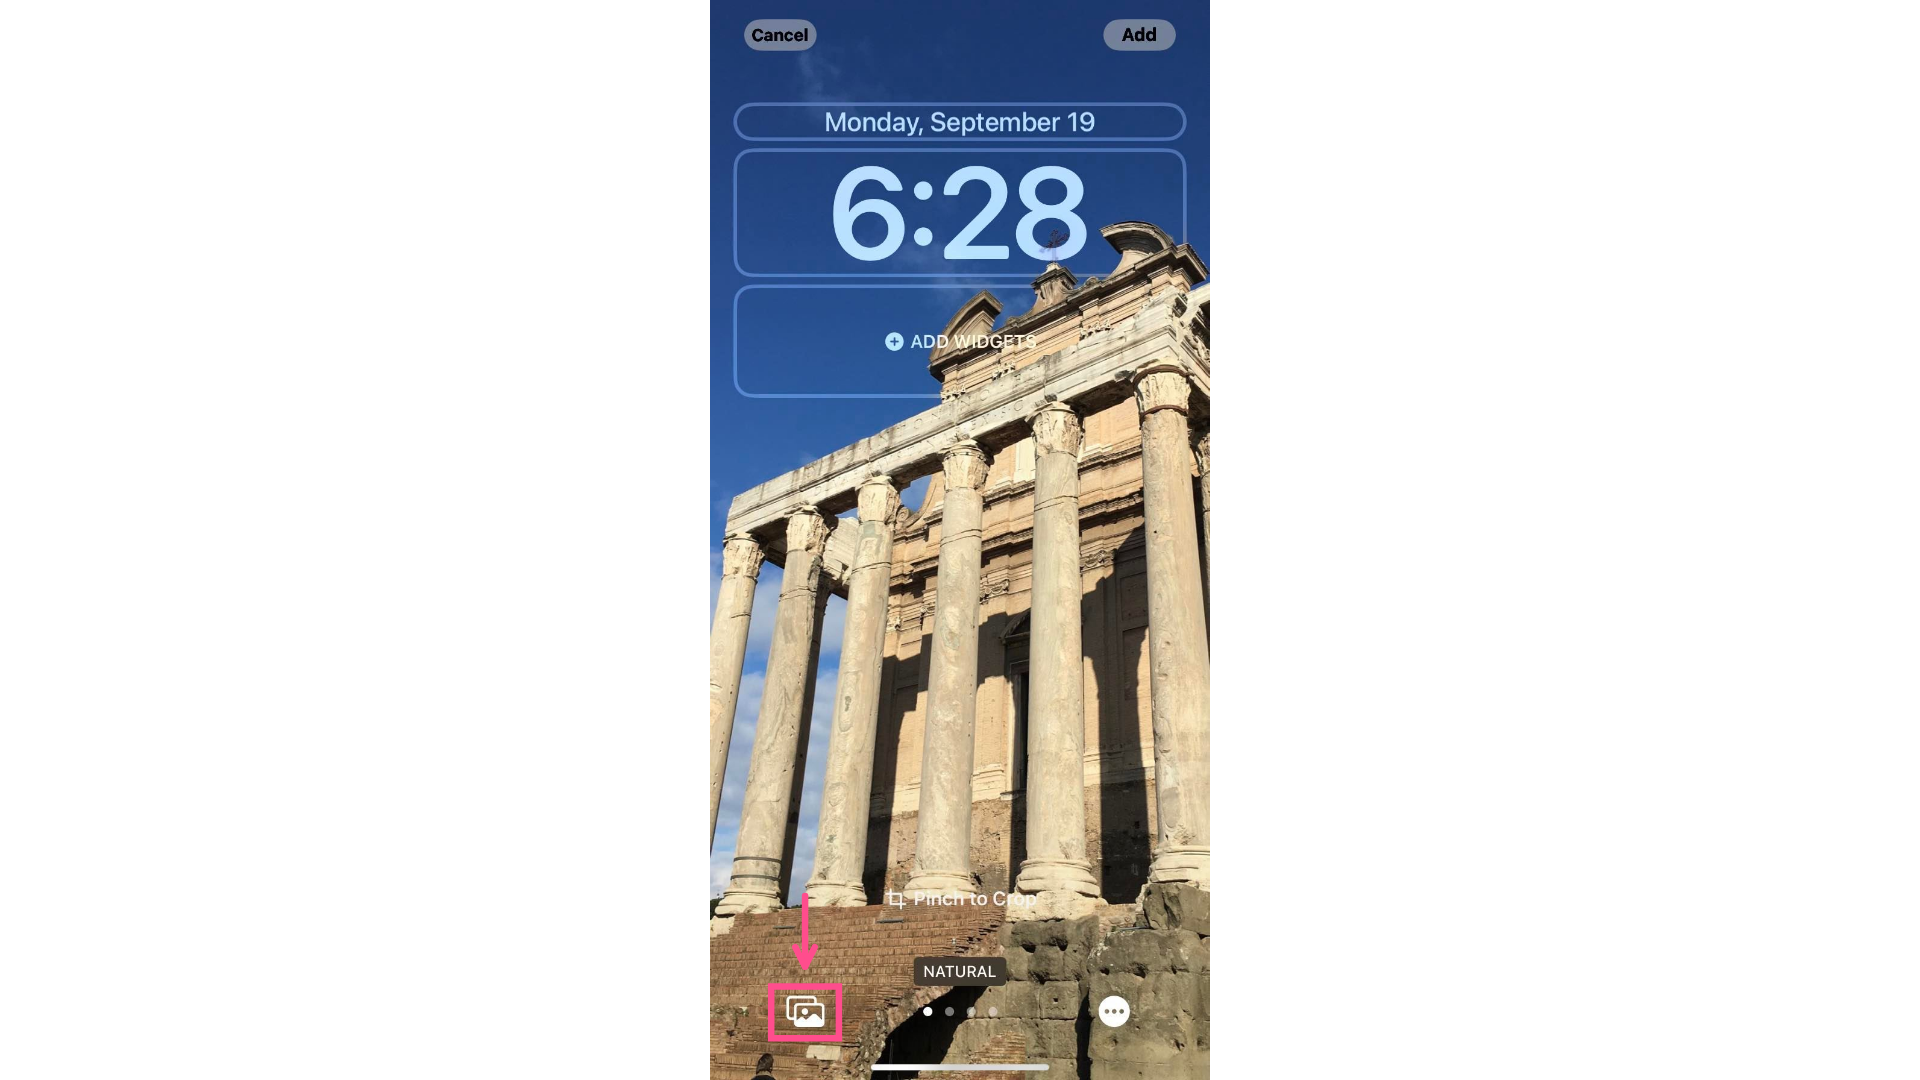
You can adjust the fit/crop of the photo by pinching the image.
Swipe left and right to apply various filters to your wallpaper. If none of the filters match what you're looking for, you can also try adding a filter to or editing your photo of choice prior to putting together your wallpaper.

Press the Photos icon in the bottom left corner to change your image.
Press any of the transparent bubbles around the date and time to customize (font style and color) and/or add your preferred widgets.
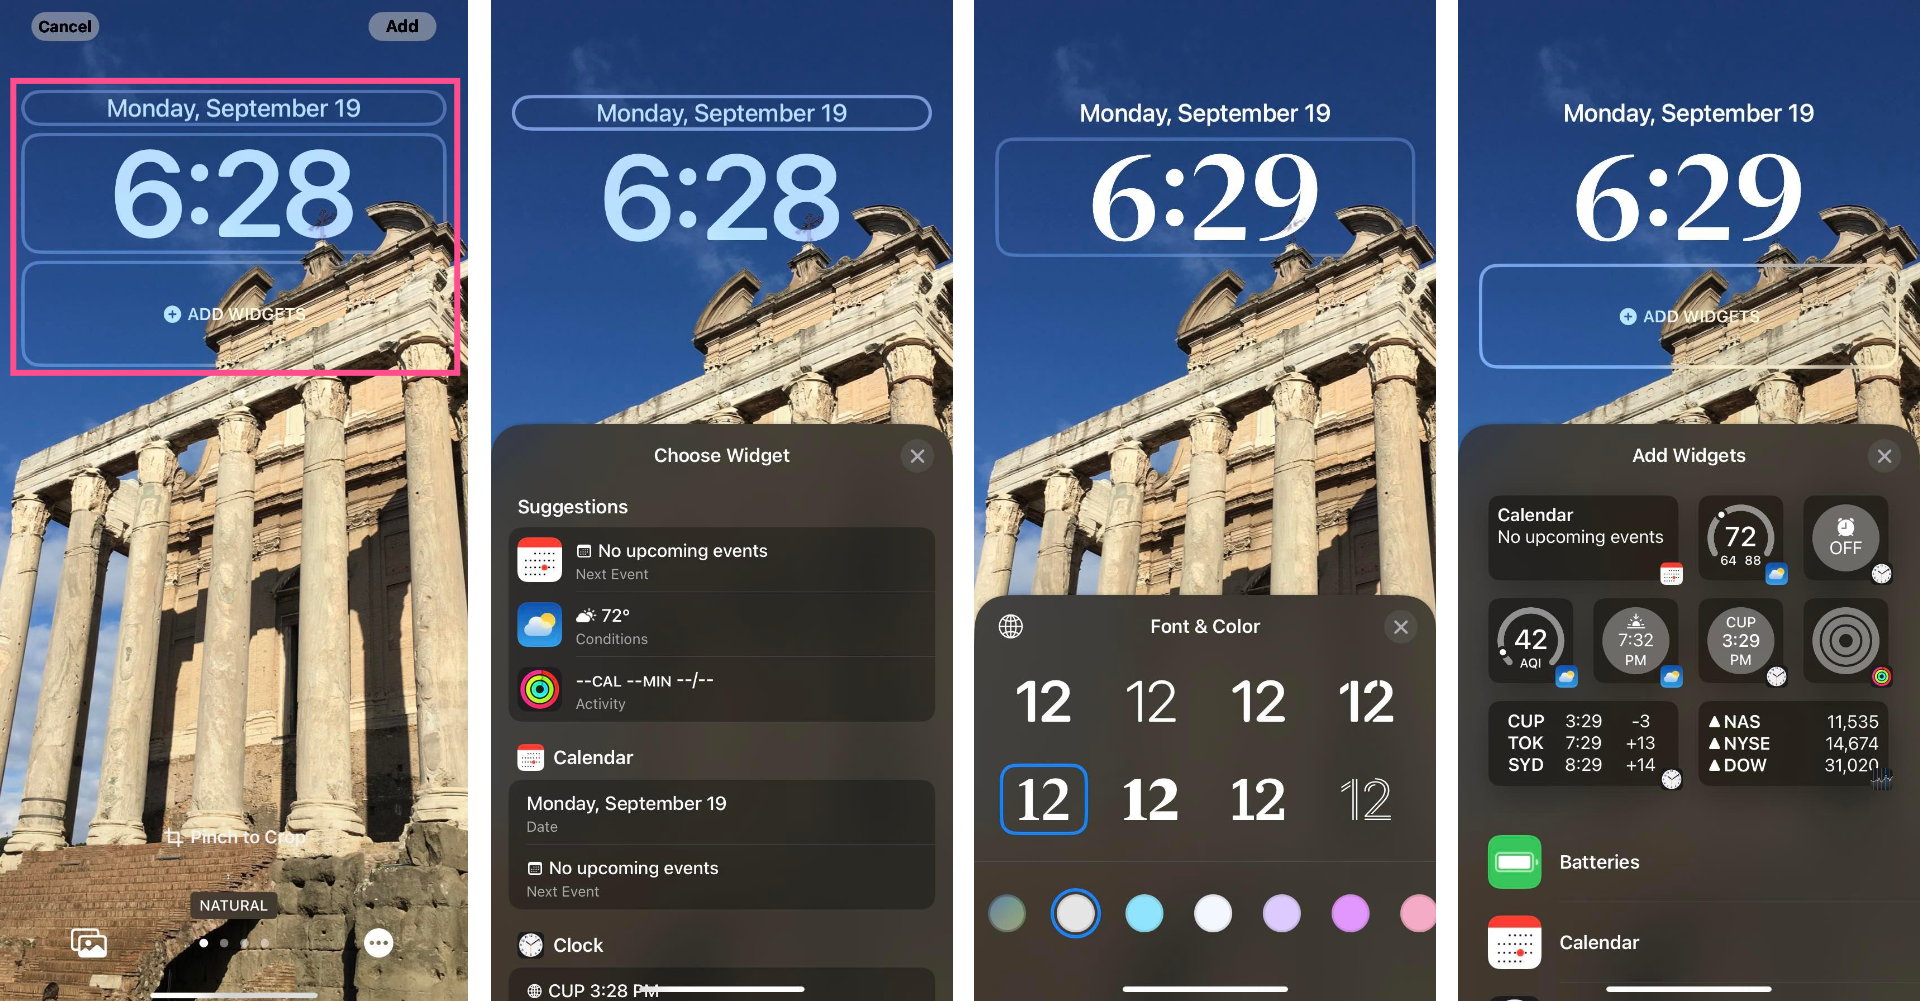
When you're satisfied with your wallpaper, press Add in the top right corner.

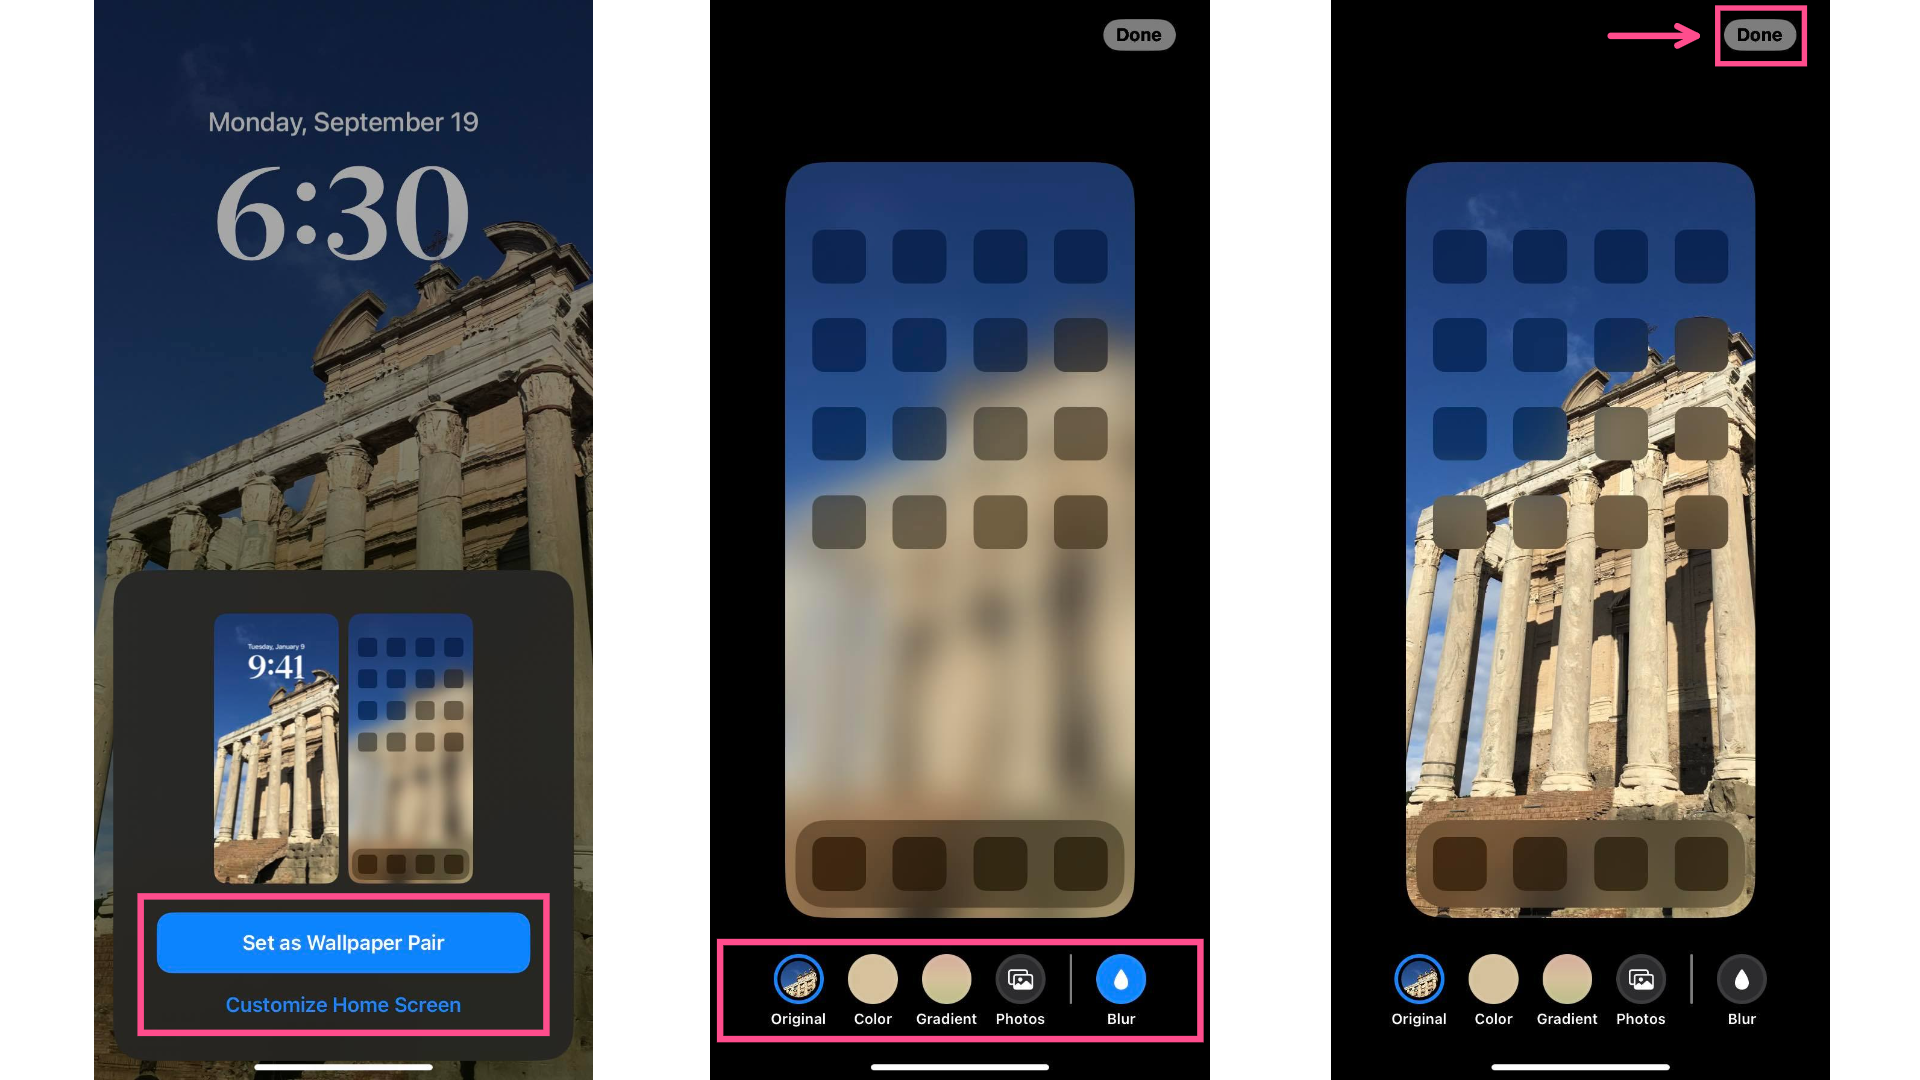
You will then have the option to either Set as Wallpaper Pair (meaning that your home screen will show up as a "blurred" version of your custom lock screen) or Customize Home Screen, giving you more options to customize your home screen.
Create a Photo Shuffle iOS 16 Wallpaper:
If you choose the Photo Shuffle layout, you will have the option to pick your photos manually or have your phone automatically select pictures for the picture shuffle.
After your photos have been selected, simply follow the above directions for the Photos layout for each picture in your shuffle.
How to Add Depth Effect to iOS 16 Wallpaper
iOS 16's Depth Effect is a powerful camera effect that lets the subject pop on an image in sharp contrast to its background, making the dominant subject in your wallpaper the foremost layer of the lock screen.

If Depth Effect is enabled, the subject of the photo is brought to the front, pushing the clock element behind the subject. However, this can sometimes obscure the full view of the clock on your lock screen. Fortunately, you can disable Depth Effect and bring the clock to the front to fix this.
Why Isn't Depth Effect Working on My New iOS Wallpaper/How Do I Turn on Depth Effect?
There are a few reasons why iOS 16's Depth Effect may not be working on your new wallpaper. Here are the three most common reasons and some ways to fix them:
1. Depth Effect is disable because you have widgets turned on.
You can only use Depth Effect on your lock screen wallpaper if you don't have any widgets (other than date and time) enabled. Having Depth Effect on at the same time as the optional widgets would obscure your view of those widgets, somewhat defeating the purpose of turning them on. Instead of allowing a suboptimal lock screen experience, Apple simply disables Depth Effect, bringing the clock back to the front instead of pushing it behind elements of your wallpaper.
To fix this, you'll want to turn off any optional widgets you've added to your lock screen wallpaper. If you'd still like to see the weather, calendar events, fitness goals, etc. at a glance, you can set a separate lock screen without depth effect and toggle between the two.

2. Depth Effect isn't working because your photo has a horizontal aspect ratio.
Vertical photos work best for lock screen wallpapers. If you have a gorgeous landscape photo that you want to use, you may run into some problems because the subject of the photo won't be centered and won't cover the clock for that signature depth effect look.
To fix this, you can simply choose an image with vertical aspect ratio or convert a horizontal photo to vertical. I'll show you how to do that using an online image and video editing tool called Kapwing.
Step 1: Upload Your Photo to Kapwing
First, go to kapwing.com and click Get Started.
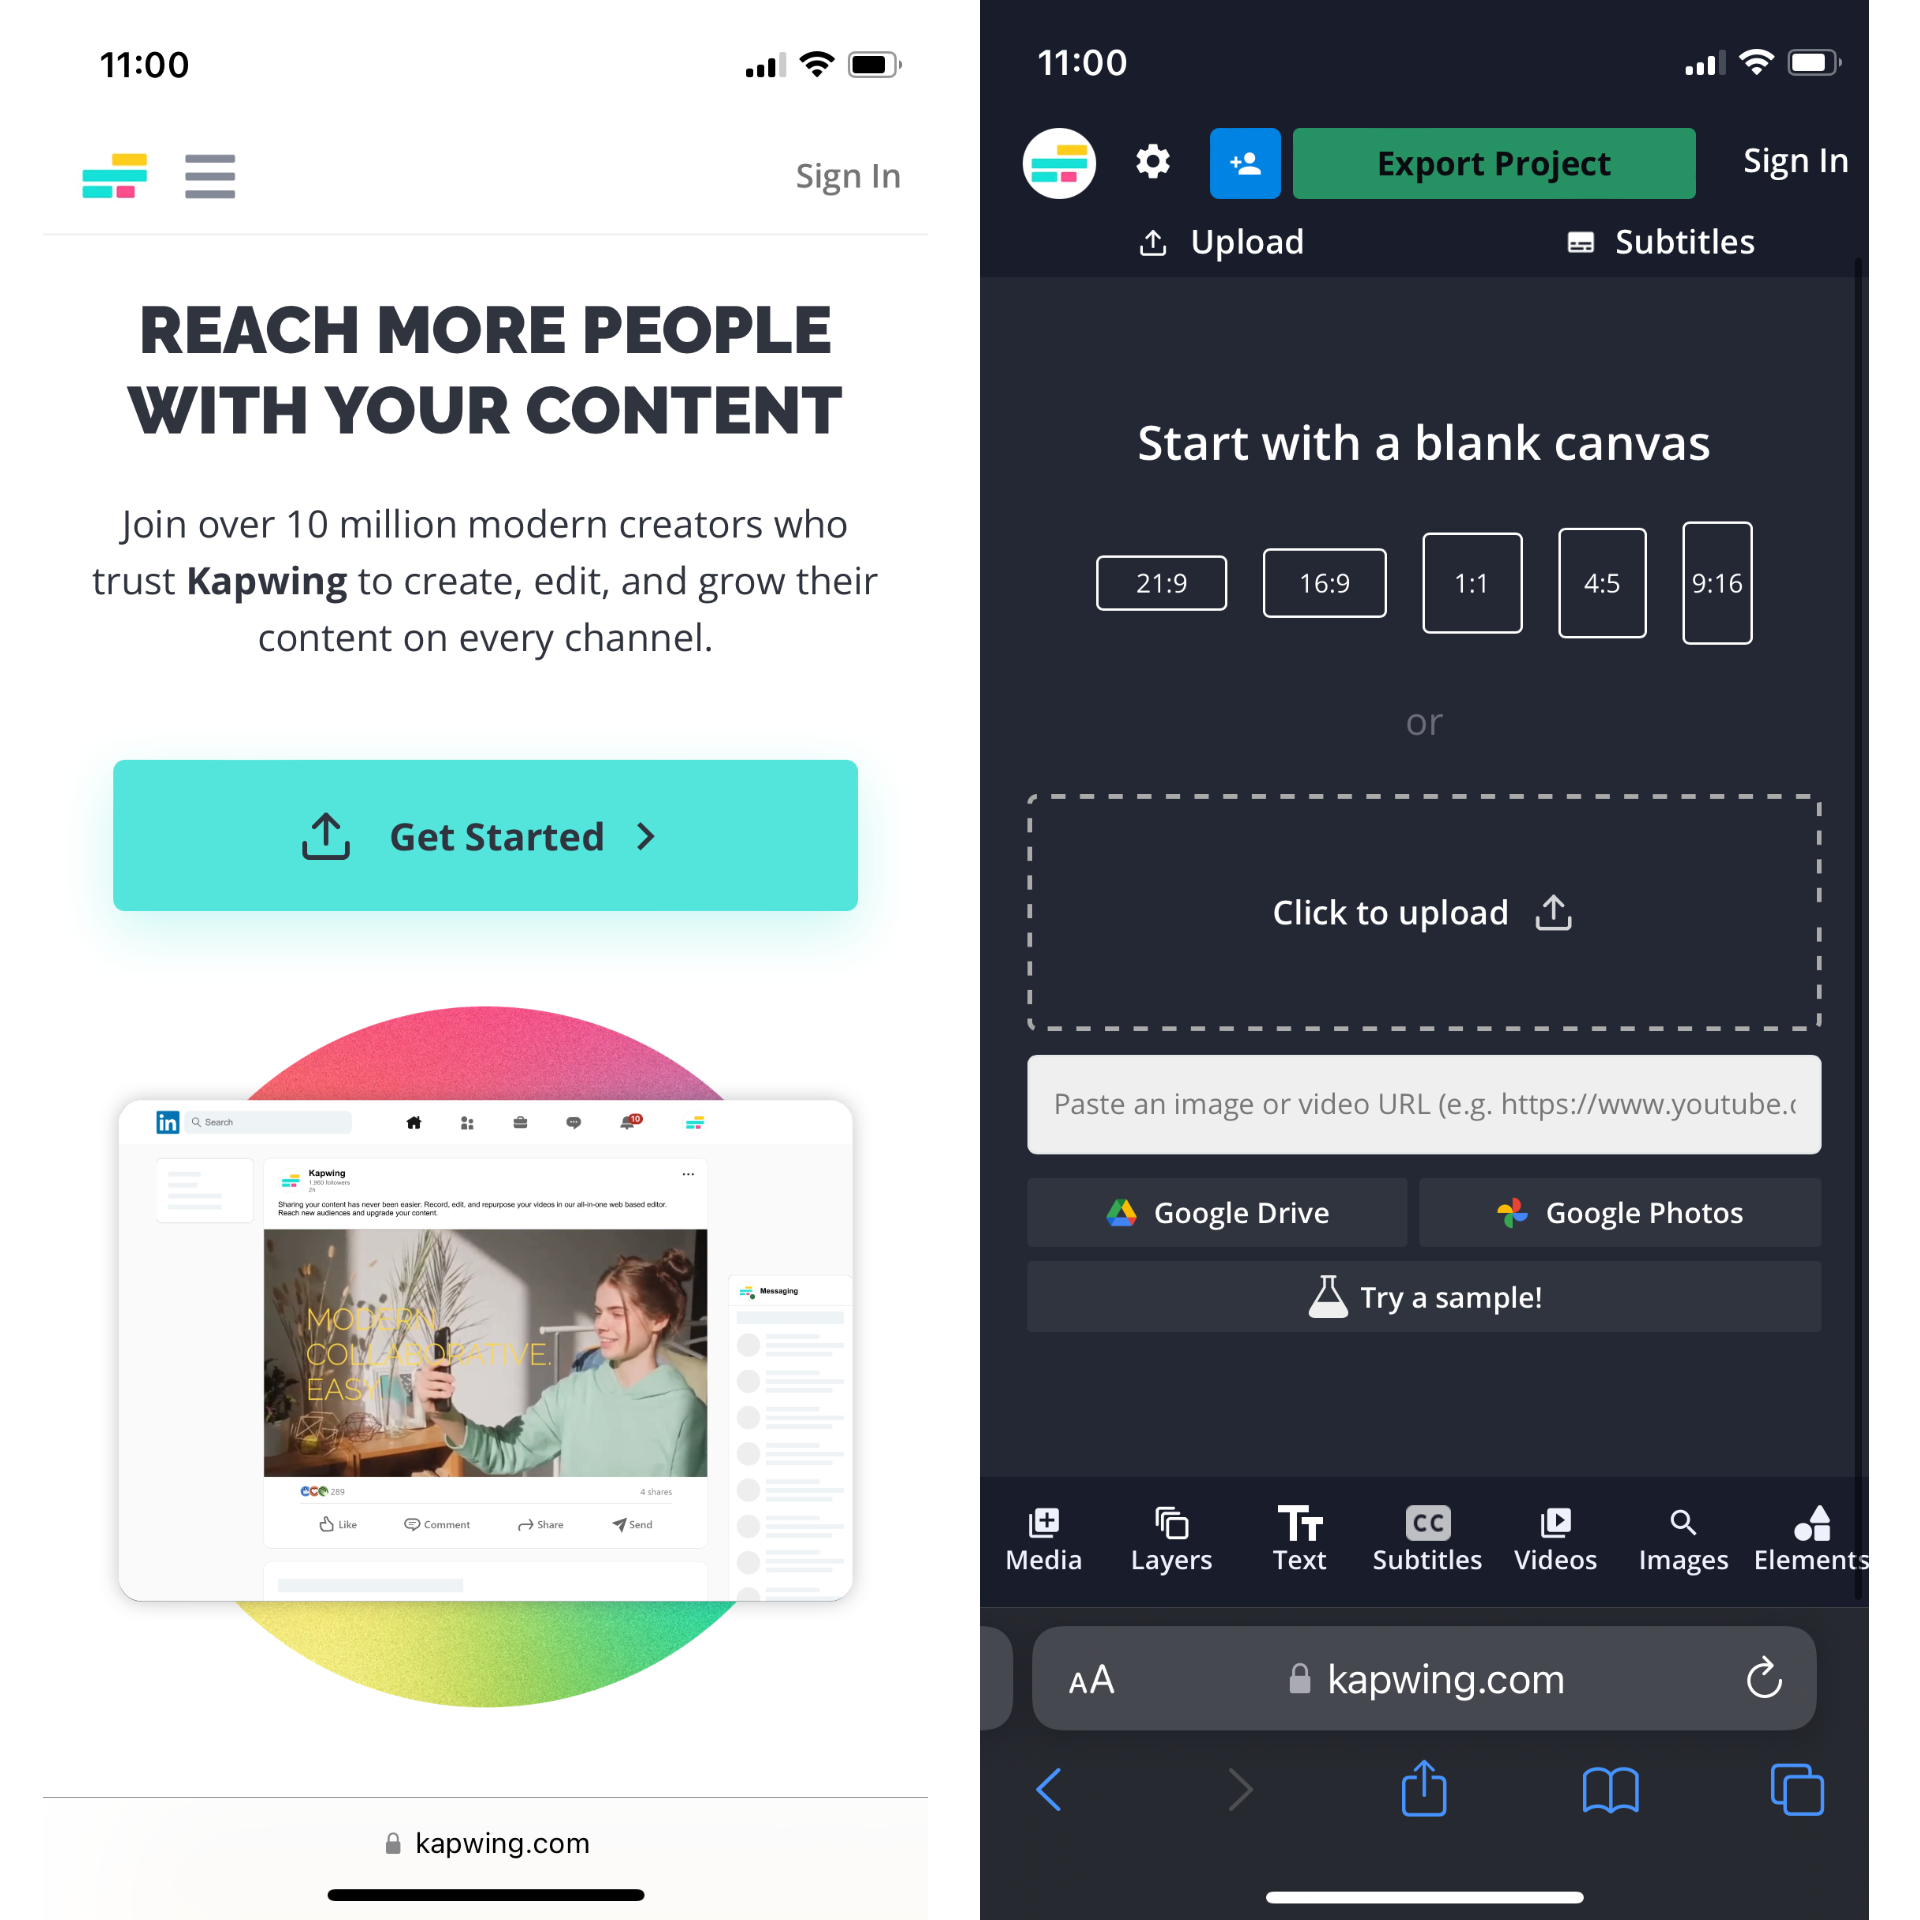
Select Click to upload and find the photo you want to convert from your camera roll or folder. You can also import from a URL if your photo is stored in the Cloud or something you found online.
Step 2: Change the Aspect Ratio and Scale the Photo
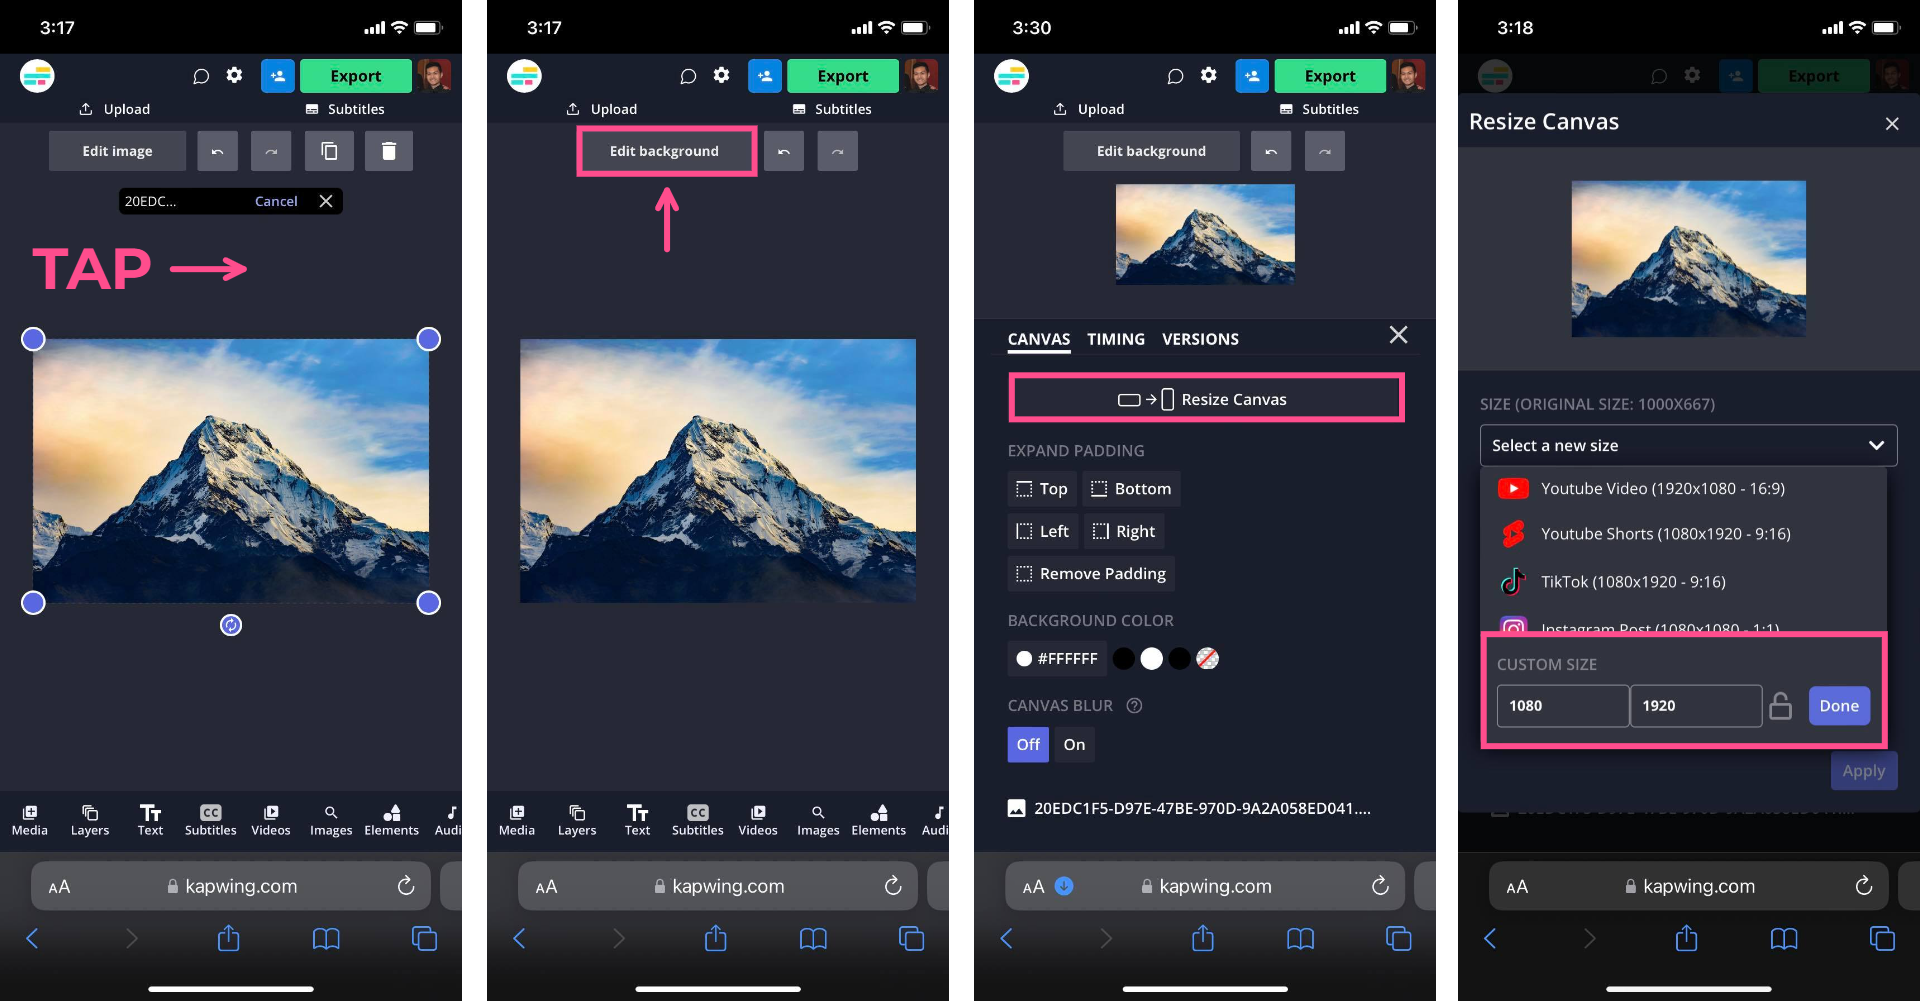
Change your photo's aspect ratio by clicking anywhere outside of the photo and selecting Edit Background. Press Resize Canvas and choose one of the 9:16 presets or simply type in 1080 by 1920 as the custom output size. Hit Done.
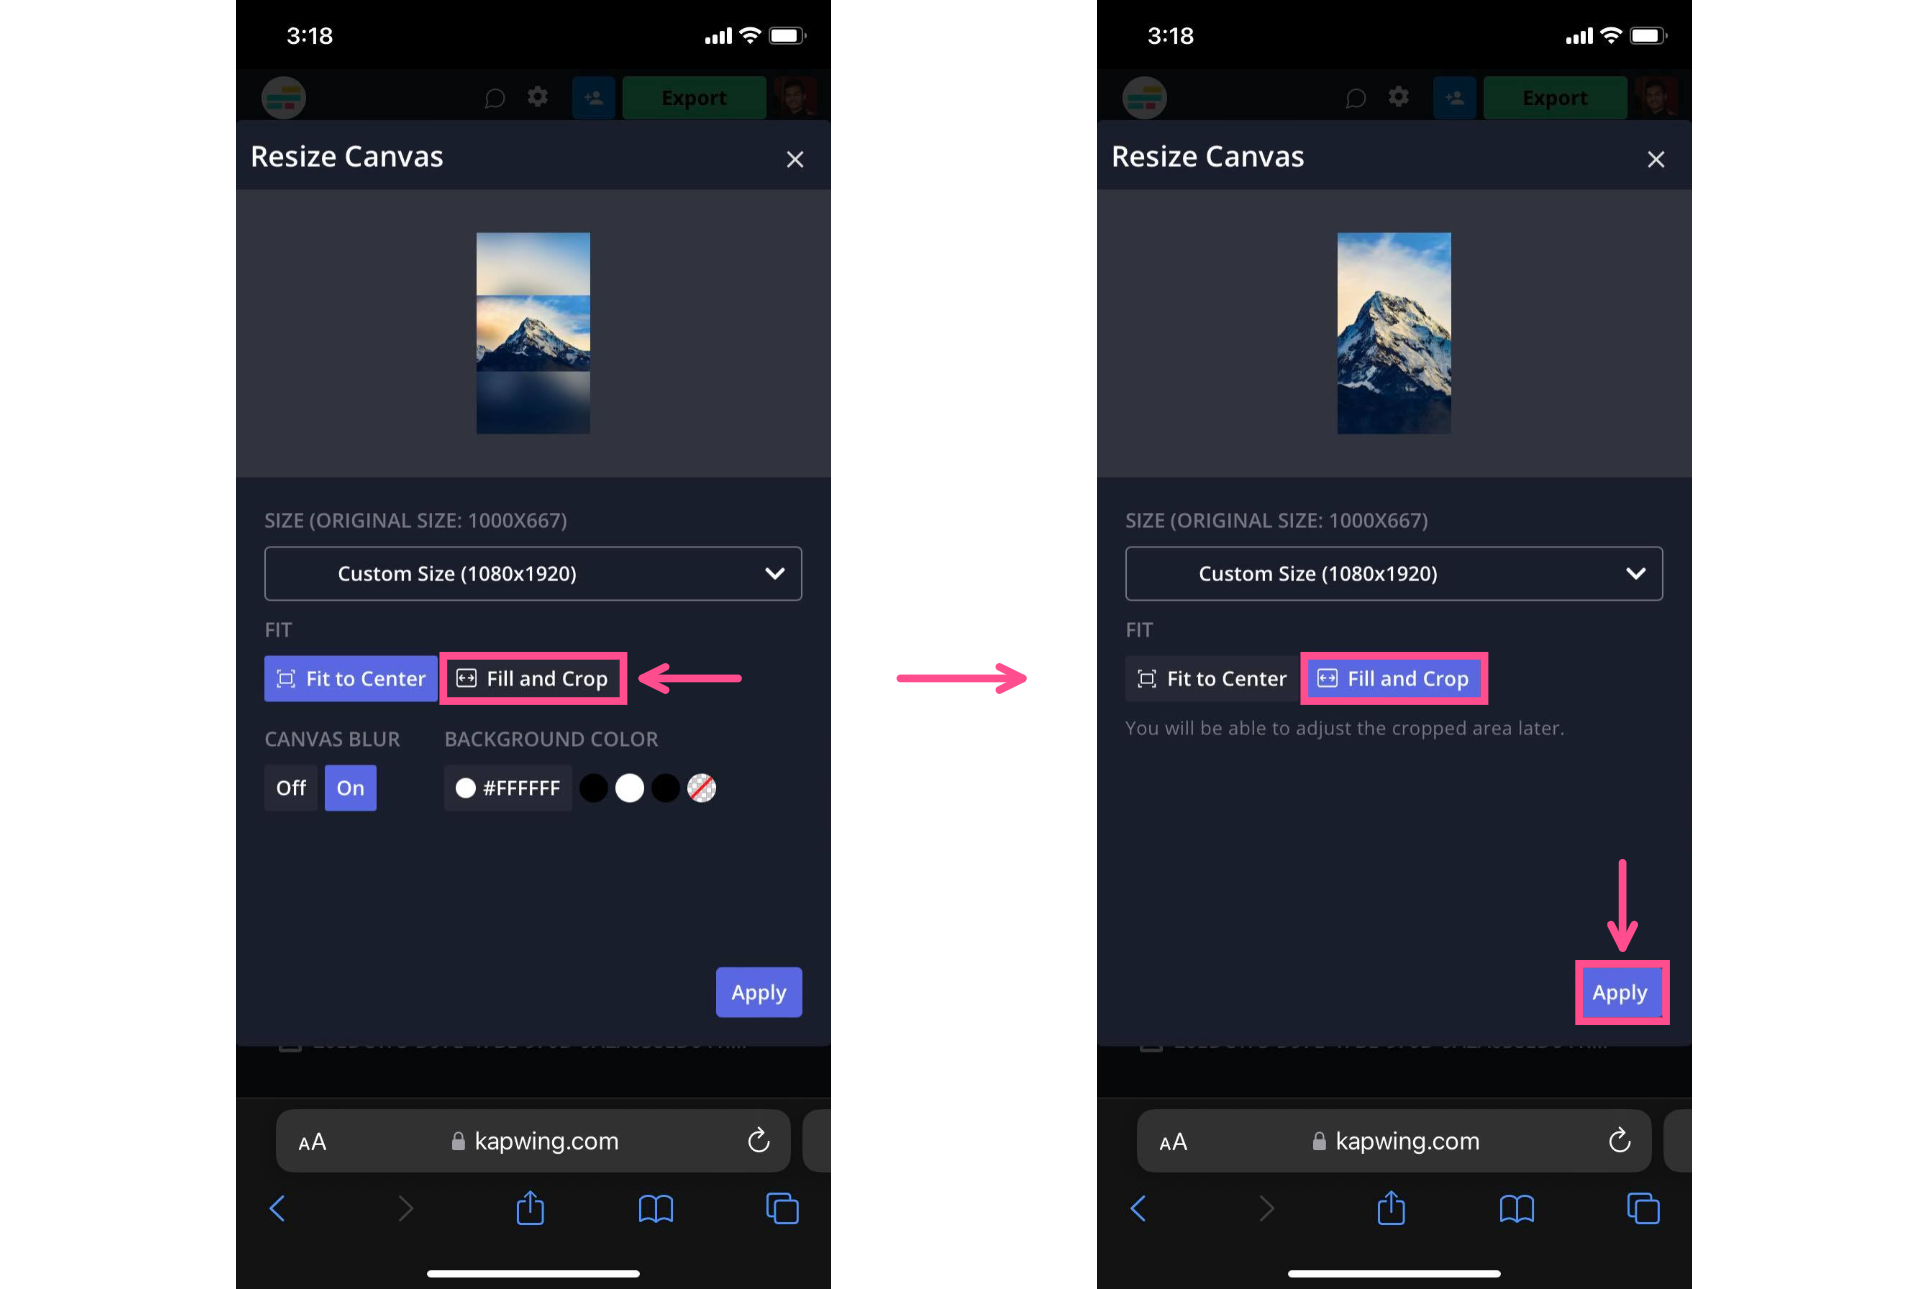
To make sure that your photo/subject takes up the entirety of the vertical screen, press Fill and Crop under Fit then tap Apply and watch your changes take effect.
Step 3: Export and Download the Photo
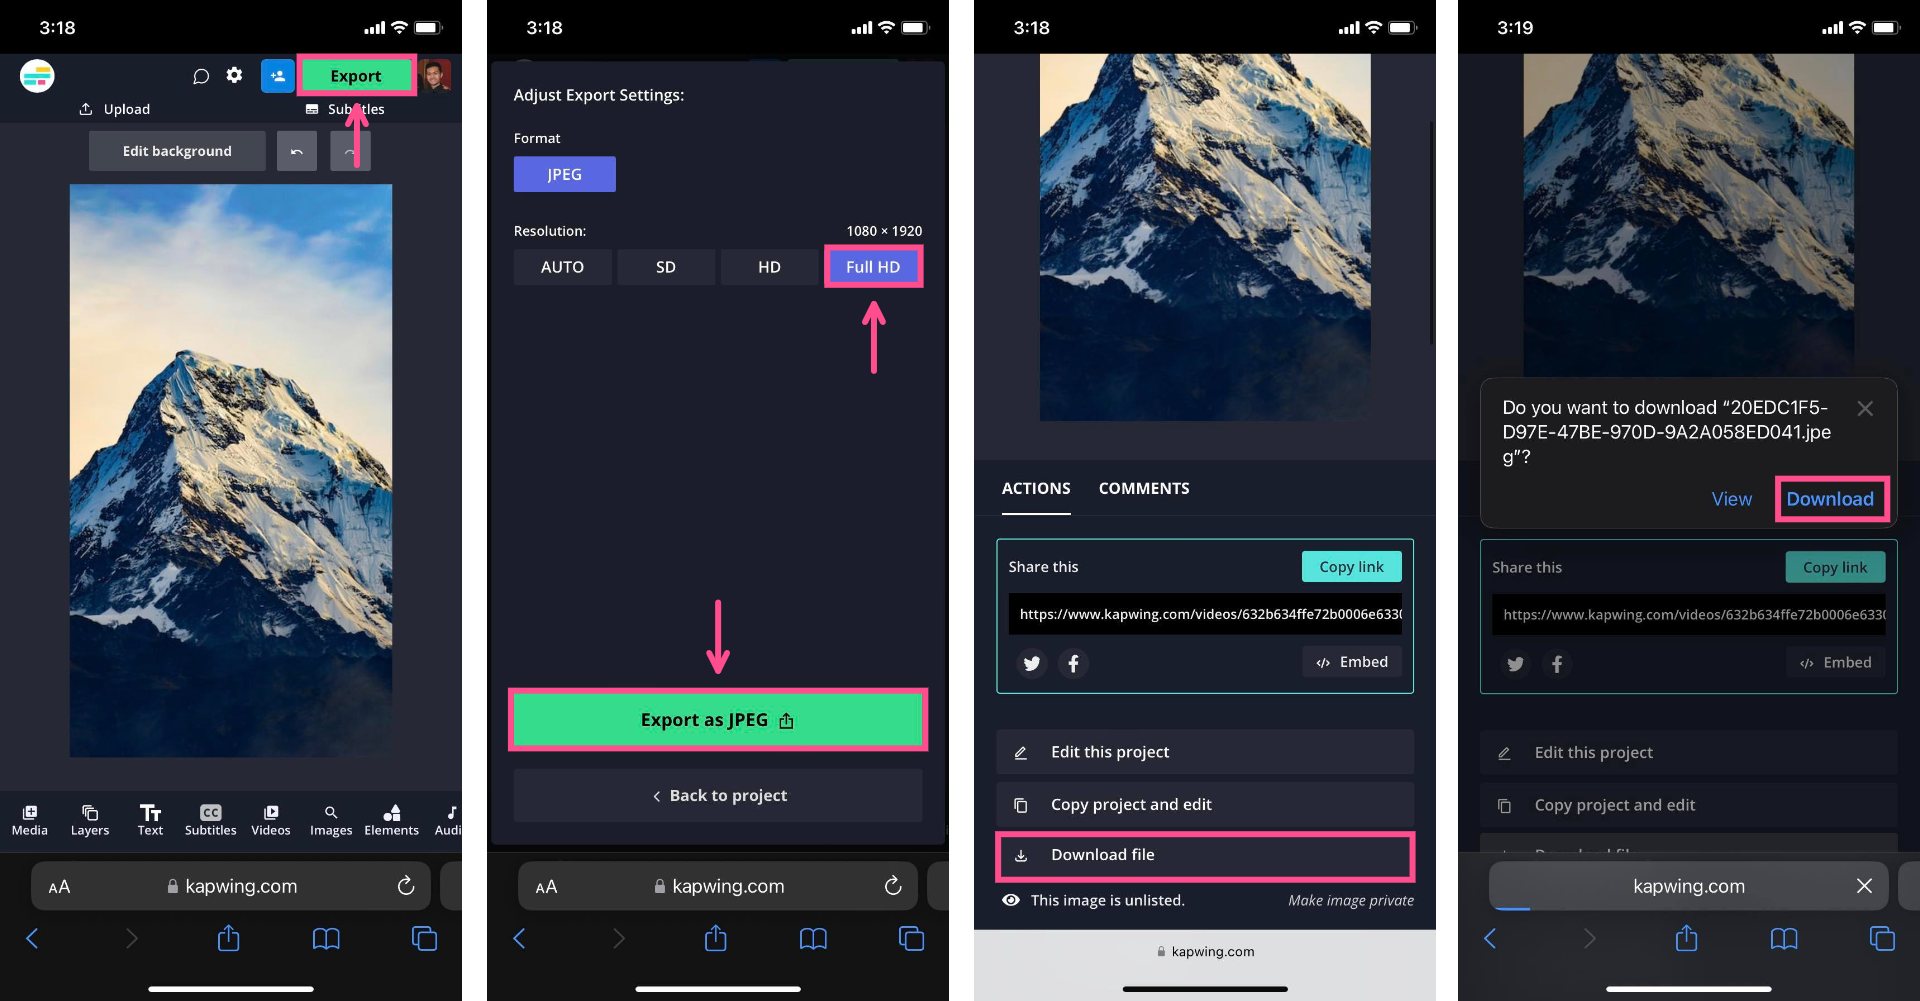
Once you're satisfied with your new image, click Export to render the image and see your download options (make sure to choose Full HD!).
If you're not already signed in, you'll be prompted to sign in to save your image watermark-free. Once you're signed in, just click Download file in Kapwing and hit Download to save it to your device.
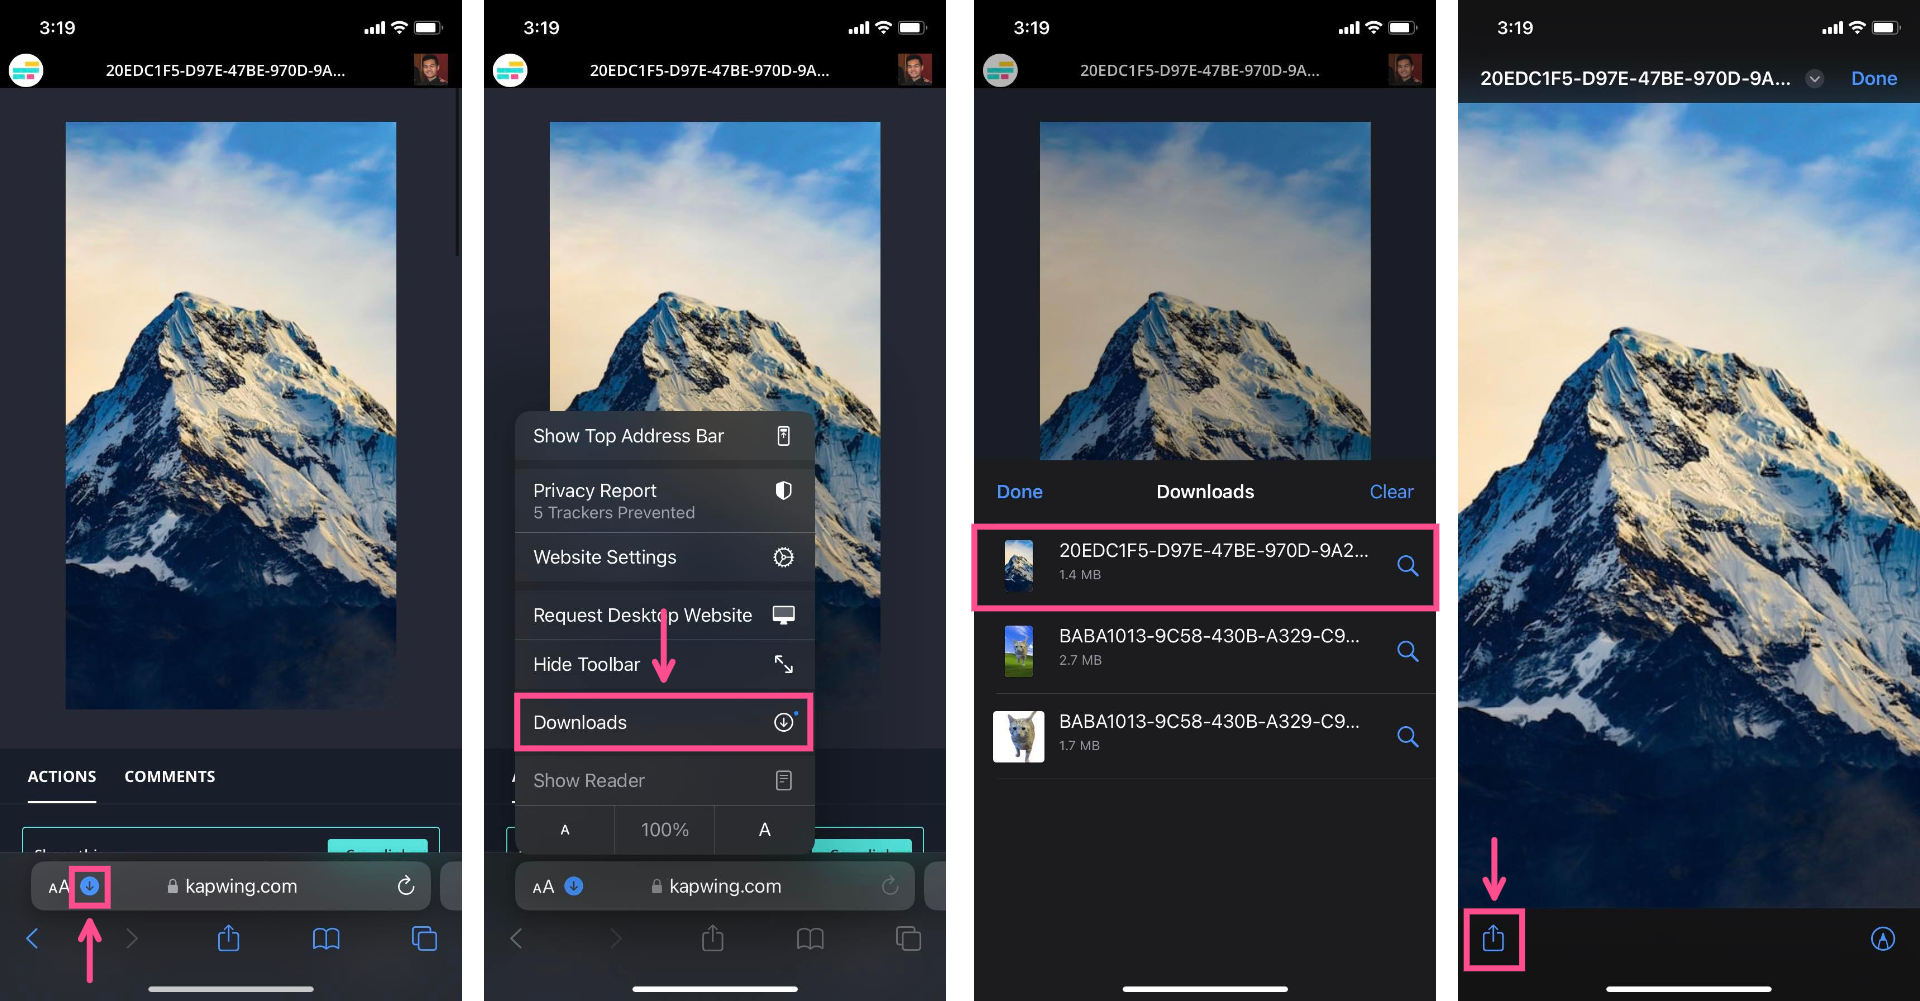
For Safari users on iPhone, the image may not automatically save to your Camera Roll. Instead, it will save to your Safari downloads. You can open this by clicking the blue download arrow button in your browser search bar and selecting Downloads. From here, press the image that you want to save and then tap the "share" icon in the bottom left corner.
From this menu, you'll have the option to Copy (which will save it to your clipboard, so you can paste it elsewhere), Save Image (which will send it to your Camera Roll), or open it directly in any of the supported apps on your phone, like Messages or AirDrop.
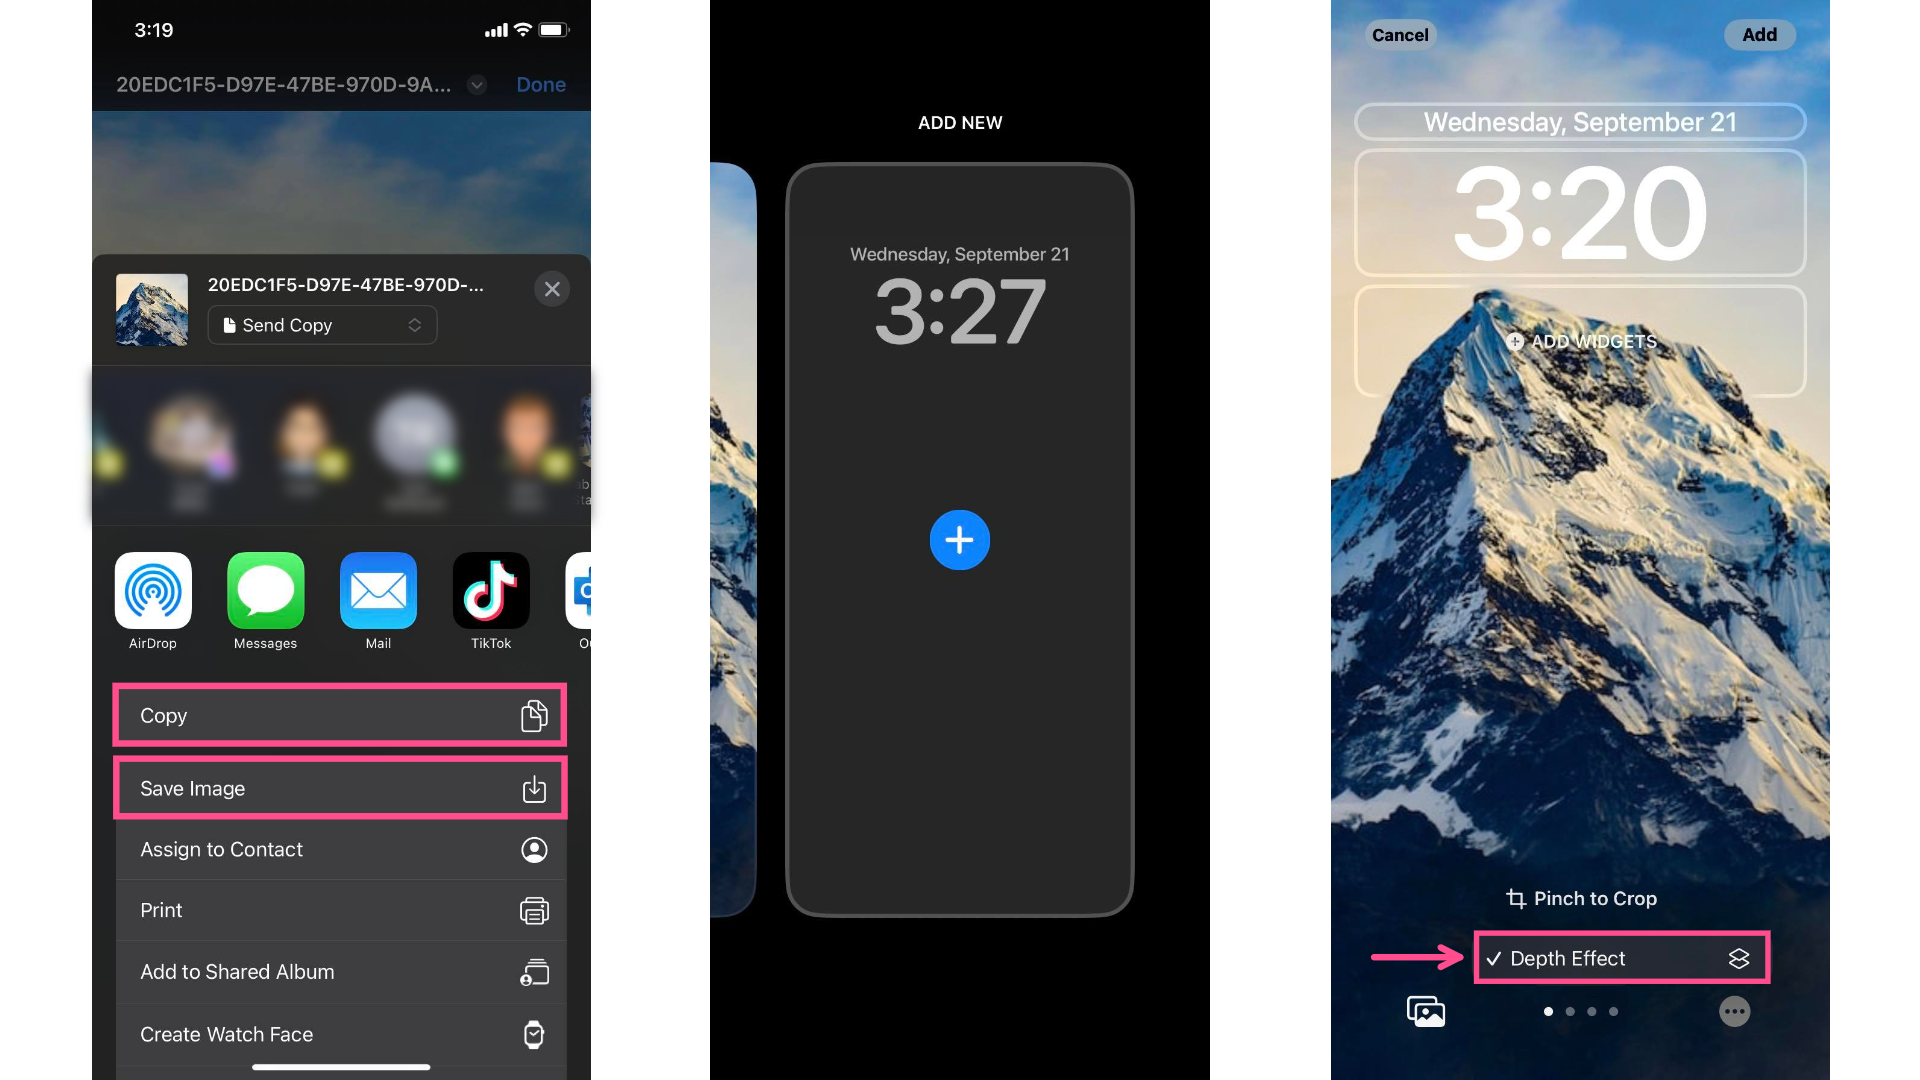
Once you've added your new, vertical photo to your camera roll, return to wallpaper customization and add it to your lock screen. Check to see that your desired subject is in front of the clock/time and that Depth Effect has a check next to it when tapping the 3 dots in the bottom right corner.
If it's still not working, your image may not be of a high enough resolution. With photos that are too grainy or pixelated, Apple can't distinguish the subject from the background. Which brings us to the final, most common reason Depth Effect might not be working for you:
3. Depth Effect can't distinguish the subject of your photo from the background.
If your photo is low resolution or if the background is very busy, Apple will have a hard time pulling the subject out from the background, which is how Depth Effect is able to create that 3D look on your lock screen.
To fix this, you can edit the photo to create a more dimensional image that Depth Effect will recognize. You can do this easily with Kapwing's background remover.
Step 1: Upload Your Photo to Kapwing
First, go to kapwing.com and click Get Started.

Then, upload your image. You'll have options to upload directly from your device, from a URL, or from Good Drive and Photos.
Step 2: Remove the Background from Your Photo
Once you've uploaded your photo, click on Edit Image to open the editing menu. You should see Erase as one of the top four options under Image. Click on the Erase button.
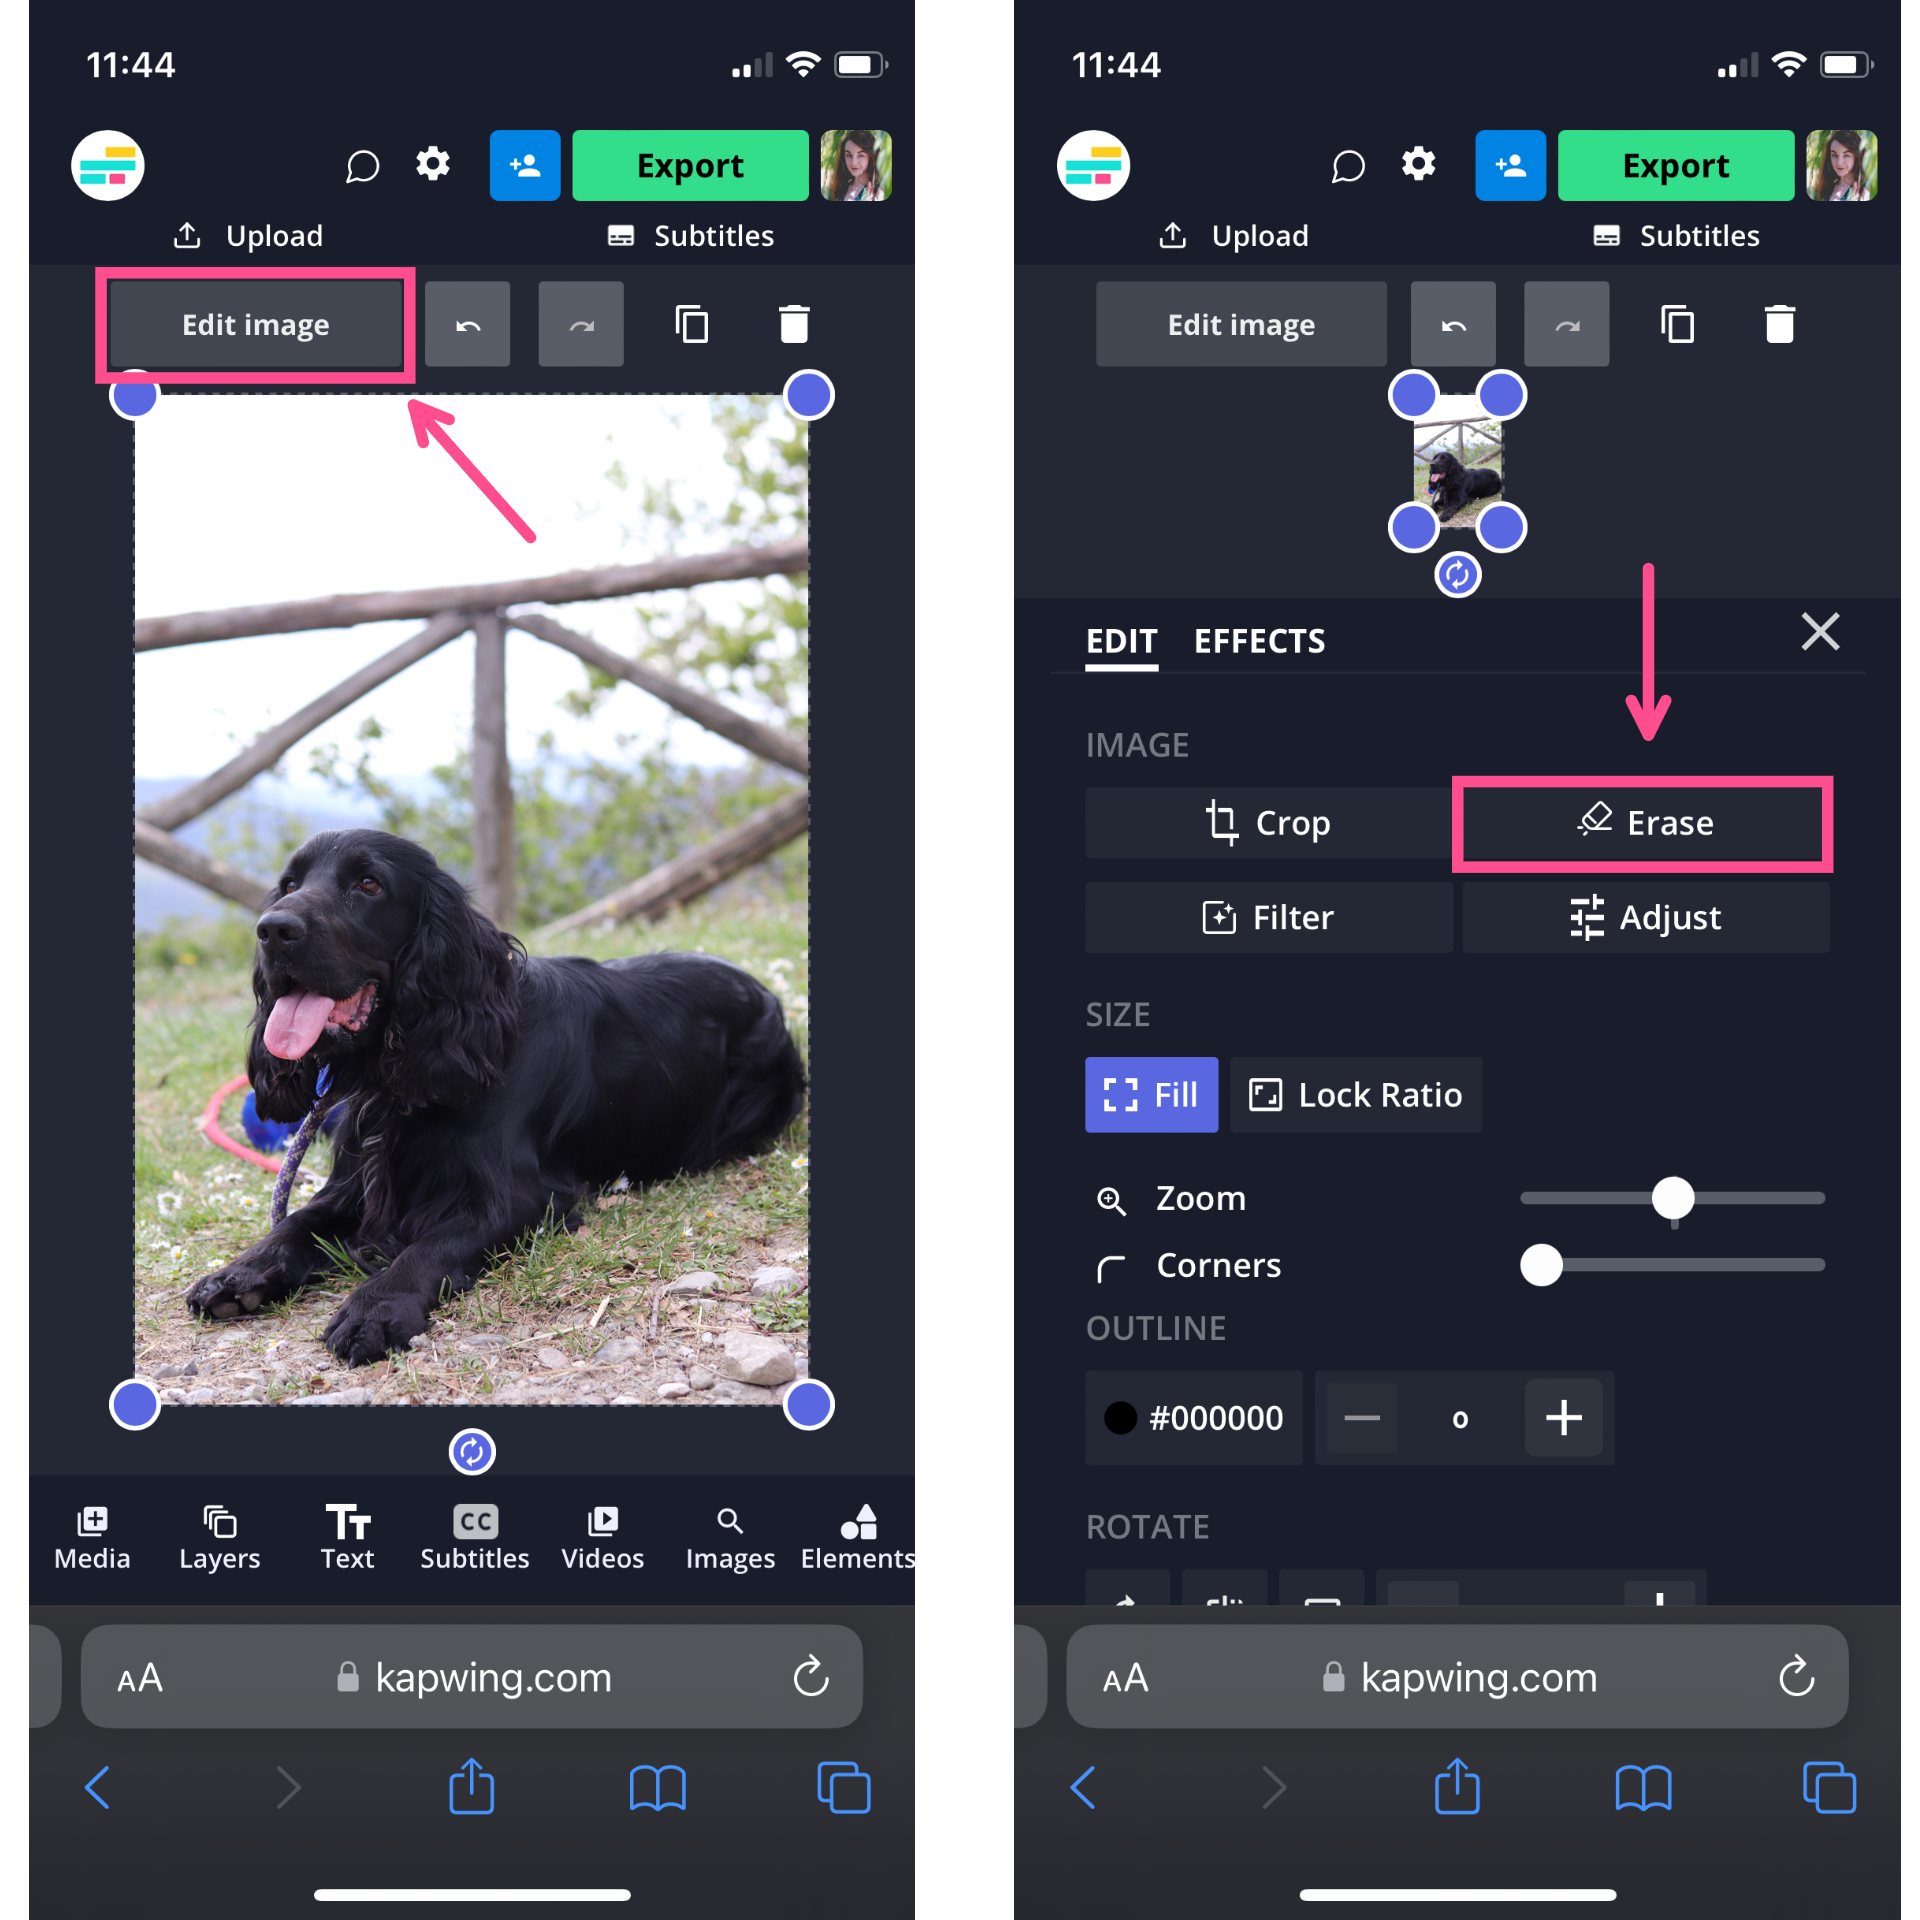
You should now see a few different tools within this tab, including the Remove Background button at the top. Tap it to instantly isolate your image subject and erase the background.
The background will now show up as gray and white checkerboard in the Studio (as shown above), indicating that it's transparent and can be saved as a PNG.
Step 3: Change the Aspect Ratio and Scale the Photo
Once your transparent photo has loaded in, change its aspect ratio if it's not already 9:16. To do this, select Edit Background, press Resize Canvas, and select from one of the 9:16 presets or type in 1080 by 1920 as the custom output size then hit Done.
Finally, select Fill and Crop and hit Apply.
Step 4: Add a Background to Your Photo
Next, let's add a background to our photo. If you want a solid color background, simply press Edit Background, located Background Color, and choose your preferred background color.
You can also add an image as your background/backdrop by tapping Media in the bottom left corner, selecting Add Media, and then choosing a background image from your device or using the Image tab to choose a photo from Kapwing's stock image library.
Send the photo Backward or to the Back using the respective buttons. Your background image should now be behind your image that originally had a transparent background.
Step 5: Download and Save Your Transparent Background Image
Once you're satisfied with your new image, click Export to render the image and see your download options.
If you're not already signed in, you may be prompted to sign in to save your image watermark-free. Once you're signed in, just click Download file in Kapwing and hit Download to save it to your device.

For Safari users on iPhone, the image may not automatically save to your Camera Roll. Instead, it will save to your Safari downloads. You can open this by clicking the blue download arrow button in your browser search bar and selecting Downloads. From here, press the image that you want to save and then tap the "share" icon in the bottom left corner.
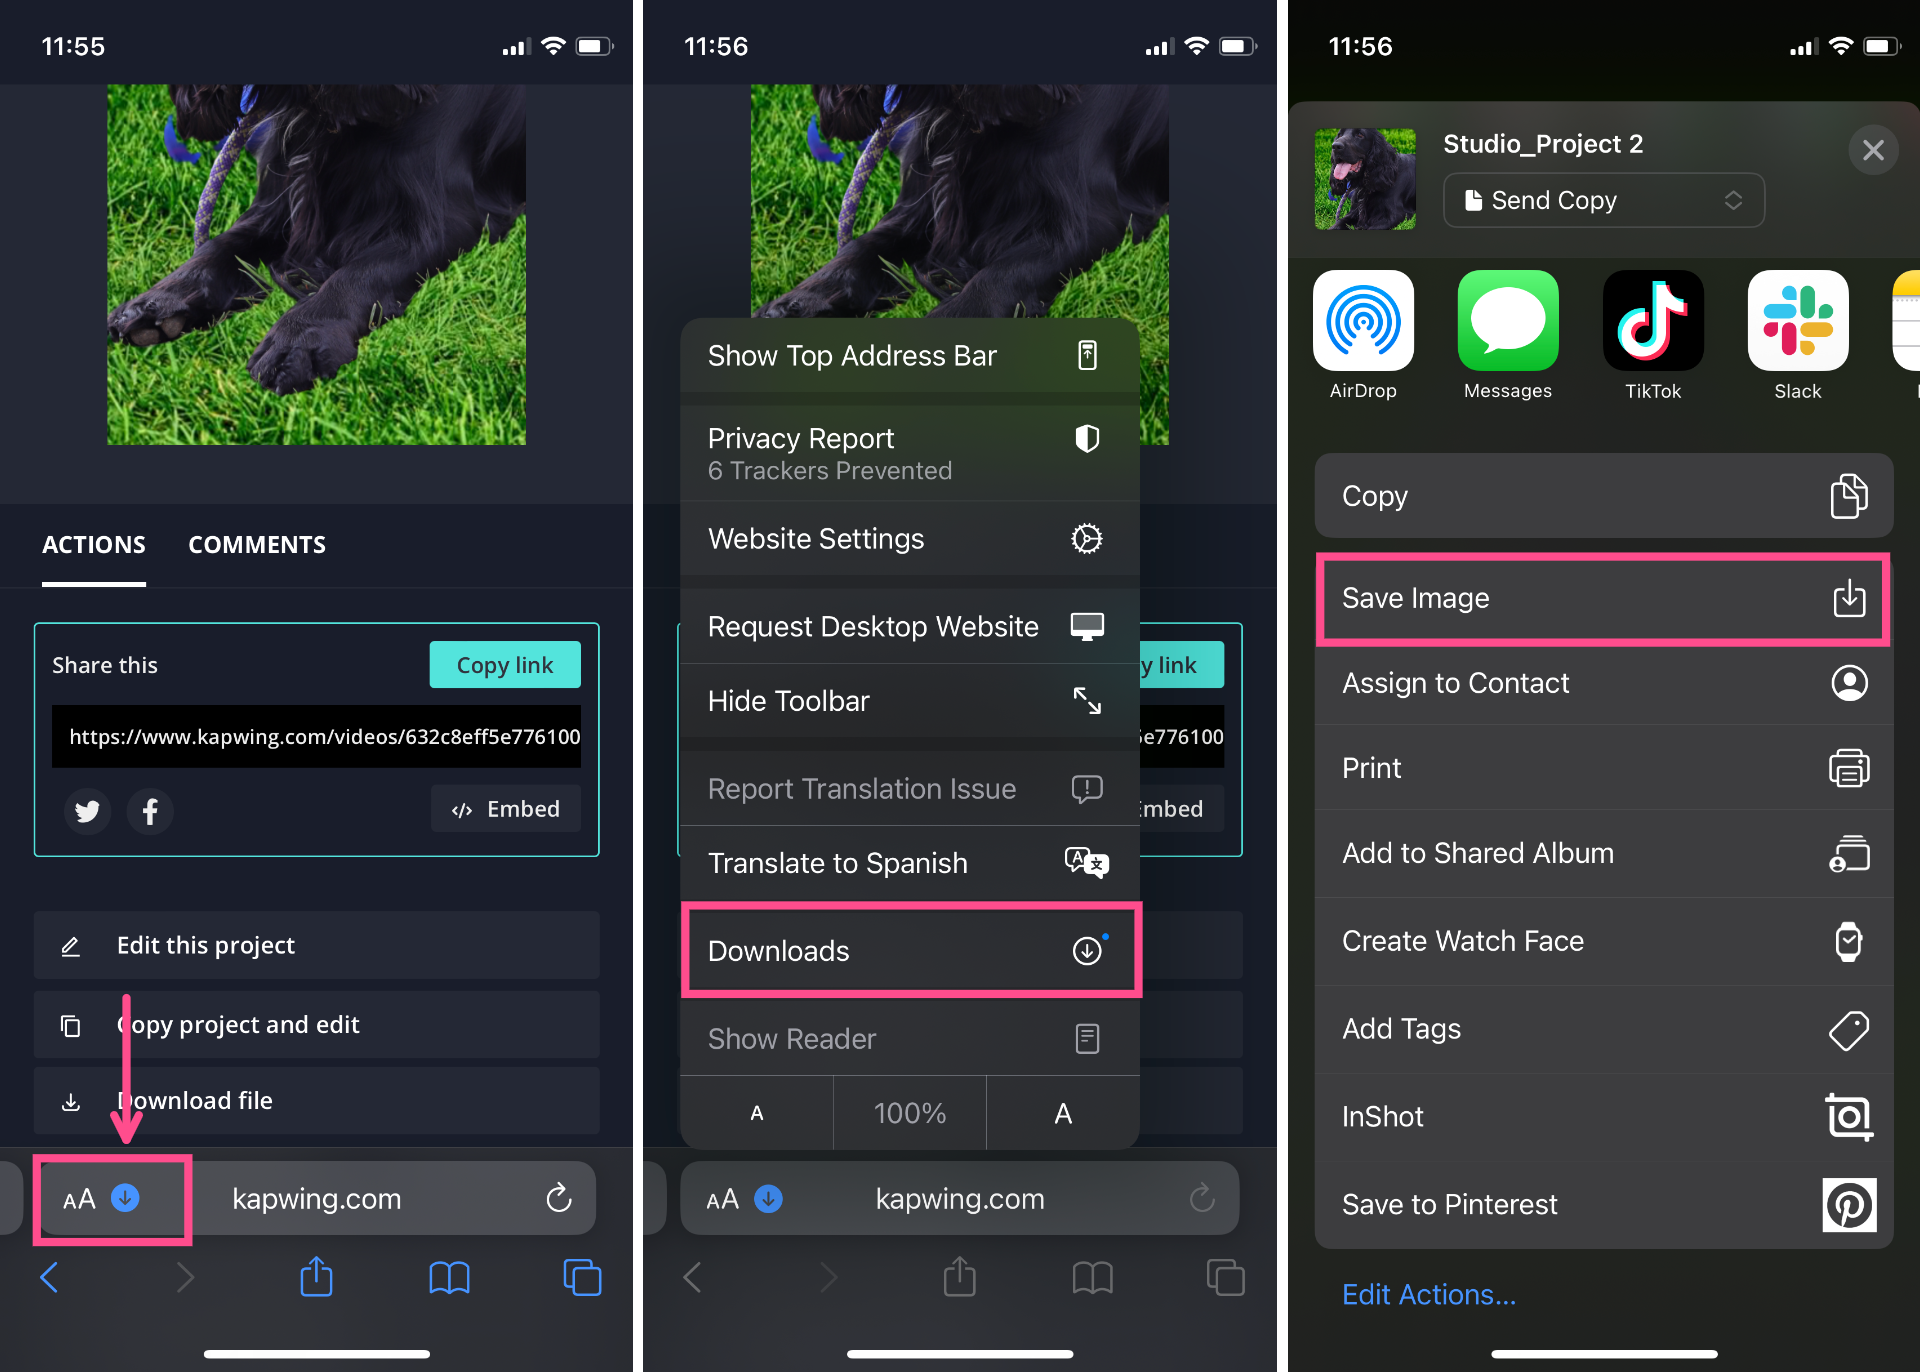
From this menu, you'll have the option to Copy (which will save it to your clipboard, so you can paste it elsewhere), Save Image (which will send it to your Camera Roll), or open it directly in any of the supported apps on your phone, like Messages or AirDrop.

Once you've confirmed that your new photo has been added to your camera roll, return to wallpaper customization and add your photo!
With these tips, you can create as many unique iOS 16 lock screen wallpapers as your heart desires, so go crazy with it! For more tips and tutorials, check out our Resource Library and subscribe to our YouTube channel.


