How to Choose the Best Auto-Subtitle Generator for Your Video Workflow
80% of people are more likely to watch a video to completion when captions are available

There are hundreds of auto subtitle tools available to content creators, each positioning itself as the “best.” In reality, there isn’t a single universal solution. The right choice depends on your specific workflow, production needs, and distribution goals.
A podcaster repurposing long-form content needs fundamentally different features than a social media manager captioning 30 clips weekly. Yet most tool comparisons list the same features side by side as if everyone weighs them equally. They benchmark accuracy on controlled test clips, not your actual content. They compare pricing tiers without accounting for your volume.
The data on subtitles is unambiguous. Research published in Policy Insights from the Behavioral and Brain Sciences found that over 100 empirical studies confirm captions improve comprehension, attention, and memory for all viewers. A Verizon Media study of 5,616 consumers found 80% are more likely to watch a video to completion when captions are available. Among Gen Z, 70% use subtitles all or part of the time, and 74% watch videos in public on their smartphones, where sound-off viewing is the norm.
The content creation industry has paid attention to the data: 90% of organizations now caption at least some content, and over 70% use auto-generated captions. But there's still a huge gap: only 14% believe auto-captions alone are fully accessible. The remaining 86% rely on human review or simply shrug and accept that their captions fall short of professional standards.
So, the question right now isn't whether to caption. It's how to do it efficiently without creating a bottleneck (or a liability) in your production workflow. This guide provides a decision framework you can apply to any subtitle tool.
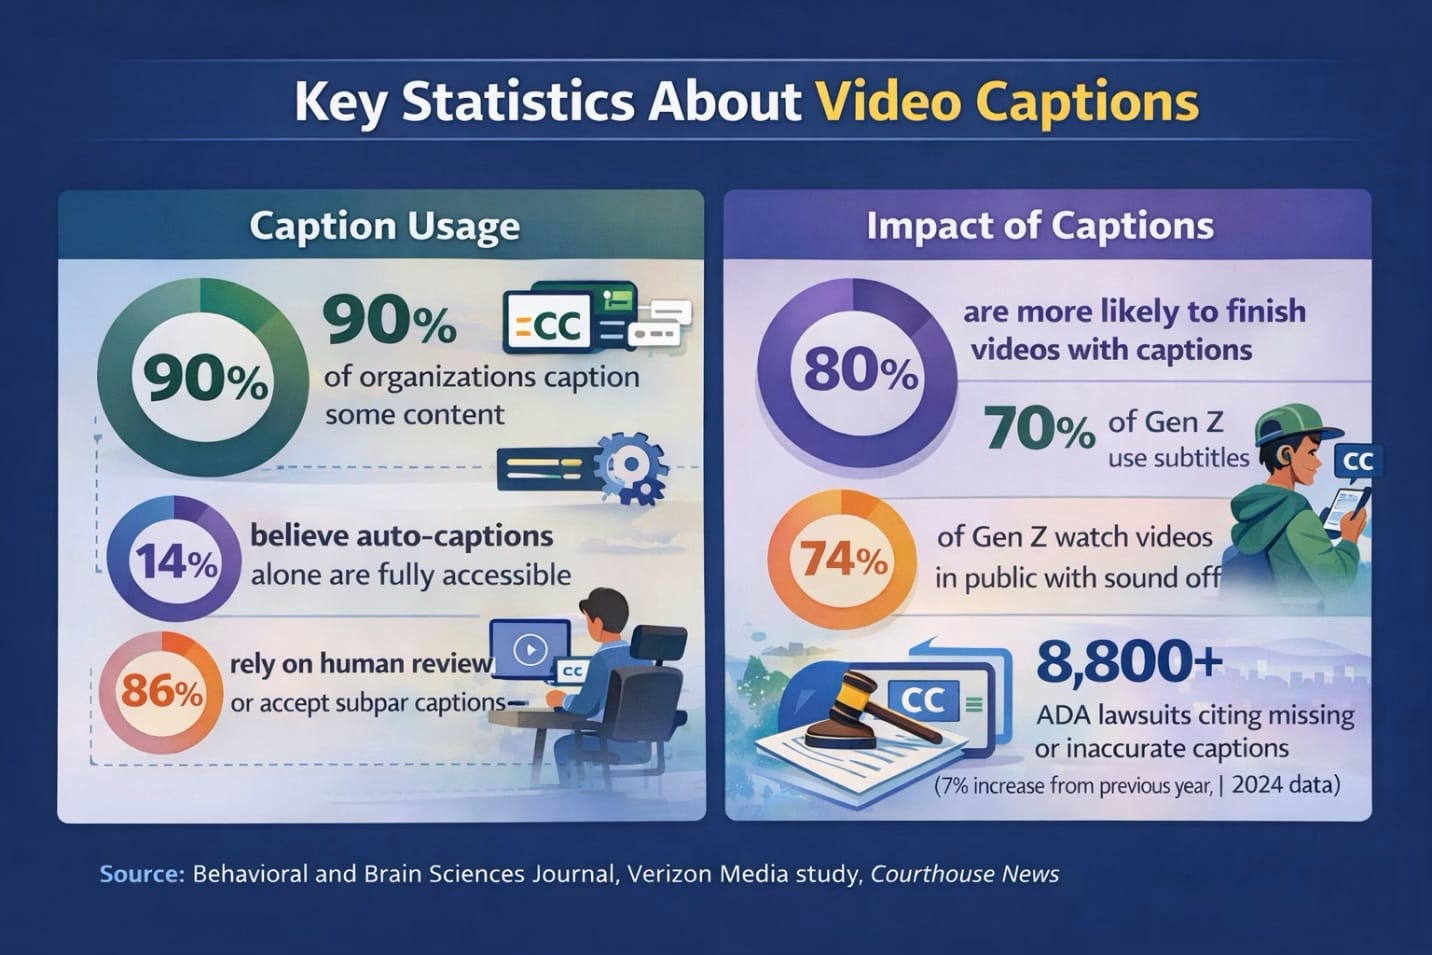
Table of Contents
Identify Your Creator Archetype
Before you even begin evaluating tools, it's important to identify which creator profile aligns best with your workflow. Each has different must-haves, and knowing yours prevents paying for capabilities you'll never use — or missing features you desperately need.
1. High-Volume Social Creator
You produce 15+ short-form videos weekly across multiple platforms. Speed trumps perfection. A 5-minute delay per video compounds into hours lost weekly. Your content often has a 48-72 hour relevance window, meaning a tool that's 95% accurate but takes an hour to process may hurt you more than one that's 88% accurate in 5 minutes.
- Must-haves: Batch processing, fast turnaround, template styles, mobile editing capability.
- Red flags: Per-video manual setup, lengthy processing queues, desktop-only workflows.
- Testing priority: Time the full round-trip from upload to exported video. A tool 3 minutes faster per video saves 2.5+ hours monthly at 50 videos.
For this archetype, an AI Assistant offers a streamlined path. Describe what you want in natural language, and the chatbot generates your subtitles. It also remembers your preferred subtitle style for future videos, helping you eliminate repetitive tool navigation.
2. Quality-First Long-Form Producer
You create documentary, educational, or corporate content where accuracy directly impacts credibility. A misheard number in a financial explainer or a misspelled technical term damages the expertise you're establishing. Plus, your content has a long shelf life, meaning that errors discovered months later still reflect on you.
The legal stakes are real: in 2024, over 8,800 ADA lawsuits were filed — a 7% increase from 2023 — with missing or inaccurate captions cited as a common accessibility barrier. The FCC mandates 99% accuracy for broadcast captioning, and the European Accessibility Act (effective June 2025) requires closed captions for all public-facing audiovisual content in the EU.
- Must-haves: High baseline accuracy (especially for technical vocabulary), granular timing controls, speaker identification, professional export formats (SRT, VTT).
- Red flags: Tools optimized for speed over accuracy, limited editing interfaces, and no custom dictionary support.
- Testing priority: Count accuracy on technical terms, specifically, not just overall word accuracy.
3. Client Service Provider
You deliver subtitled content to clients with varying requirements — different audio quality, inconsistent terminology, and last-minute revision requests. Your tool must handle this range gracefully.
Economics start to really matter at scale. Per-minute pricing that seems cheap at low volume can destroy margins. If you charge clients $50 for captioned video and the tool costs $15 per project at volume, your margins evaporate.
- Must-haves: Multiple export formats, white-label capability, team collaboration, consistent quality across varied content.
- Red flags: Per-seat pricing that scales poorly, watermarks on client-facing tiers, and limited export options.
- Testing priority: Test with your clients' messiest content — background noise, multiple speakers, poor audio. Your worst-case performance sets client expectations.
4. Budget-Conscious Creator
Free tiers matter, but "free" sometimes costs more in time than the tool saves. In-house captioning costs approximately $165 per hour of content when you account for transcription time (4-5 hours per hour of audio for a trained person), syncing, and quality assurance.
Professional captioning services range from $1-15 per minute. If a free tool requires 30 extra minutes of editing per video compared to a $15/month alternative, and you produce 8 videos monthly, you're trading 4 hours for $15!
- Must-haves: Generous free tier or low entry price, acceptable accuracy for your content type, basic editing without excessive friction.
- Red flags: Aggressive watermarks, accuracy so low it creates more work than manual transcription, pricing that spikes after trial periods.
- Testing priority: Map free tier limitations precisely, including minutes, exports, and features. Calculate when you'll hit them.
The 10-Minute Testing Protocol
Most creators test tools with the tool's demo video, see if it works, and commit. Then they discover problems after investing hours into their actual workflow. This protocol uses your content to test what actually matters.
1. Prepare Test Content (2 minutes)
Select a 60-90 second clip from your actual footage containing your hardest transcription challenges. Include at least three of: fast dialogue or overlapping speakers, technical jargon or unusual proper nouns, background music or ambient noise, accented speech, quiet or mumbled sections.
This clip becomes your benchmark for testing every tool identically.
2. Run Baseline Test (3 minutes)
Upload with default settings. Start a timer when you hit "generate."
When complete, create a scorecard tracking: processing time, critical errors (wrong numbers, incorrect names, missing negatives), minor errors (misspellings, missed filler words), and timing issues (subtitles appearing before speech or lingering after).
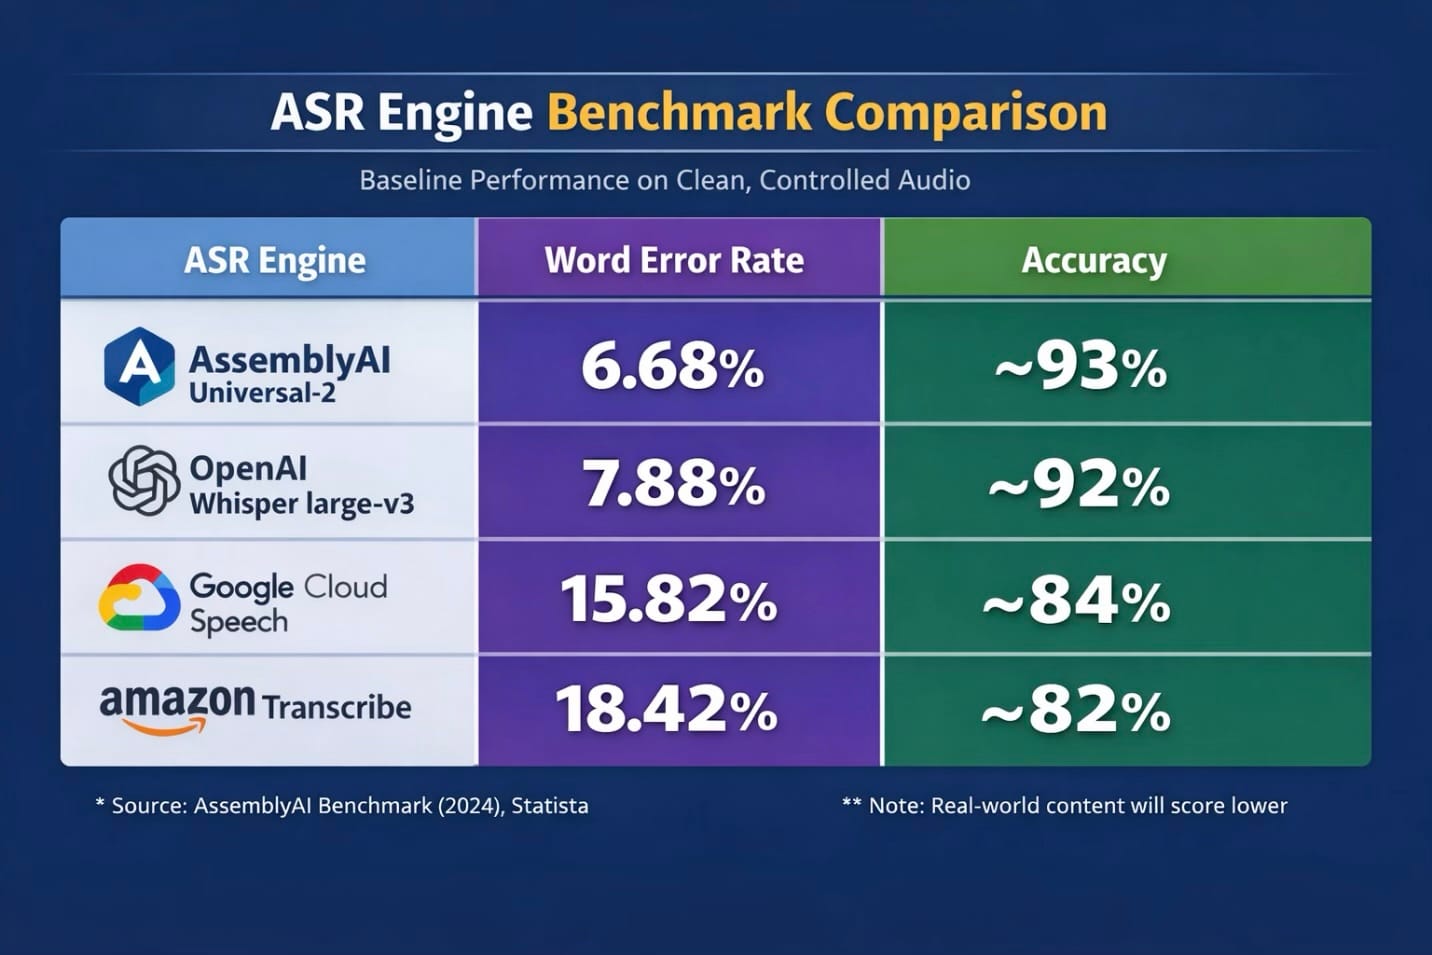
For context, most auto-subtitle tools use one of these core ASR (Automatic Speech Recognition) providers (although this isn't an exclusive list), making them a good baseline for accuracy tests. Here's how they perform on clean, controlled audio:
3. Test Editing Experience (3 minutes)
Fix five errors in the generated subtitles. Track clicks per correction, playback integration, keyboard shortcuts, and timing adjustment method (visual waveform or numerical input only).
This reveals scaling costs. A tool with 95% accuracy but a clunky editor may cost more total time than an 88% accuracy tool with streamlined correction. If you're captioning 10 videos weekly, a 2-minute editing difference per video adds up to 17+ hours annually.
4. Test Export Path (2 minutes)
Export in your required format. Verify: exports include your edits, formatting is correct for your destination platform, no unexpected watermarks or quality limitations, and no additional conversion tools required.
Decision Frameworks
When Free Stops Making Sense
Upgrade once the time cost exceeds the subscription cost. If a free tier limits you to 10 minutes per month and you’re captioning two or more hours, the time spent managing workarounds quickly outweighs the $10–$20 monthly fee.
Upgrade when limitations force workarounds. Watermarks you’re cropping, exports you’re reformatting, features you’re recreating elsewhere — these are hidden costs. For example, if a “free” tool adds just 15 minutes of extra work per video, publishing 10 videos per month costs you roughly $50 in time at a $20/hour rate.
Stay free when volume is genuinely low (under 30 minutes monthly), you're testing whether captioning improves metrics before committing, or the free tier's limitations don't affect your specific use case.
Accuracy vs Speed
Optimize for speed when: Content has a short shelf life, you're publishing high volume, minor errors don't damage credibility, and you have a fast editing workflow to catch critical errors.
Optimize for accuracy when: Content lives indefinitely, errors create compliance or legal exposure, your audience includes non-native speakers relying on captions, or you're serving clients who judge you by caption quality.
Platform Specialists vs All-in-One Tools
Choose specialists when: You exclusively publish to one platform, want the trendiest visual styles, and accept switching tools if you expand later.
Choose all-in-one when: You repurpose content across platforms, need professional formats (SRT/VTT) alongside burned-in captions, or want fewer tools in your workflow.
5 Mistakes That Cost Time and Money
1. Testing with clean audio only.
Your test clip should include your hardest challenges. A tool that performs professionally on studio-quality audio may fail on real content.
2. Ignoring the editing interface
Accuracy gets all the marketing attention, but you'll spend more time fixing subtitles than generating them. A clunky editor requiring six clicks per correction costs more total time than a tool with lower accuracy but streamlined one-click correction.
3. Committing based on trial performance
Free trials often include premium features such as higher accuracy models, faster processing. Know exactly what your actual paid tier includes before building workflows around capabilities that disappear.
4. Optimizing for the wrong metric
Speed matters for social creators publishing daily; accuracy matters for educational content with years of shelf life. Match your optimization to your actual needs.
5. Forgetting export requirements
You need SRT for YouTube's caption system, burned-in captions for TikTok, possibly VTT for web players. A tool offering only one format may require conversion tools. Map your export needs across all platforms first.
Ready-to-Use Workflows
Workflow 1: Social Sprint
For: High-Volume Social Creators captioning 10+ videos weekly.
Setup (one-time, 15 minutes): Create 2-3 caption style templates matching your brand. Configure default export settings. Set up folder system: /Raw → /Captioned → /Posted.
Per-video process (under 5 minutes):
- Upload and auto-generate (1-2 min).
- Skim-check at 1.5x speed for critical errors only — names, numbers, profanity misdetections (1-2 min).
- Apply template, export, file (30 sec).
Alternative: Use AI to generate and caption in a single conversational flow, with your preferences remembered for future projects.
Workflow 2: Quality Long-Form
For: Quality-first producers where accuracy reflects credibility.
Setup (one-time, 30 minutes): Build a custom dictionary with technical terms, brand names, and proper nouns. Create a QA checklist. Configure export for both preview and a separate caption file.
Per-video process (15-25 minutes for a 10-minute video):
- Upload with enhanced settings (speaker labeling, noise reduction).
- Full-speed review with active editing.
- Second pass for timing.
- Export SRT/VTT separately.
- Store caption files for future revision.
Workflow 3: Client Deliverable
For: Service Providers scaling while maintaining quality.
Setup (one-time, 45 minutes): Create intake questions for client requirements. Build a client-specific template library. Document QA process for delegation. Set up tracking: Client → Project → Draft → Review → Delivered.
Per-project process:
- Gather requirements before starting.
- Process with client terminology in a custom dictionary.
- First-pass edit, export draft for review, incorporate feedback, export final.
- Archive with caption files stored separately.
- Build a 15-minute buffer into timelines for unexpected issues.
The Bottom Line
The best auto subtitle generator fits your actual workflow, not the one with the longest feature list or most impressive accuracy benchmark. That fit depends on your volume, accuracy requirements, budget, and the specific challenges in your content.
Identify your archetype first. Test with your hardest content, not curated demos. Apply the decision frameworks to resolve trade-offs consciously. Then implement a process that makes captioning sustainable rather than a bottleneck.
The landscape will keep evolving. But this decision framework remains constant: understand your workflow, test systematically, and choose based on fit. The goal isn't finding the perfect tool. It's finding a tool good enough that subtitles stop being a barrier and become an asset.