How to Transcribe a YouTube Video: A Step-by-Step Guide
Does YouTube transcribe videos? Yes! We'll show you how to transcribe a YouTube video on YouTube *and* with a helpful online tool.
Video transcripts are a useful tool to boost any video’s accessibility and repurposability, including YouTube videos. And with improving transcription technology, converting YouTube videos to text is easier than ever now.
There are three ways to transcribe YouTube videos:
- Manually transcribe the video (or pay for manual transcription)
- Use YouTube’s transcript feature
- Use video transcription software
Manually transcribing a YouTube video is incredibly labor intensive and time-consuming, so we absolutely don’t recommend taking that route. Instead, let’s take a look at the other two options and how they work.
How to transcribe a video on YouTube
The fastest way to transcribe a YouTube video is by using YouTube’s built-in transcript feature. Finding the transcript can be a little tricky though, if you don’t know where to look.
Here’s how to find and use transcripts on YouTube:
Step 1: Expand the video description
YouTube’s auto-generated transcripts aren’t in the video player settings with the subtitles like you might expect. Instead, they’re down in the video description.

Click on “...more” underneath the truncated video description to expand the description box.
Step 2: Scroll down to the Transcript section
With the description box expanded, scroll all the way down to the very bottom.
You should see a section labeled “Transcript” with the description: “Follow along using the transcript” and a button that reads “Show transcript.”
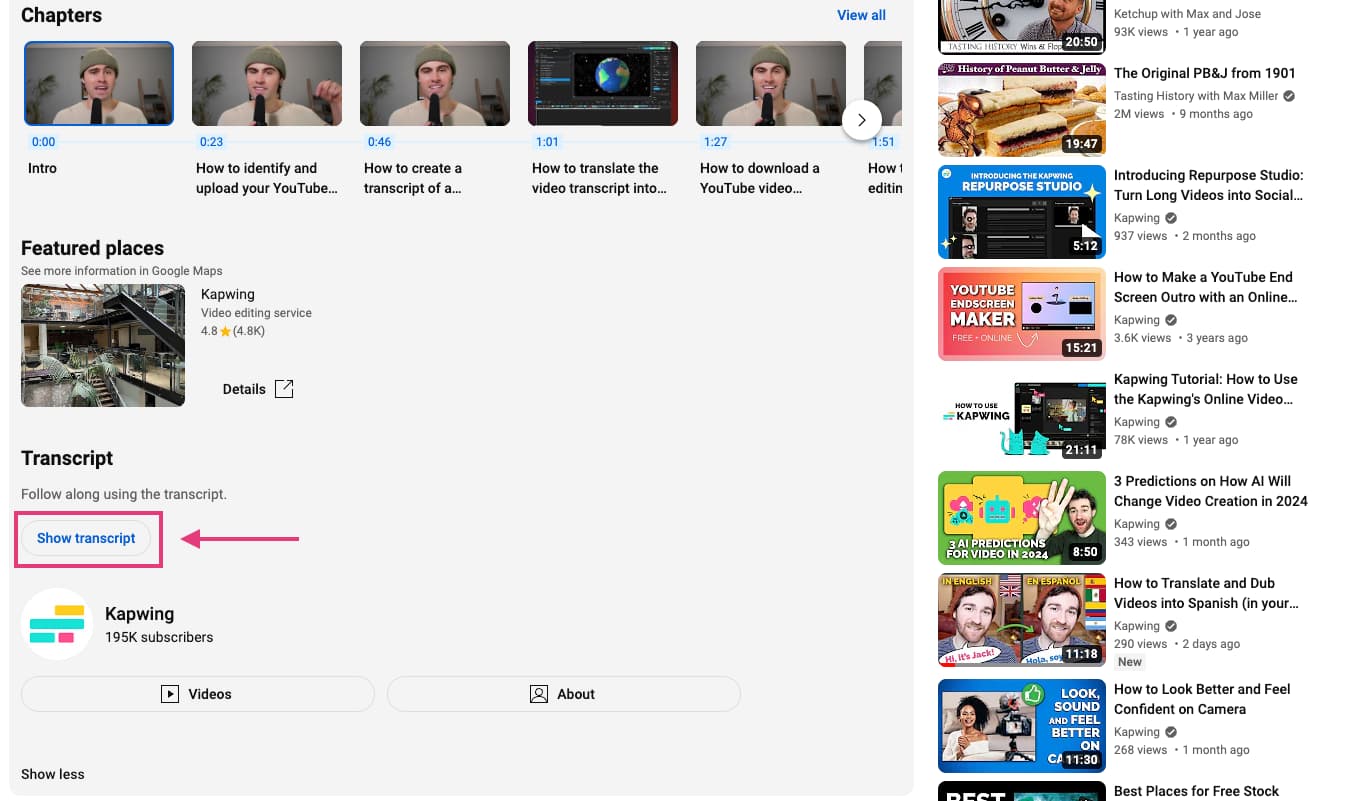
Click on the button.
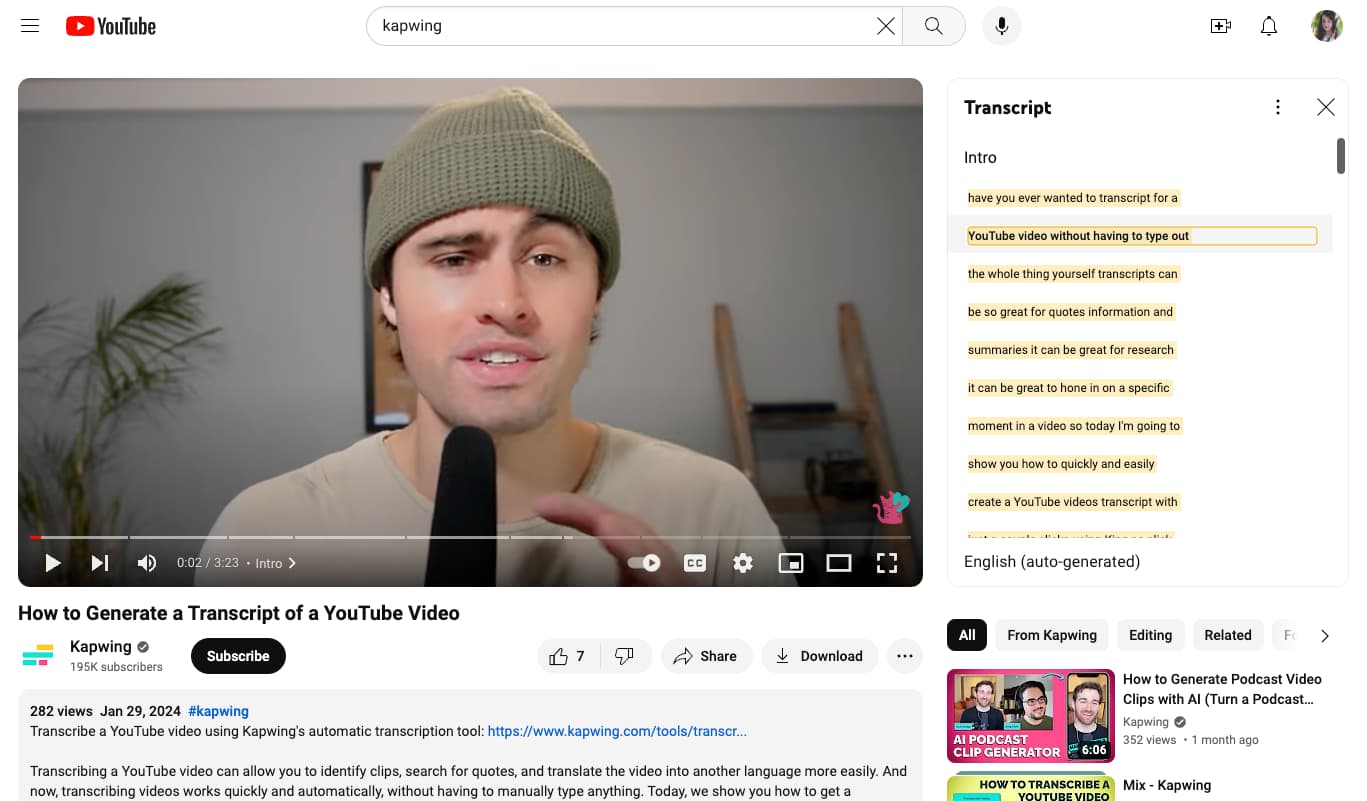
Step 3: View the YouTube video’s transcript
When you click “Show transcript,” you’ll be automatically taken back to the video player at the top of the page. To the left of the player, you’ll now see the automatically generated and timestamped transcript.
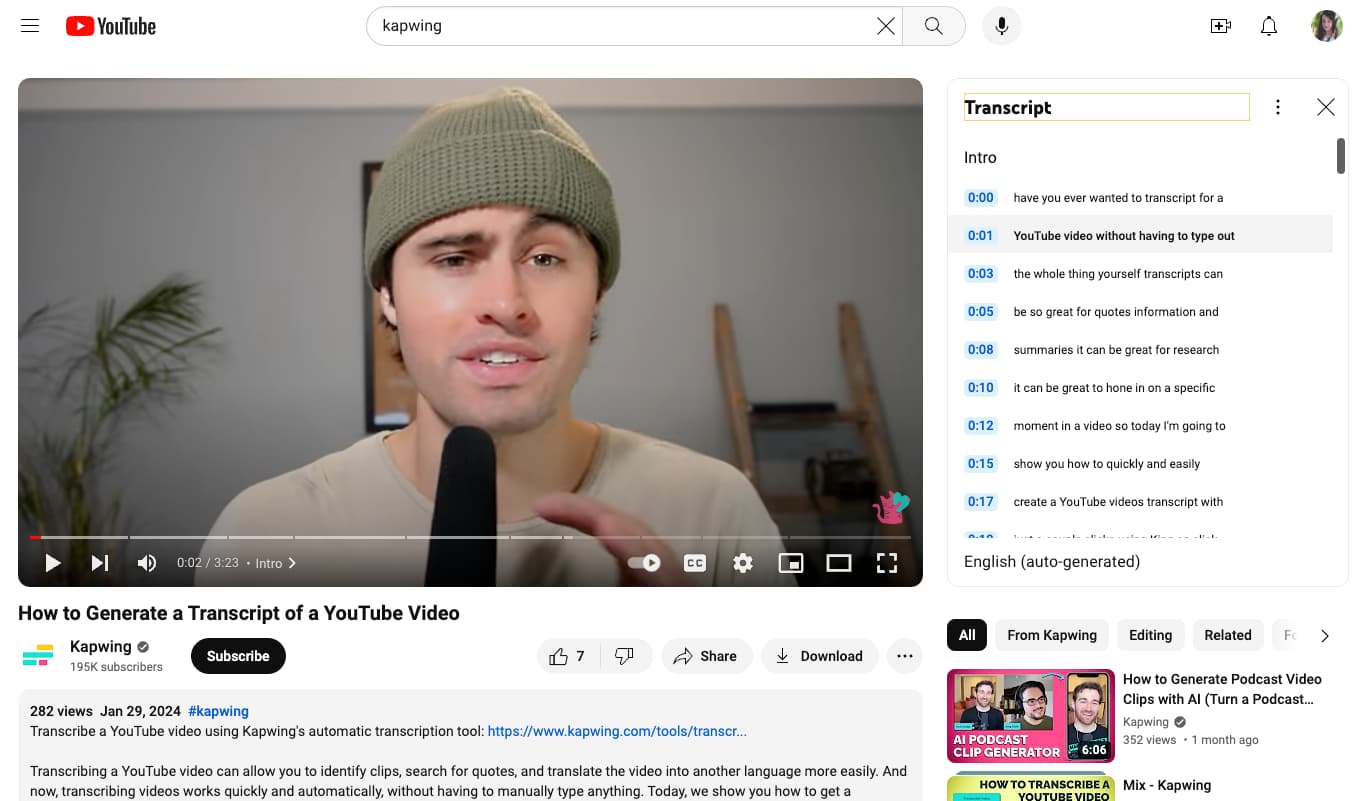
The transcript will scroll as the video plays, allowing you to read the transcript and follow along with the spoken audio of the video in real time.
If you want to export the transcript to use elsewhere, follow the next two steps.
Step 4: Toggle off the transcript timestamps
Click on the three dot menu at the top of the transcript window to access the transcript settings. As of writing this, there’s only one option in the settings, which is to toggle the timestamps on or off.
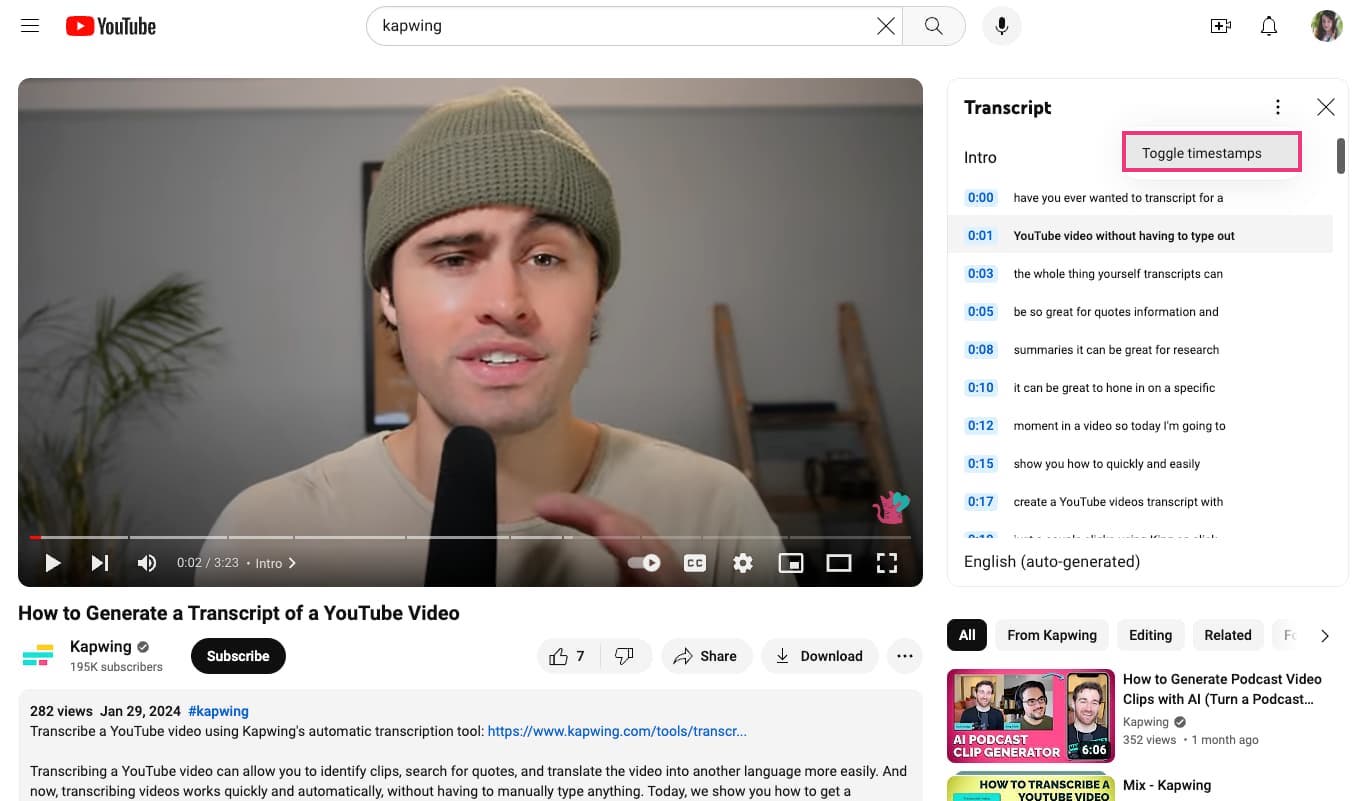
If you’d like to export the transcript, we recommend turning off the timestamps first for a cleaner transcript.
Step 5: Copy the transcript to your clipboard
There is currently no way to export or download a YouTube video transcript directly from YouTube, however you can copy and paste the transcript into a word processing program, like Google Docs.
Place your cursor over the transcript and left click to select. Then hold down the left mouse button while scrolling down until the entire transcript is highlighted.
Ctrl/cmd + “C” to copy or right click on the mouse and click “Copy” to save the transcript to your keyboard.
Open the word processor of your choice and paste the text in.
Note: As is, this transcript won’t be ready to publish or use, so you’ll need to format it and review for spelling, punctuation, and transcription mistakes.
How to transcribe a YouTube video with transcription software
YouTube’s built-in transcription feature is pretty limited and not super accurate–in the previous examples you can see that there’s no capitalization or punctuation. Not the best if you’re using the video’s transcription to pull quotes from the video or repurpose it as a text post on your blog or social media channels.
Fortunately, transcription software does a much better job of accurately transcribing video to text. Let’s look at how to convert a YouTube video to text using Kapwing’s transcription tool.
Step 1: Copy the YouTube link
First, grab the URL for the YouTube video you want to transcribe.
You can pull this from the search bar at the top of your web browser or click the “Share” button underneath the video player and copy the link from there.
Step 2: Upload the video to Kapwing
With the YouTube video link saved to your clipboard, head to Kapwing.com and start a new project.
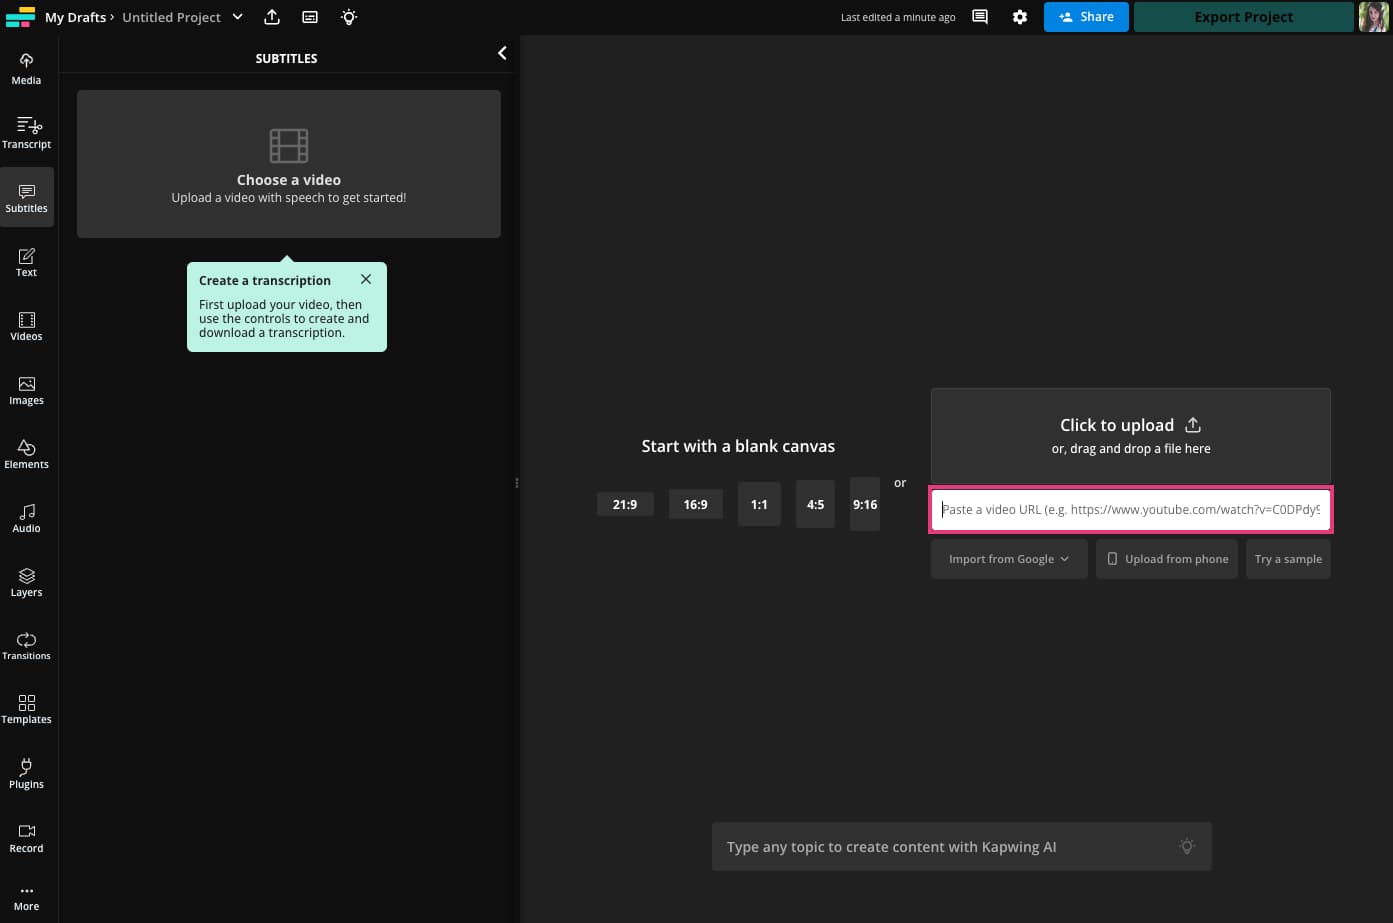
Paste the YouTube link into the upload box.
Step 3: Generate a transcript from the YouTube video
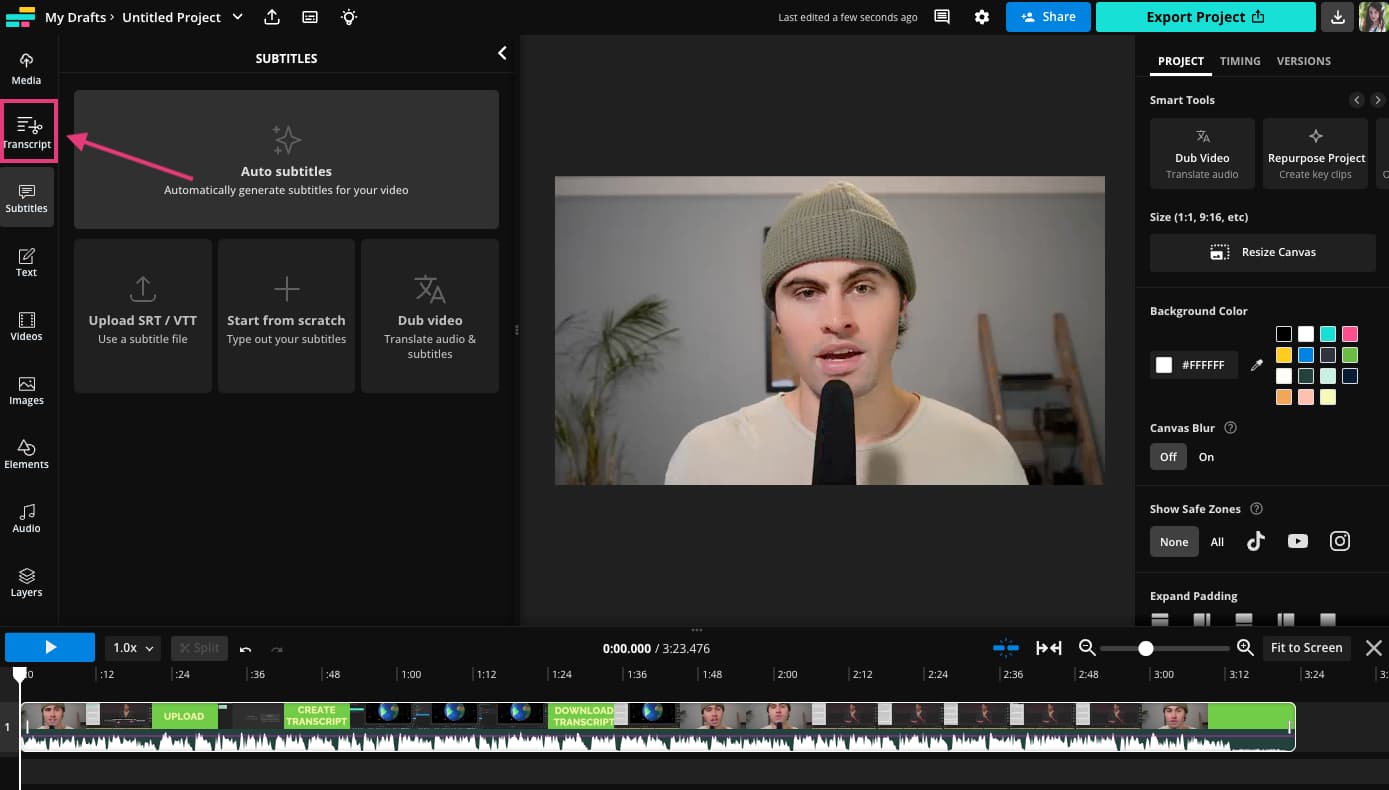
Once the video is uploaded, click on the “Transcript” tab in the left-side menu.
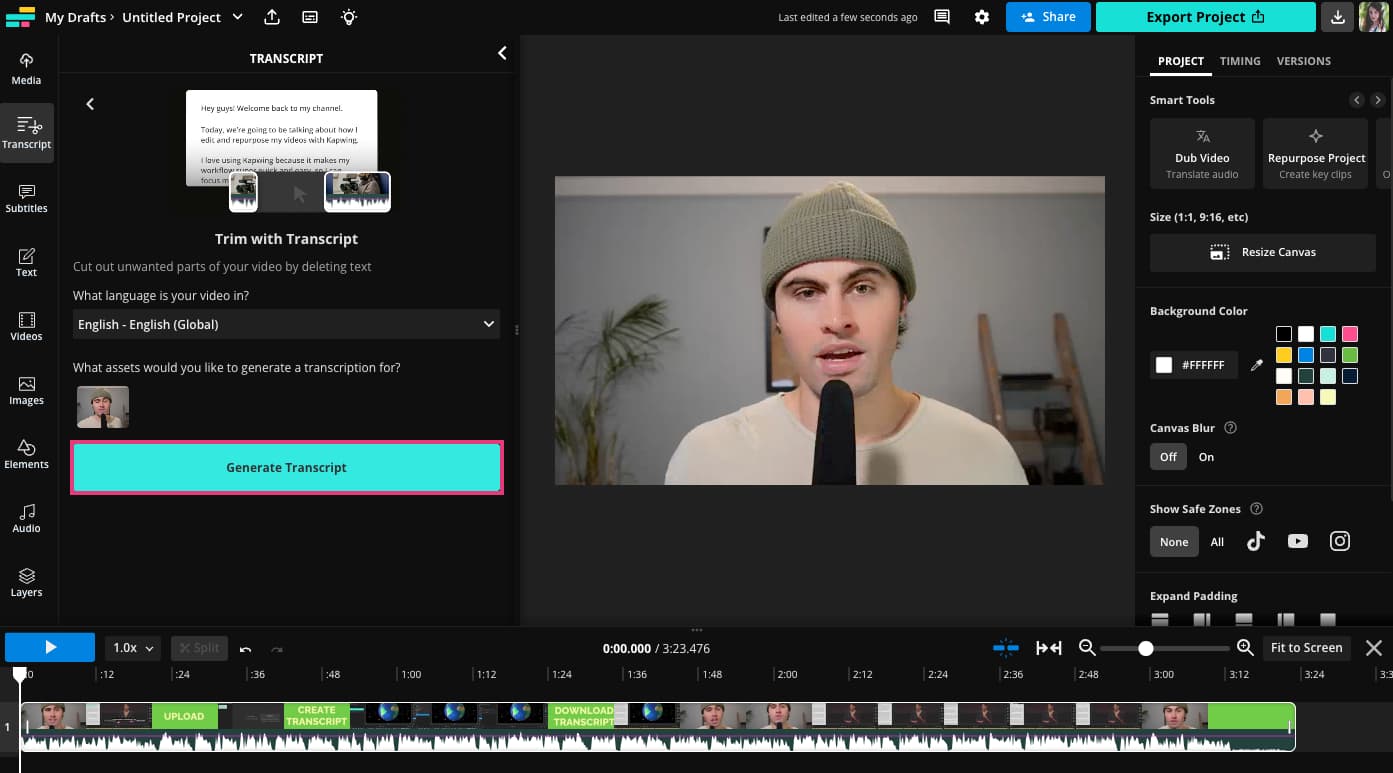
There are a few options in the transcript tab. Click on the first one: “Trim with Transcript.” You can use this tool to edit your video by editing the transcript, but you can also use it just to generate fast, accurate transcripts.
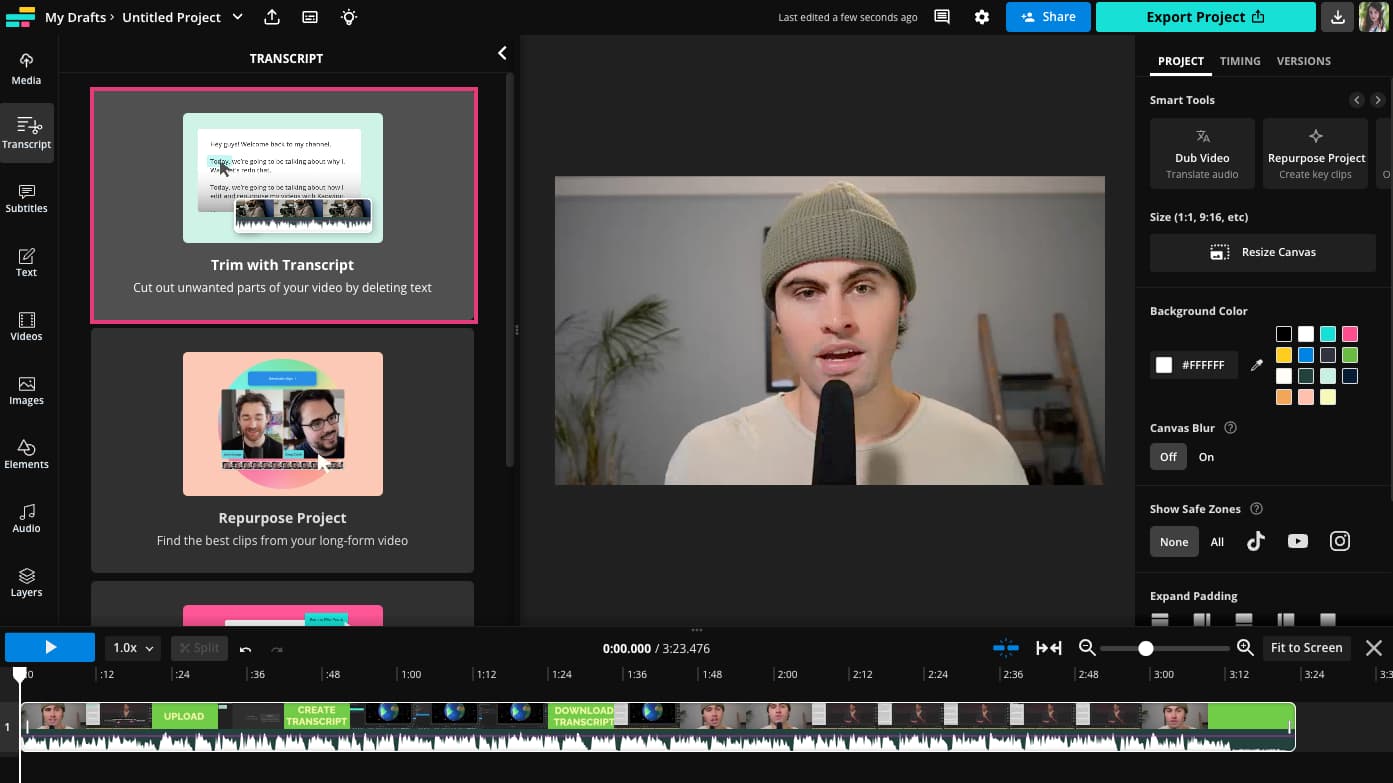
Choose the language setting for your transcript. This should match the language being spoken in the video. Then hit “Generate Transcript.”
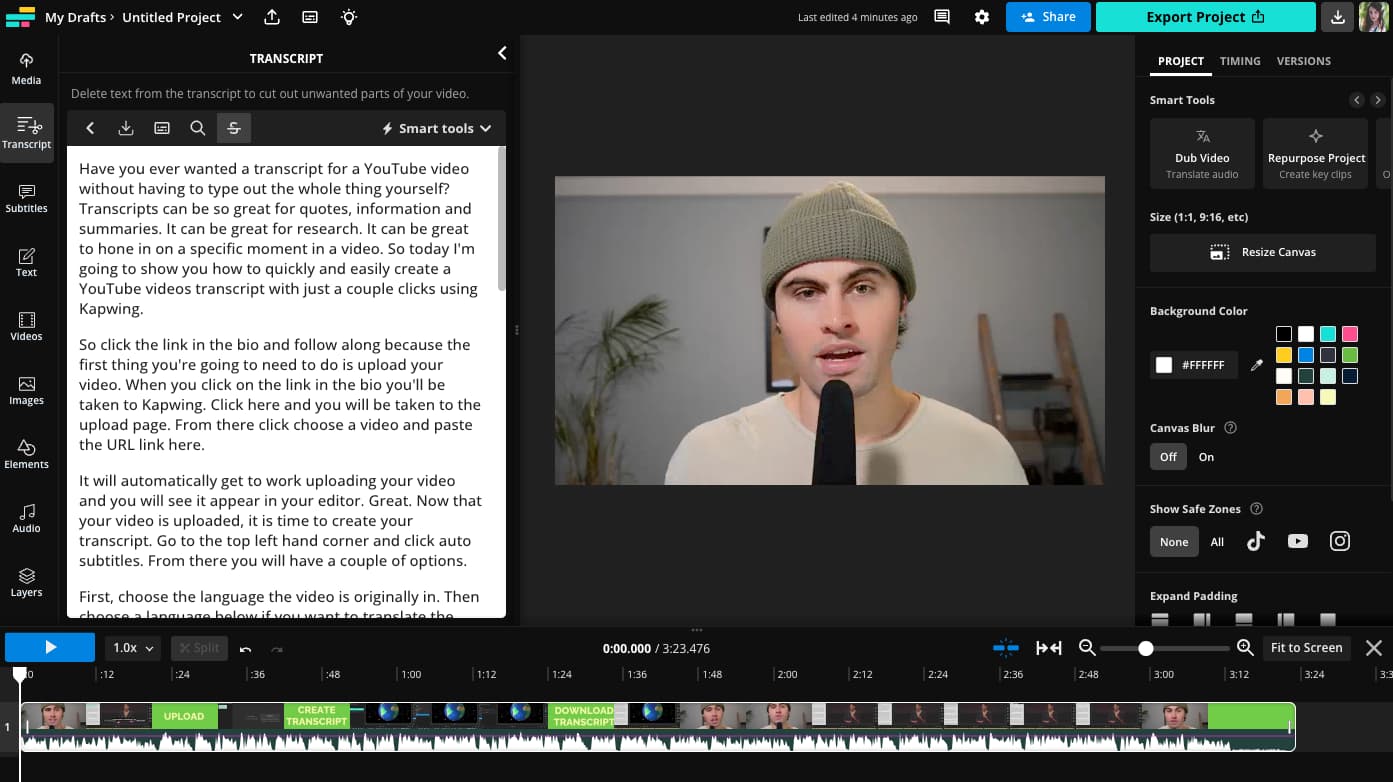
Depending on the length of the video, it may take up to a few minutes for the transcript to process. Once it’s ready, you’ll see the full, editable transcript open in a window to the left of the video preview.
Step 4: Download the video transcript
Before downloading the YouTube video transcript, you can clean it up a little bit.
While the transcripts are highly accurate, occasionally some words can be transcribed incorrectly, especially uncommon proper nouns, like brand names. To correct these, we recommend using our Custom Spelling feature so that Kapwing can learn the proper spellings of commonly mistaken words and automatically correct them in future transcriptions and subtitles.
Another way to polish up your transcript before downloading is with Cut Filler Words. This will automatically remove all “Ums” and “Uhs” from the transcript so you don’t have to edit them out later.
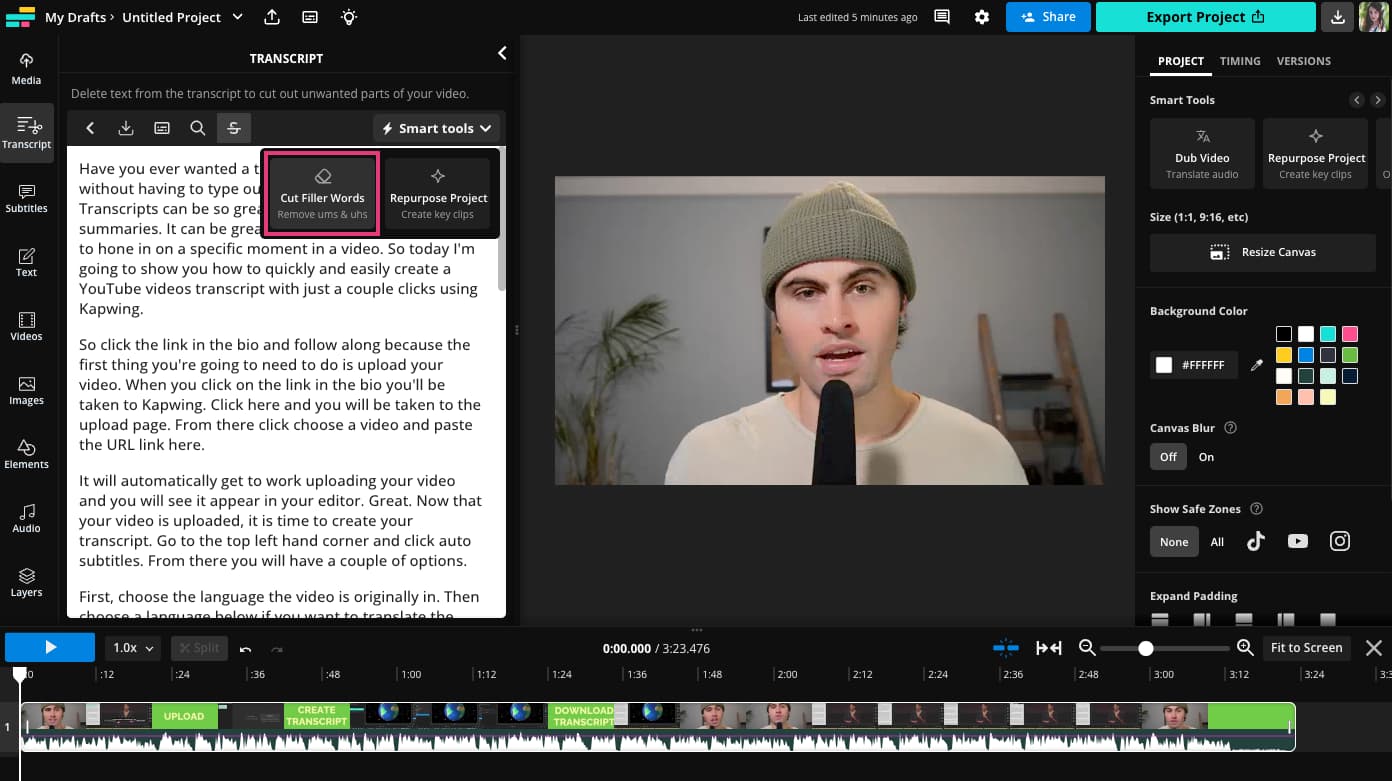
Click on the “Smart tools” dropdown at the top of the Transcript window then click on “Cut Filler Words.”
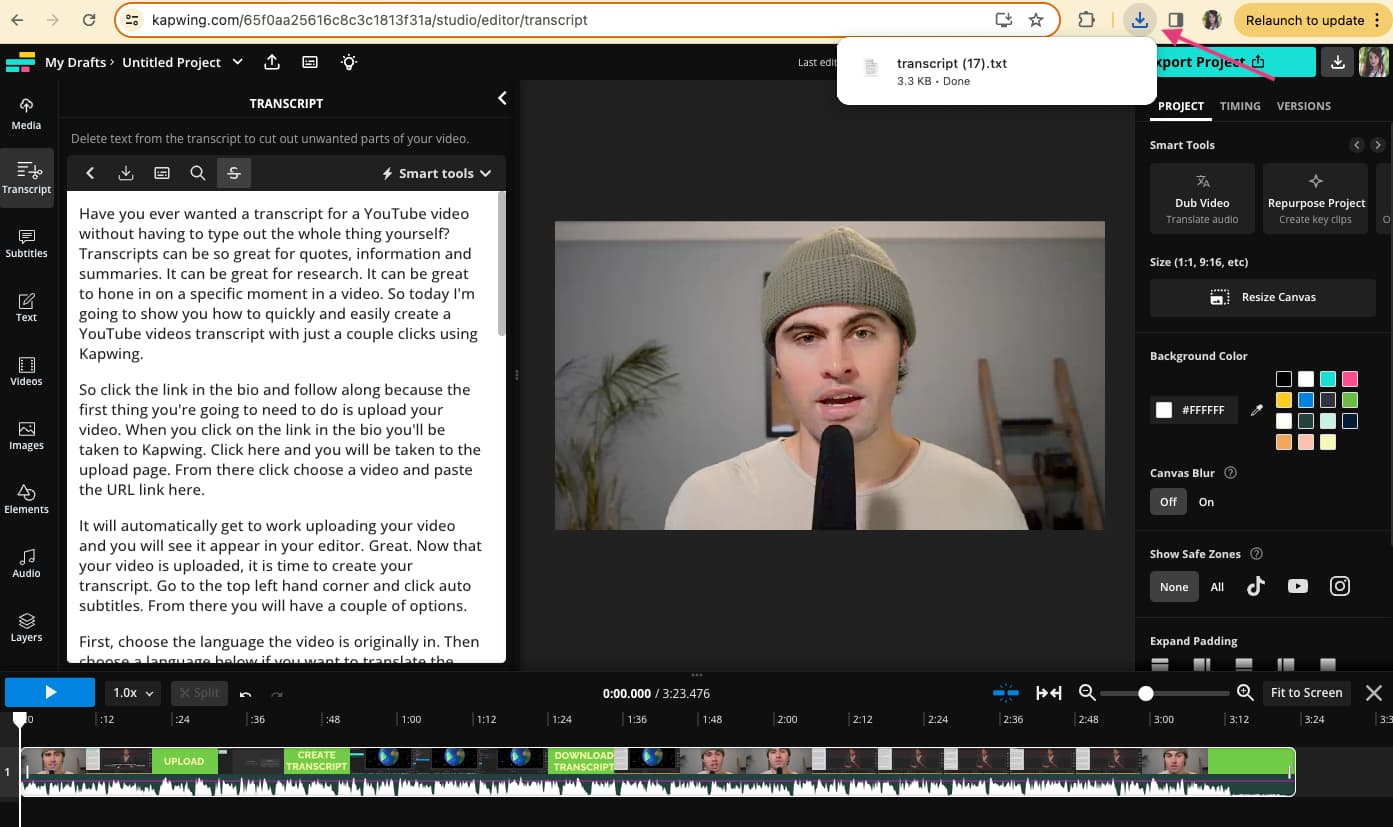
When you’re ready to export your transcript, click the download button at the top of the transcript window.
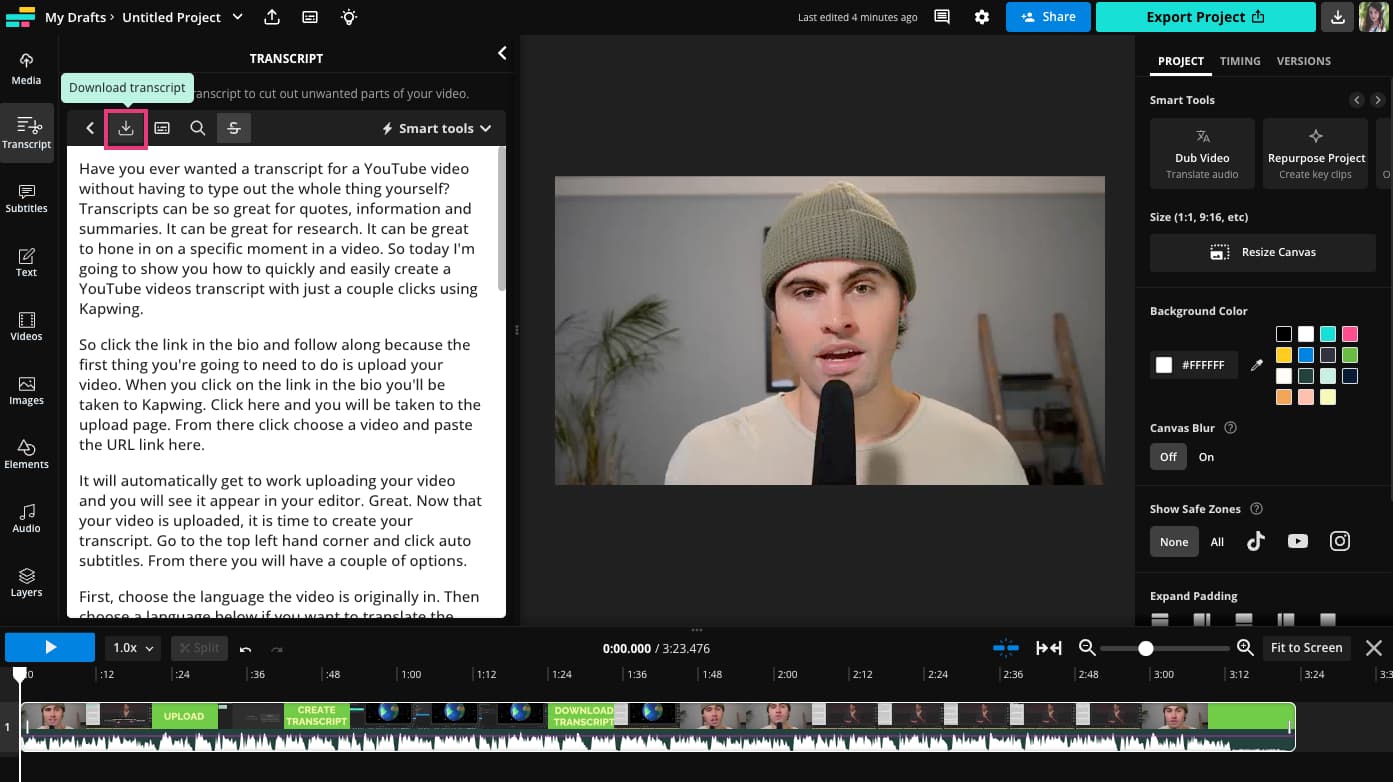
Your transcript will be saved as a .TXT file to your device.
From there, you can open the text file with your word processor of choice and make any further edits.
What to use a YouTube transcript for
Beyond just using transcripts as an accessibility aid for anyone viewing YouTube videos, there are several ways transcripts can help you repurpose your YouTube videos for other formats and channels.
Here are a few ways to repurpose YouTube videos as text:
1. Pull quotes from an interview
Quotes are a great way to add important insights and personality into written content. If your primary source is a YouTube video, manually playing the video back, pausing, and transcribing any quotes by hand is time consuming and tedious. It also makes it difficult to find the quotes you’re looking for.
We recommend transcribing the full YouTube video then using a simple search function to pull the appropriate quote. This is an especially useful way to repurpose a podcast episode for your blog.
2. Convert a YouTube video to a blog post
If you have a YouTube channel and a blog, it might be time to start cross-posting. Work smarter, not harder.
Turn your best performing YouTube videos into blog posts. Transcribe the YouTube video in question, then spend some time reworking the text to make it read more like a written post.
3. Share insights as social media posts
Creating short clips is a popular way to repurpose YouTube videos for social media, but you can also turn YouTube content into a series of text posts, too.
Pull the best insights and information from your YouTube video’s transcript and copy edit it down to share on LinkedIn, X, or Threads.
Create content faster with Kapwing's online video editor →